Simple Platformer Controller
How To Create A Simple, Left, Right and Jump Platformer Controller
One of the most common game genres for retro computers is the platformer, a game where the player typically has controls to move left and right, and to jump onto platforms and fall down when walking off a platform. This tutorial guides you through creating the logic nodes to create a player object in this style. While this very likely won't be adequate for a fully fledged game it should give some insights into some of the techniques that Kwyll offers to do this and serve as a starting point for customisation and improvement.
Setup
Sprite
First, lets start by creating a sprite for our character, something simple as we're not focused on animation for this tutorial.
![]()
Object
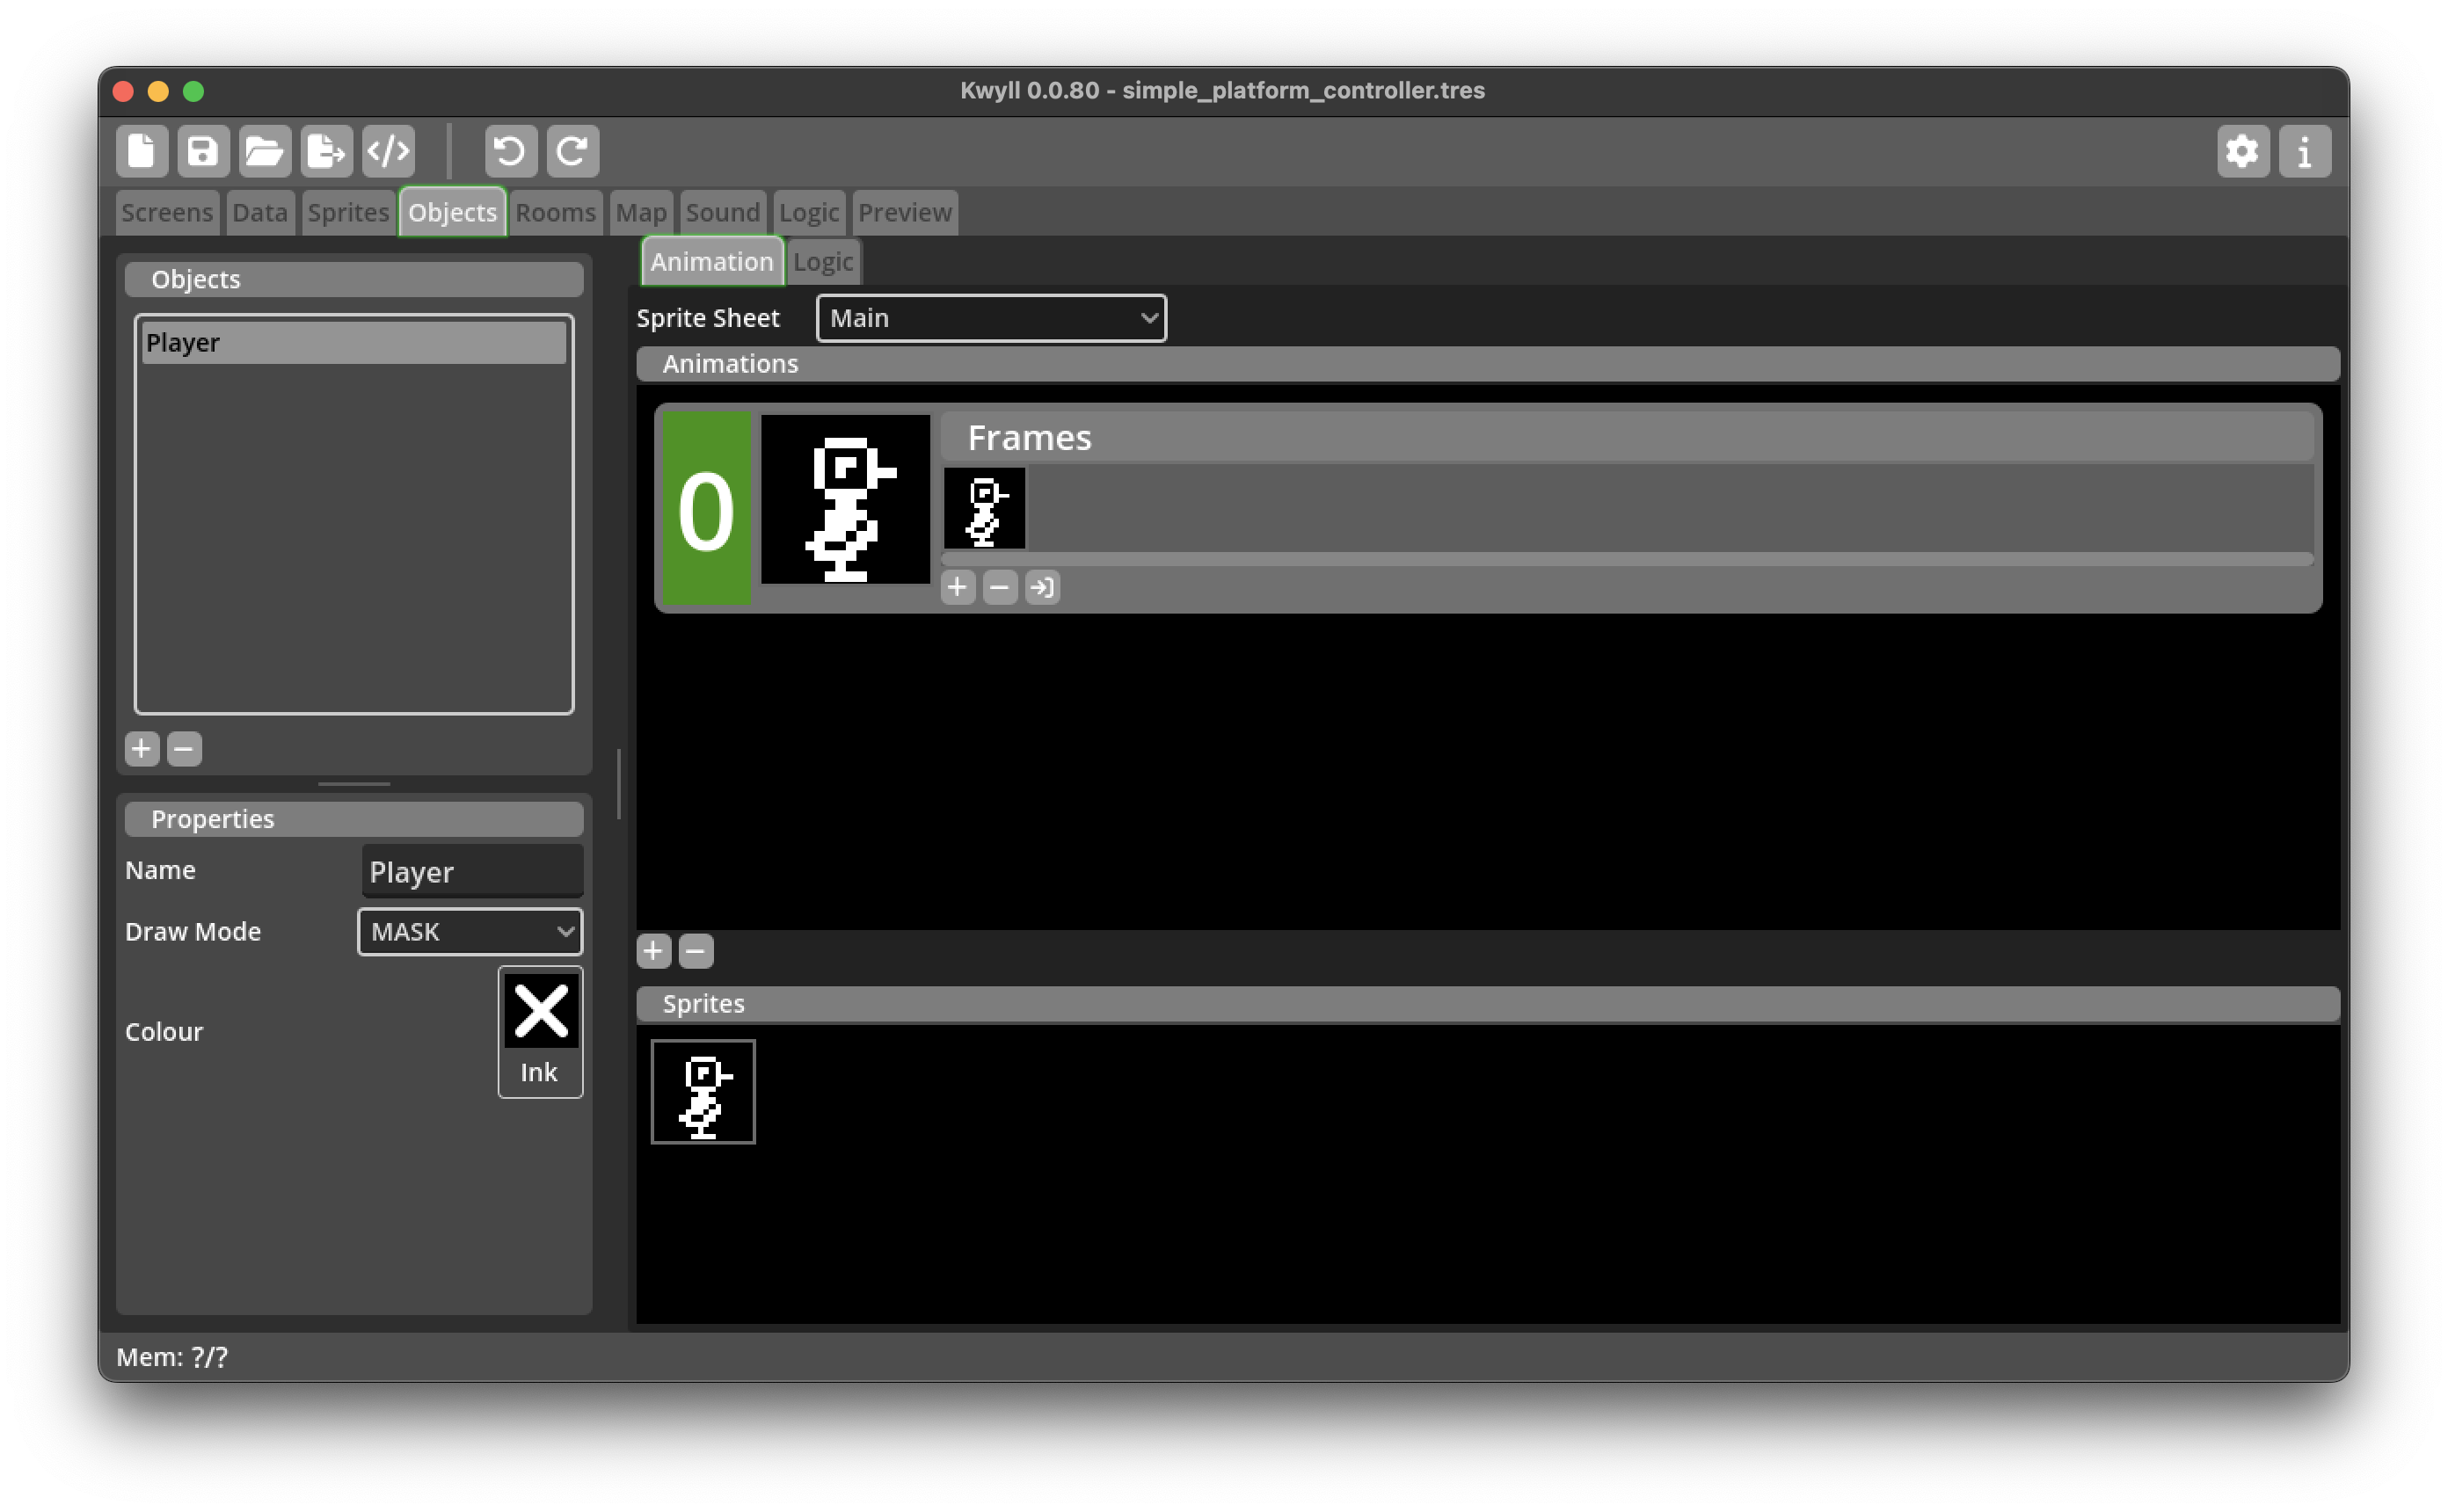
Then we'll turn this sprite into a simple object, our Player, remember to name it appropriately and set the draw mode to mask if you've drawn a mask for your player sprite. Add a single animation with one frame and choose the sprite you created for your character.
Room
Next we'll setup a simple room to test out the player. Create a single simple tile, in the properties dialog, make sure to set the default collision to "top" as this will be the tile for our platforms, we want to be able to jump up through it, but then land on the top and not fall through.
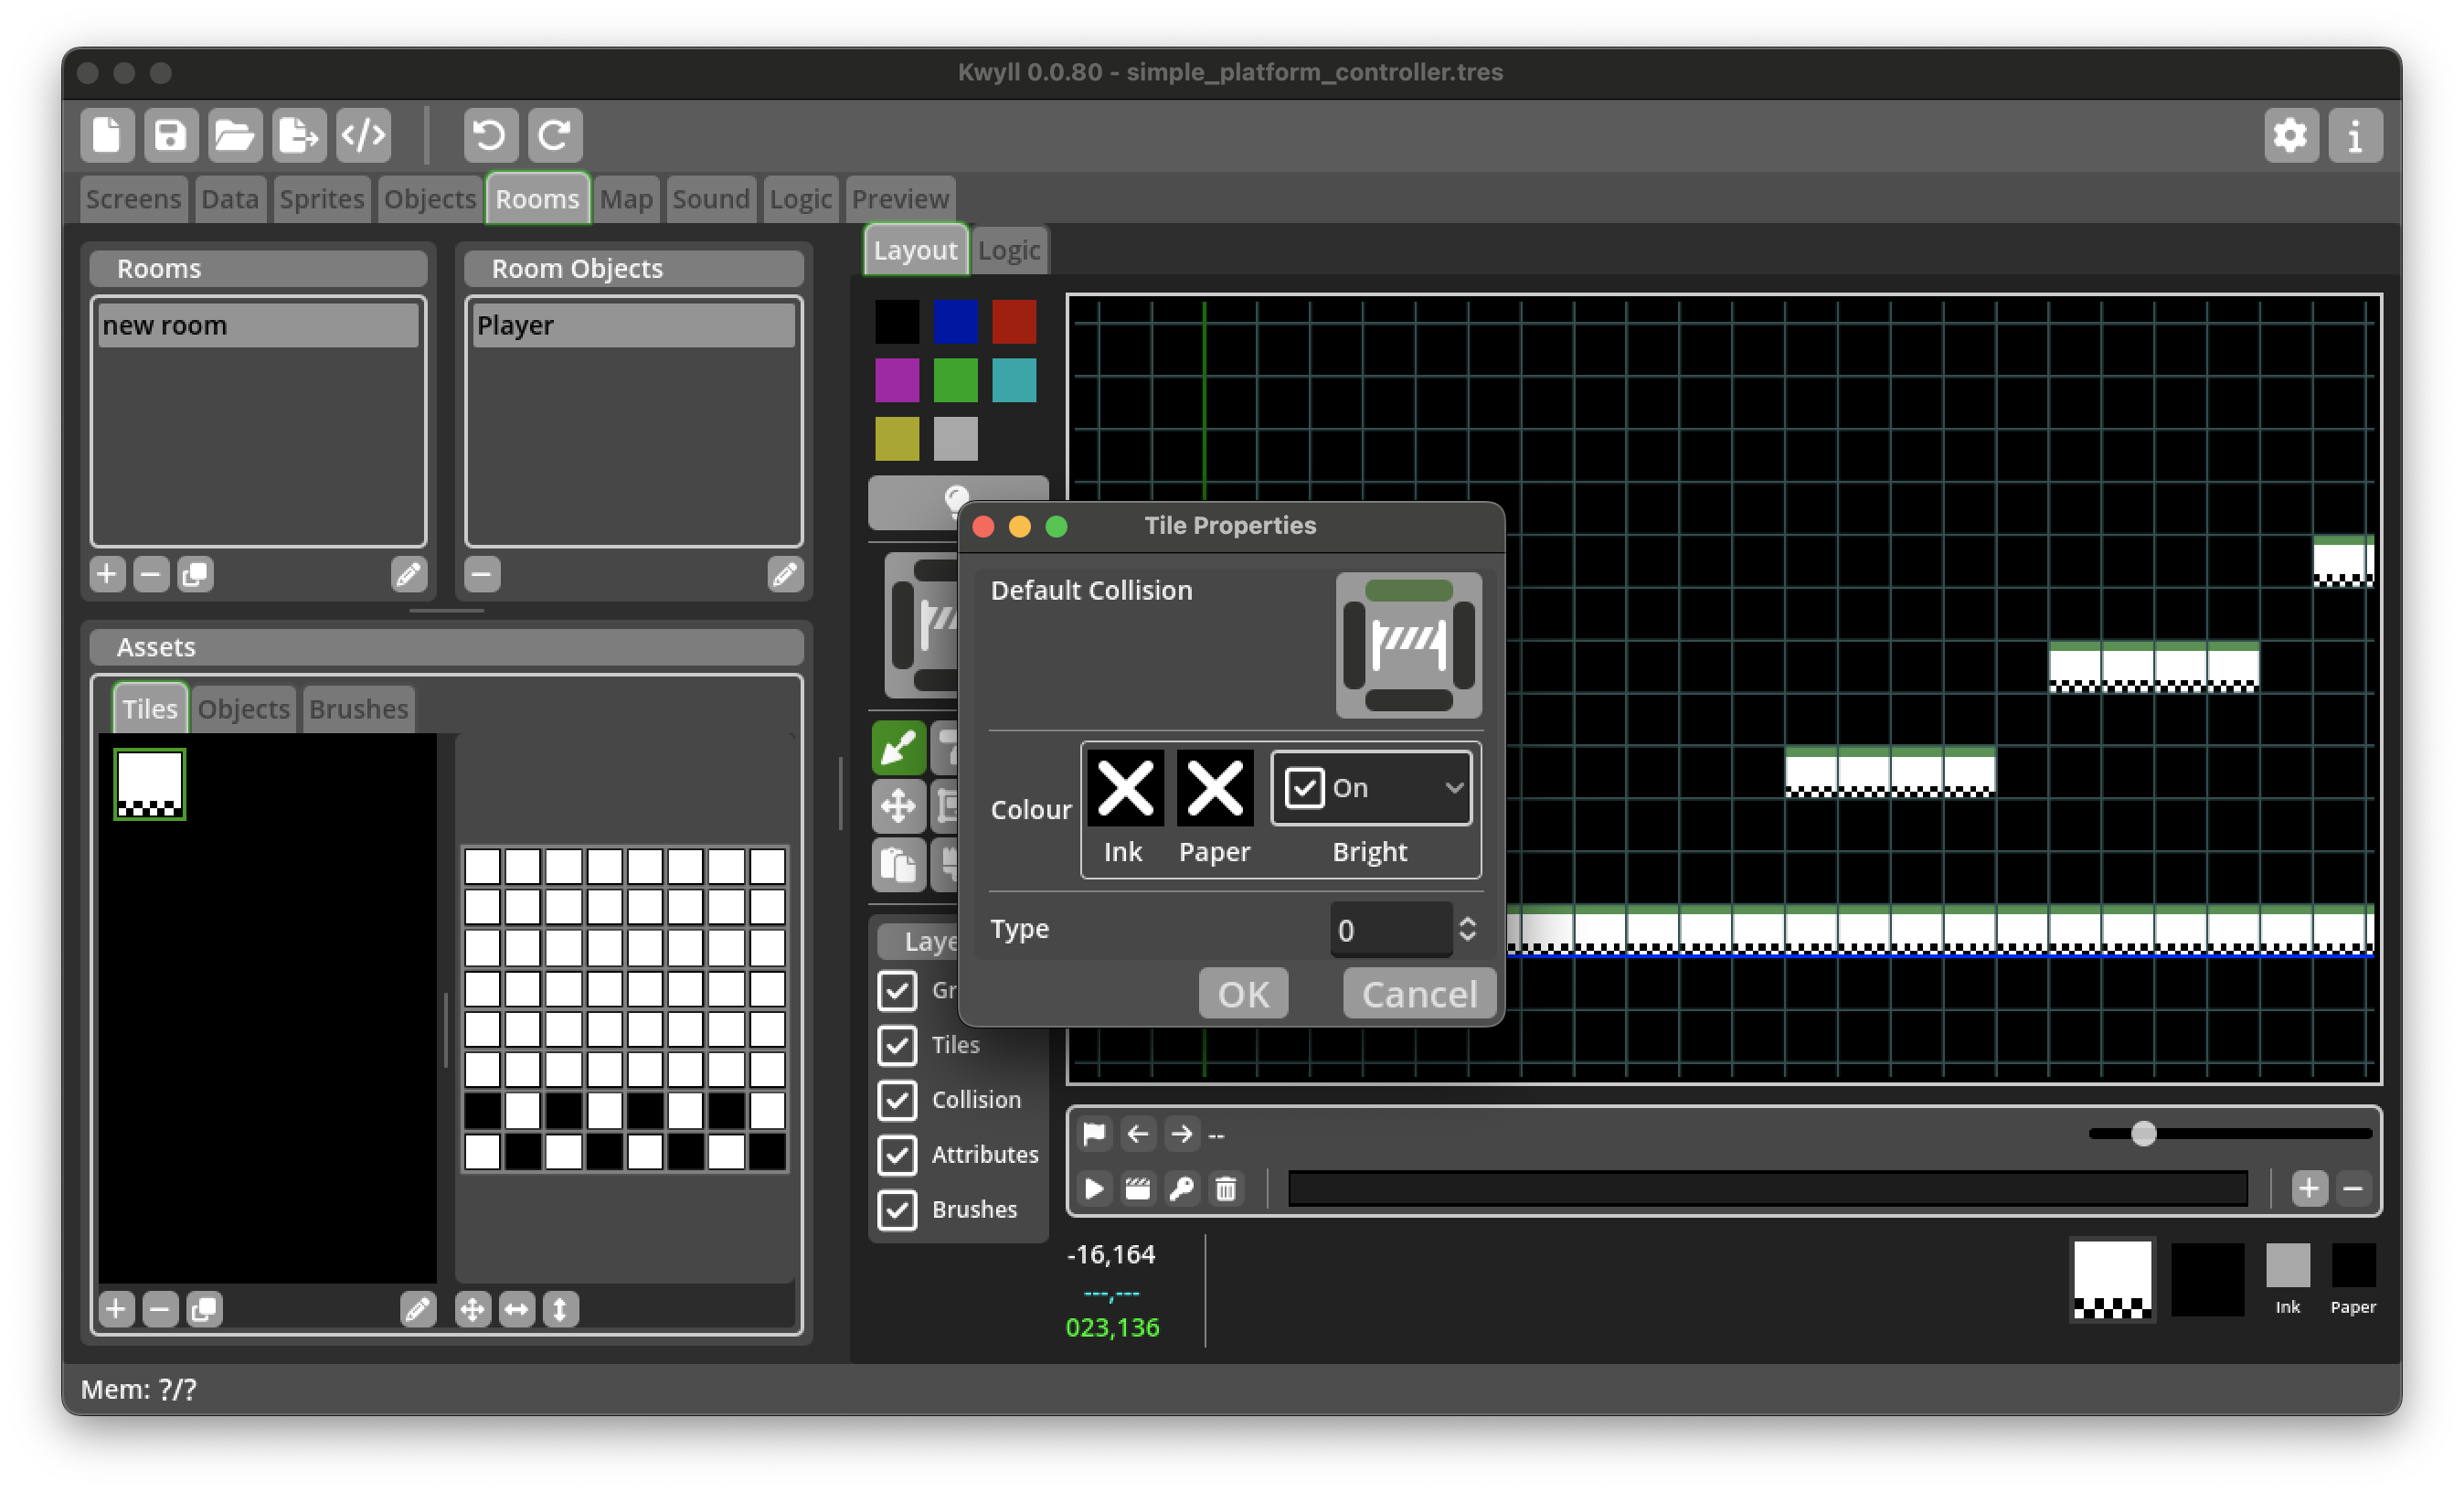
Draw a ground and some platforms for our player to jump on using the tile we just created.

Drag the Player object from the objects panel onto the room. Note: normally the player would be a "Map" object, which allows it to travel between rooms, but for the purposes of this tutorial, we'll just have a single room, so we can just place our player in the room directly.

Map
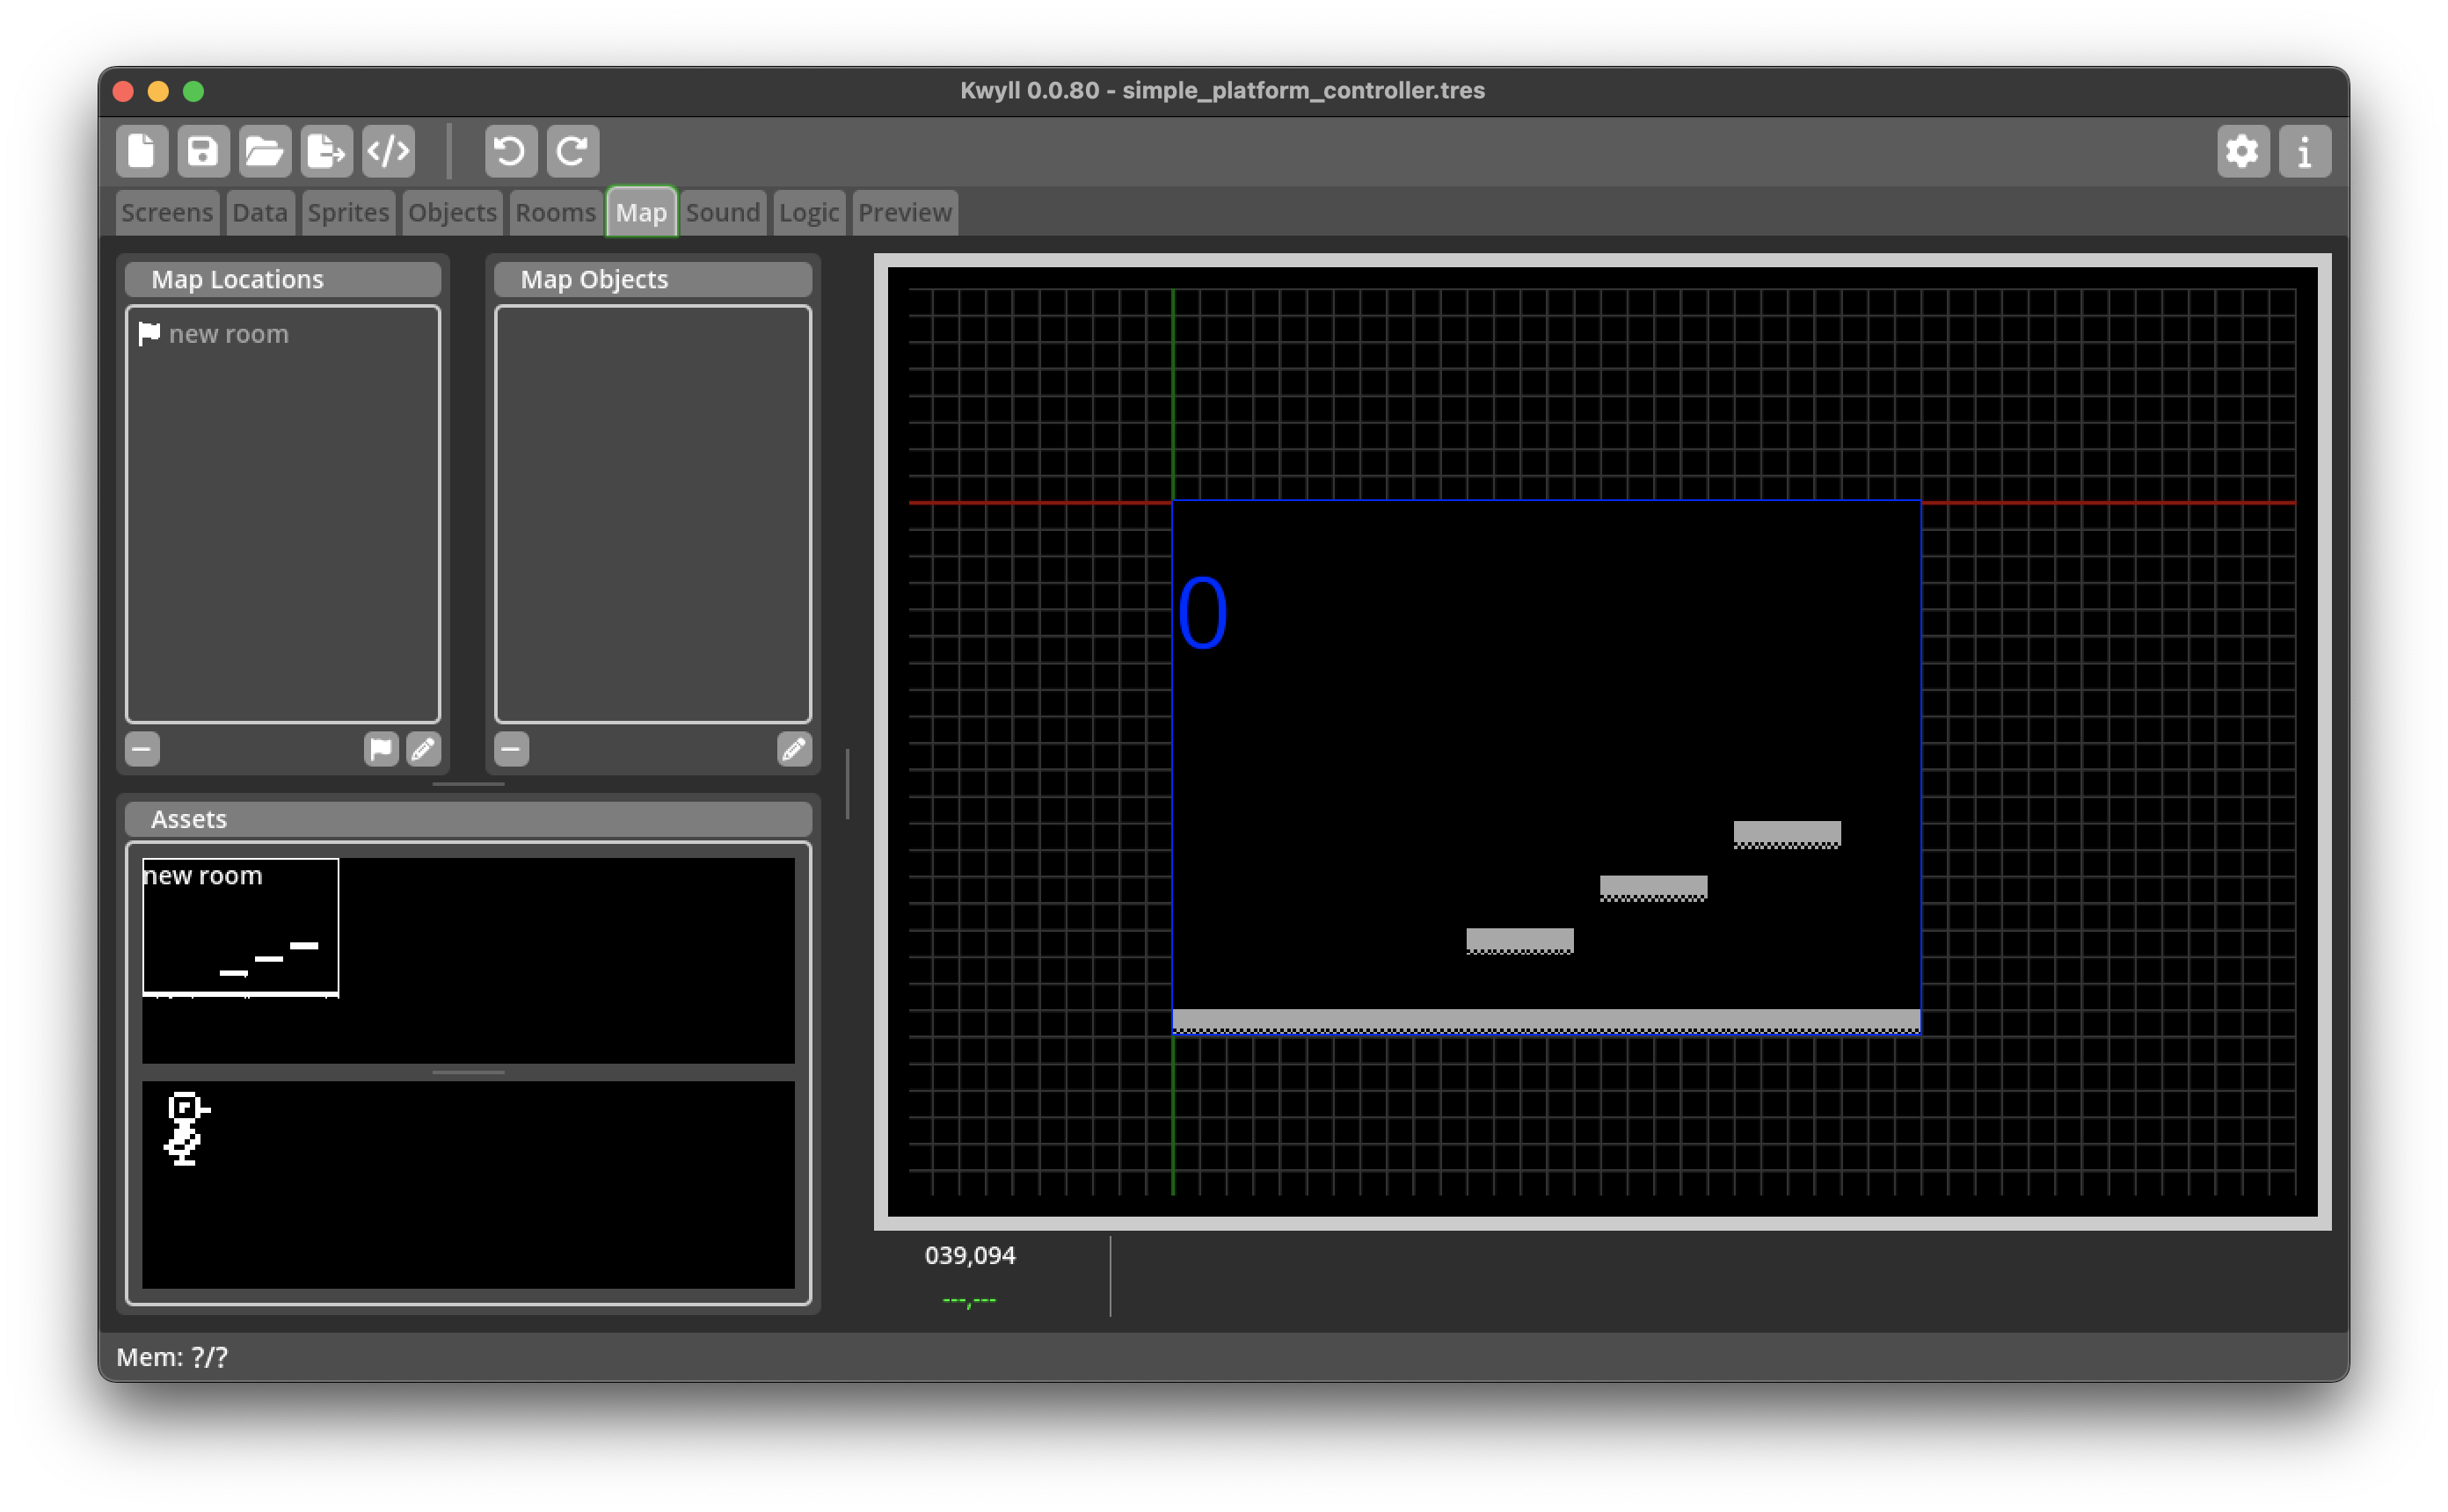
Finally, in order to be able to play the game, we must add the room to the map.
Logic
Now that we've got all the pieces in place, it's time to look at the core of this tutorial, the logic. In order to keep things clear, the different steps of the logic are implemented as separate flows, some of them could potentially be combined if you wanted to reduce the number of nodes, that is left as an exercise for the reader.
We break the logic down into 5 steps, movement, jump triggering, fall processing and landing.
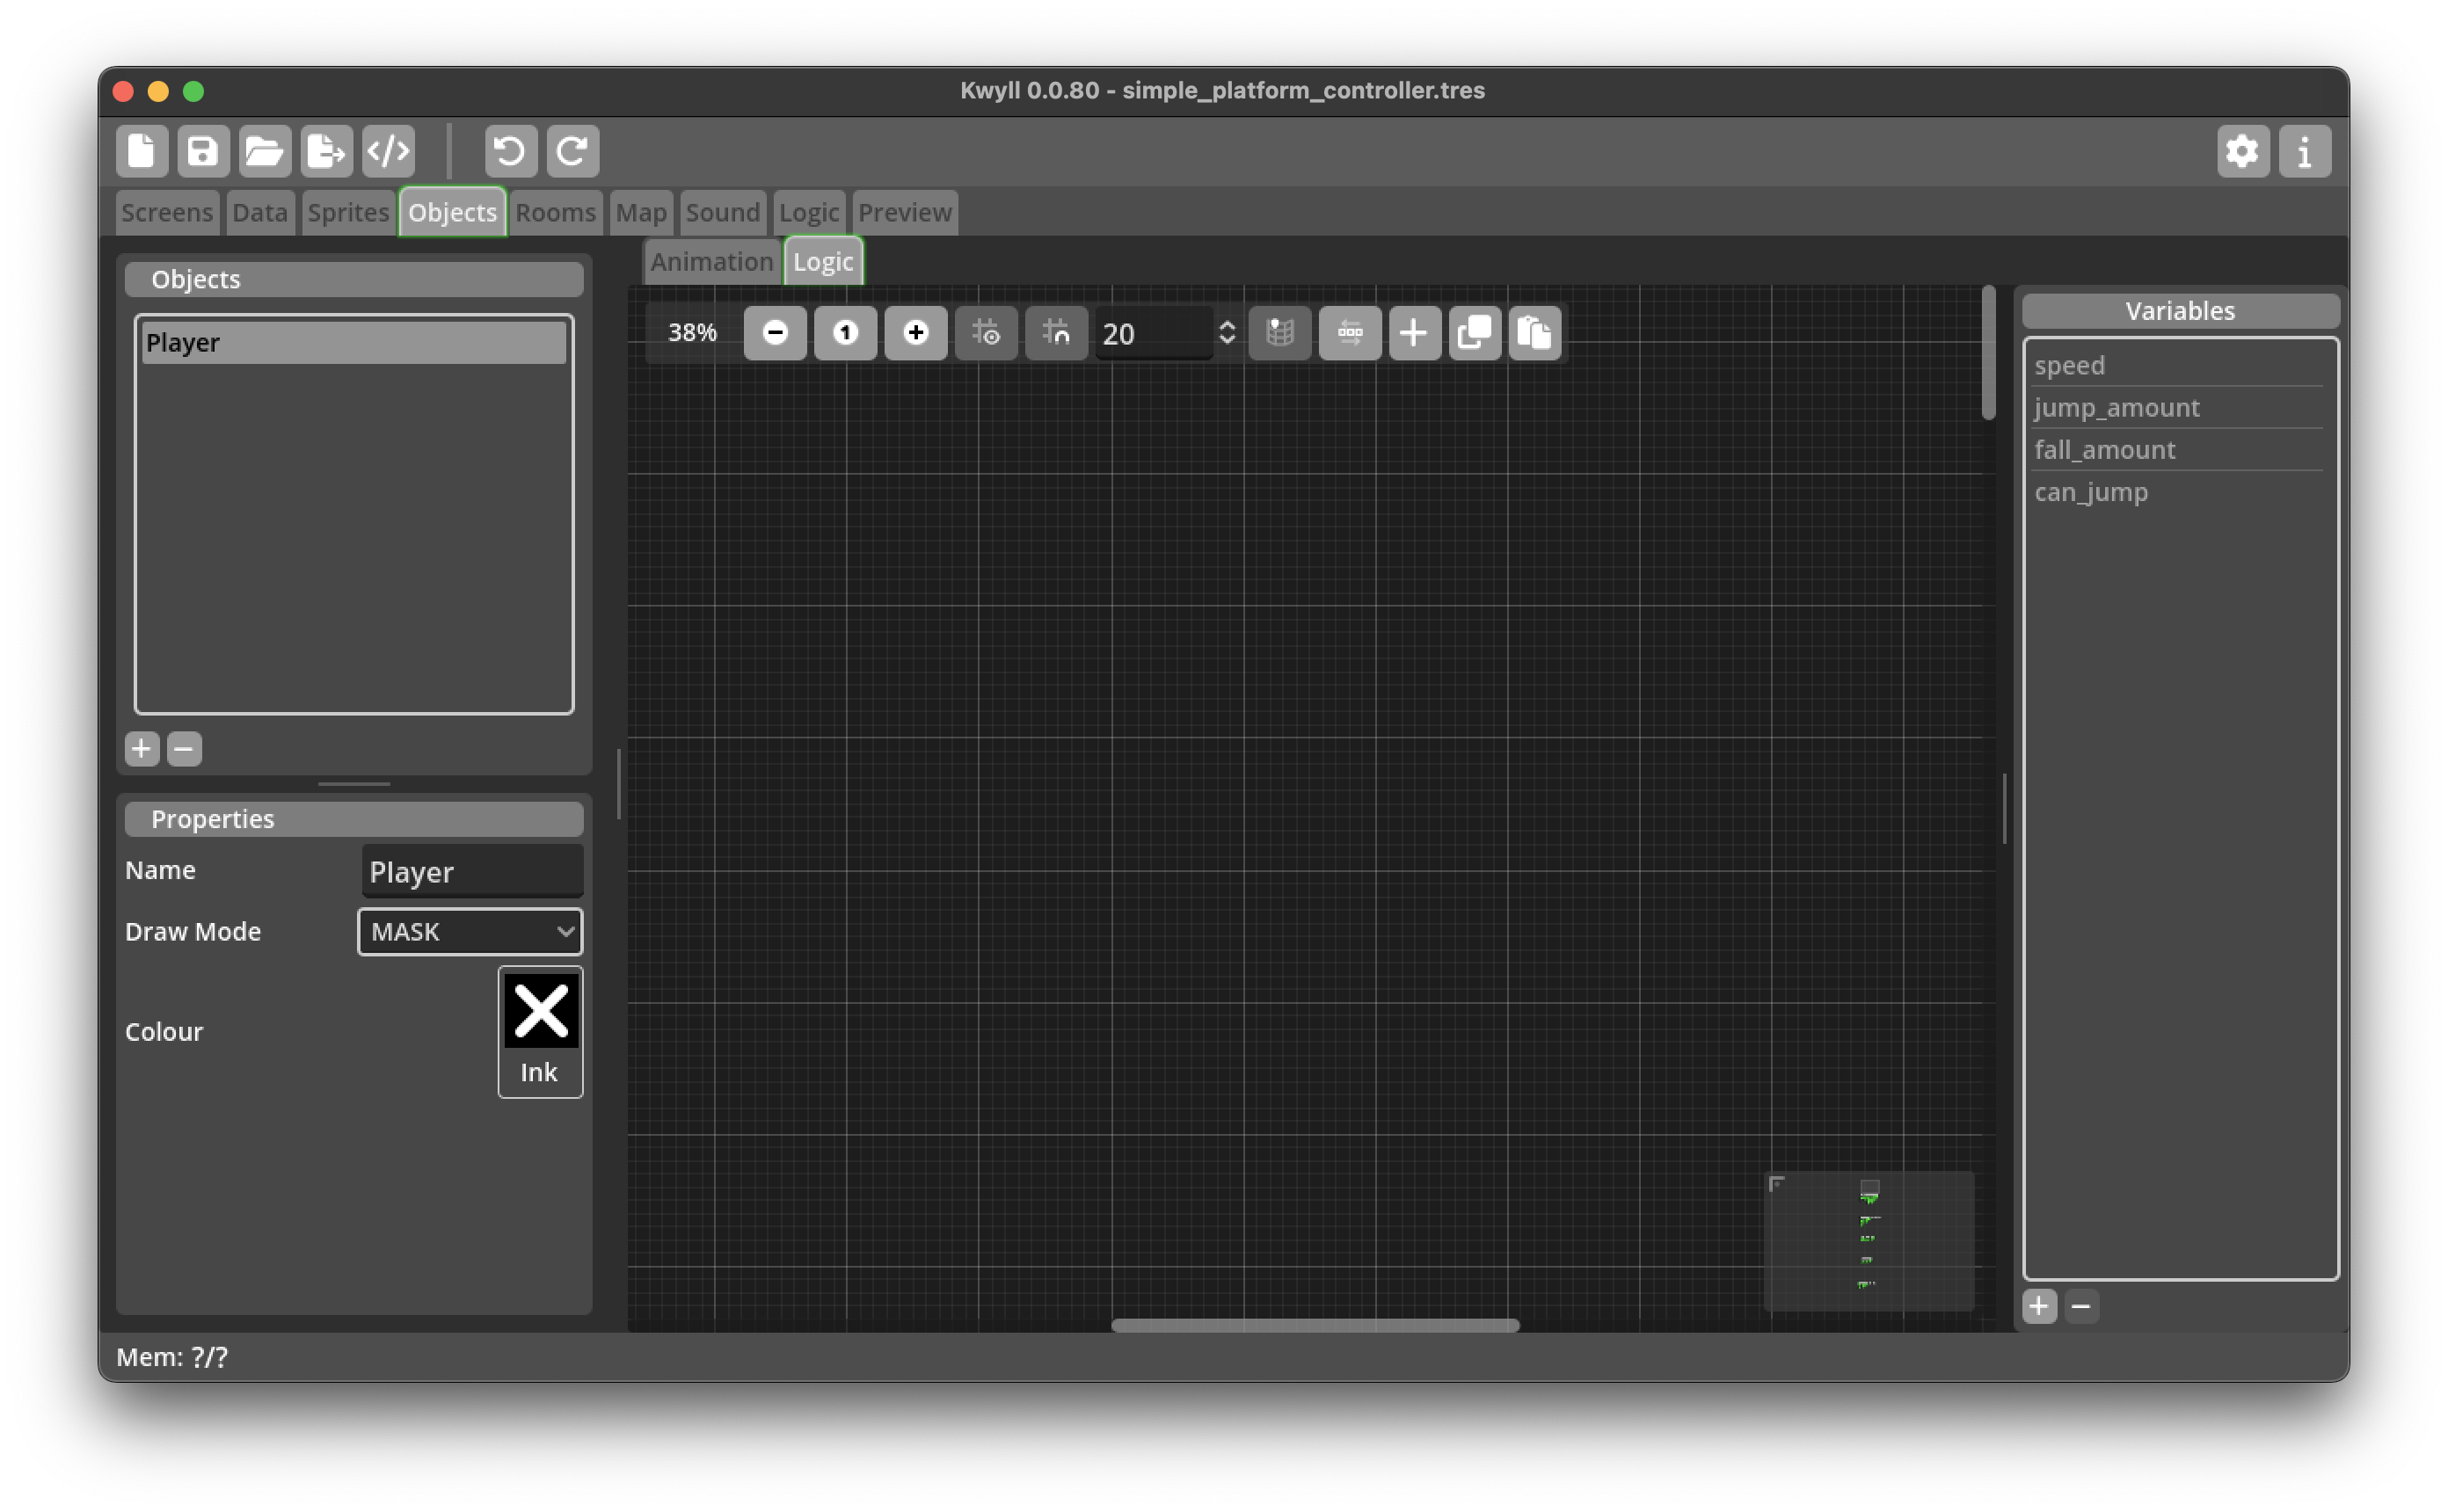
Firstly, we'll need some variables to use during the logic, add the following variables to the Player object logic:
- speed
- can_jump
- y_velocity
- jump_strength
Movement
This flow is triggered by an "Always" trigger so will run every frame. It serves two purposes, checking the left right keys and altering the player's position in the horizontal direction, and applying any jump/fall amounts to adjust the player's position in the vertical direction. Once this is done, it will attempt to move the player to the new location.
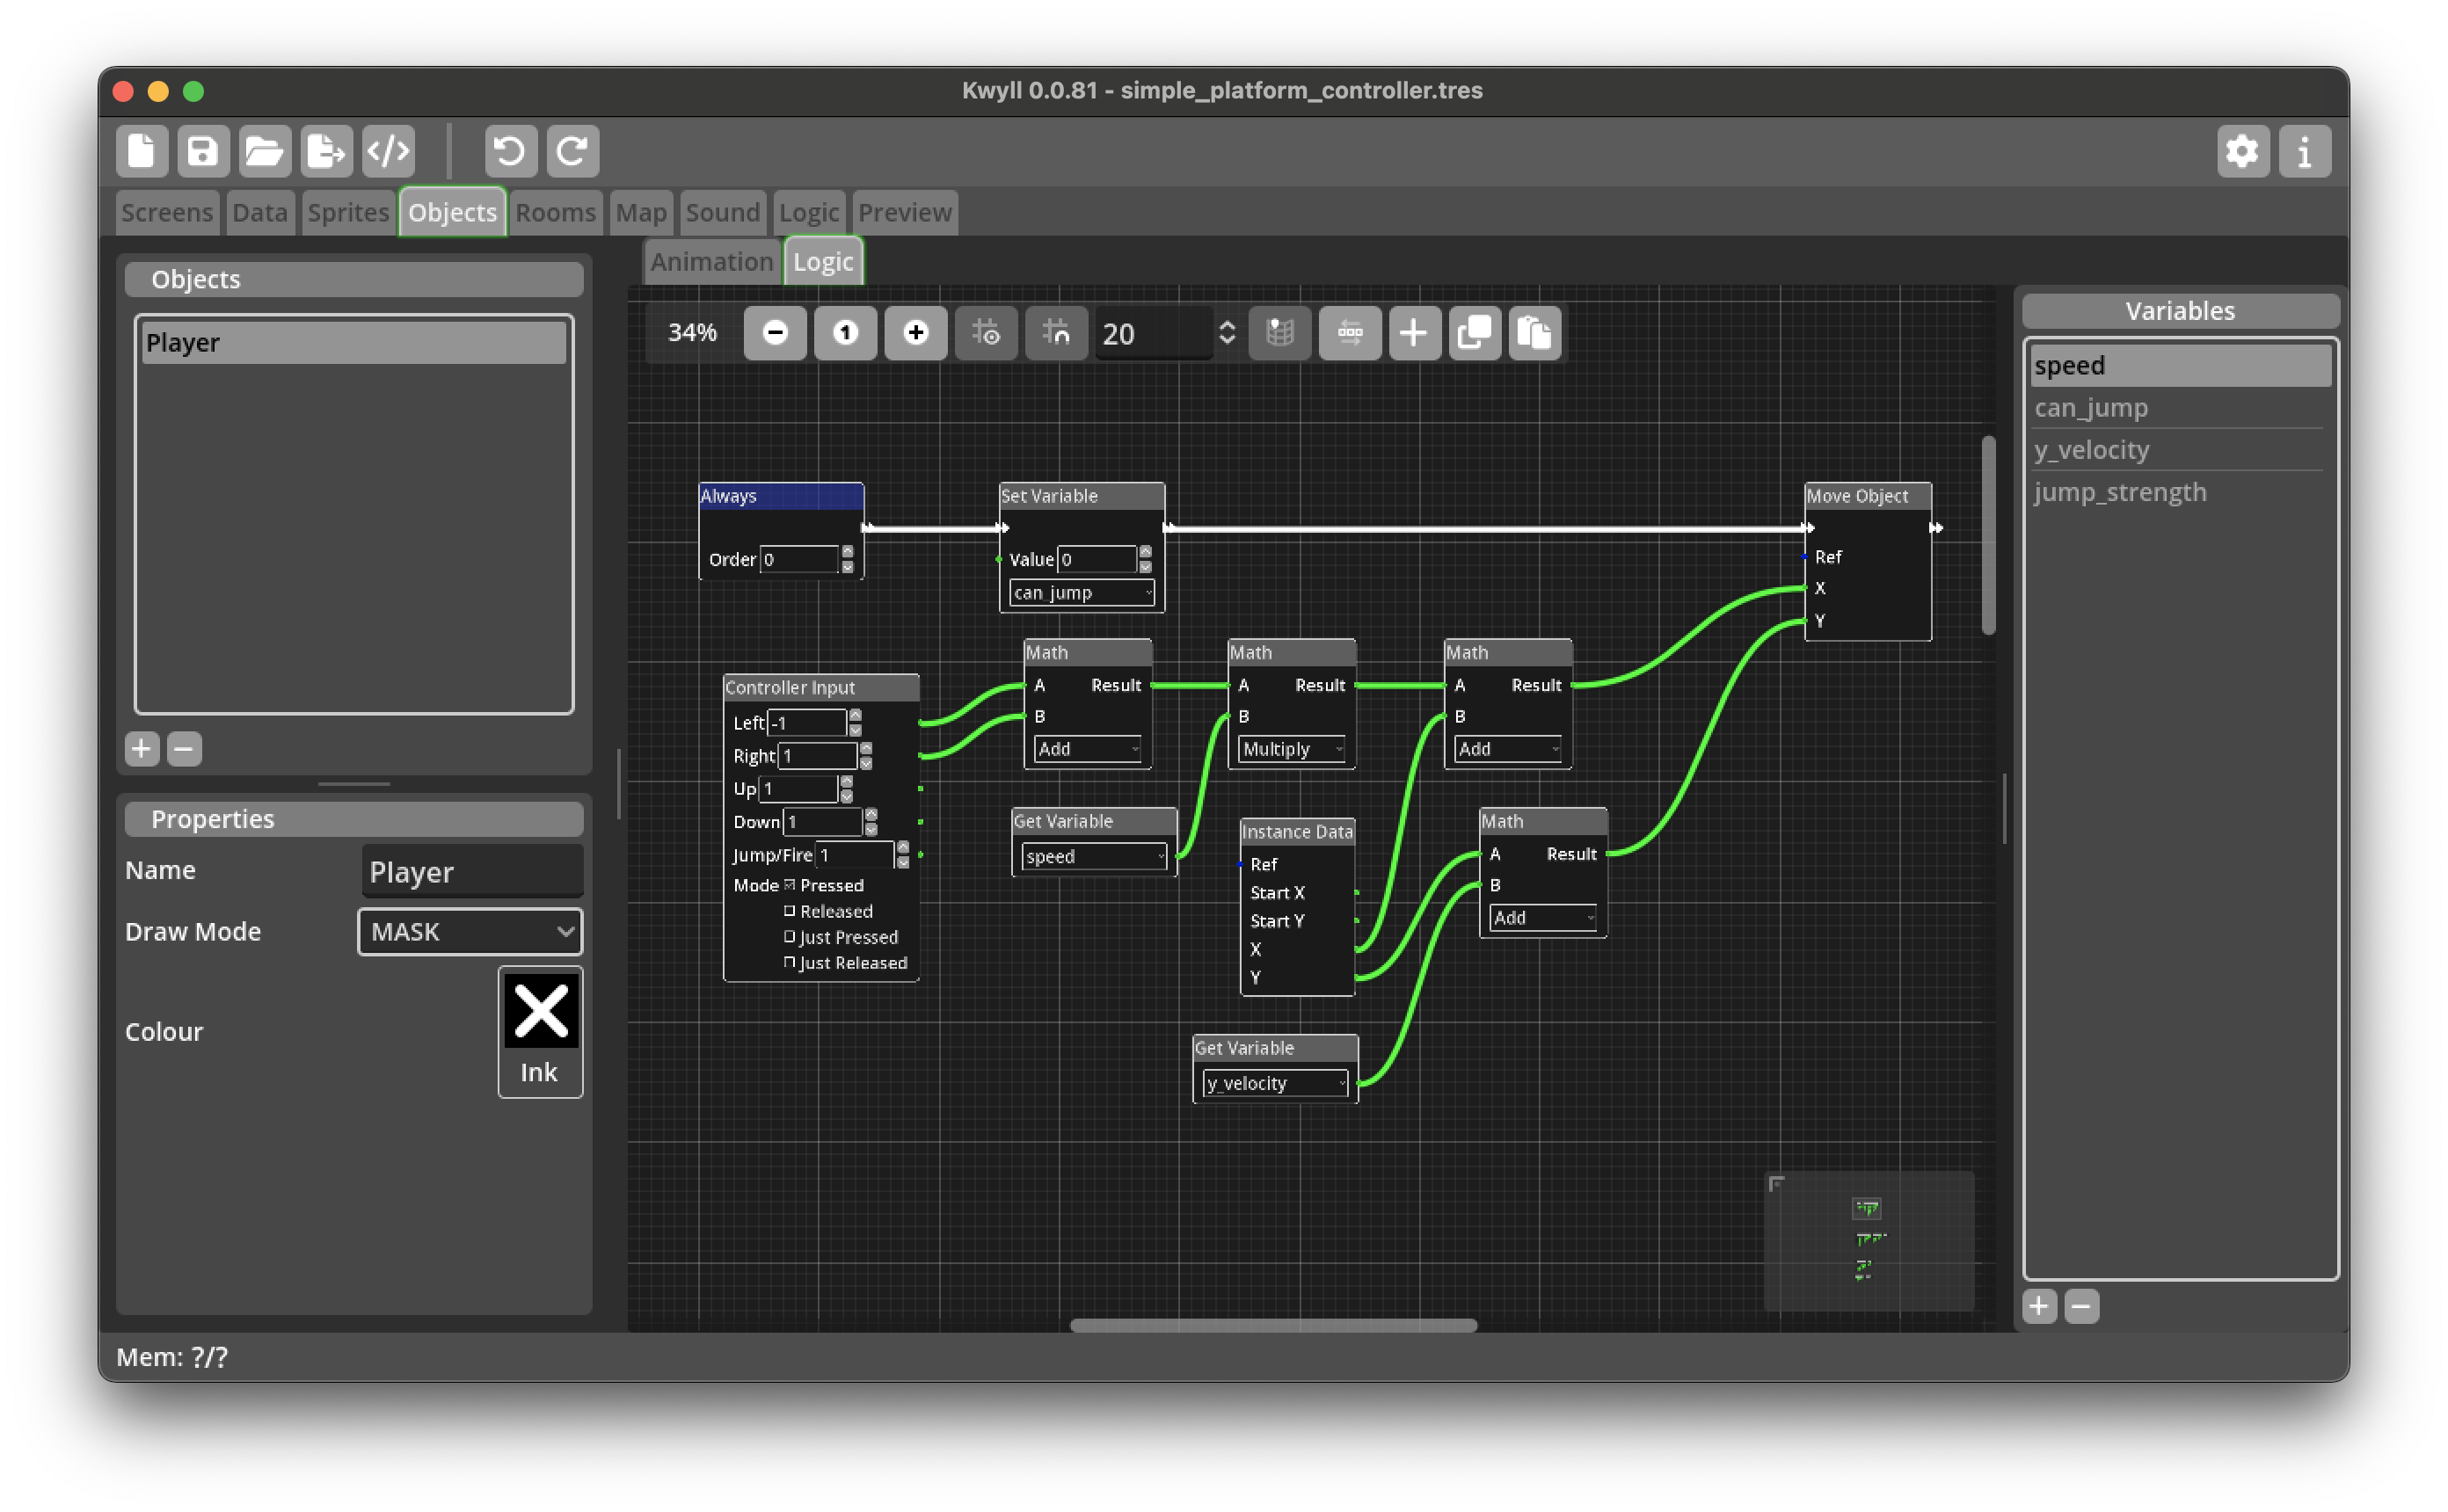
Following the flow connections (white) you can see the first thing that happens after the flow is triggered is to set the "can_jump" variable to 0, this is so that should the move cause the player to fall off a platform they won't be able to jump, if the move does not cause the player to start falling, this flag will be reset by the Landing flow described below.
The next thing in the flow is the actual move, this gets the X and Y position to move to from a set of calculations. Let's look at X first.
The "Controller Input" node is configured to return -1 for left and 1 for right, if either button is not pressed, it will return 0 for that direction. These two values are added together in a "Math" node, this is to cancel out should the player press both left and right simultaneously, as 1 + -1 is 0, if only one button is pressed, the result will be either -1 or 1 depending on whether left or right is pressed.
The result of this calculation is then fed into another "Math" node that multiplies the direction by the "speed" variable. The result of this calculation is then fed into a third "Math" node that adds it to the current X position of the player, moving it in the correct direction by the desired speed.
The Y position is calculated by adding the "y_velocity" variable to the current Y position of the player.
Finally, we try to move the player to the calculated new position.
Jump Triggering
Next, in a separate "Always" flow, we check the jump button, note the "Controller Input" is set to "Just Pressed" for this, as we don't want the jump to be continuous as we do for the left/right movement, this is one good reason to keep the flows separate.
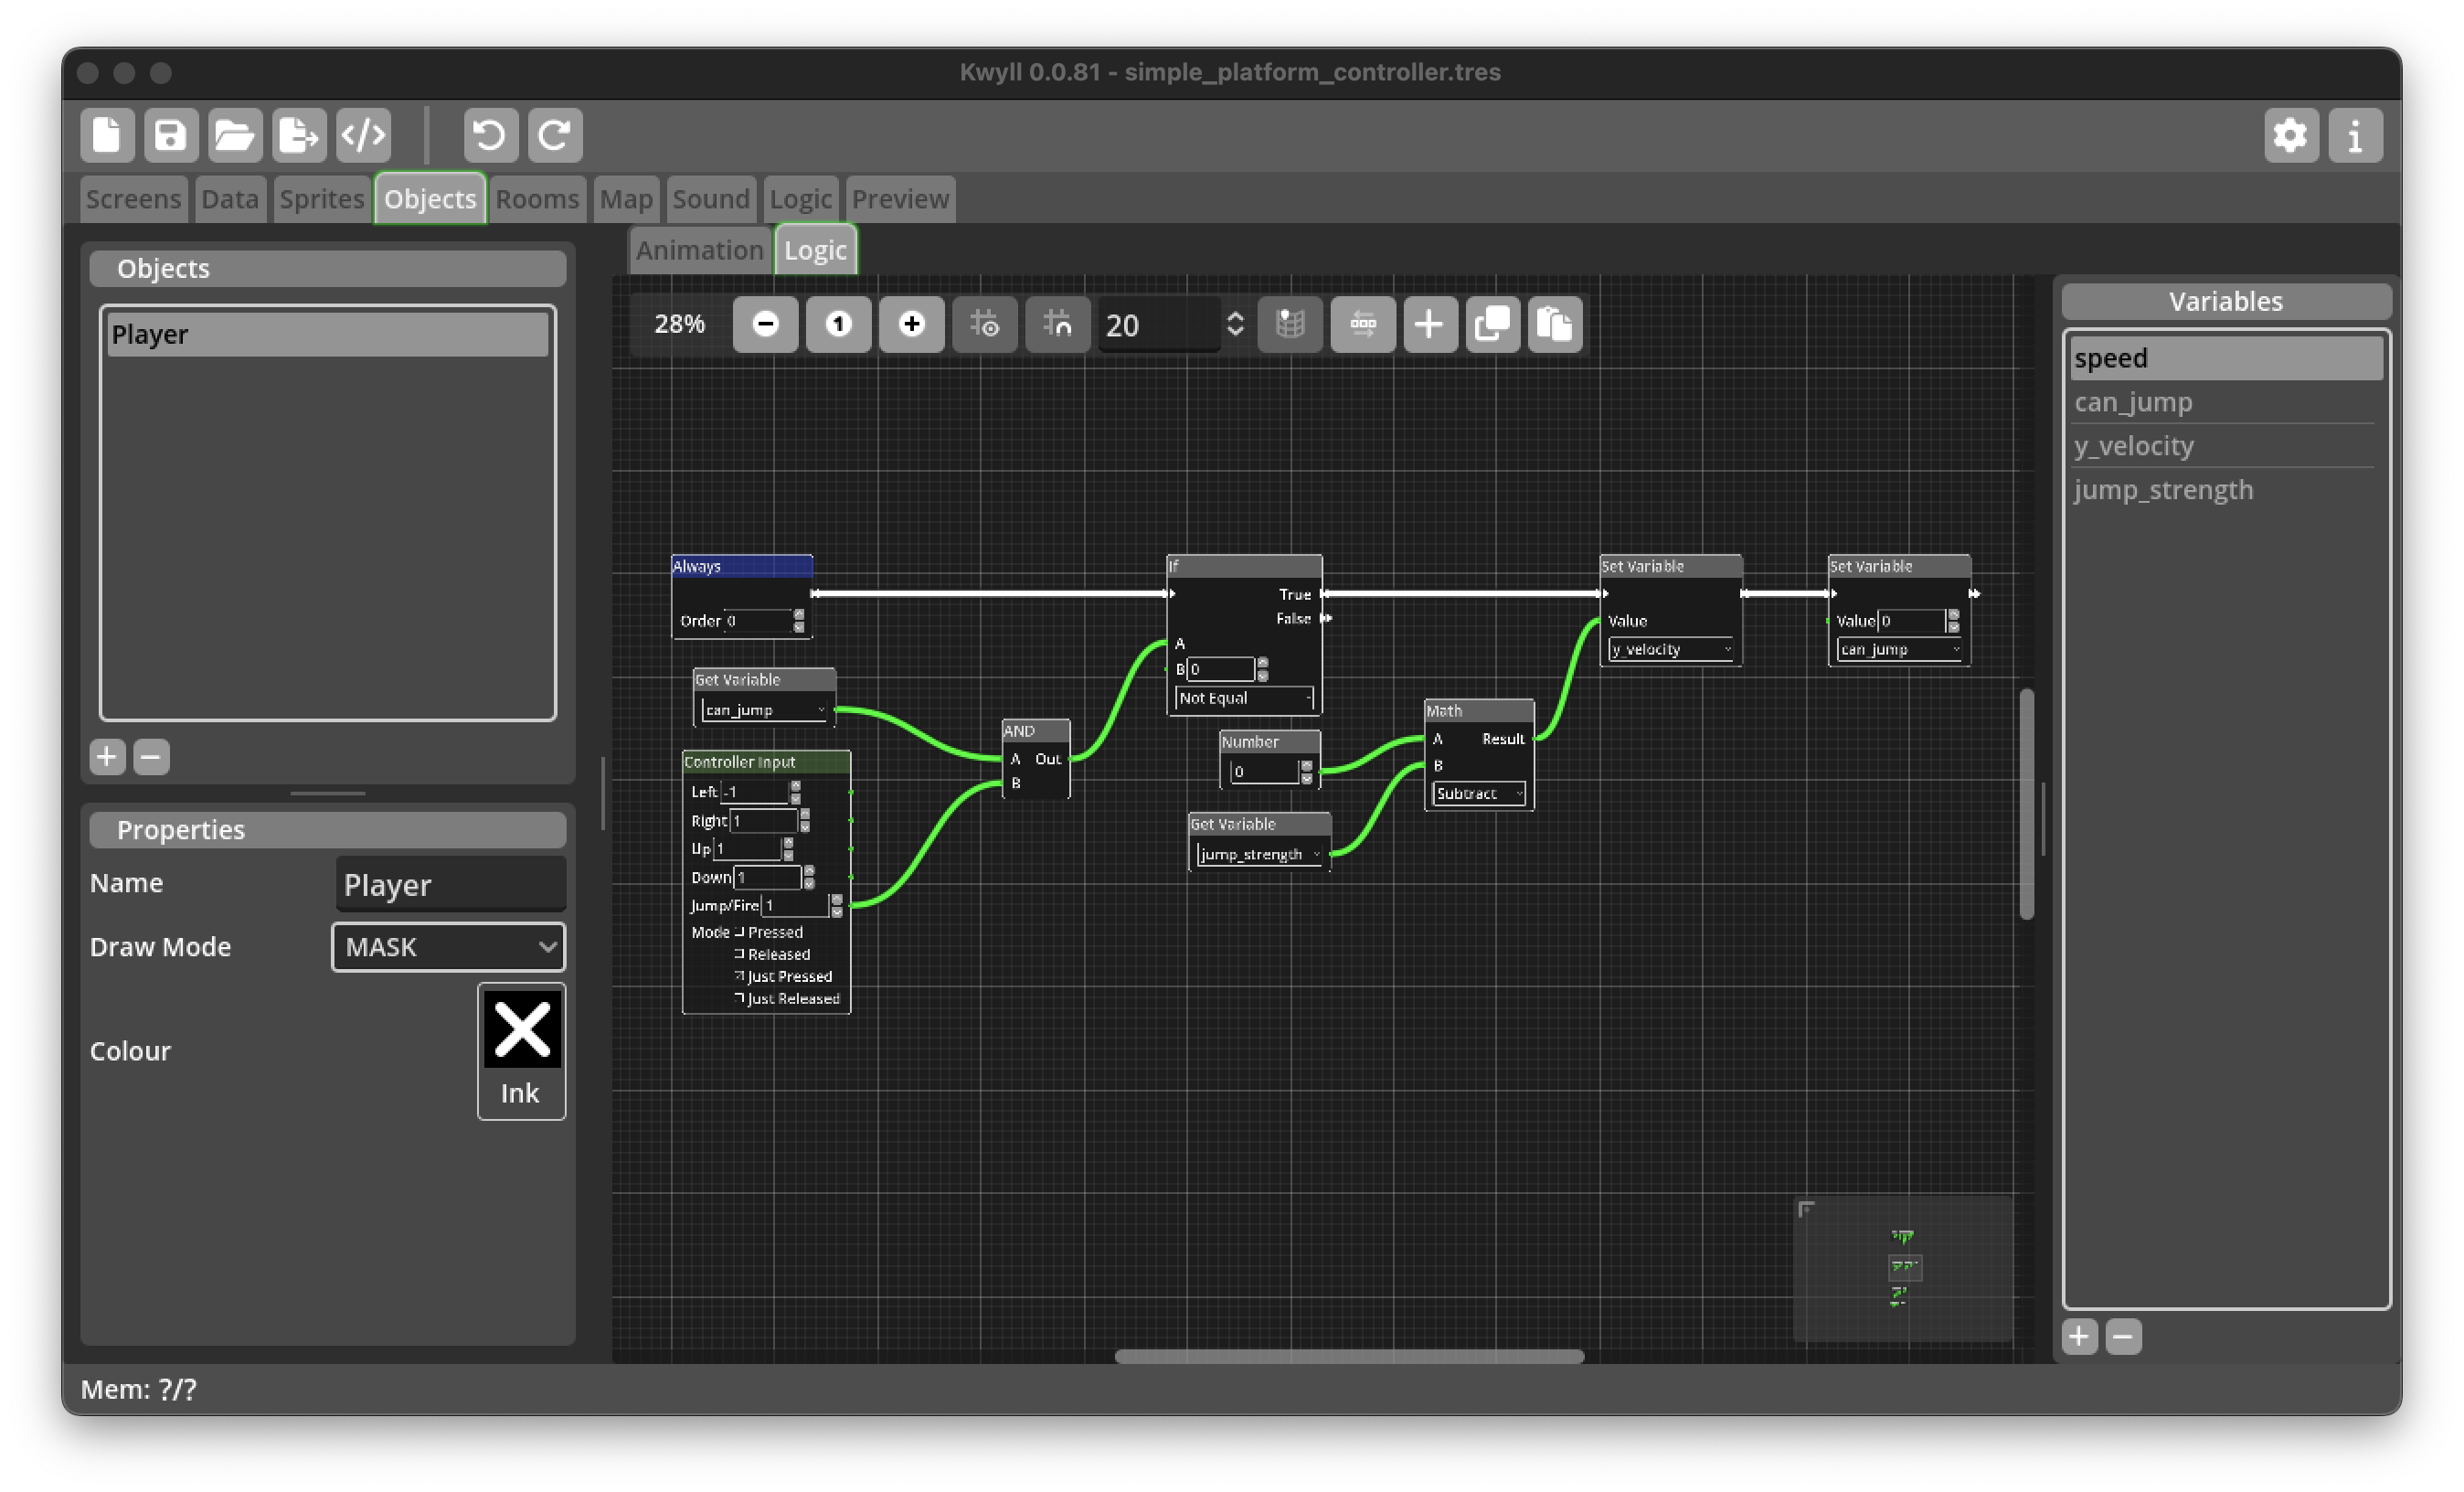
We get the result from the "Controller Input" to see if jump has just been pressed. We also get the value of the "can_jump" variable, and feed the result of both of these into an "AND" node. Only if the button is pressed, and the player can jump (both are 1), do we proceed to make the player jump. This is done by simply setting the "y_velocity" variable to minus the "jump_strength" variable, remember, negative in the Y direction is UP. We also set the "can_jump" to 0, this prevents the player from jumping again until they have landed.
Fall Processing
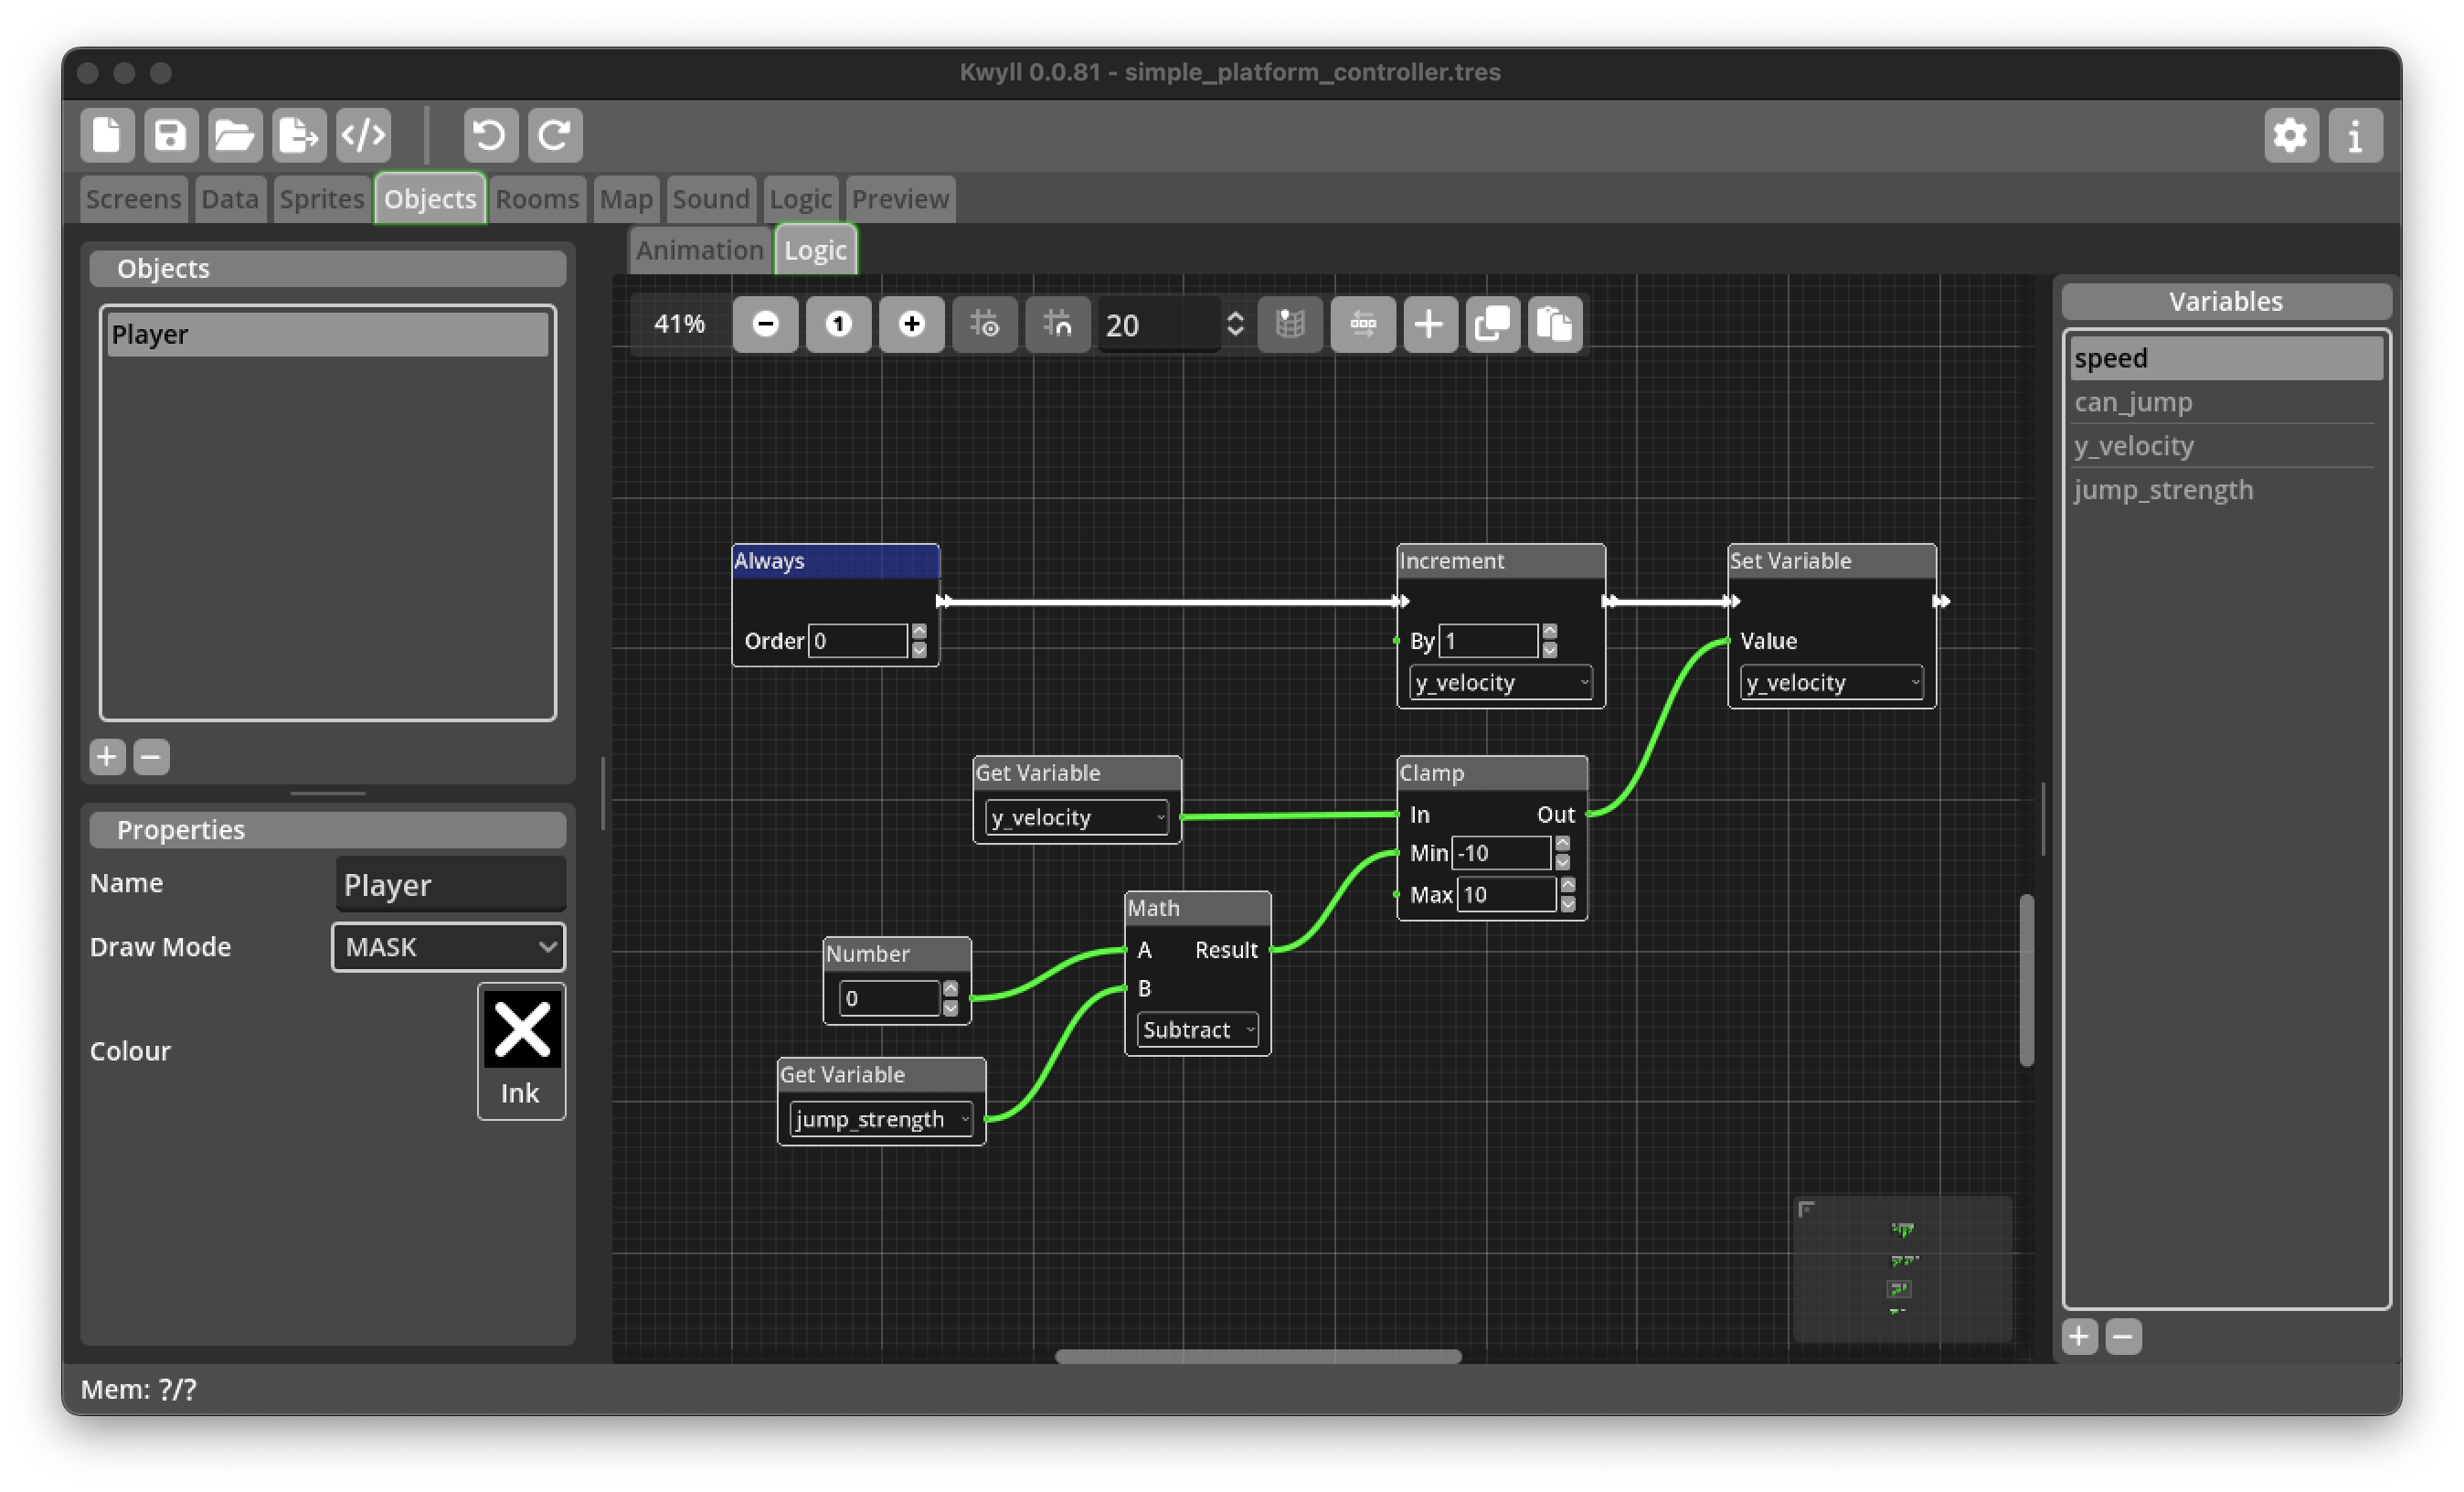
Next, in yet another "Always" flow, we continuously adjust the "y_velocity" to account for gravity. We clamp the value to always be between minus the "jump_strength" and 10, this ensures the player never goes up by more than the defined jump strength, and never falls faster than 10 pixels per frame.
Landing
Finally for now, we have the logic flow that reacts when the player has collided with something. The "Collided" trigger is automatically run when the "Move Object" node in the Movement flow results in the player hitting something. For the purposes of this tutorial, we know it can only be a platform or the ground, but we check the direction for completeness anyway and to ensure that collision in other directions is cleanly handled as you continue to develop your game around this controller.
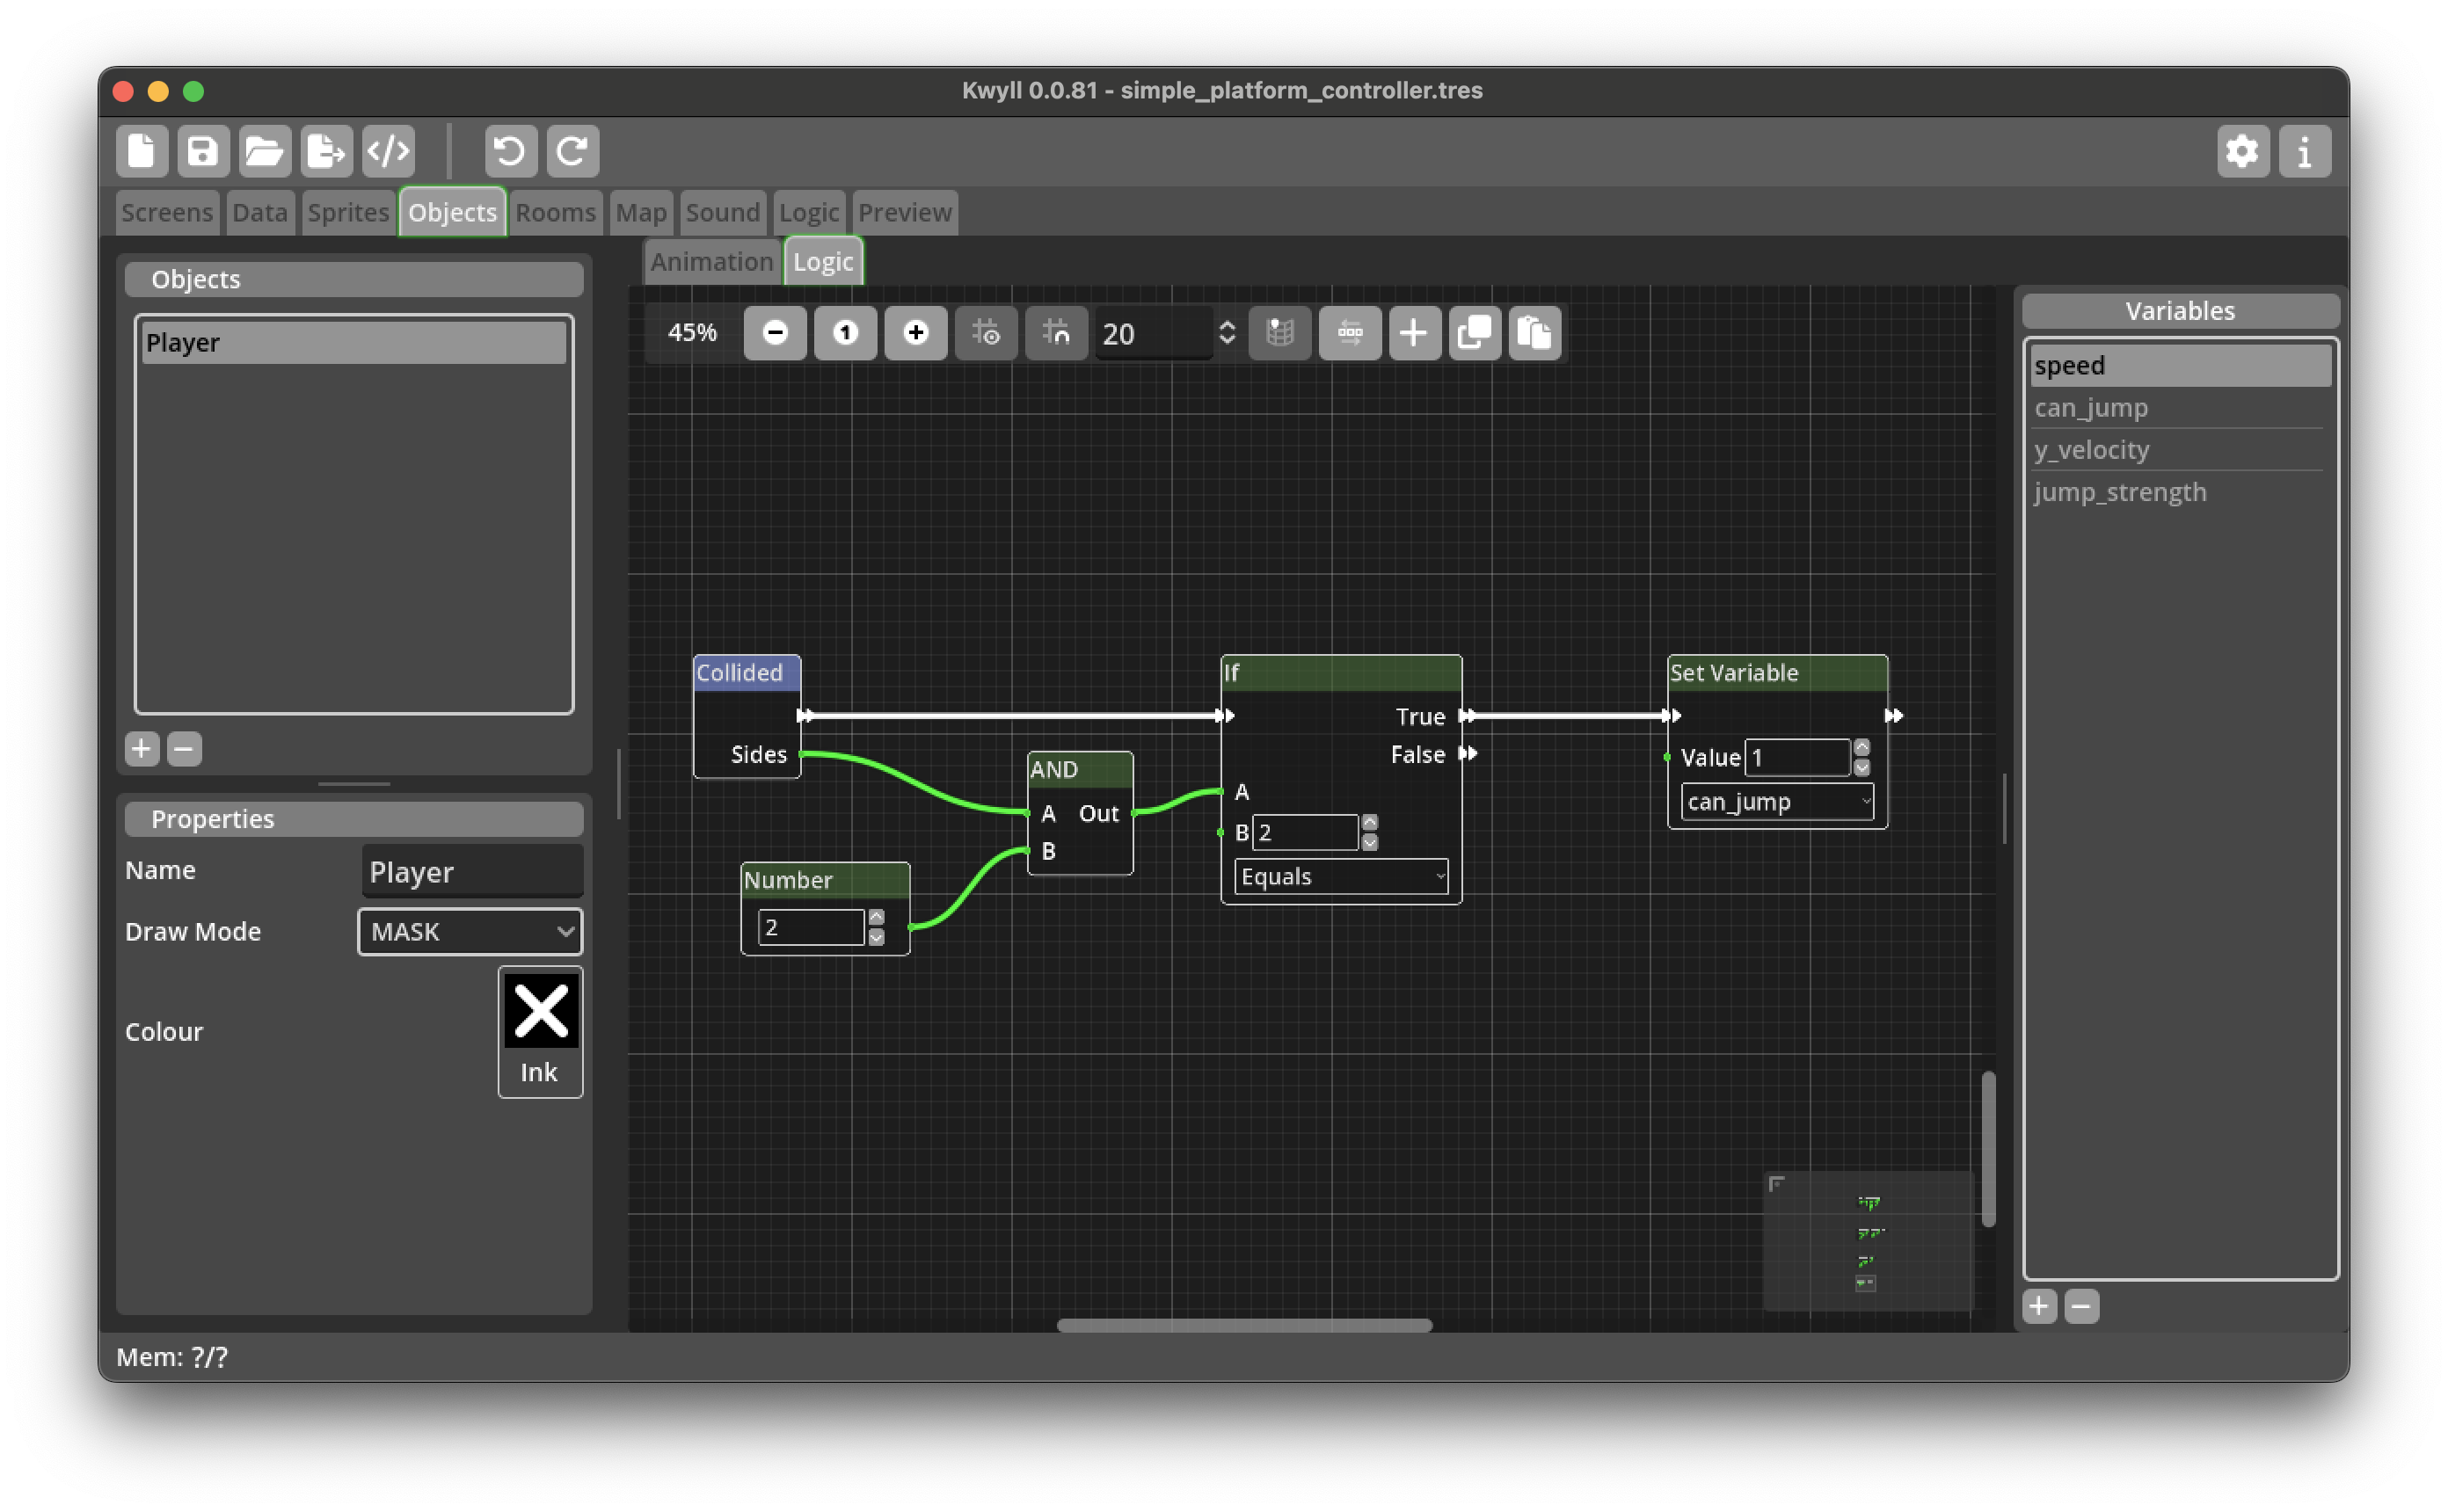
The flow first checks if the sides includes "TOP" which is 2, it does this by logically ANDing the sides value with 2. Recall that the sides is a bit field, bit 0 (value 1 if collided) is UP, i.e. the move resulted in the object hitting something from below, bit 1 (value 2 if collided) is DOWN, bit 2 (value 4 if collided) is LEFT and bit 3 (value 8 if collided) is RIGHT. The actual value of sides is a potential combination of these values, for example, if the object collided in both the DOWN and LEFT directions, the value will be 2 + 4 = 6, ANDing with 2, will remove any other directions from the value but the DOWN value, so if the player does collide both DOWN and LEFT, LEFT will be ignored, the output from 6 AND 2 is 2, as illustrated by the binary representation below.
            RLDU
6       00000110
AND
2       00000010
result  00000010
Only if both "bits" in the binary number are 1, will the bit be 1 in the result, so the result of ANDing these two number will be 00000010 in binary, which is 2. This means we can just compare the result with 2 to check if the object collided in a downwards direction at all, irrespective of whether it collided in another direction as well or not.
If this is true, we set "can_jump" variable to 1 to indicate that the player can now jump again as they have landed.
Testing
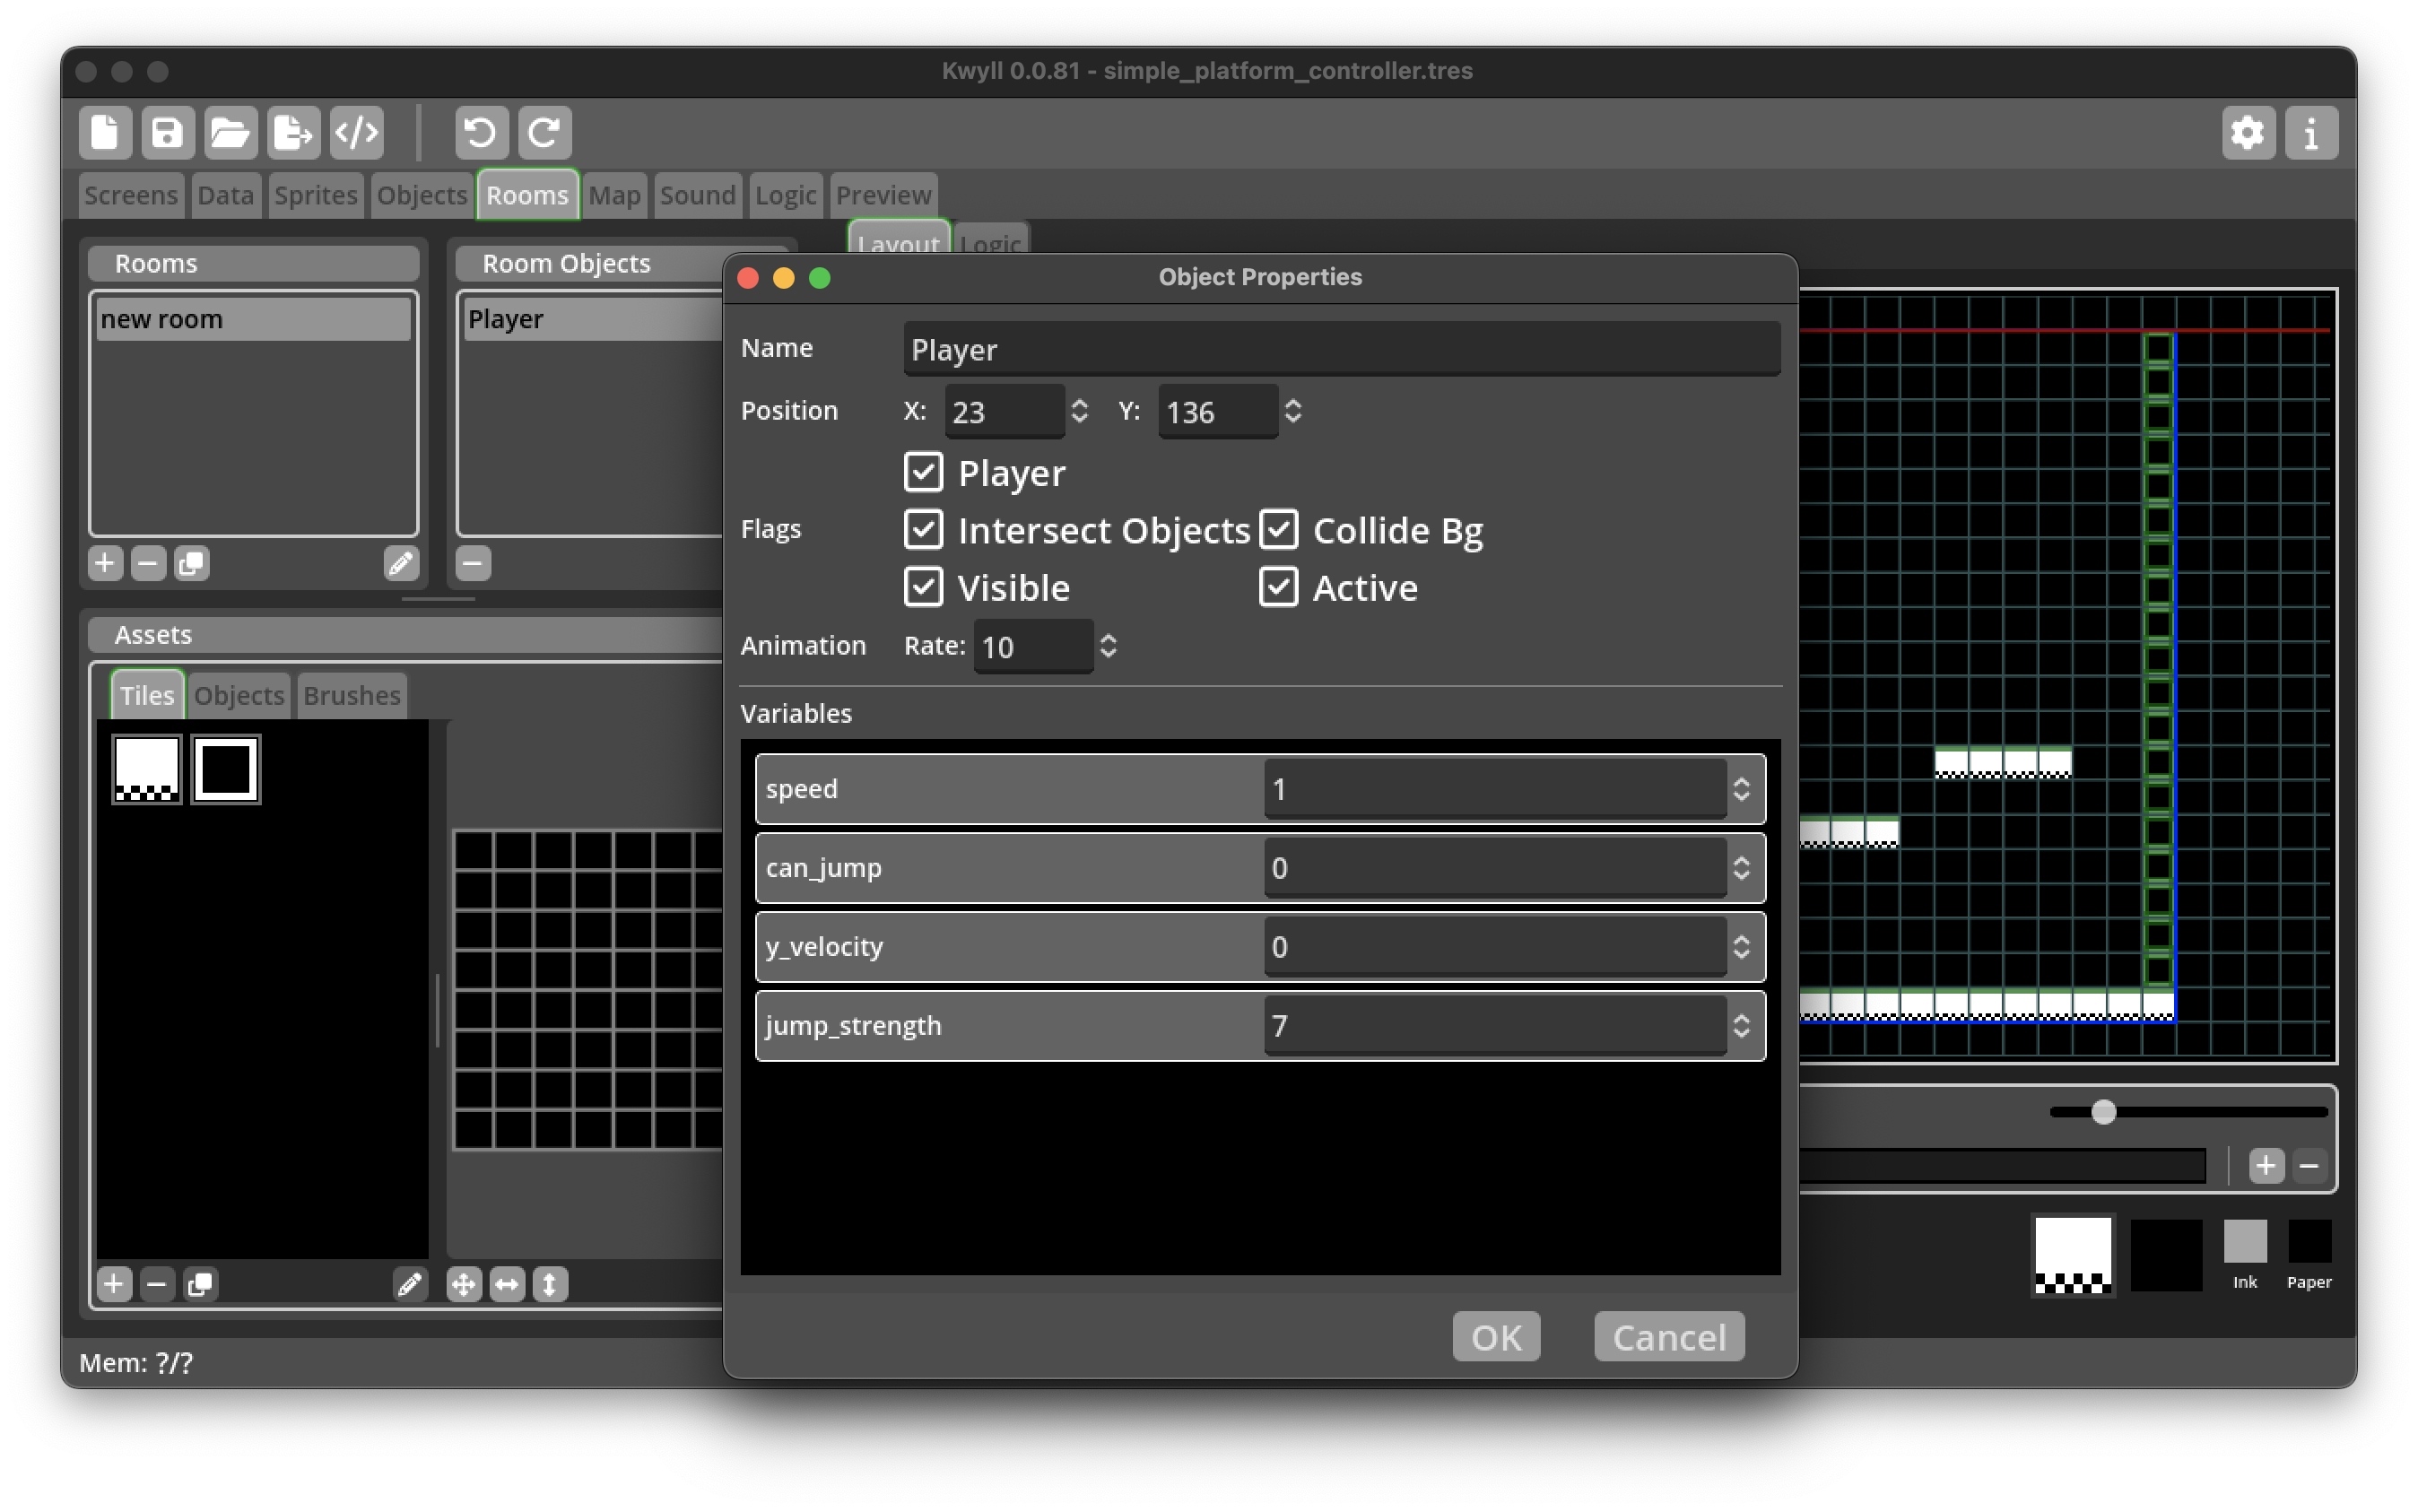
Back in the Room Editor, open the object properties dialog for the player and make sure the "Collide Bg" flag is set so that the player object will collide with our platform tiles.
In the Variables section of the object properties, you'll need to set the values of "speed" and "jump_strength" to suitable values, 1 and 7 will be good for our example, but you can tweak those as you choose.
That should be all that is required to get a basic platformer control working in Kwyll. Switch to the Preview tab and start the game, you should be able to move left and right, and jump up onto the platforms. When you walk off a platform the player should fall to the ground.