Build Your First Kwyll Game: Gem Patrol
In this tutorial, we will build a small top-down game called Gem Patrol. The player will explore several locations, collect gems, avoid moving enemies, and fire projectiles. The finished project will be a starting point that you can experiment with rather than a complete game.
Along the way, we will use the main building blocks of a Kwyll project: Screens, Instruments, Tiles, Room Types, Locations, Object Types, Object Instances, sounds, and Logic.
You do not need any previous experience with node-based logic. We will build each piece in small steps and test the game regularly.
What we are going to build
Gem Patrol will contain four Locations:
Entrance Yard     Upper Yard
      |                |
Stone Corridor -- Store Room
The two Yard Locations will both use the same Yard Room Type. This will
introduce an important Kwyll idea: a Room Type defines a reusable kind of
room, while a Location is one particular use of it on the Map.
The controls will be:
-
Left, Right, Up, and Down to move
-
Fire to shoot in the direction the player is facing
By the end of the tutorial, the game will:
-
move the player between connected Locations;
-
stop the player at solid walls;
-
collect gems painted into the room tilemap;
-
remember collected gems after the player leaves and returns;
-
display the number of collected gems in an Instrument;
-
move enemies around the rooms; and
-
let projectiles destroy enemies.
| Save the project regularly. It is also useful to keep a copy after each major section so that you have an easy point to return to. |
Milestone 1: Build the game world
Our first milestone is the game world without a player. We will make the game Screen, draw a small tile set, create three Room Types, and arrange four Locations on the Map.
When this milestone is complete, Preview will show the first Location inside our game Screen. Nothing will move yet.
Create and save the project
-
Start Kwyll and create a new project.
-
Save it as
gem_patrol.tres.
Choose a folder where you can keep the project and any copies you make while following the tutorial.
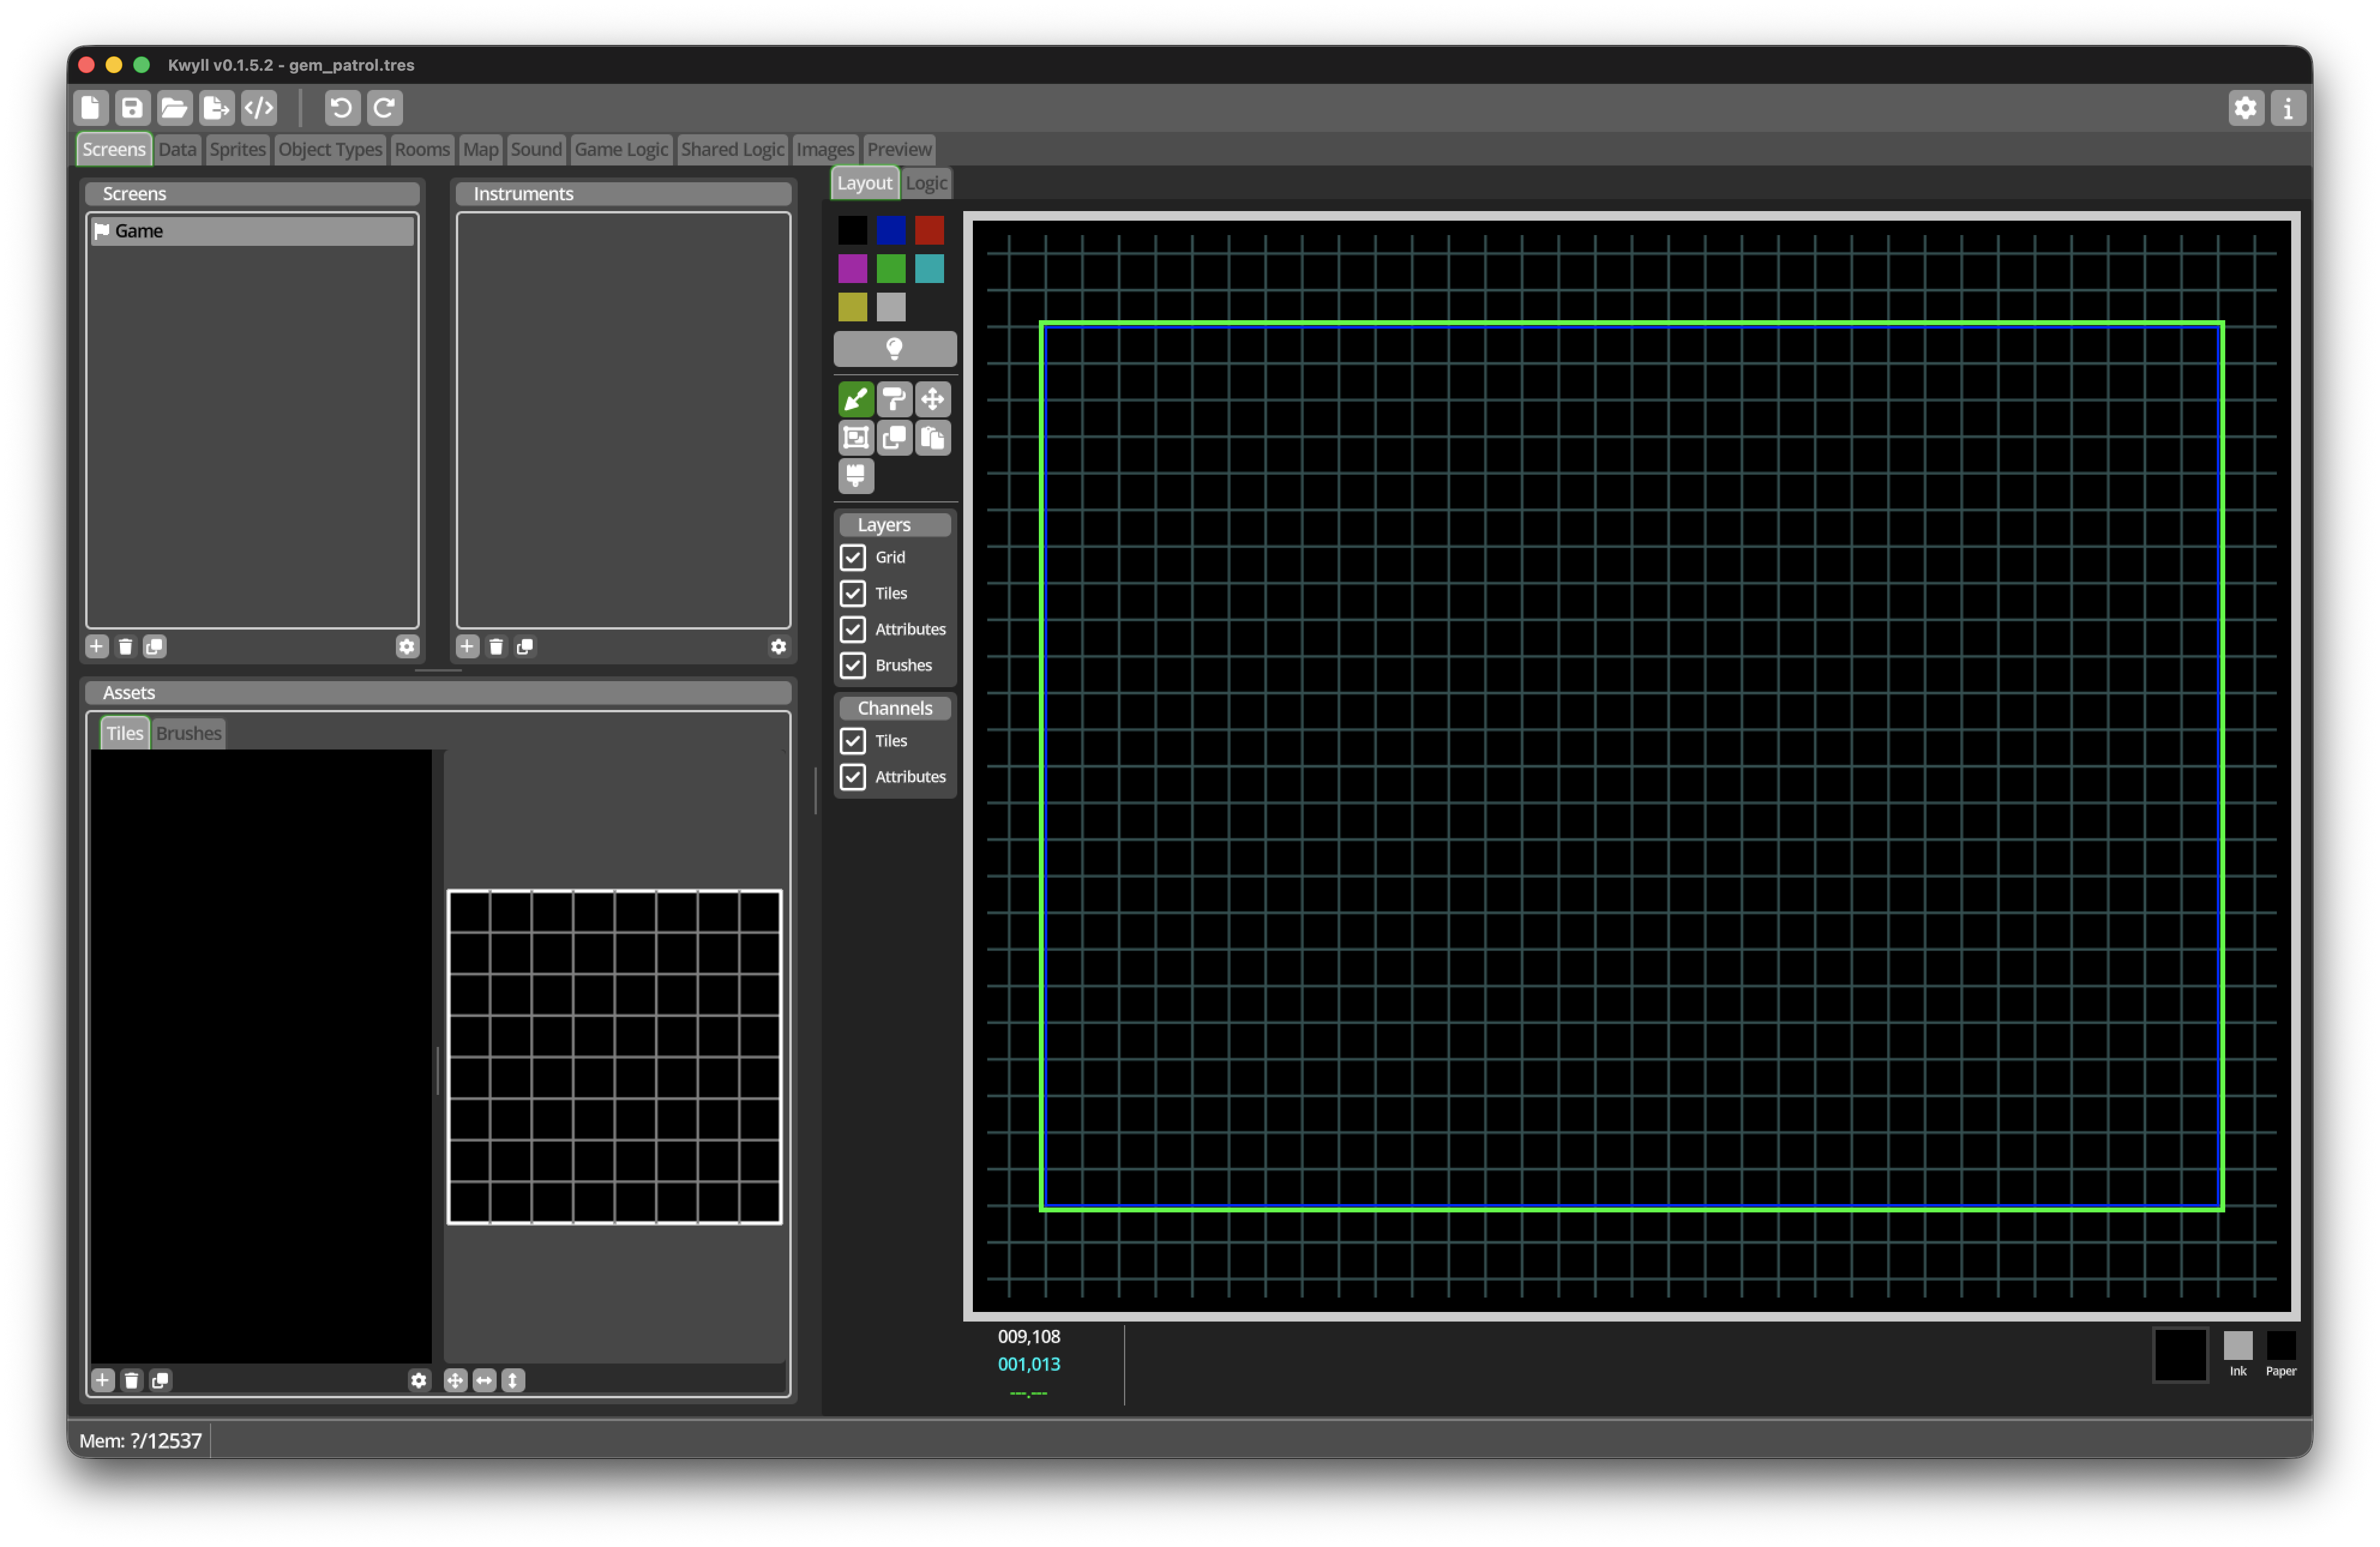
Before adding anything, take a moment to notice the main editors in Kwyll. We will use the Screens, Rooms, and Map editors in this milestone. Later, we will also spend time in the Object and Logic editors.
Set up the game Screen
A Screen controls what the player sees around the game itself. It can contain the game window, a tilemap used as a border or background, and Instruments that display values such as a score or number of lives.
-
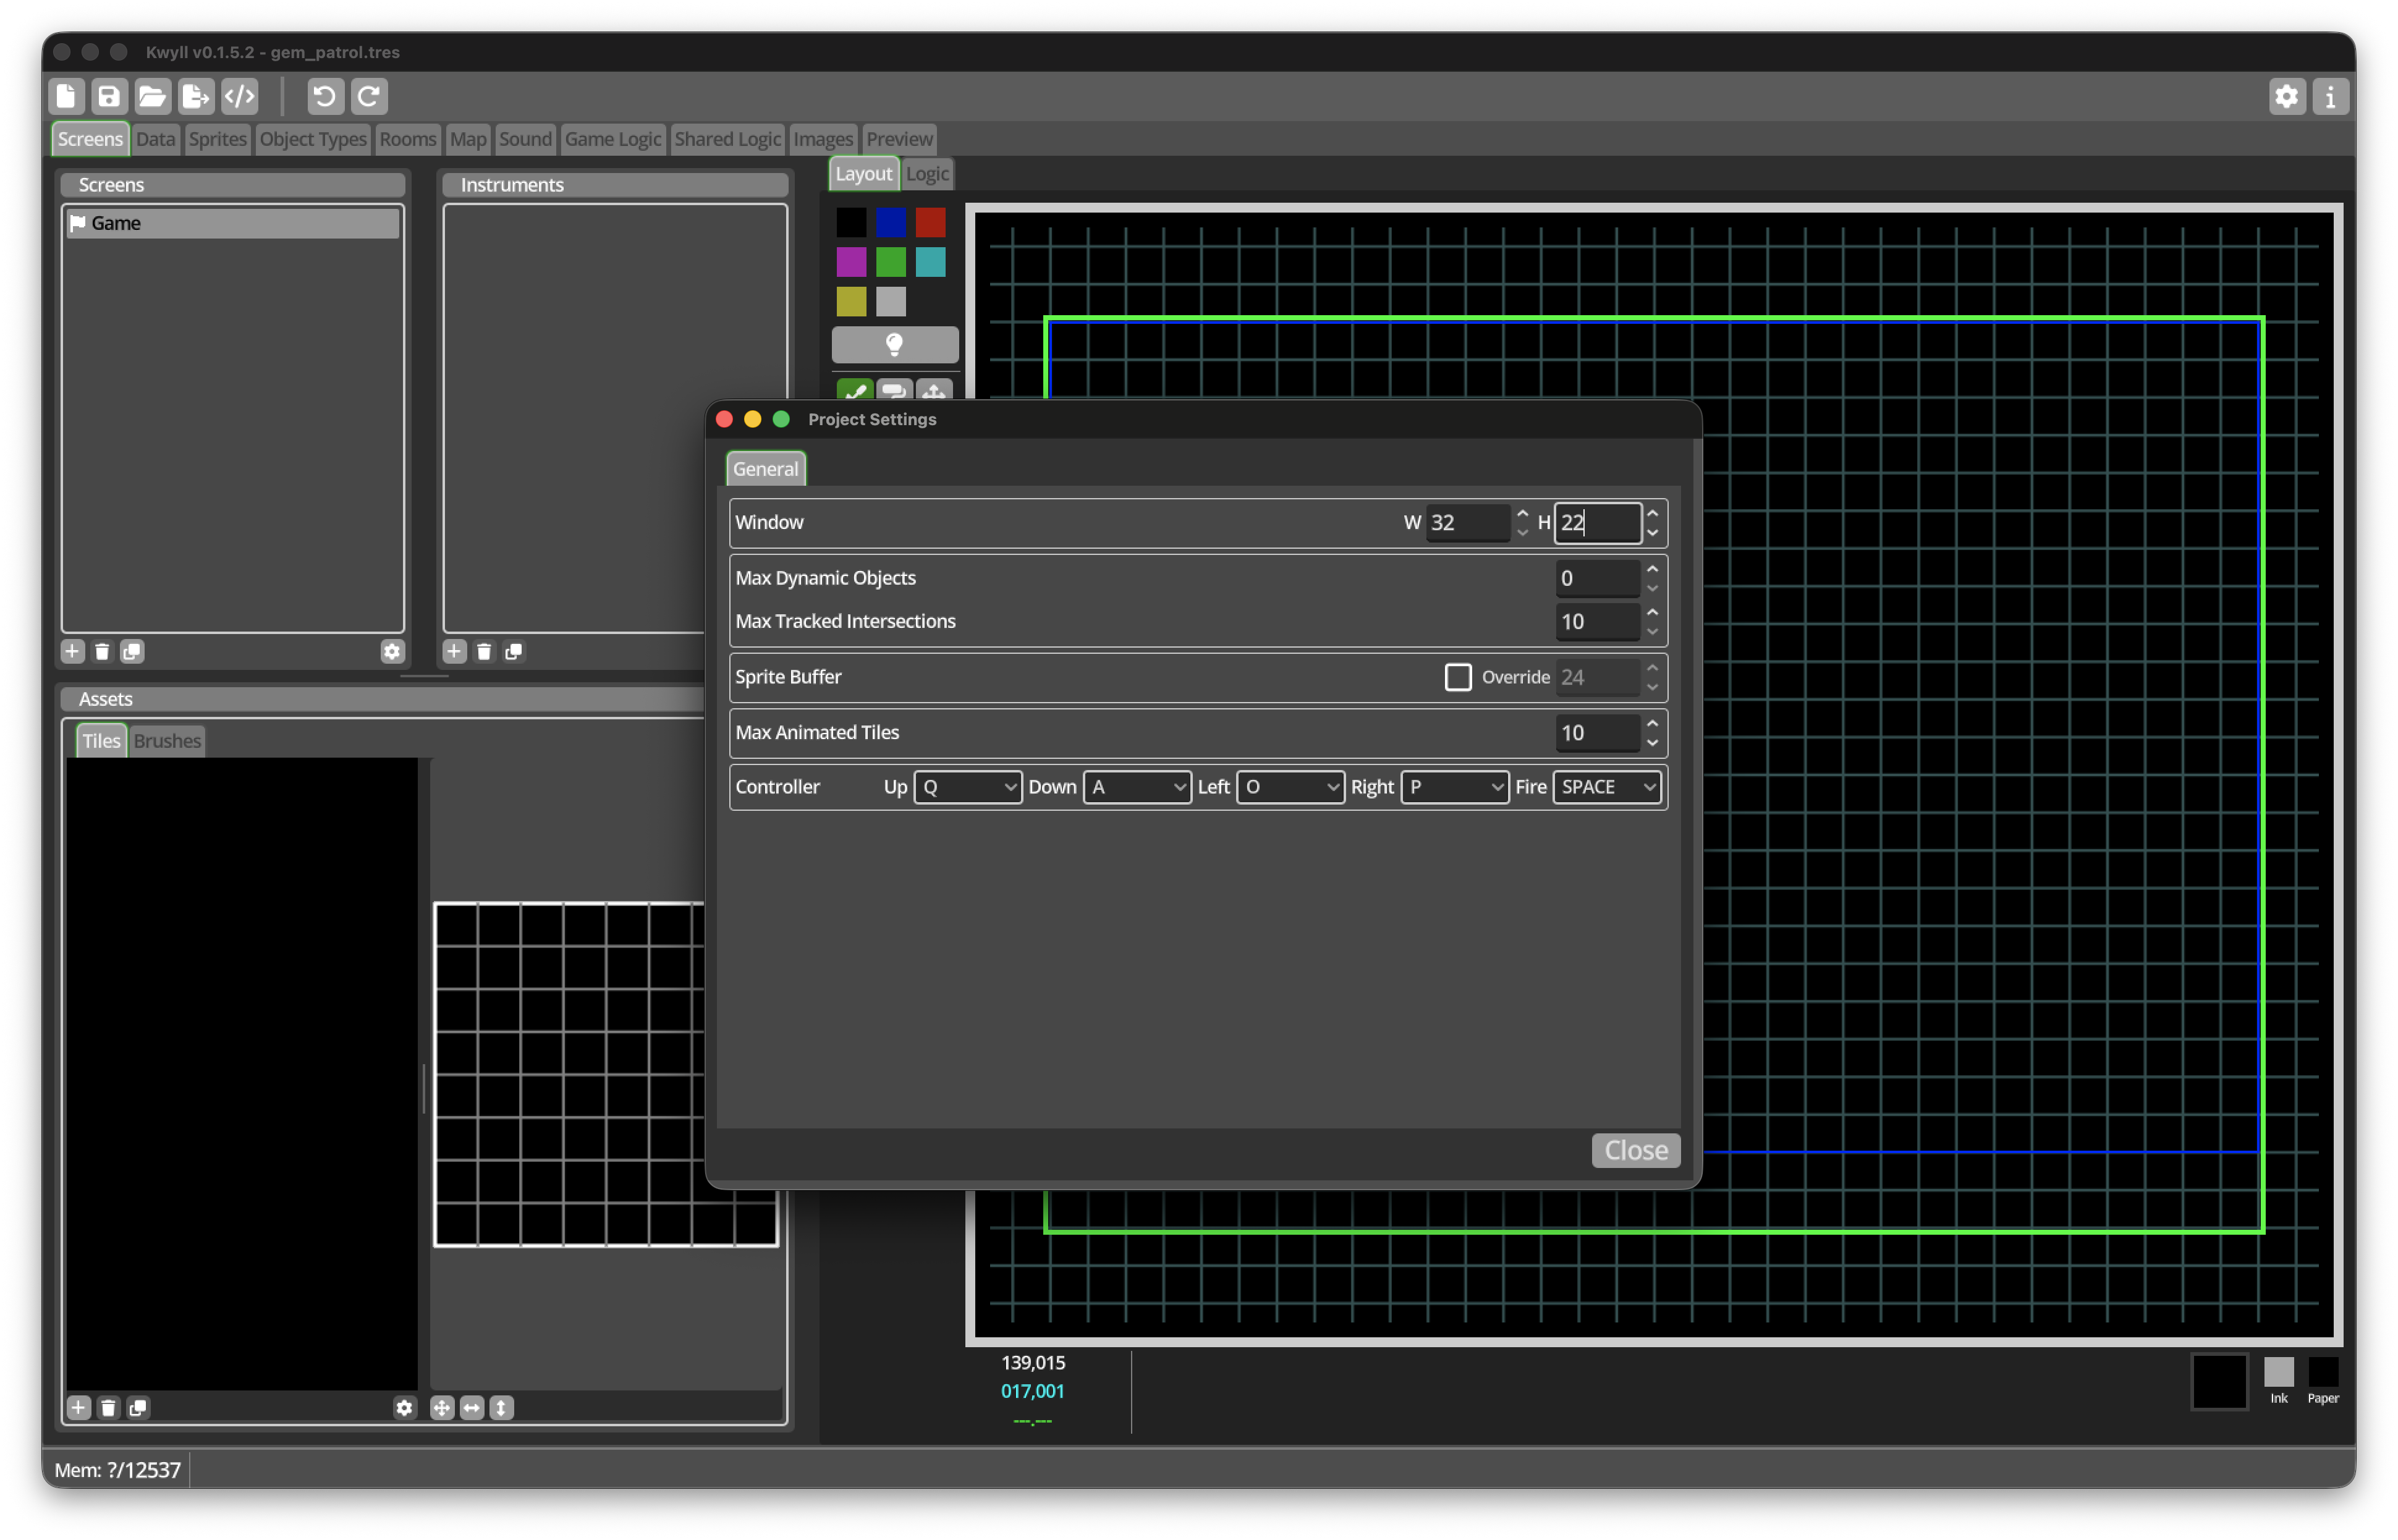
Click the gear icon in the top-right of the main toolbar to open Project Settings.
-
Open the game-window settings.
-
Set the window Width to
32cells and its Height to22cells. -
Accept the changes.
This makes the game window 256 pixels wide and 176 pixels high, leaving two 8-pixel rows for the status area on a 256-by-192-pixel Screen.
| Resize the game window in Project Settings before moving it in the Screen Editor. Moving the default-sized game window without first making it smaller can cause Kwyll to crash. |
-
Open the Screens editor.
-
Select the existing Screen. If the project does not contain one, add a new Screen.
-
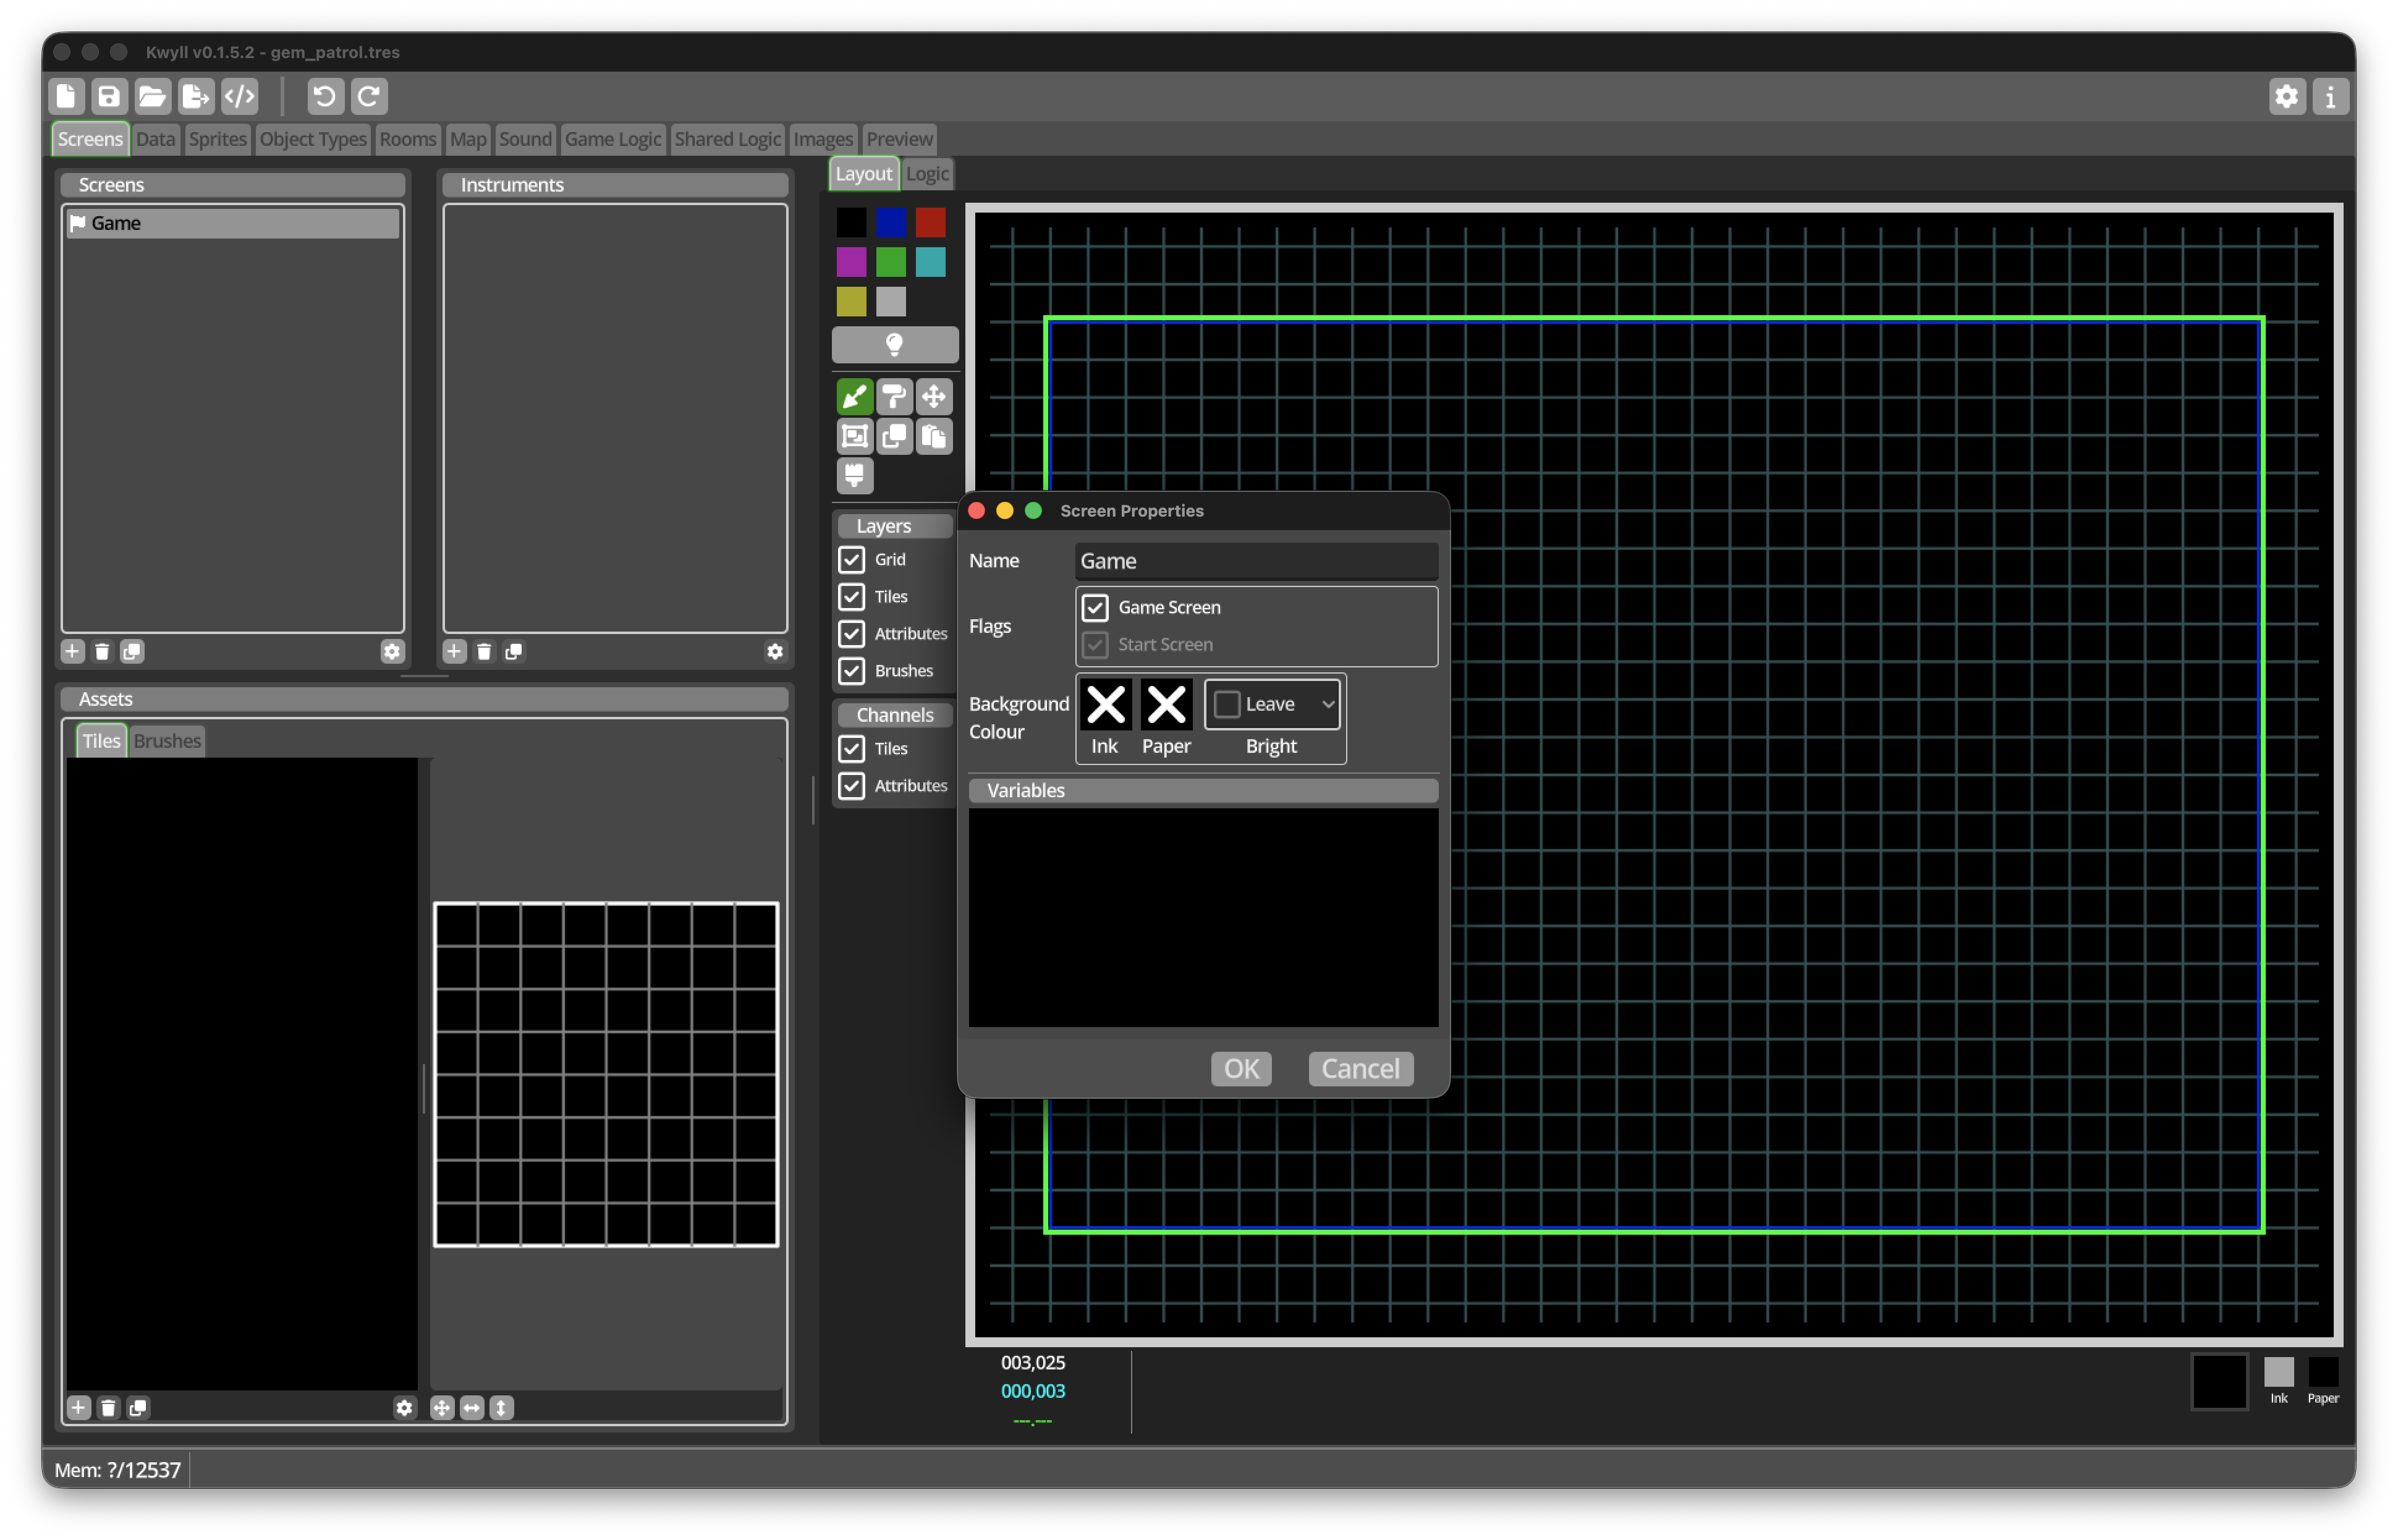
Open its properties.
-
Change its name to
Game. -
Enable Game Screen? so that the game window appears on it.
-
Enable Start Screen? so that this is the first Screen shown when the game starts.
-
Accept the changes.
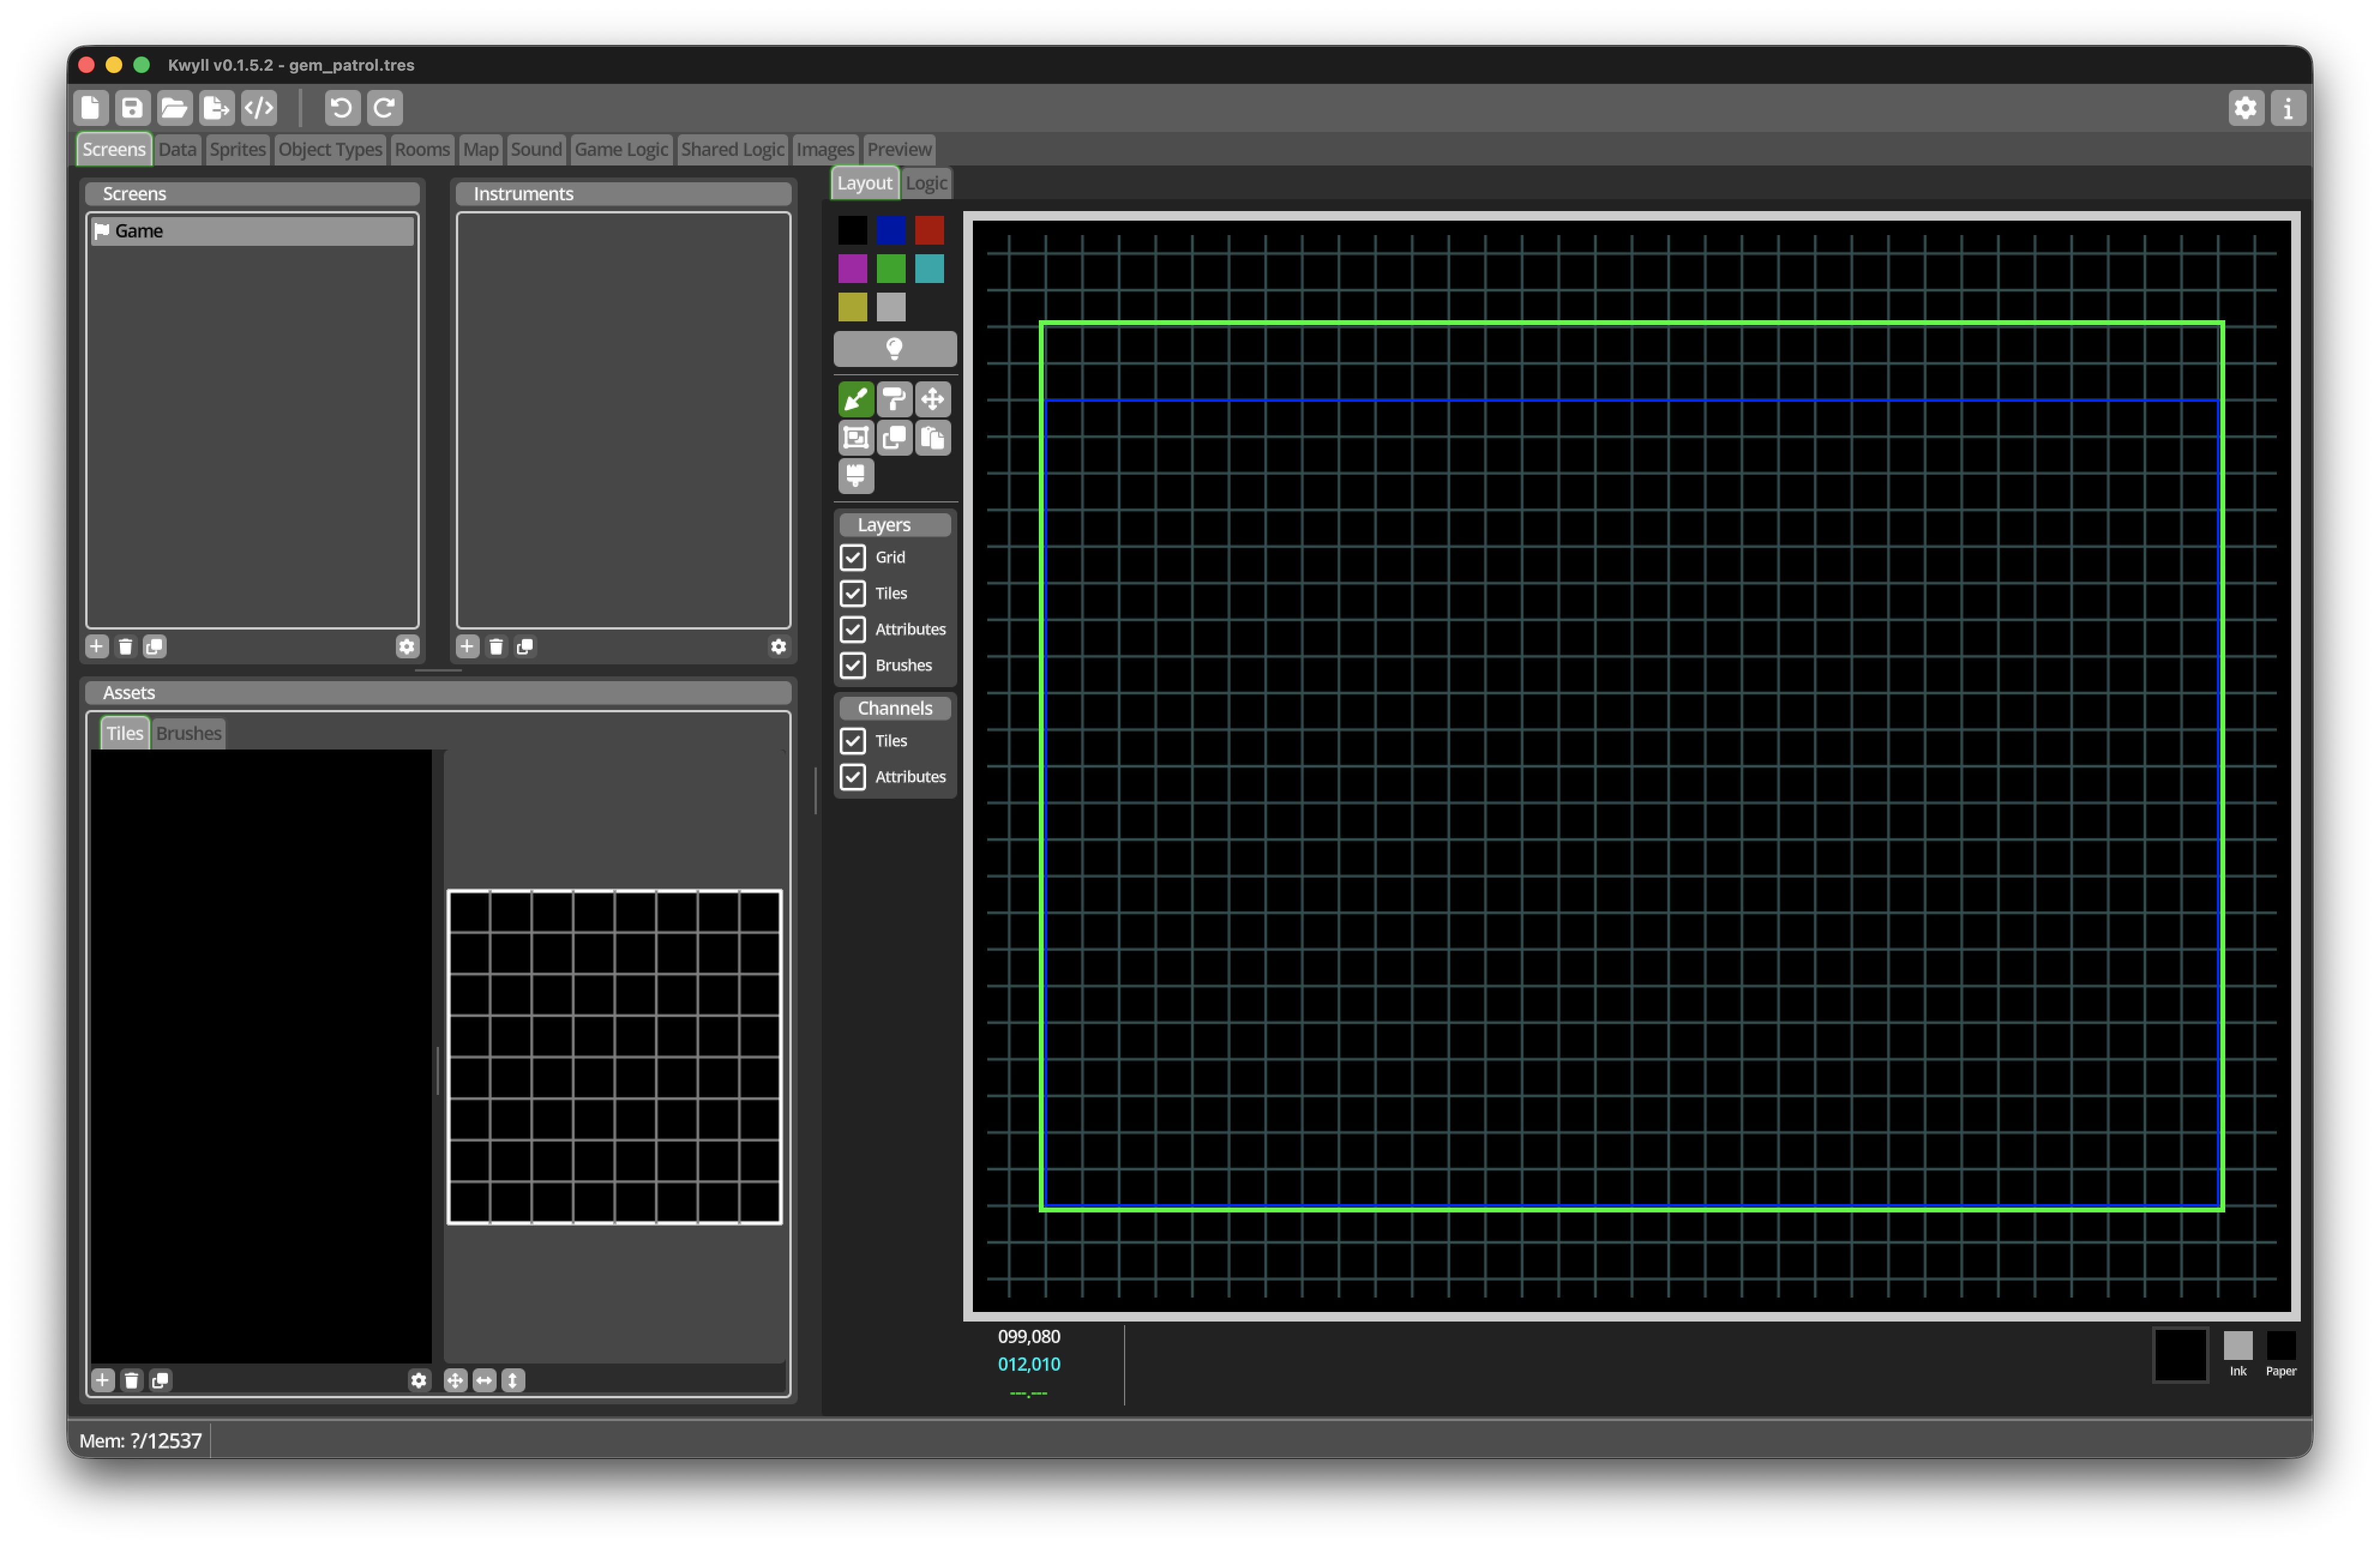
In the Screen Layout, the blue rectangle represents the game window. Drag it
down by two character rows to leave a narrow status area above it. Its final
position should be X 0, Y 2 in screen cells.
Leave enough space above the game window for a number showing how many gems have been collected.
Add the gem counter
An Instrument is a value displayed on a Screen. We will add the counter now and connect it to the game Logic in a later milestone.
-
In the Instruments list, add an Instrument.
-
Open the new Instrument’s properties.
-
Name it
GemCount. -
Set its Type to
Integer. -
Set its initial Value to
0. -
Give it enough width to display at least two digits.
-
Position it in the status area above the game window.
-
Accept the changes.
The yellow rectangle in the Screen Layout represents the Instrument. You can drag it to move it or use its bottom-right handle to change its size. Both position and size snap to the 8-by-8 grid.
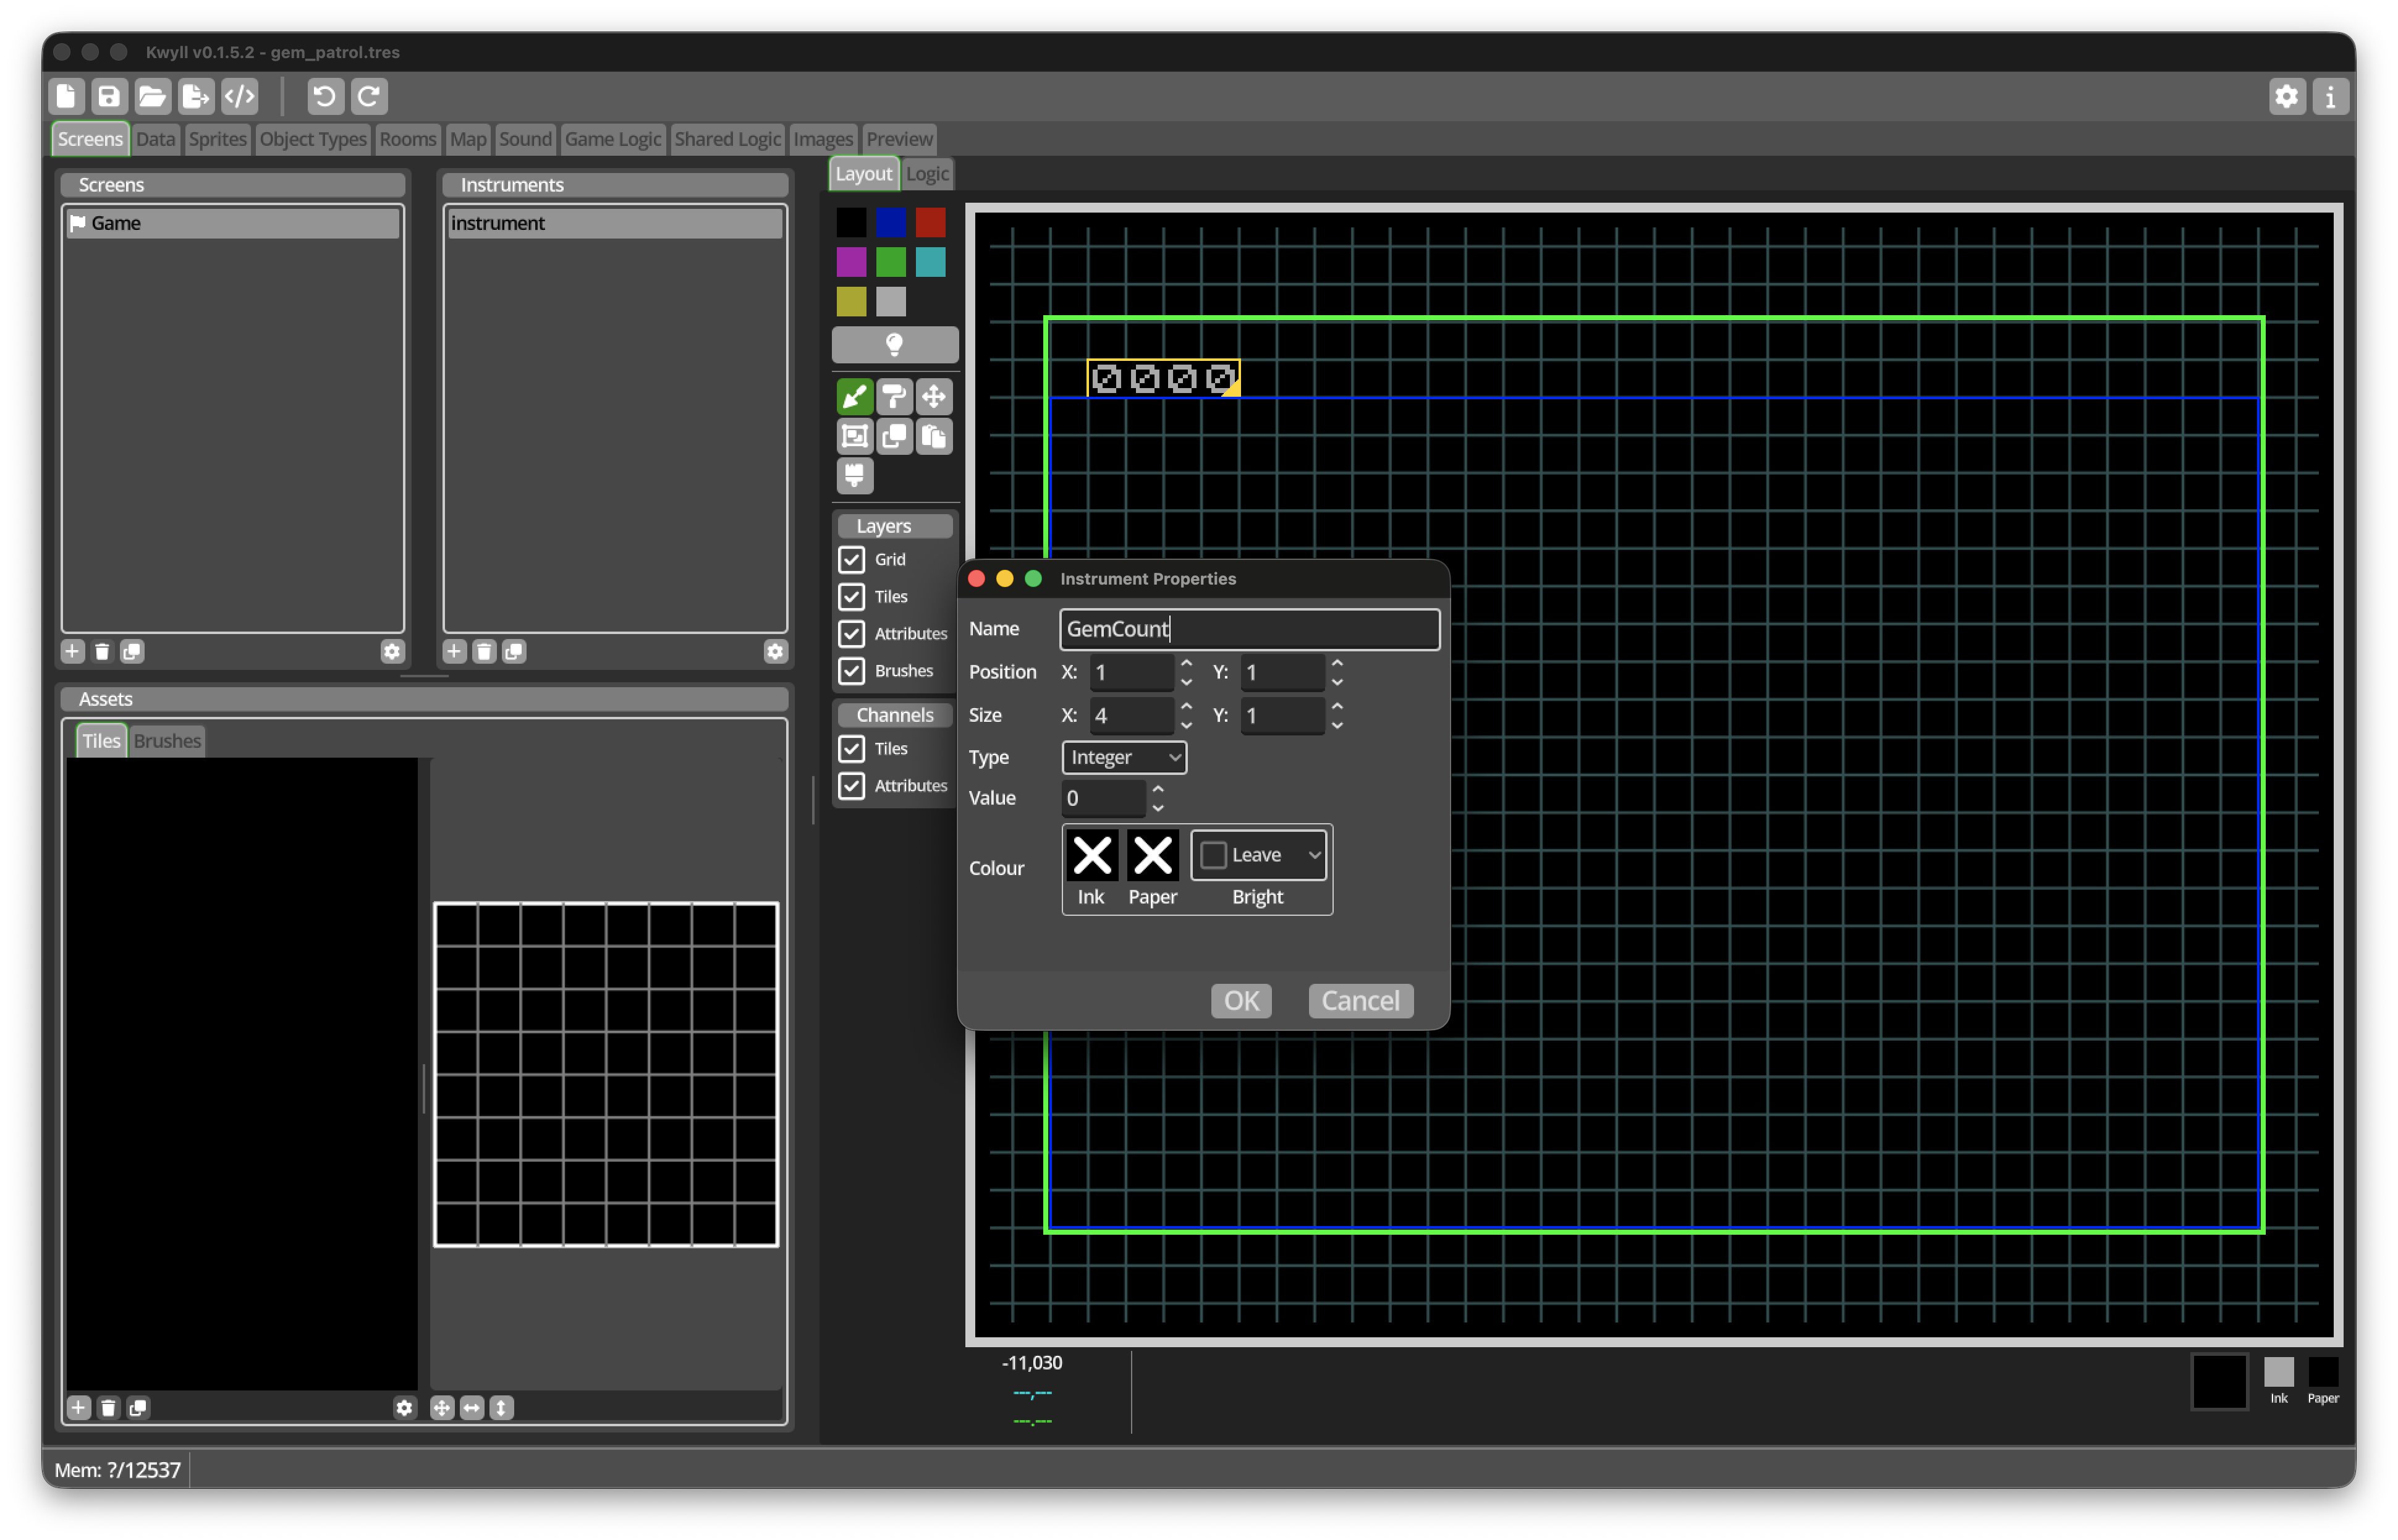
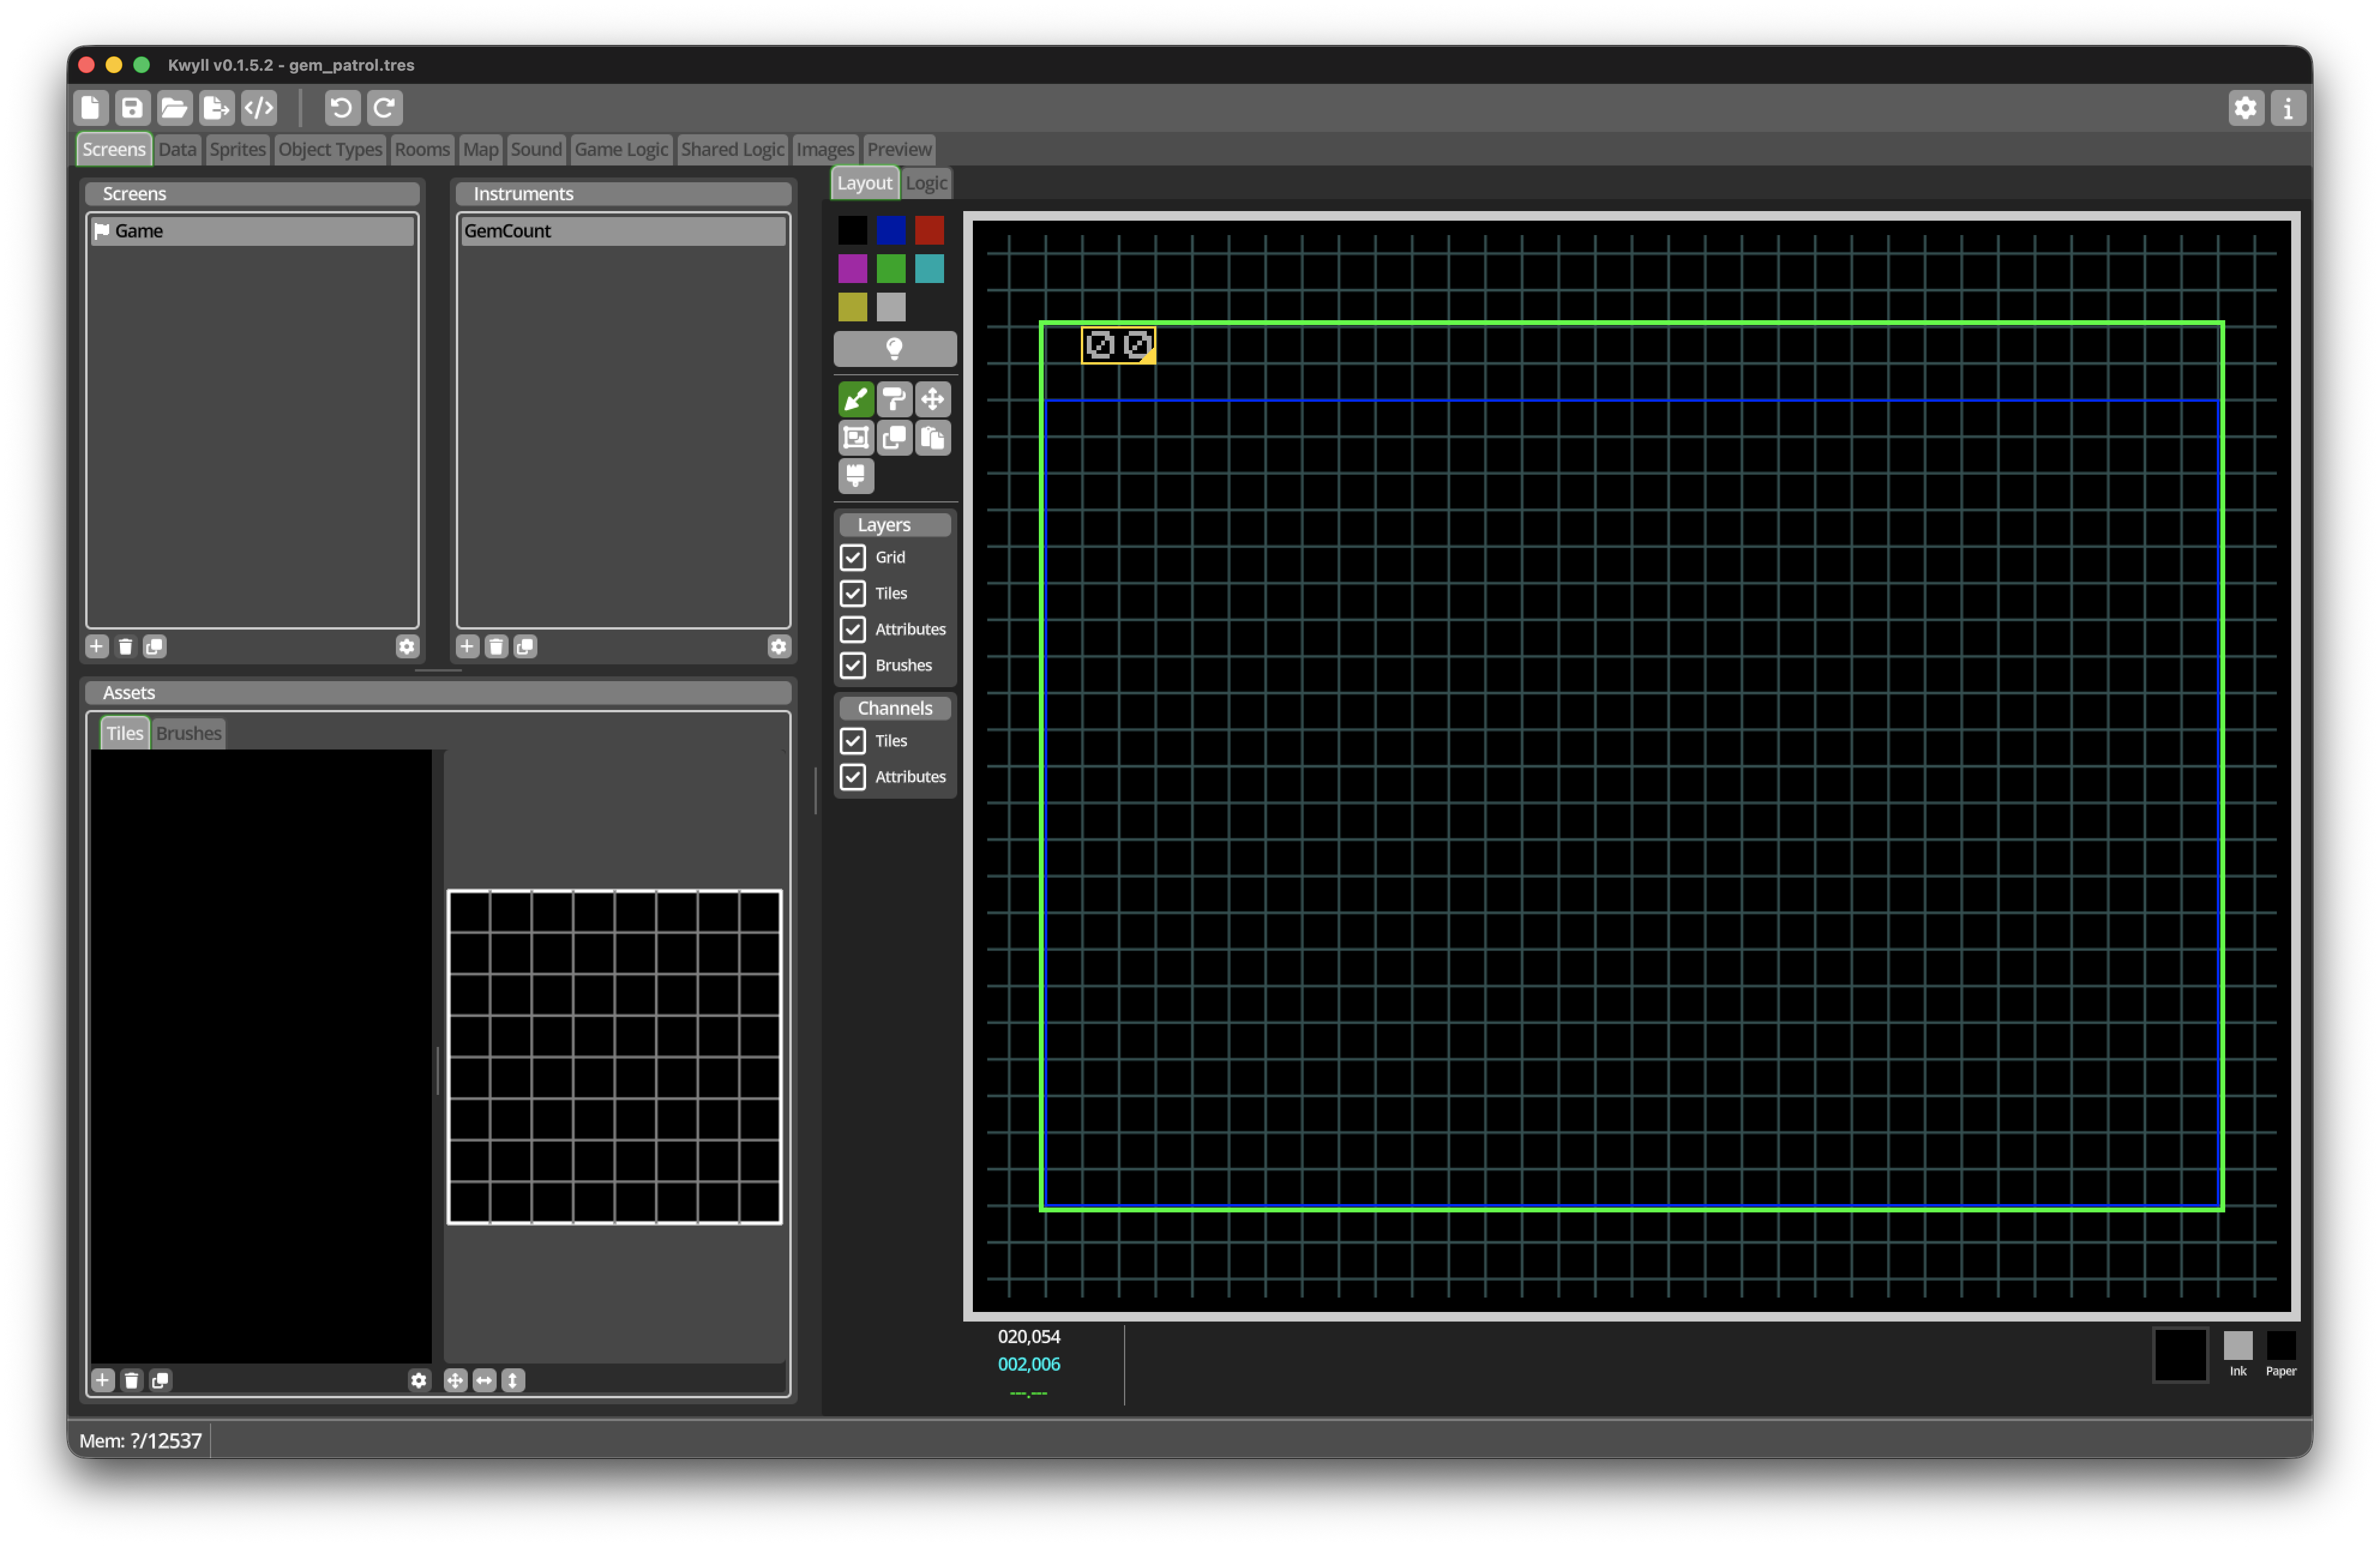
For now, the Instrument will always show 0. Later, Screen Logic will
update it whenever the player collects a gem.
|
Draw the game tiles
Rooms use a tilemap for their background. A tile is a small reusable picture; on the ZX Spectrum target each tile is 8 by 8 pixels. Tiles can also carry collision and Type information that affects the game.
For this tutorial, keep the artwork simple. Clear shapes make it easier to concentrate on how the project is assembled.
Create these four tiles:
| Tile | Appearance | Purpose |
|---|---|---|
Floor |
A plain or lightly patterned square |
Walkable background |
Wall |
A solid brick or block pattern |
Stops the player and projectiles |
Gem |
A small diamond shape |
Collected when the player touches it |
Decorative floor |
A variation of the floor |
Makes the rooms easier to distinguish |
Add some colour
Kwyll can give a tile default Ink, Paper, and Bright values. These colours are used unless they are replaced by colour information painted into a tilemap or by Logic while the game is running.
Open the tile properties and use these defaults:
| Tile | Ink | Paper | Bright |
|---|---|---|---|
Floor |
Leave unset |
Leave unset |
Off |
Wall |
Cyan |
Black |
Off |
Gem |
Yellow |
Black |
On |
Decorative floor |
Green |
Black |
Off |
Leaving the Floor colours unset allows it to use the default colours of its Location. The other defaults make the walls, gems, and decorations easy to recognise without painting colour attributes over every room.
| ZX Spectrum colour applies to an 8-by-8 attribute cell. Because each of our tiles is also 8 by 8 pixels, these defaults fit naturally with the room tilemap. |
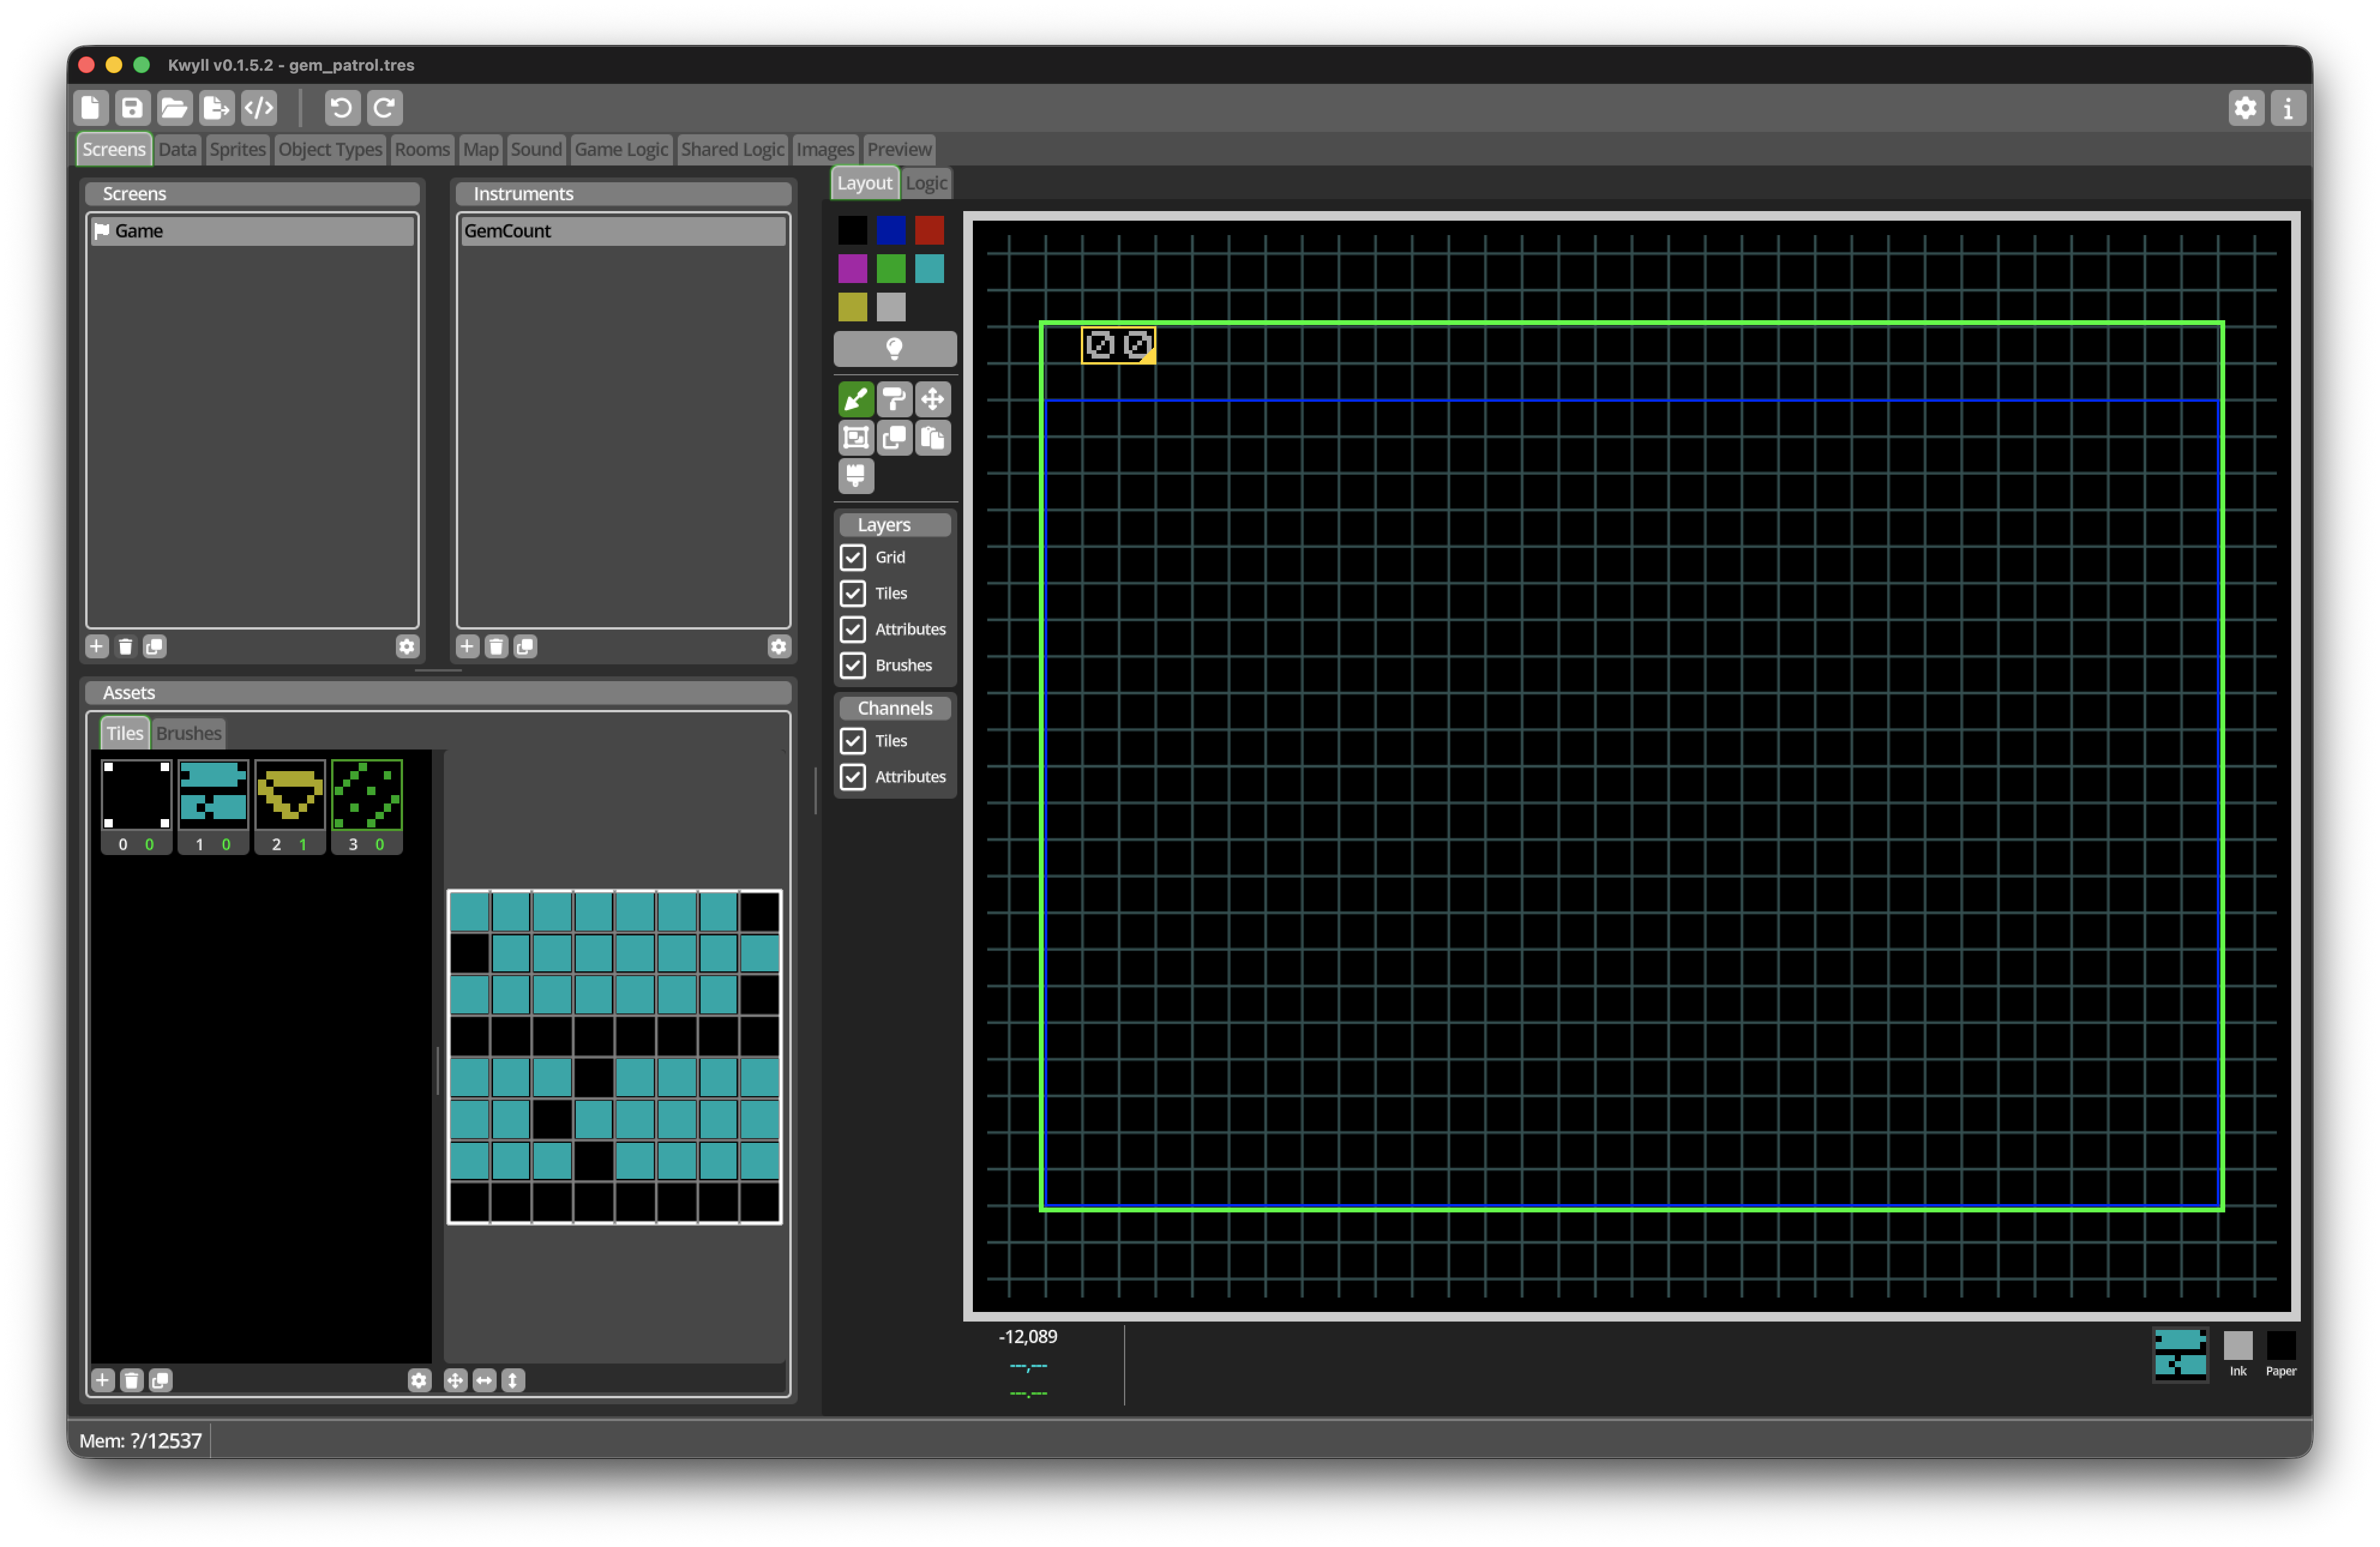
Configure the wall
Open the Wall tile’s properties and set its default collision on all four sides. This will eventually prevent the Player from moving through it.
The Floor, Decorative floor, and Gem should not have collision.
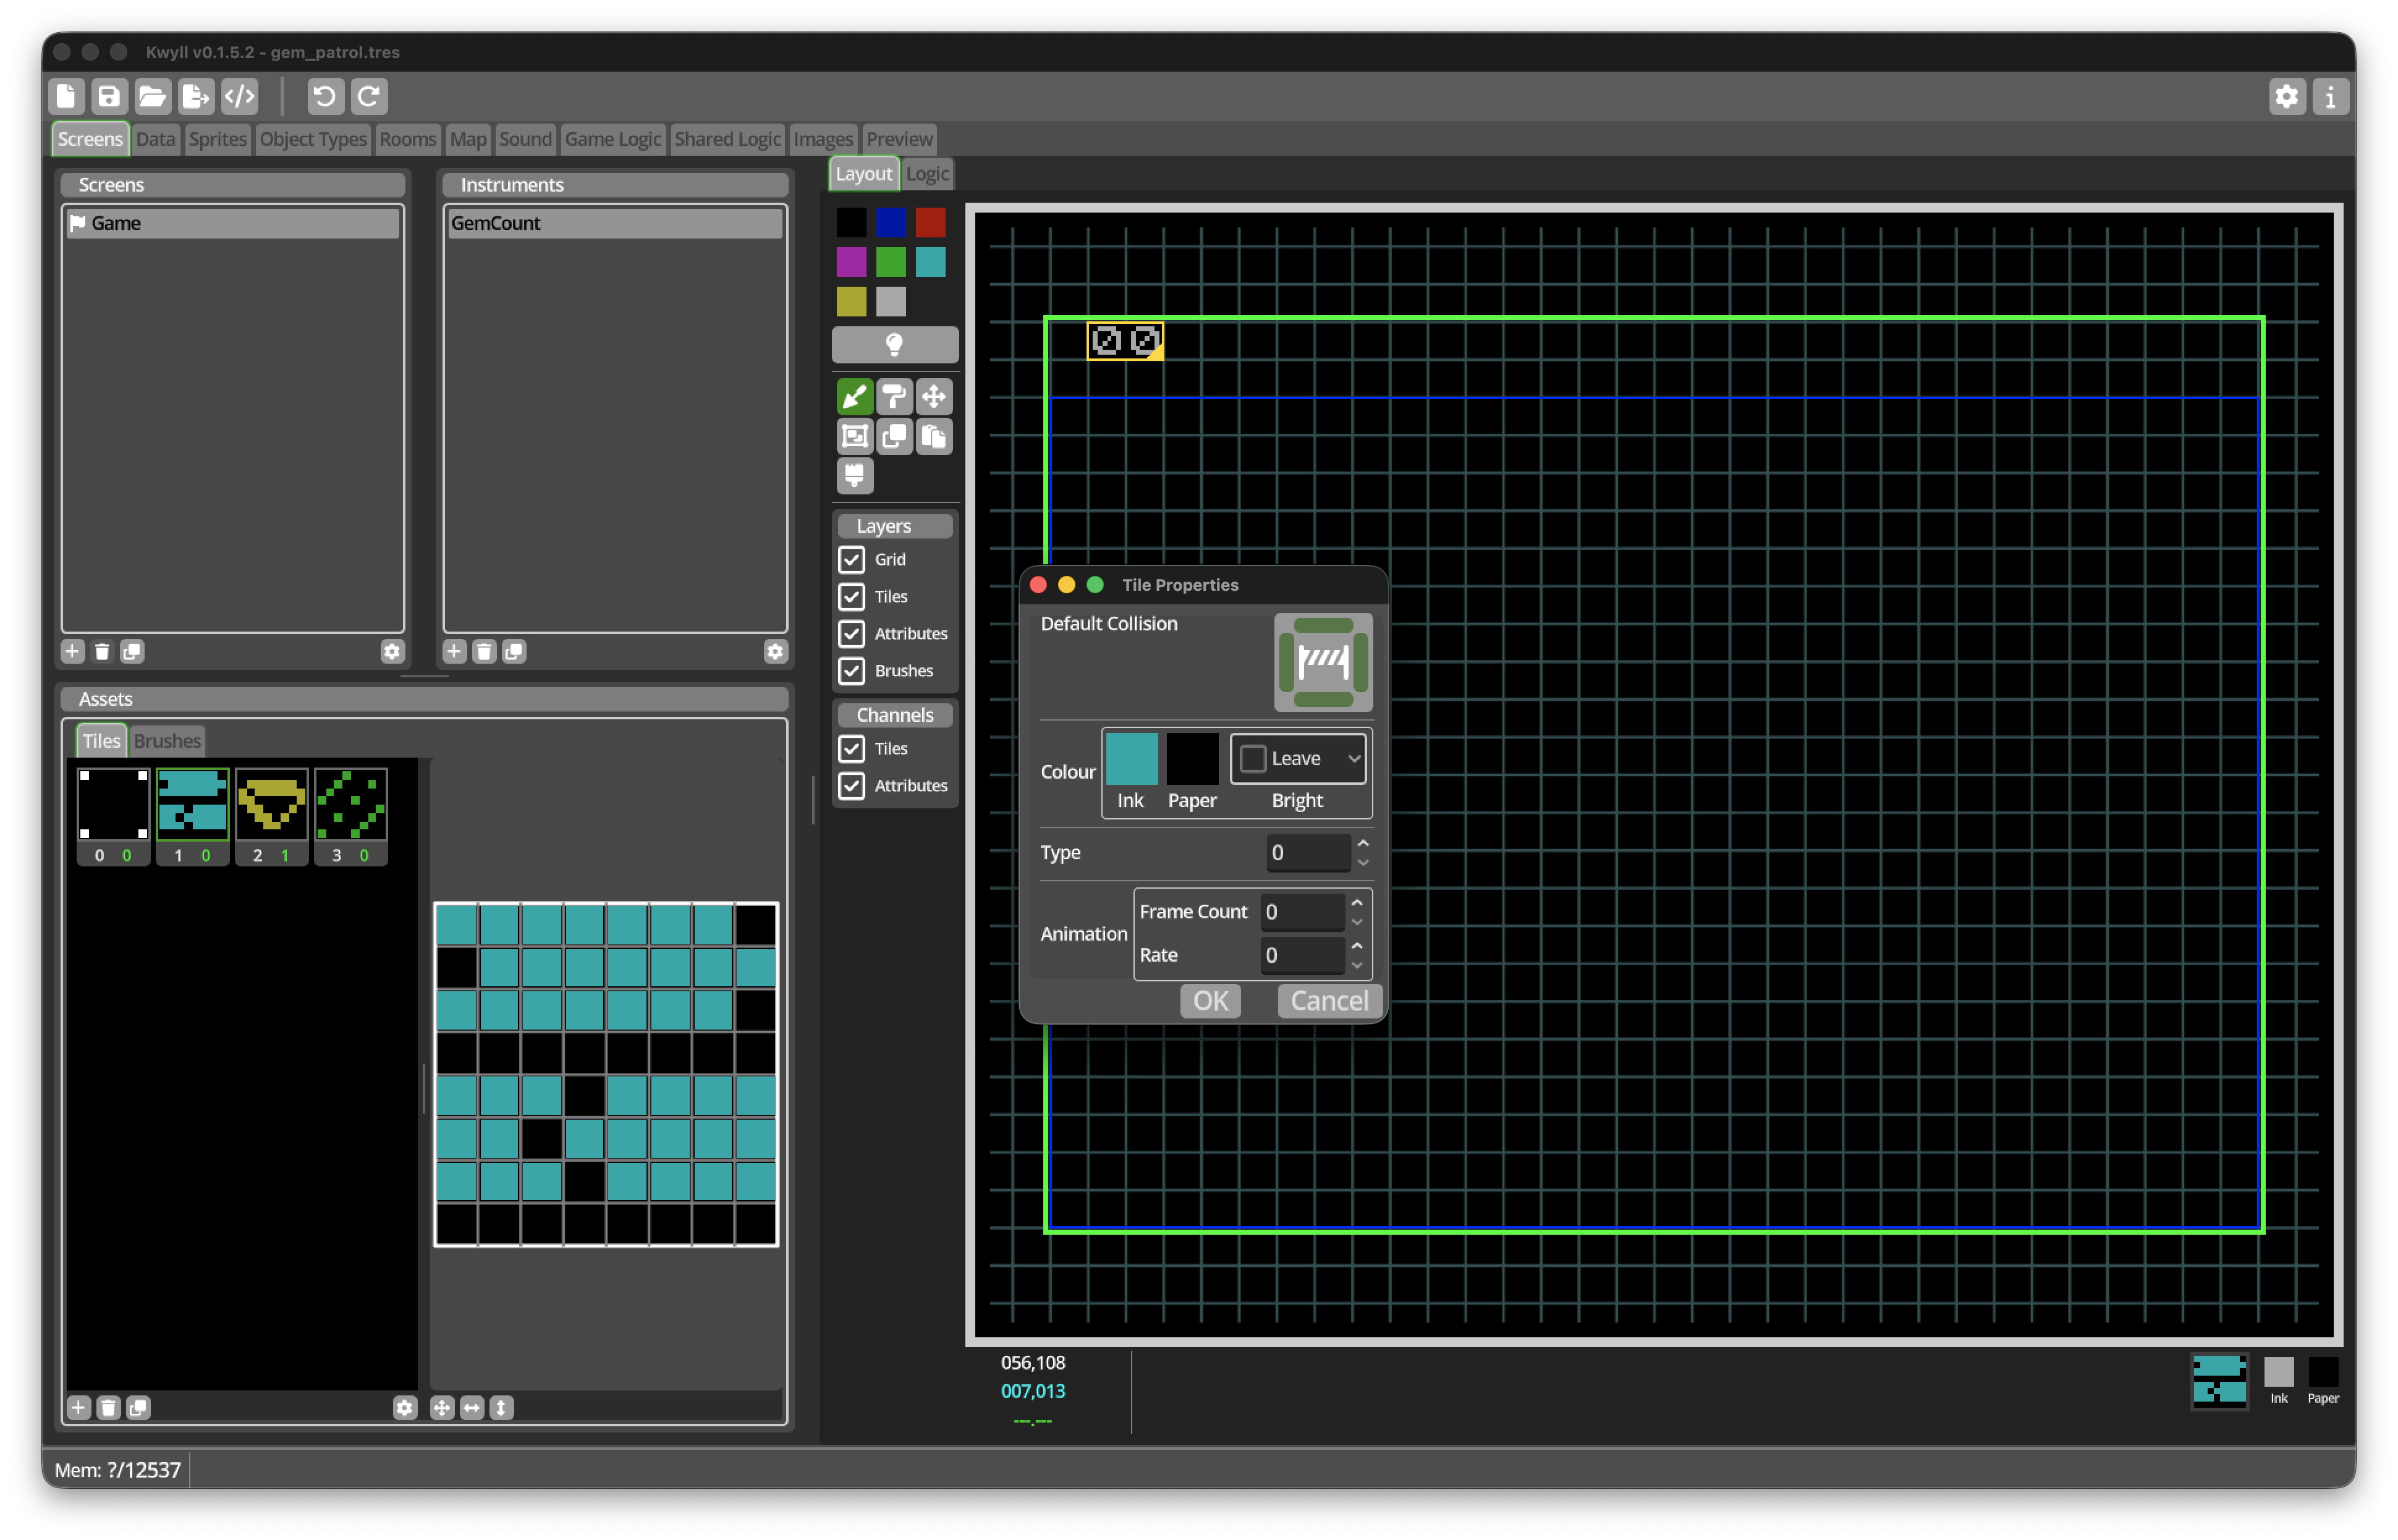
Give the gem a Type
Open the Gem tile’s properties and set its Type to 1.
Type is a number that Logic can use to recognise a tile. In a later milestone,
the Player’s Touch Tile trigger will run when the Player touches a tile with
a non-zero Type. The value 1 will tell our Logic that the touched tile is a
gem.
The other tiles should keep Type 0.
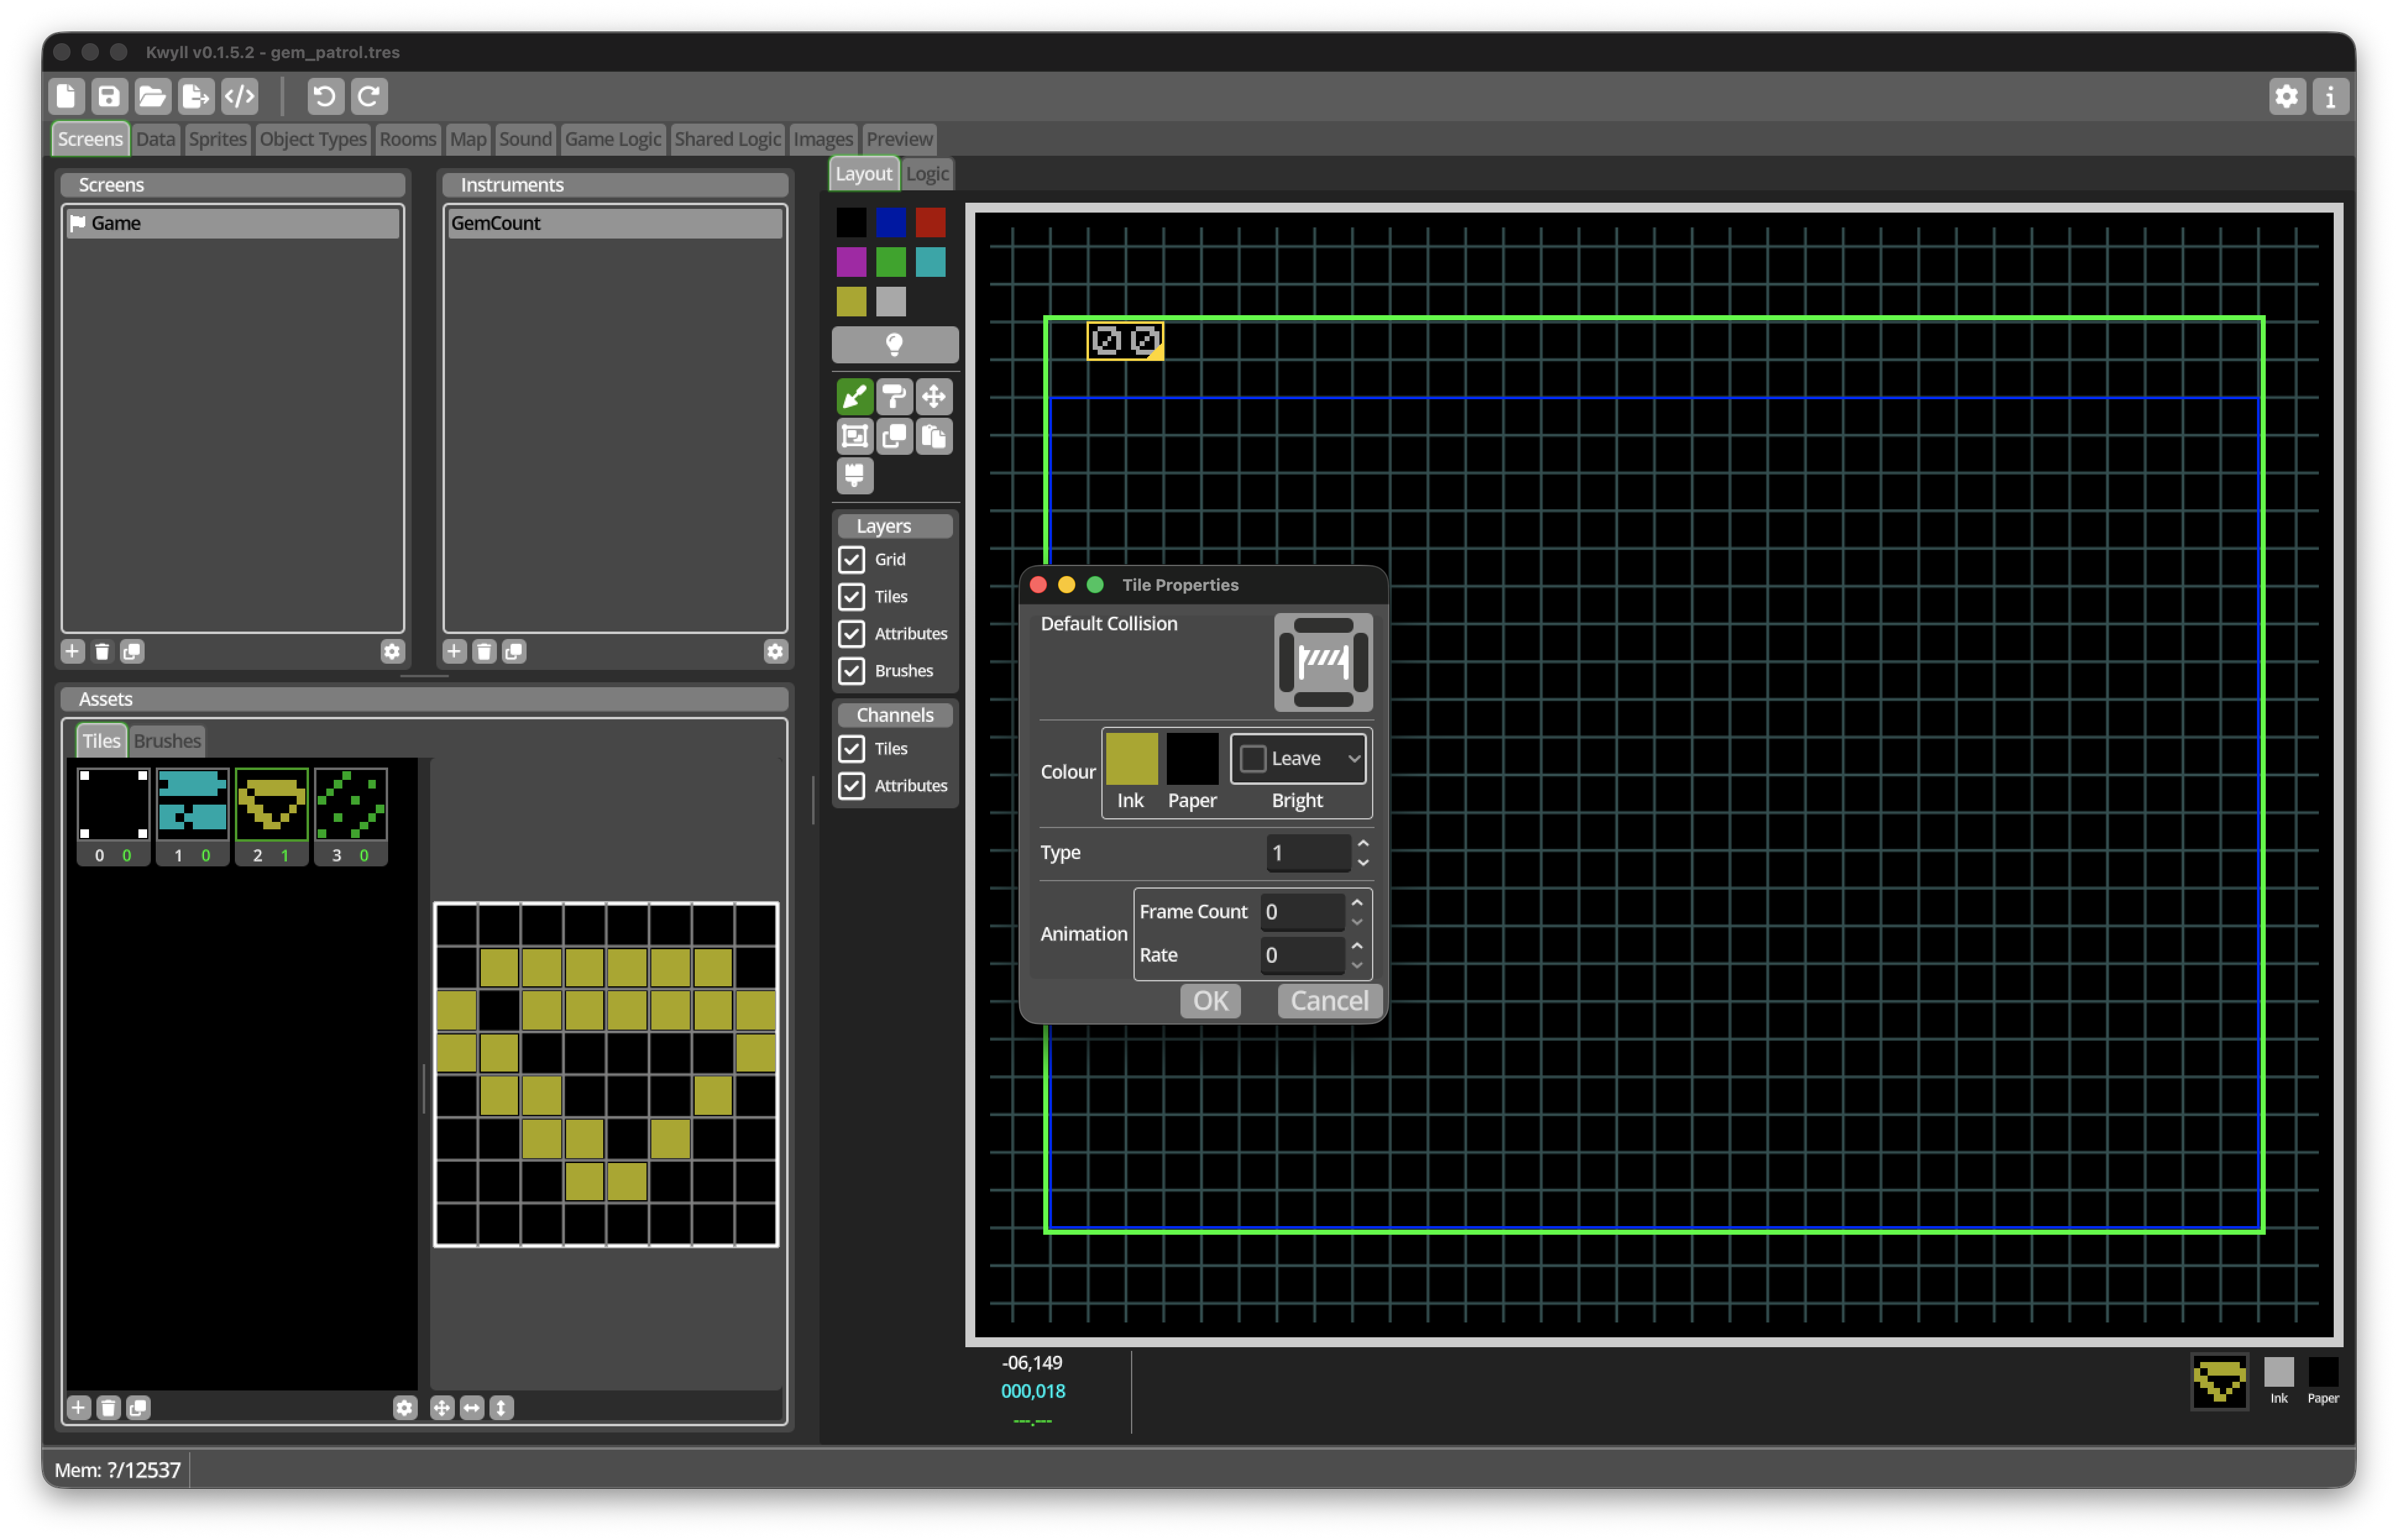
At this point, check that:
-
the Wall has collision on all sides;
-
the Gem has Type
1; and -
the two Floor tiles have neither collision nor a non-zero Type.
Create the Yard Room Type
A Room Type defines a reusable space. It contains a tilemap and can also contain objects, markers, variables, and Logic. A Room Type does not appear in the game until it is placed on the Map as a Location.
-
Open the Rooms editor.
-
Add a Room Type.
-
Open its properties and name it
Yard. -
Fill the room with the Floor tile.
-
Draw Wall tiles around the outside edge.
-
Leave one opening in the middle of the bottom edge.
-
Add a few Decorative floor tiles.
-
Paint two or three Gem tiles in positions that can be reached from the opening.
Keep the opening at least as wide as the Player sprite that you intend to draw. A two-tile-wide opening is a safe starting point for a 16-pixel-wide Player.
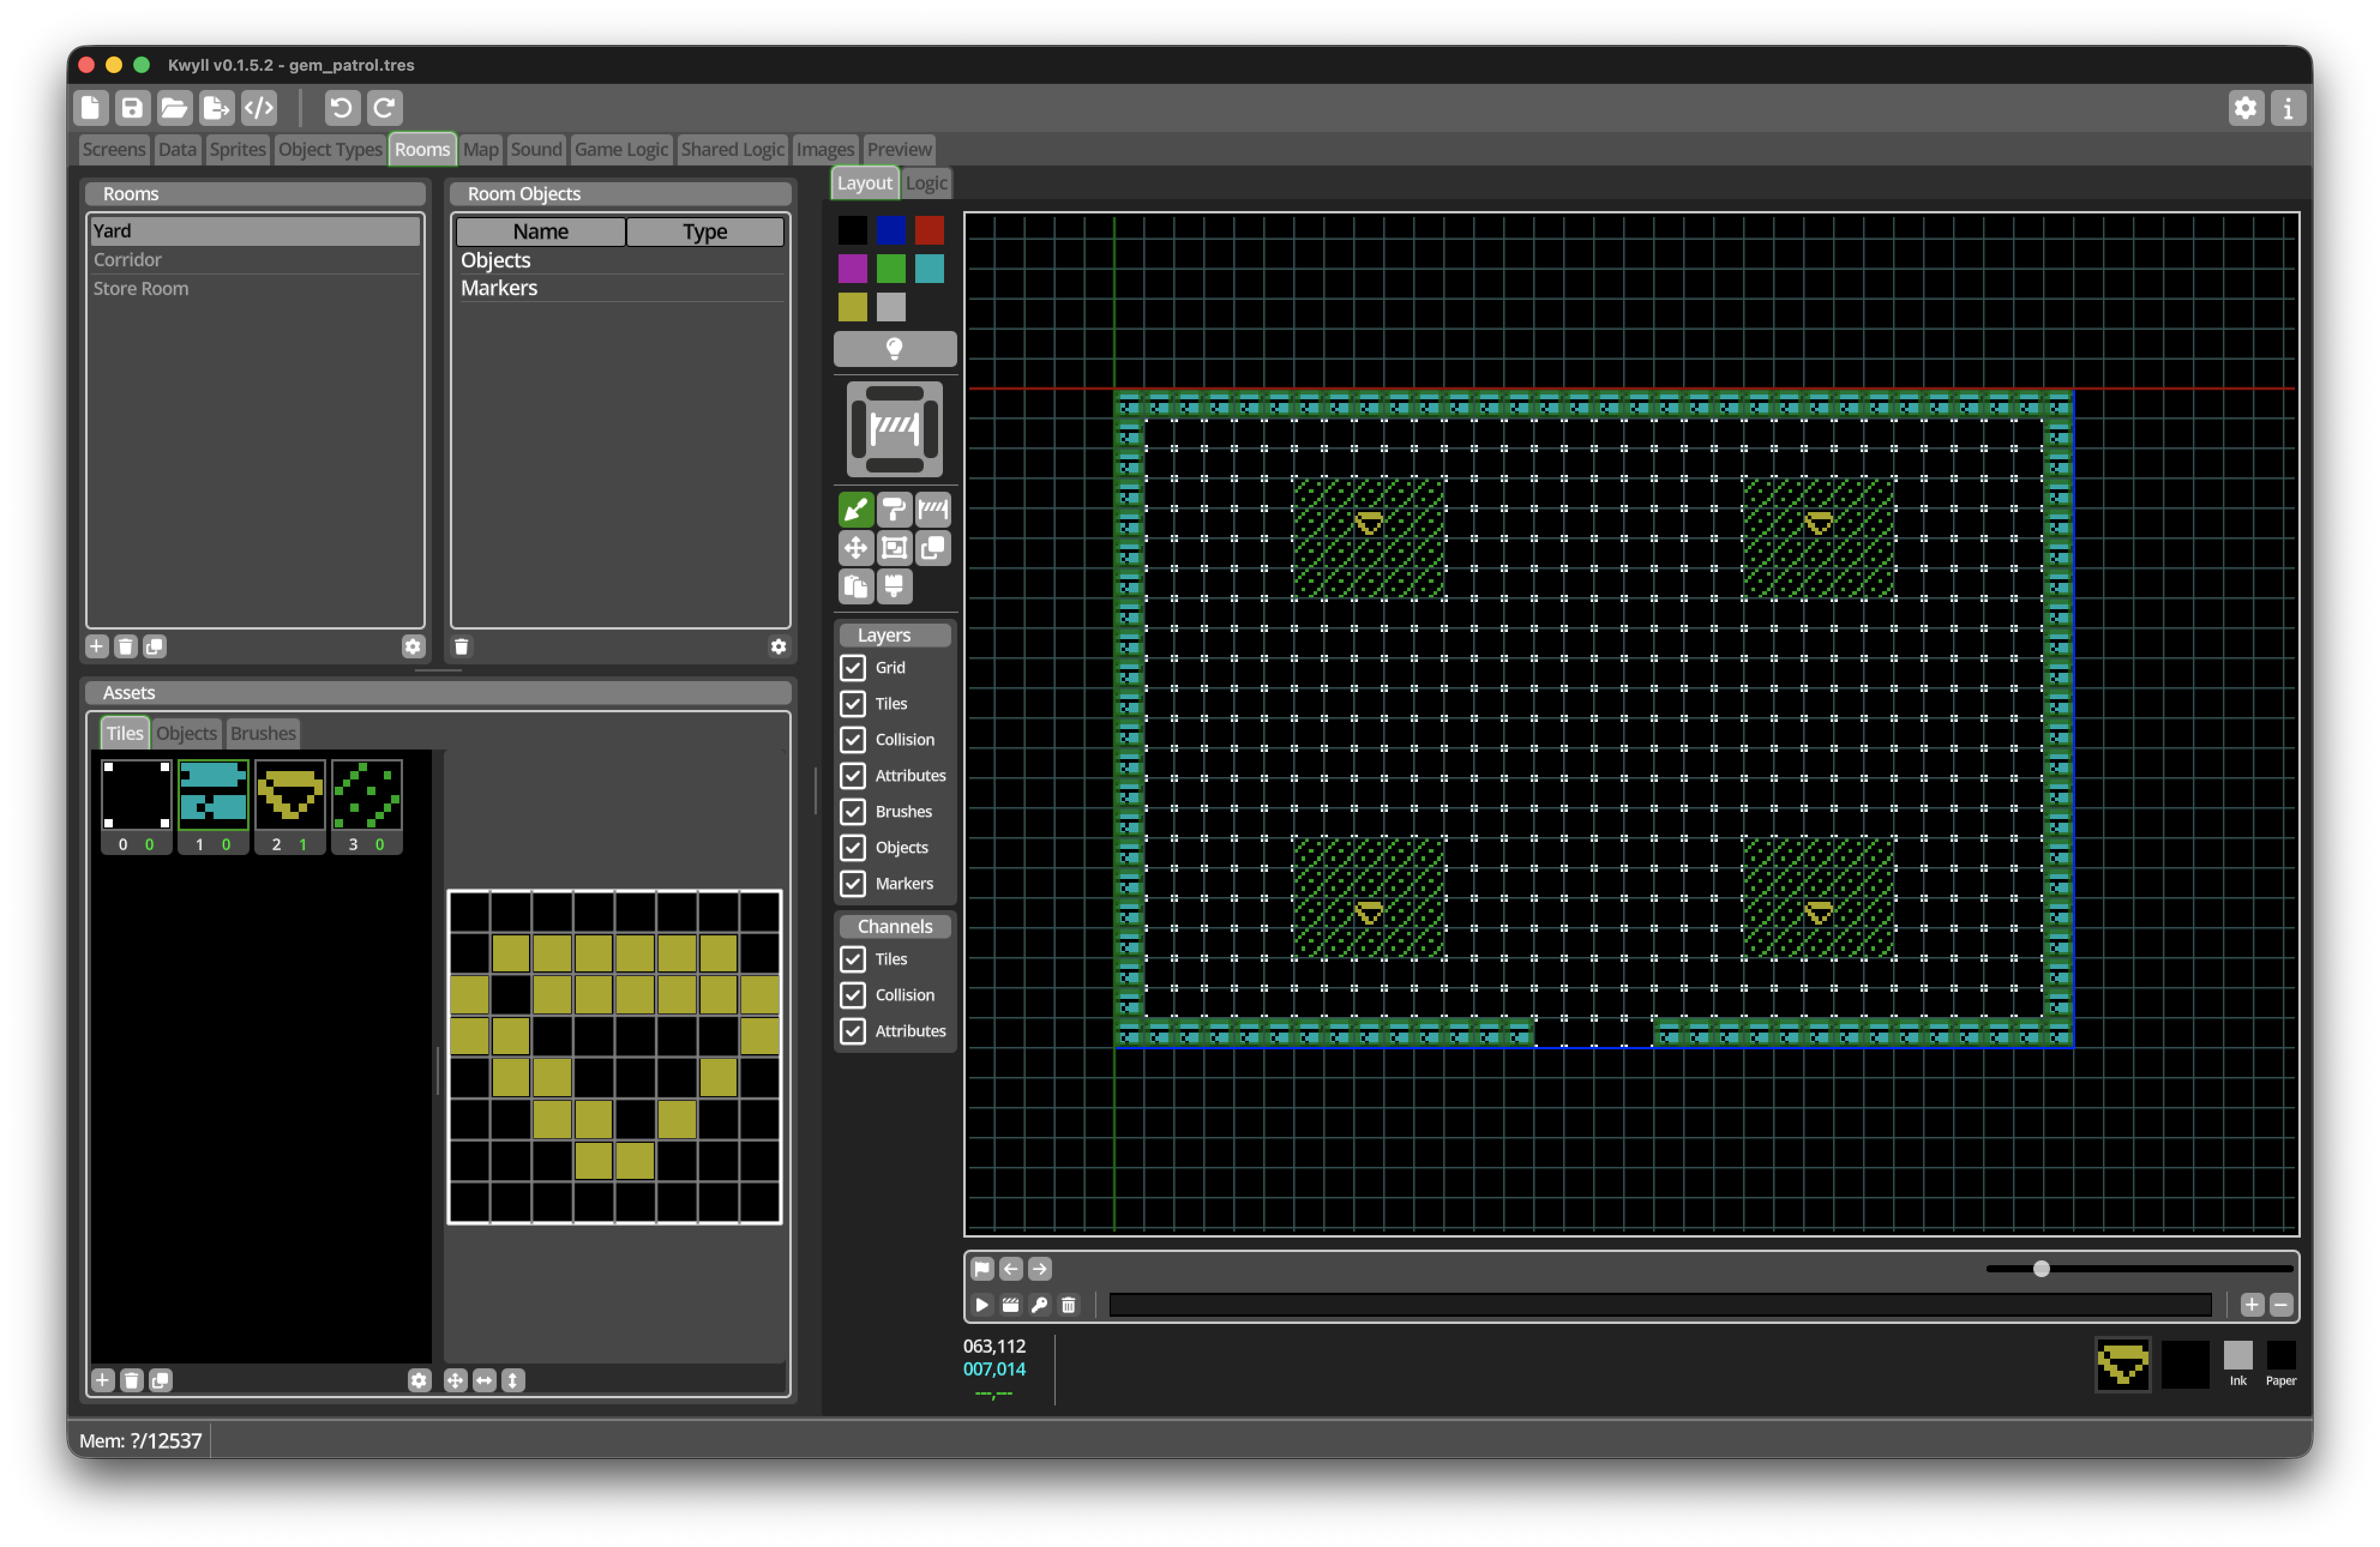
The same Yard will later be used for both Entrance Yard and Upper Yard. Giving it a single bottom opening means both uses of the Room Type have the same connection pattern, and neither produces an opening that leads nowhere.
Create the Corridor Room Type
-
Add another Room Type and name it
Corridor. -
Fill it with Floor.
-
Surround it with Wall tiles.
-
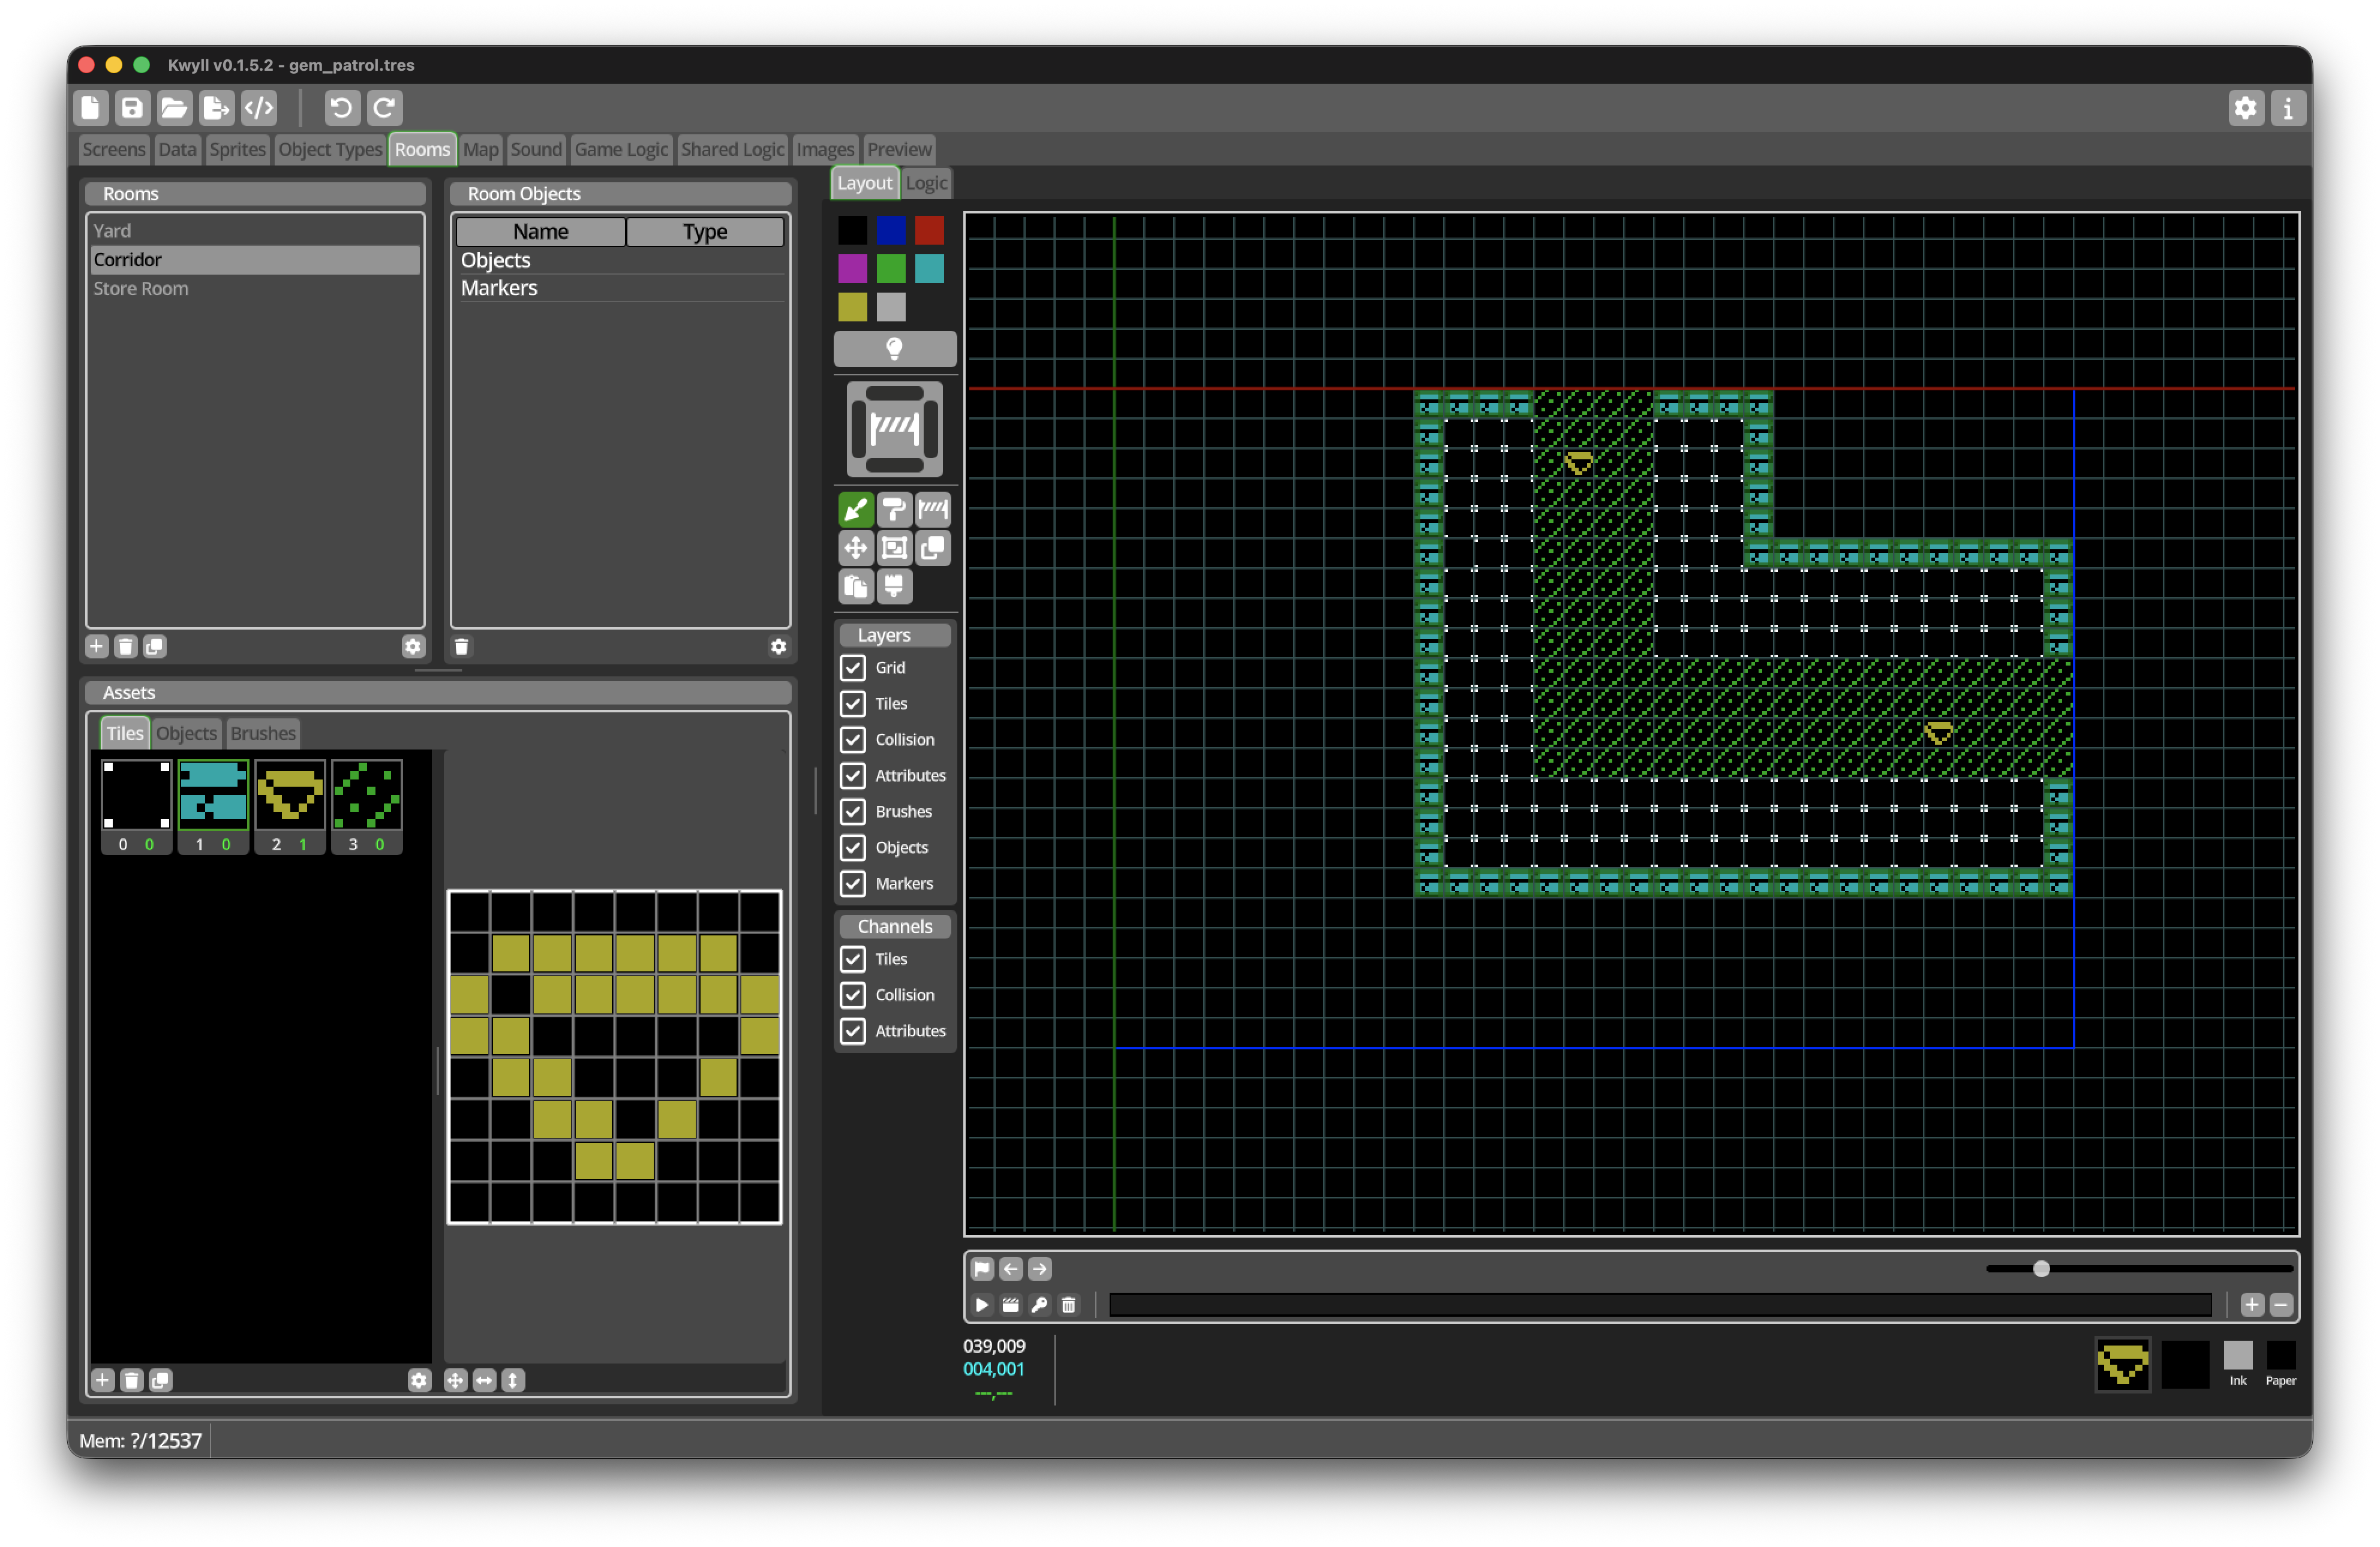
Leave openings in the right and top edges.
-
Use Decorative floor to make a clear path through the room.
-
Add one or two Gem tiles.
The top opening will connect to Entrance Yard and the right opening to the Store Room.
Leave a reasonably open space in the middle. We will place a horizontally moving enemy there in a later milestone.
Create the Store Room Type
-
Add a third Room Type and name it
Store Room. -
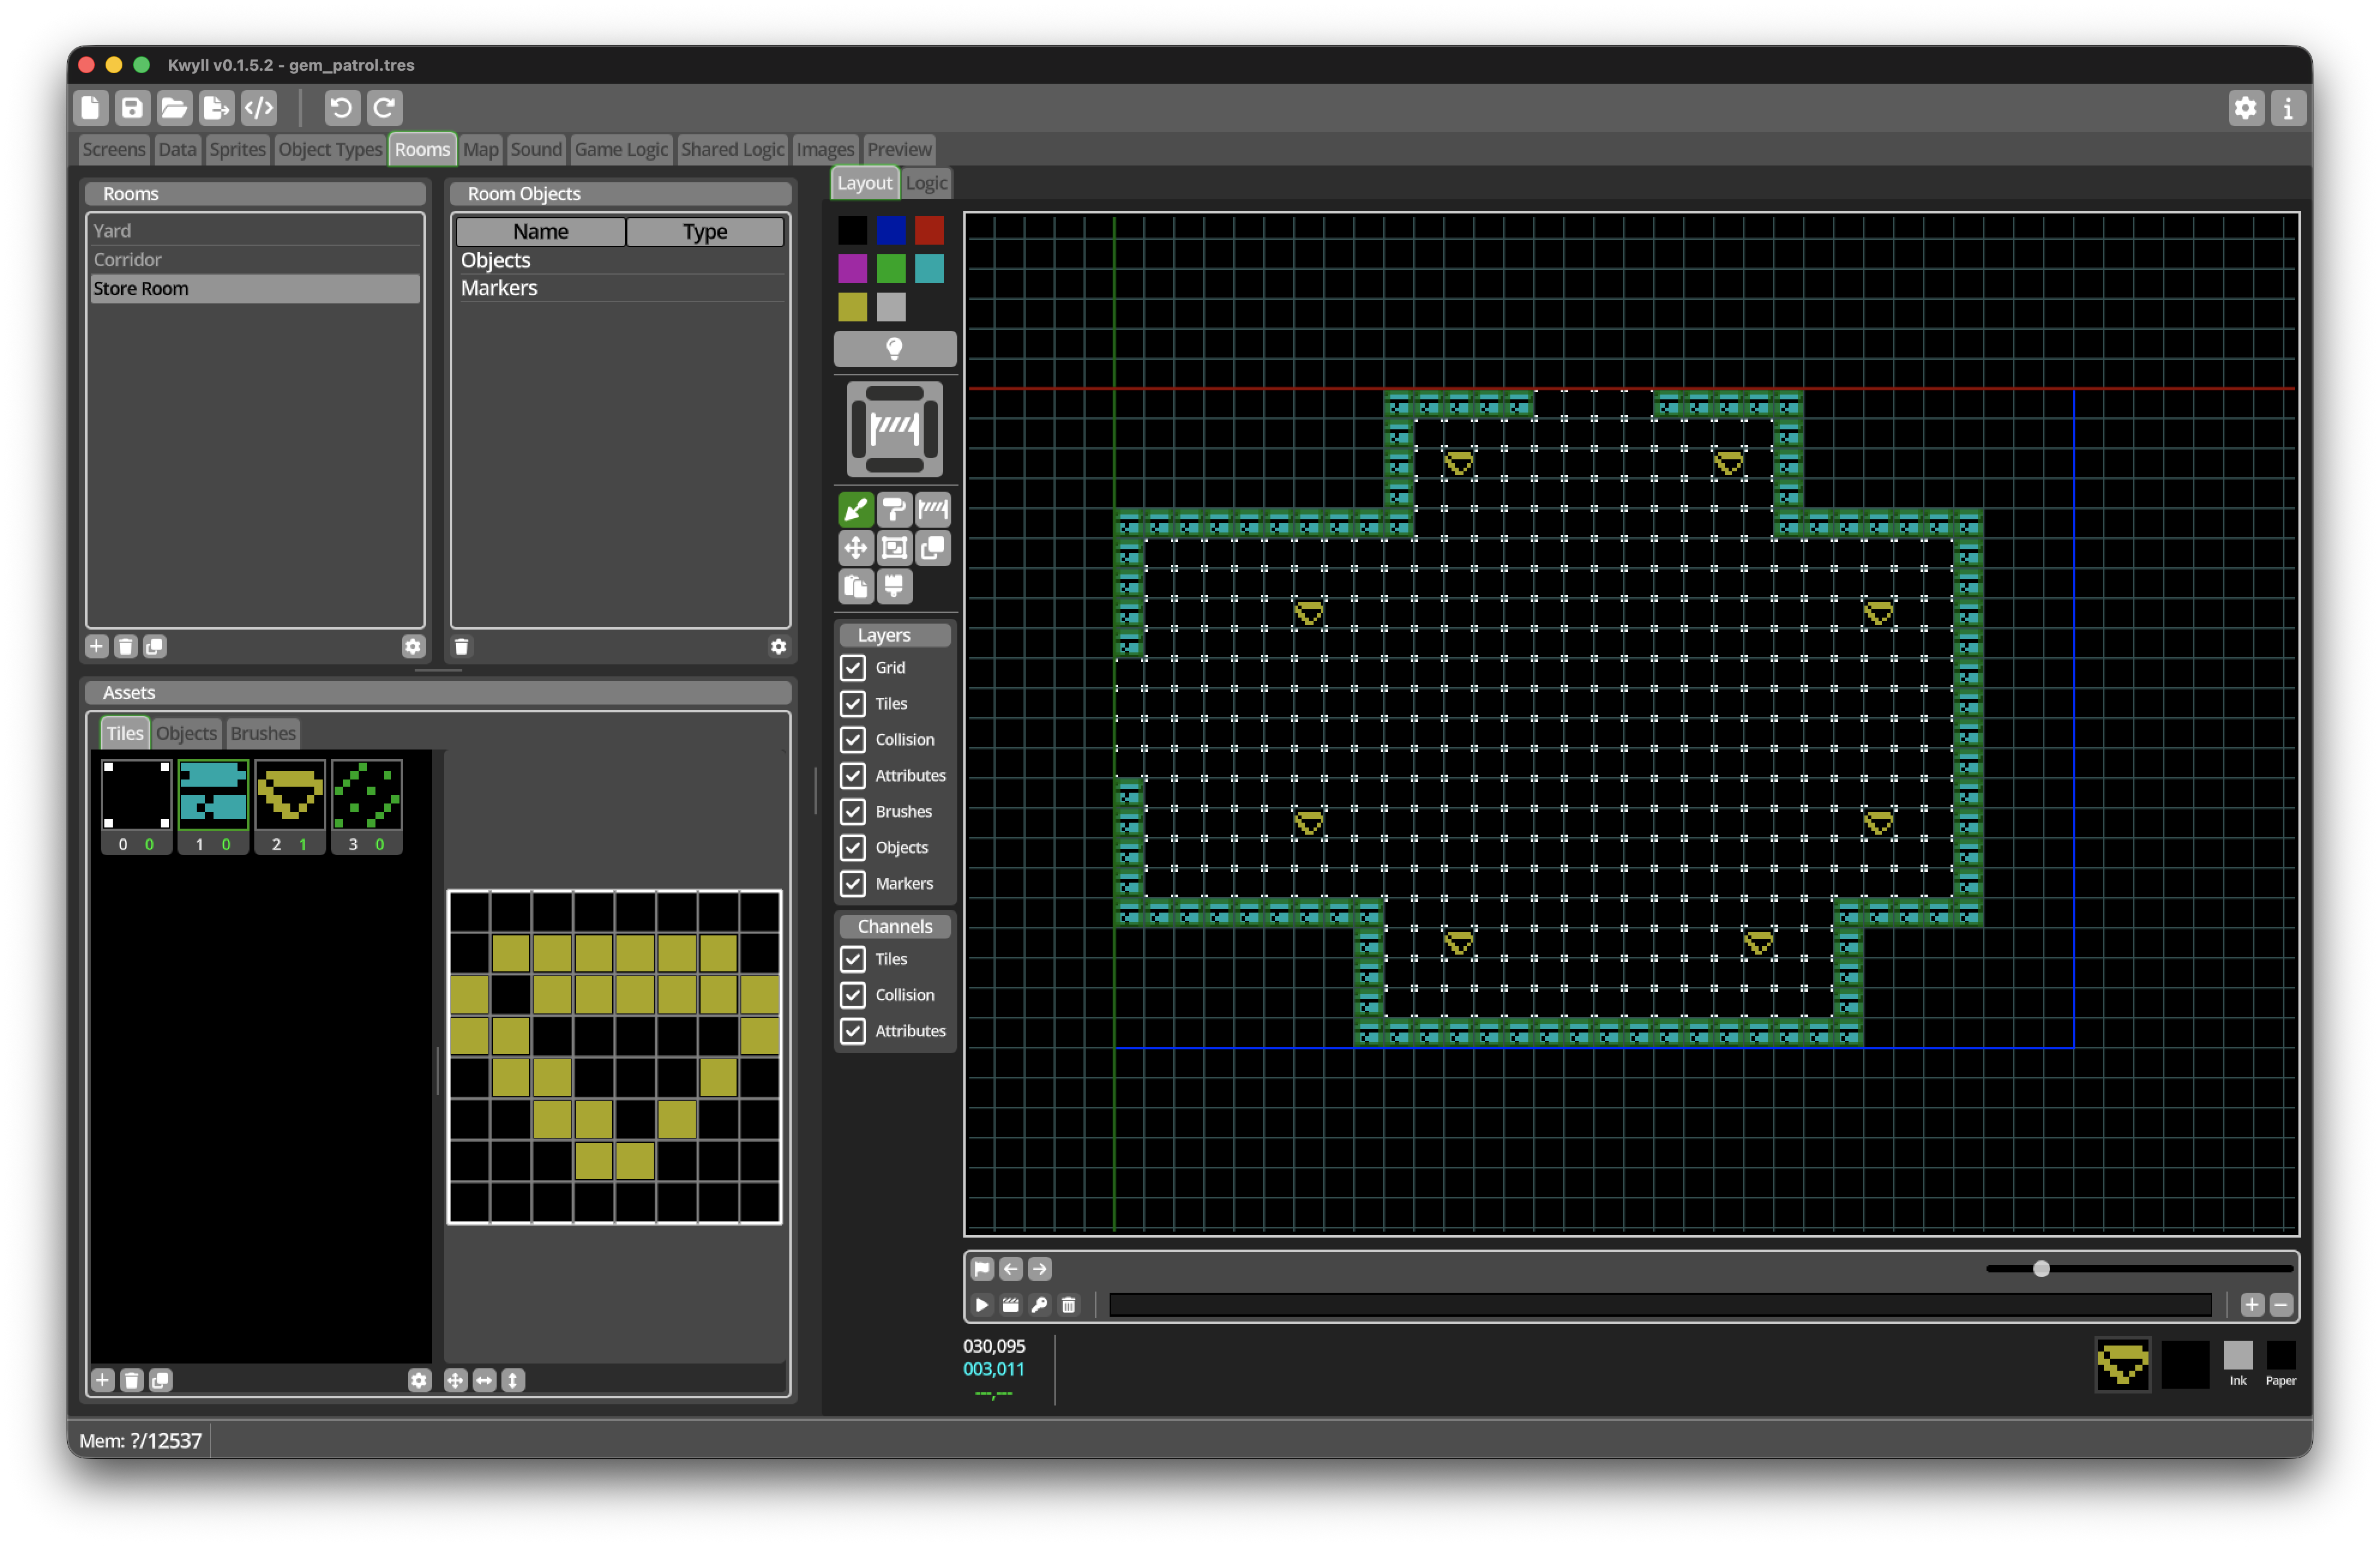
Fill it with Floor and surround it with Walls.
-
Leave openings in the left and top edges.
-
Use short internal walls or blocks to give the room a different shape.
-
Add two or three Gem tiles.
Do not make the passages too narrow. The Store Room will later contain a vertically moving enemy, and the Player needs enough space to avoid it.
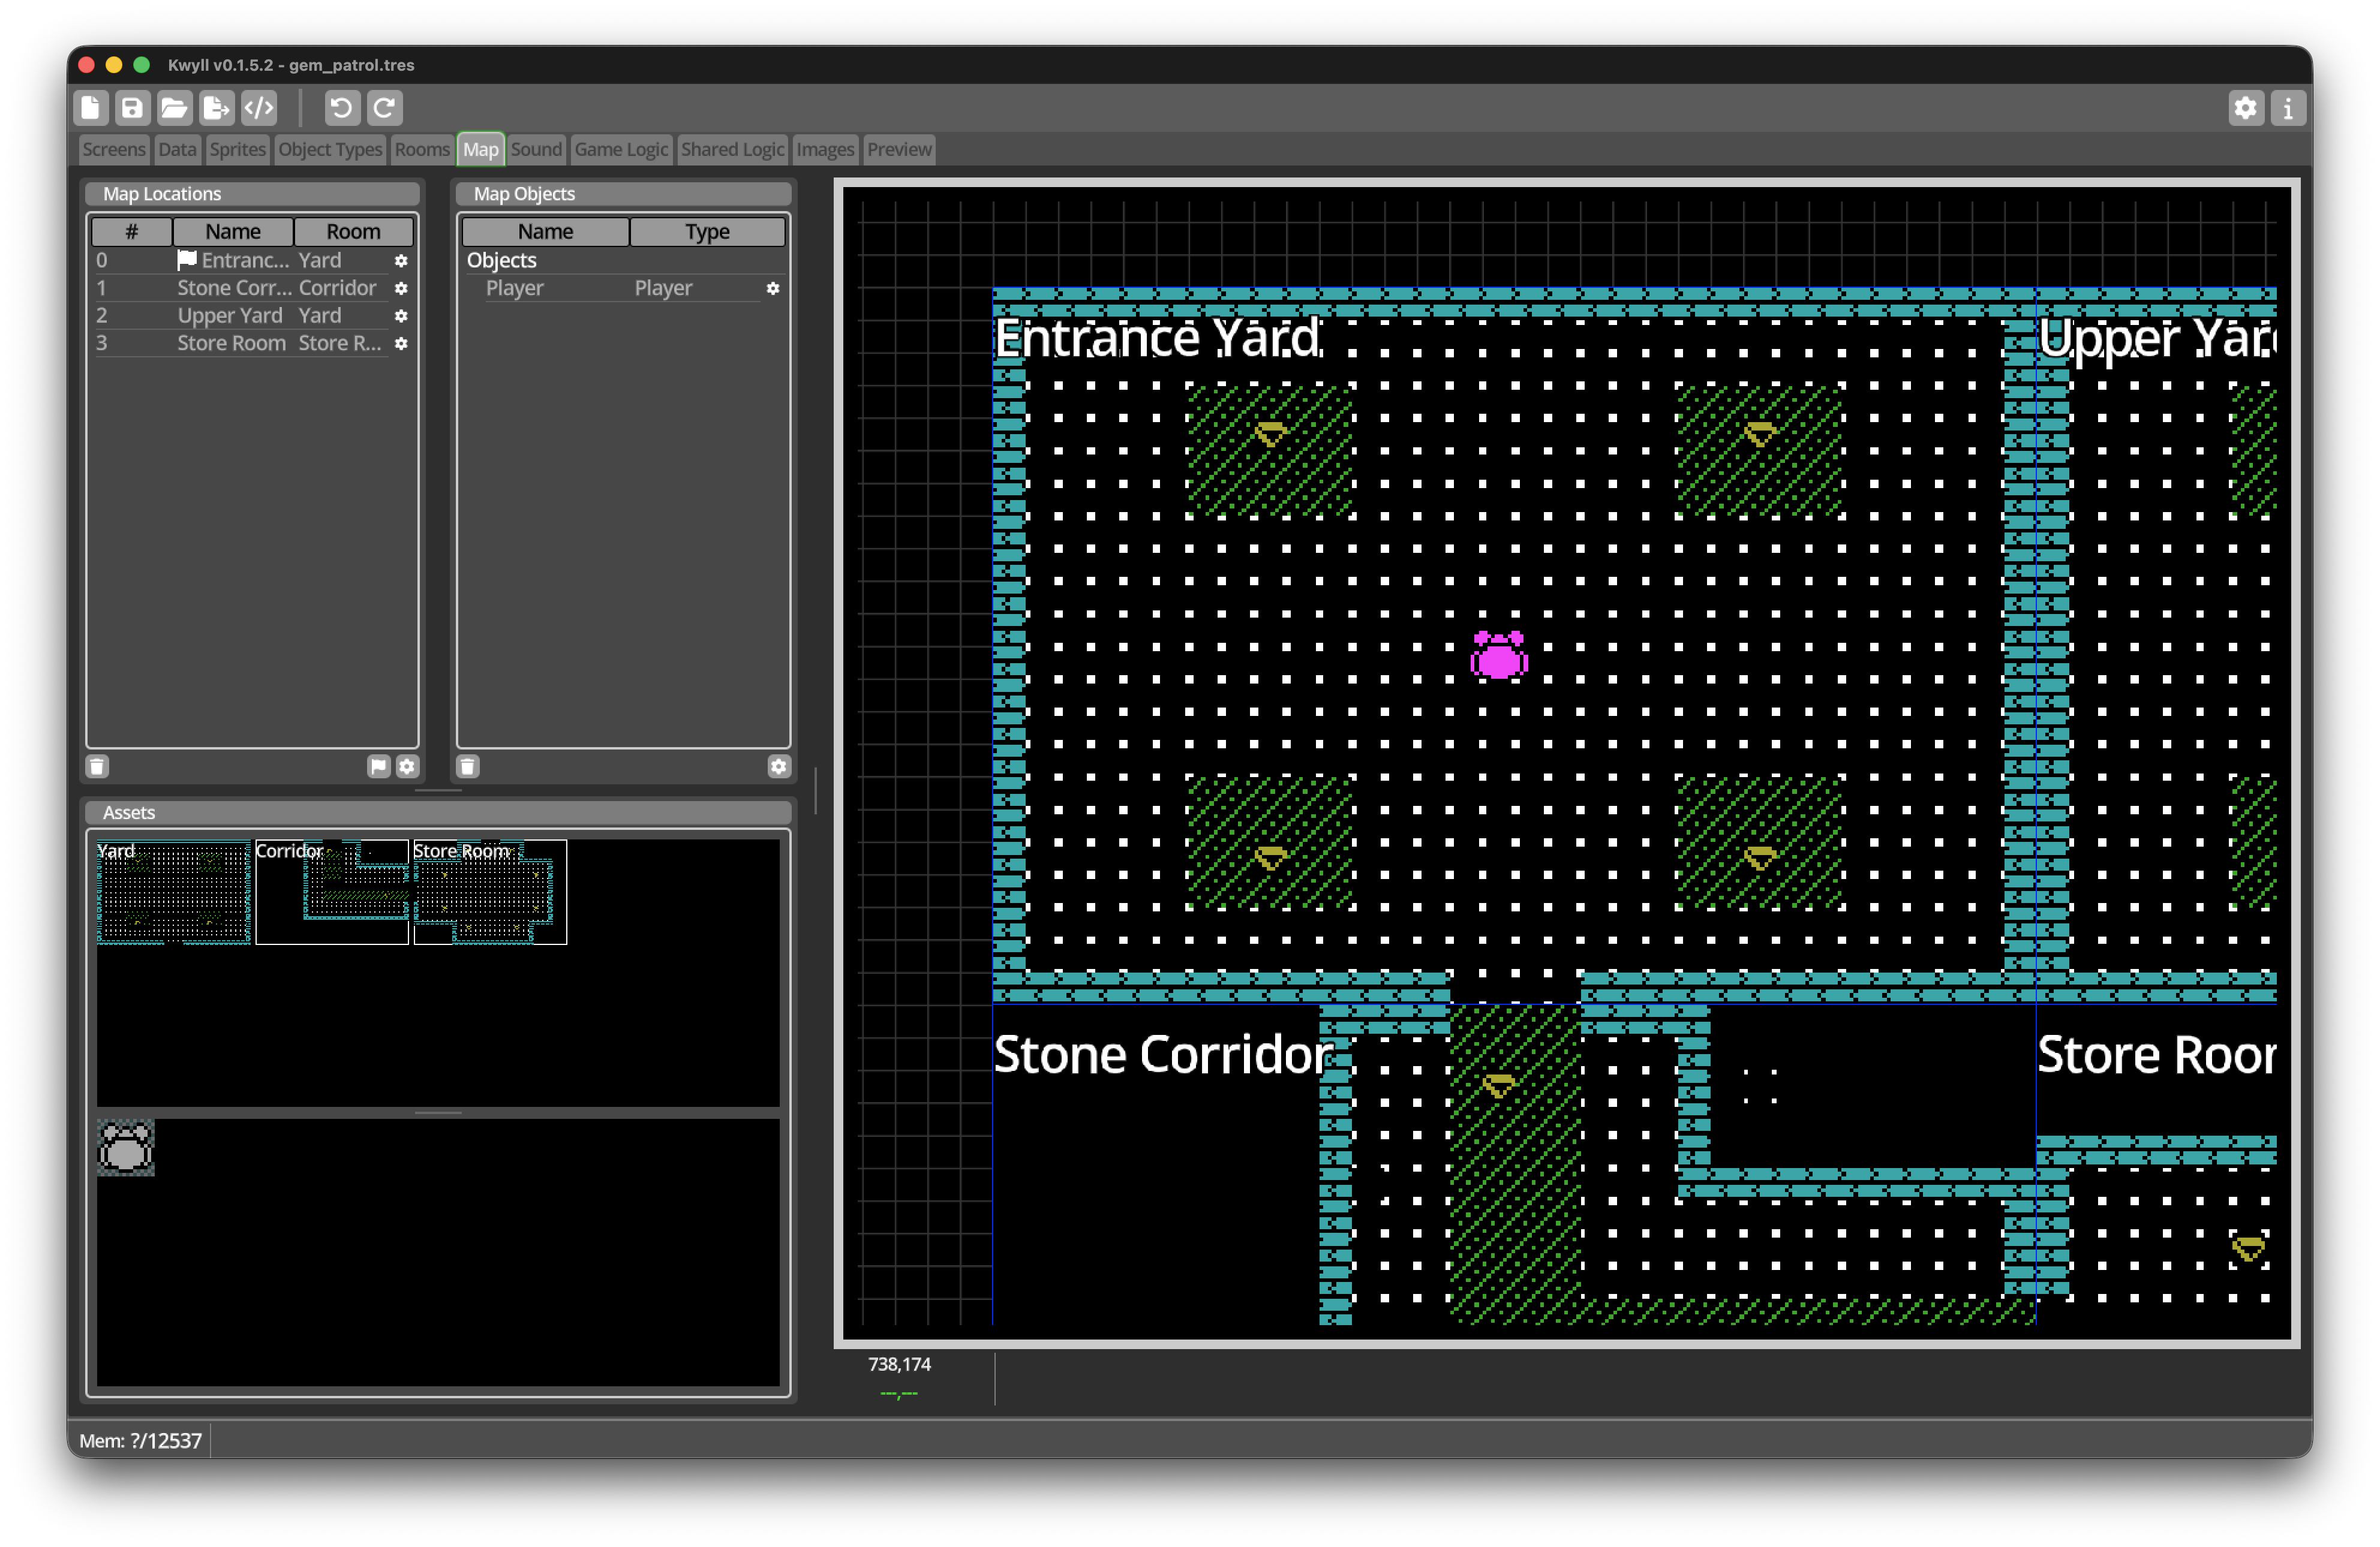
Place the Locations on the Map
Open the Map editor. The asset list contains the three Room Types that we have created.
Drag a Room Type from the asset list onto the Map to create a Location. We need four Locations:
| Location name | Room Type |
|---|---|
Entrance Yard |
Yard |
Stone Corridor |
Corridor |
Upper Yard |
Yard |
Store Room |
Store Room |
-
Drag
Yardonto the Map. -
Open the new Location’s properties and name it
Entrance Yard. -
Drag
Corridorbelow Entrance Yard and name the LocationStone Corridor. -
Drag
Yardonto the Map a second time, place it to the right of Entrance Yard, and name the LocationUpper Yard. -
Drag
Store Roombelow Upper Yard and to the right of Stone Corridor. Name the LocationStore Room. -
Select Entrance Yard and use the Start Location button to make it the Location shown when the game begins.
Arrange the Locations so that their matching room openings meet:
Entrance Yard     Upper Yard
      |                |
Stone Corridor -- Store Room
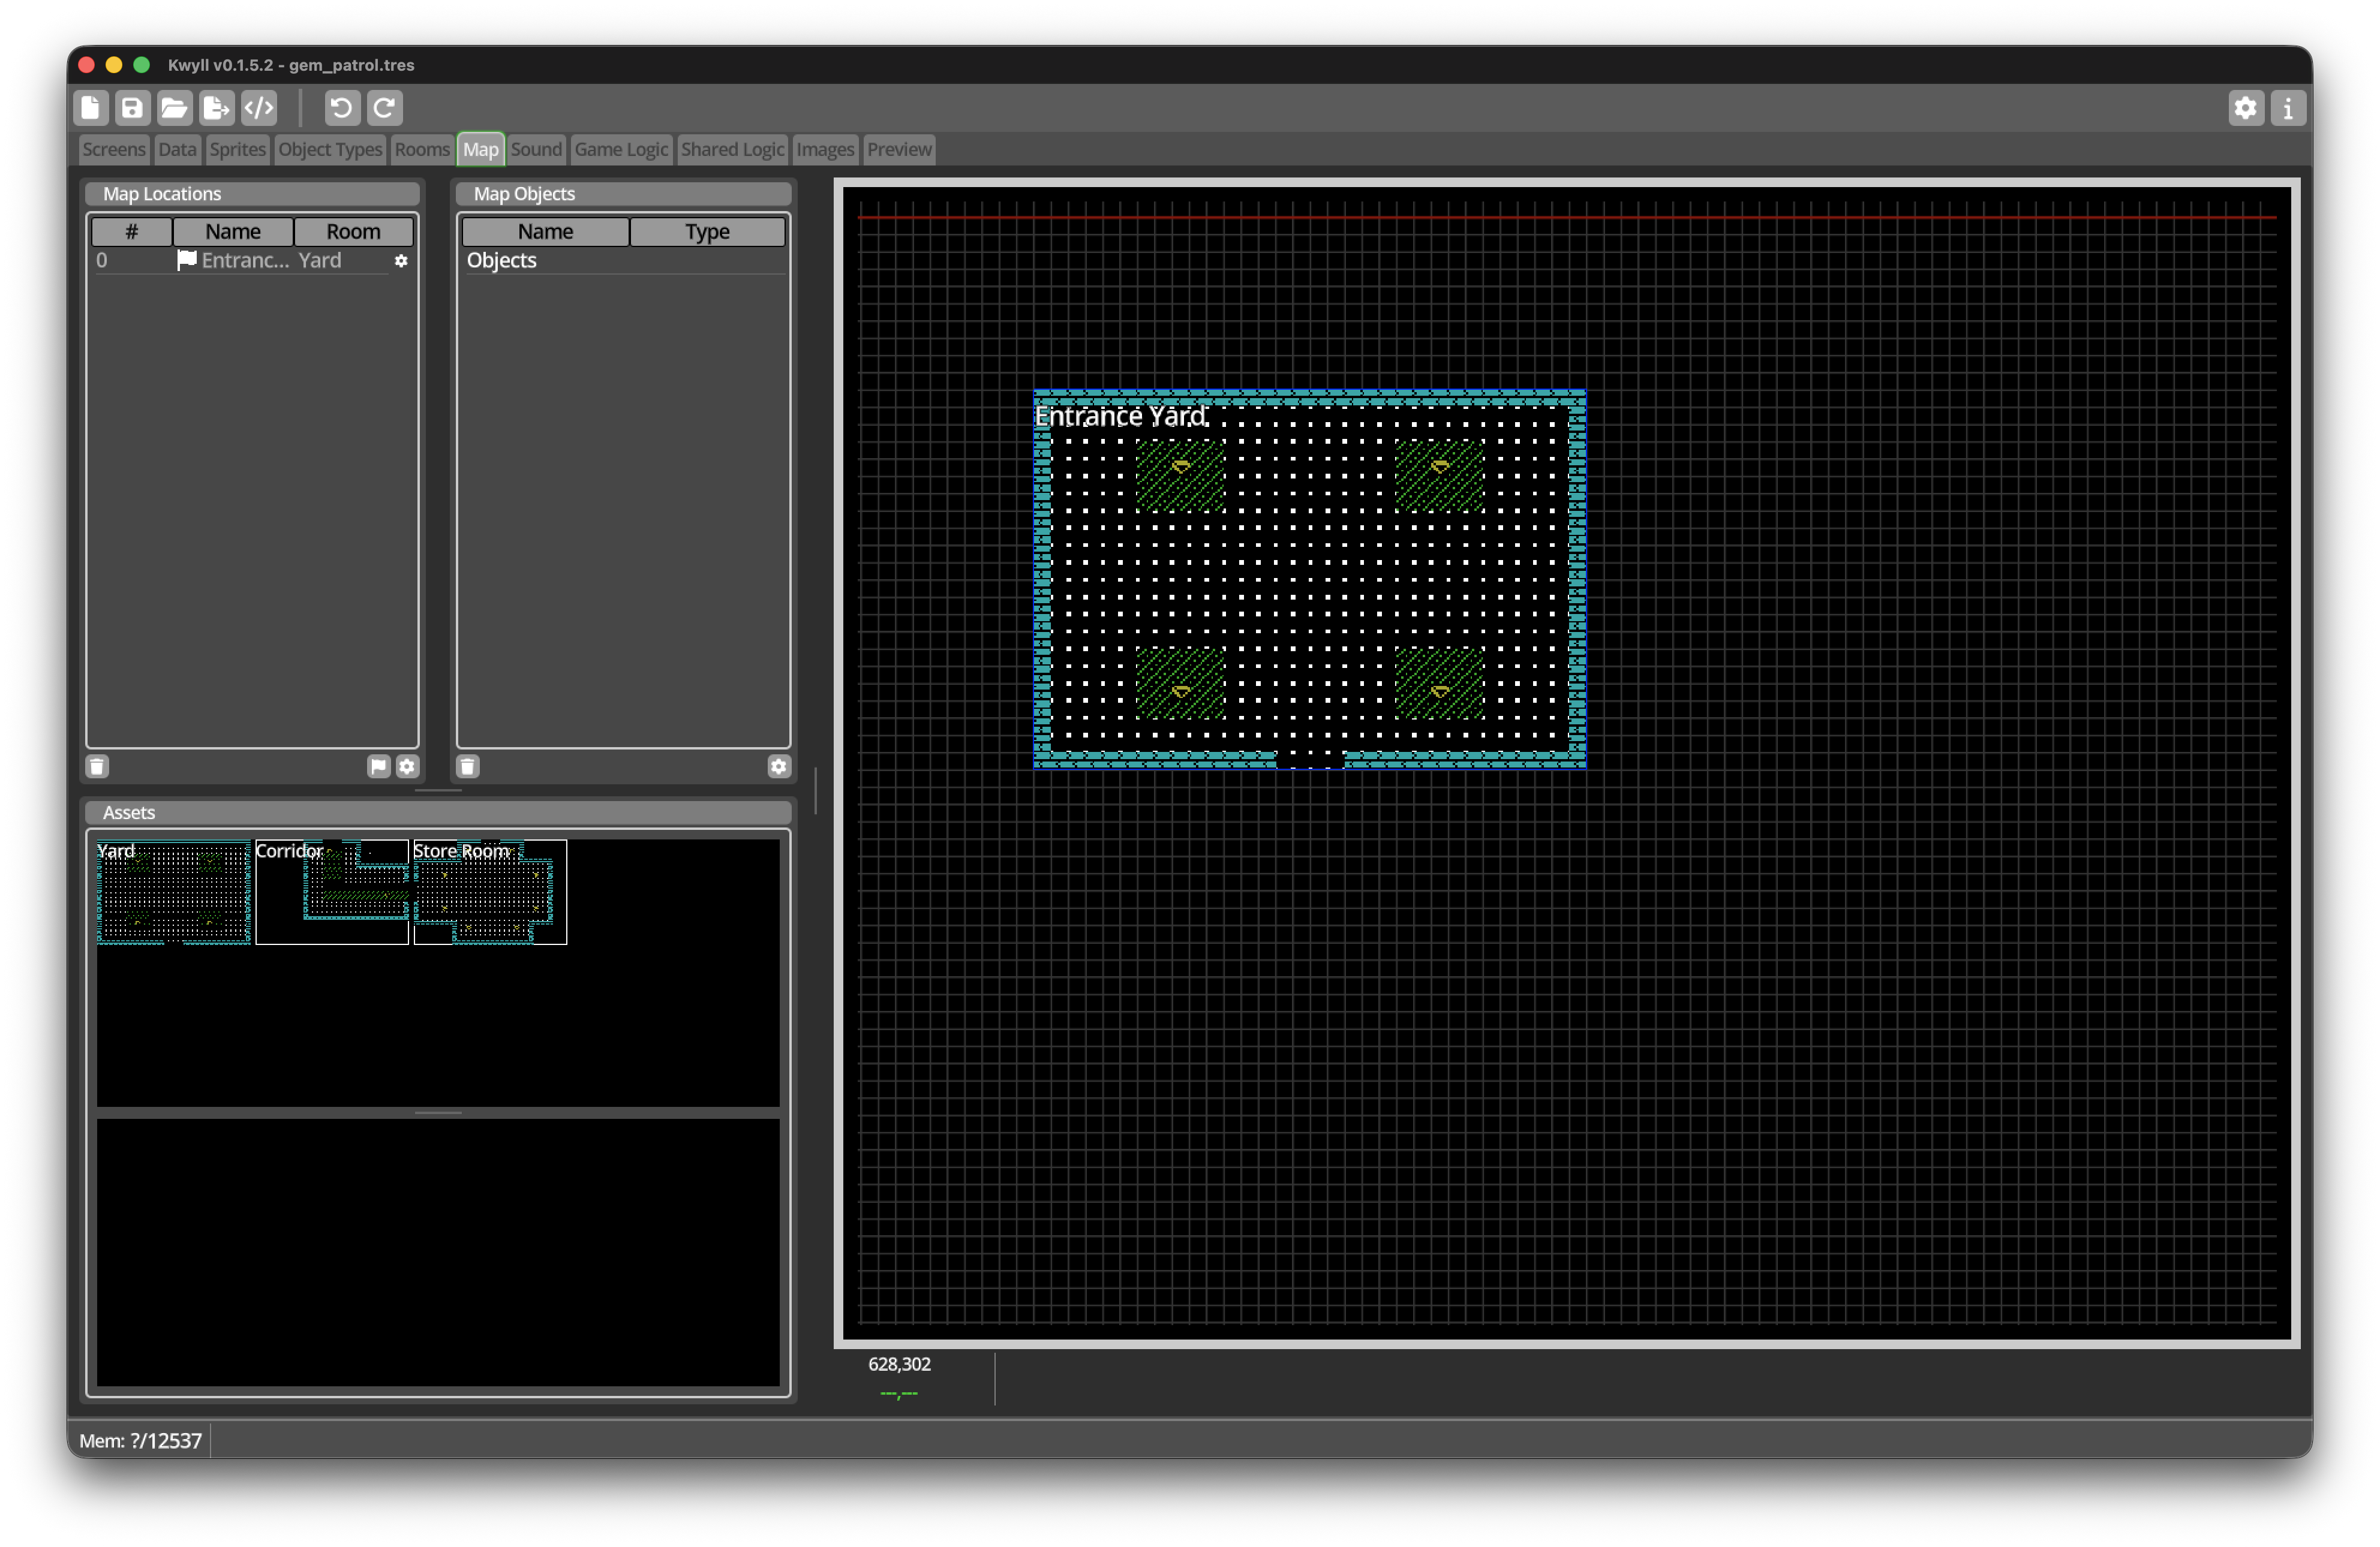
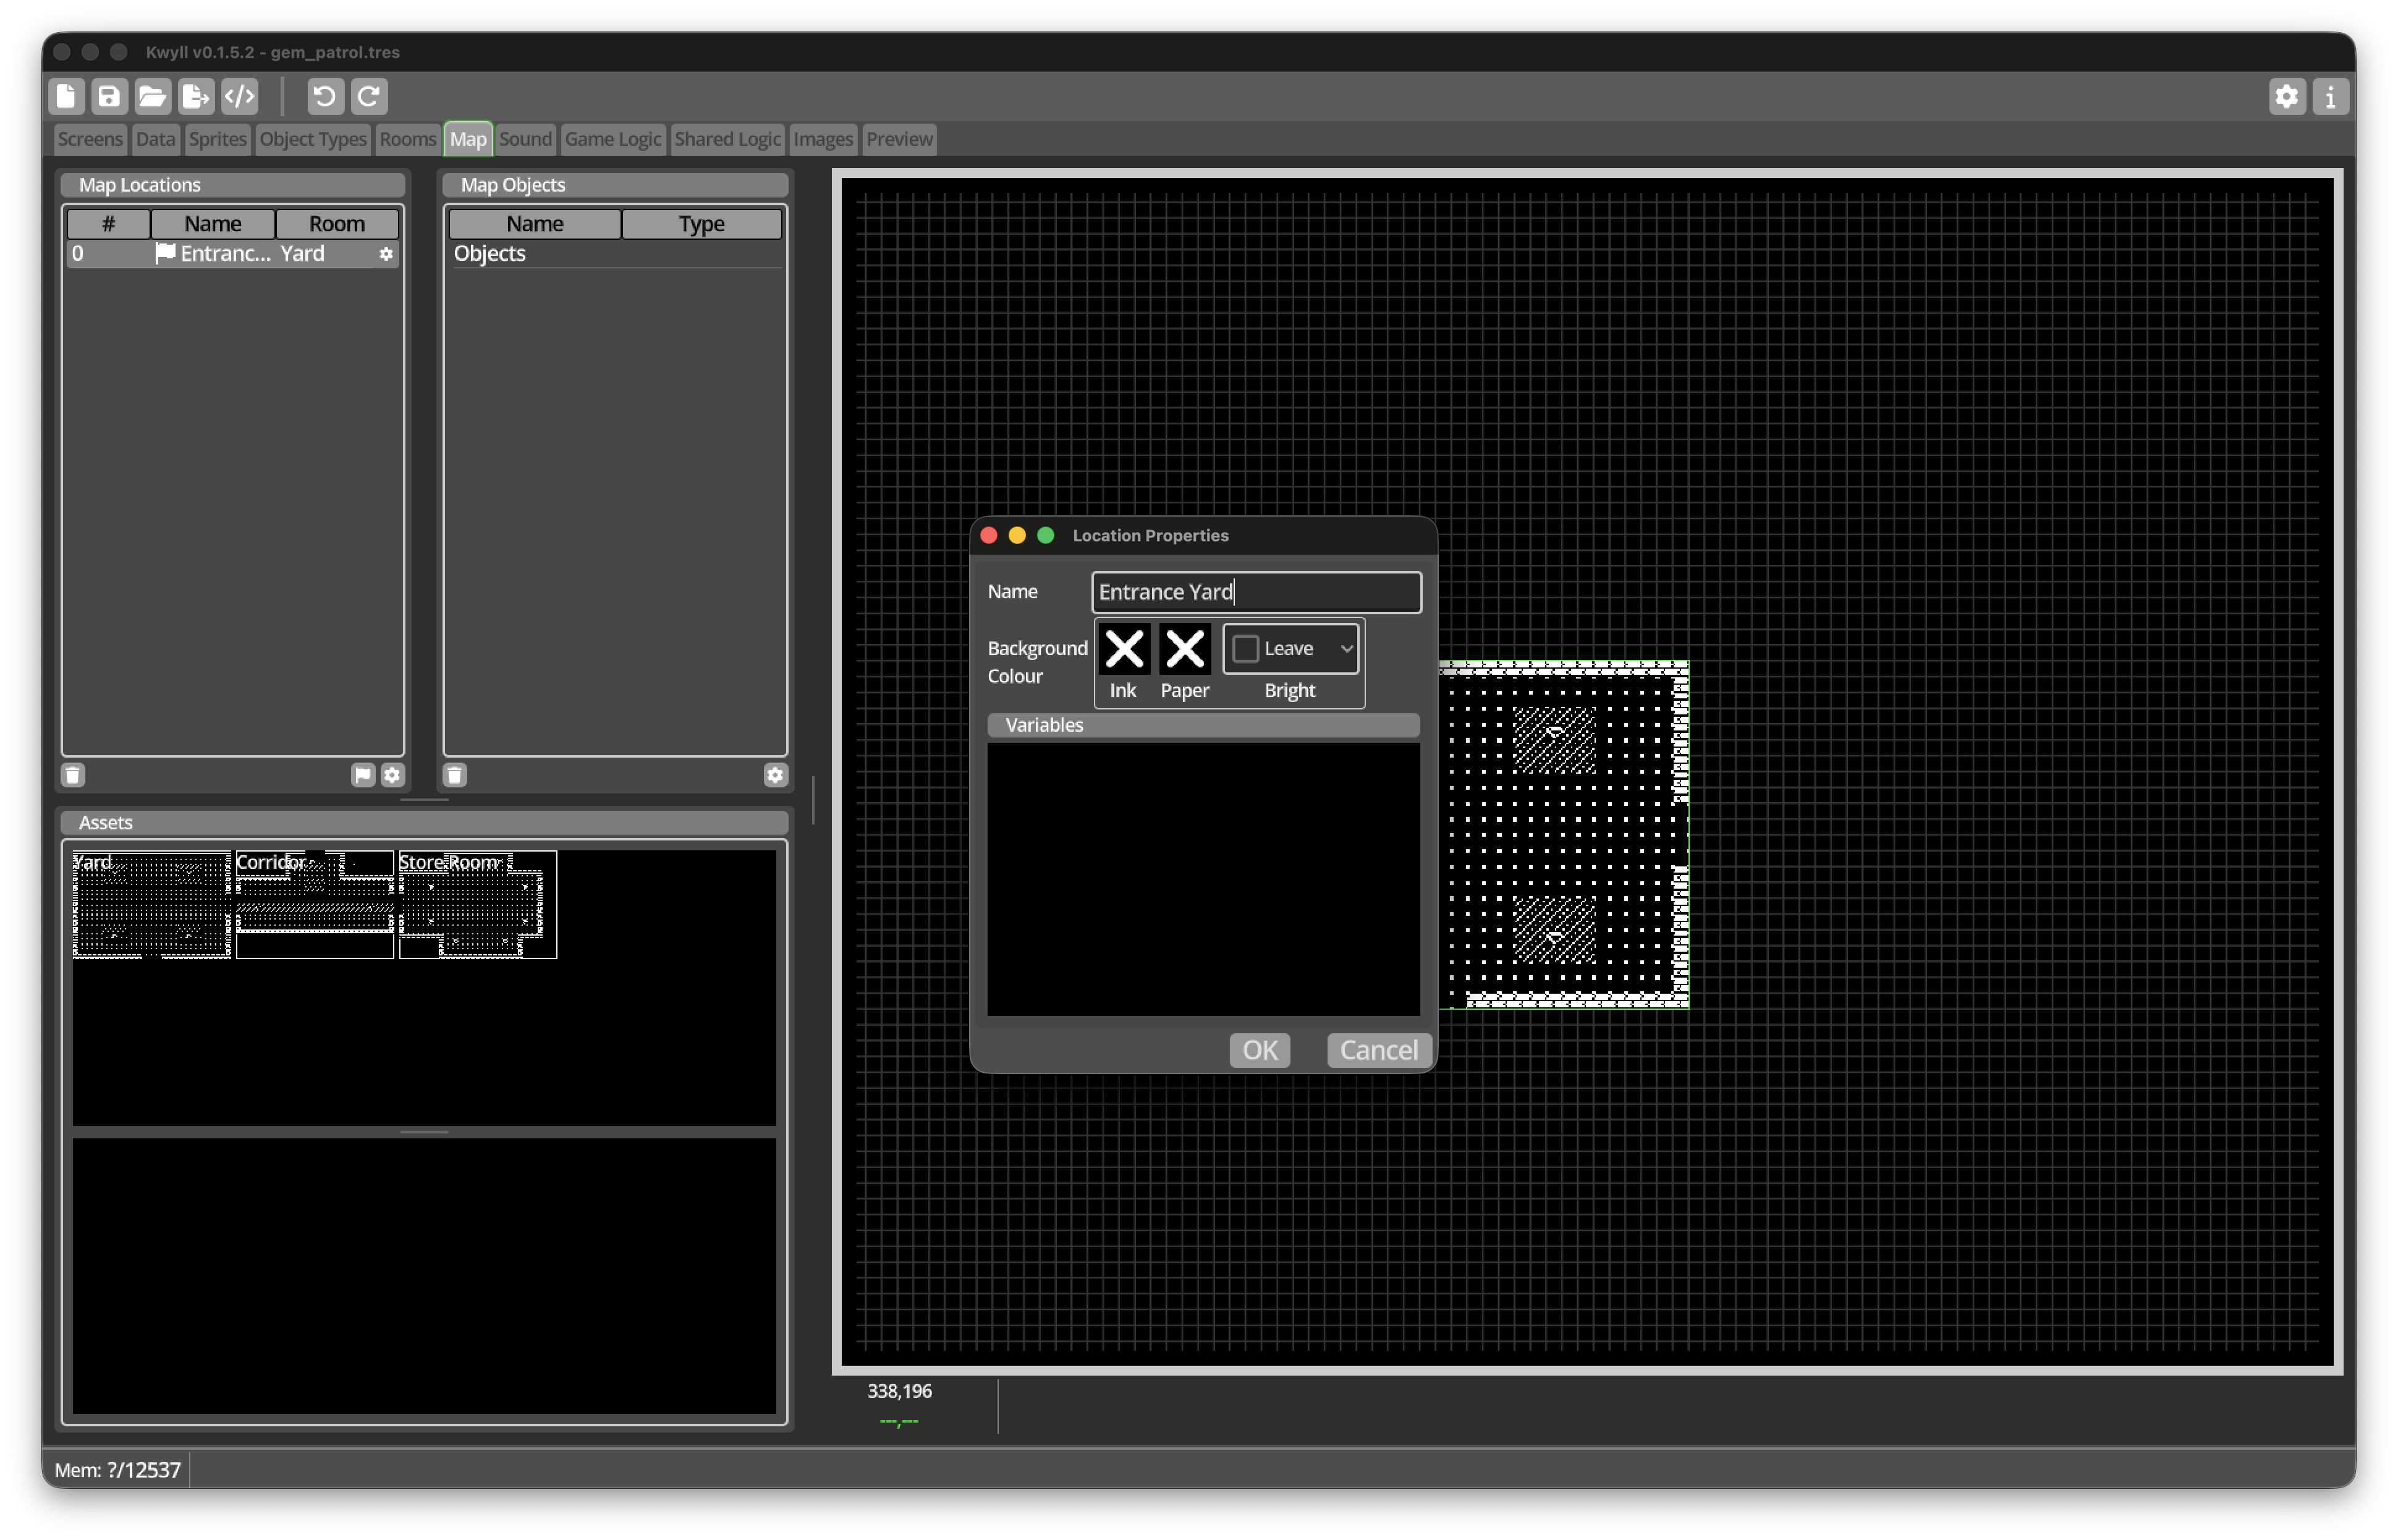
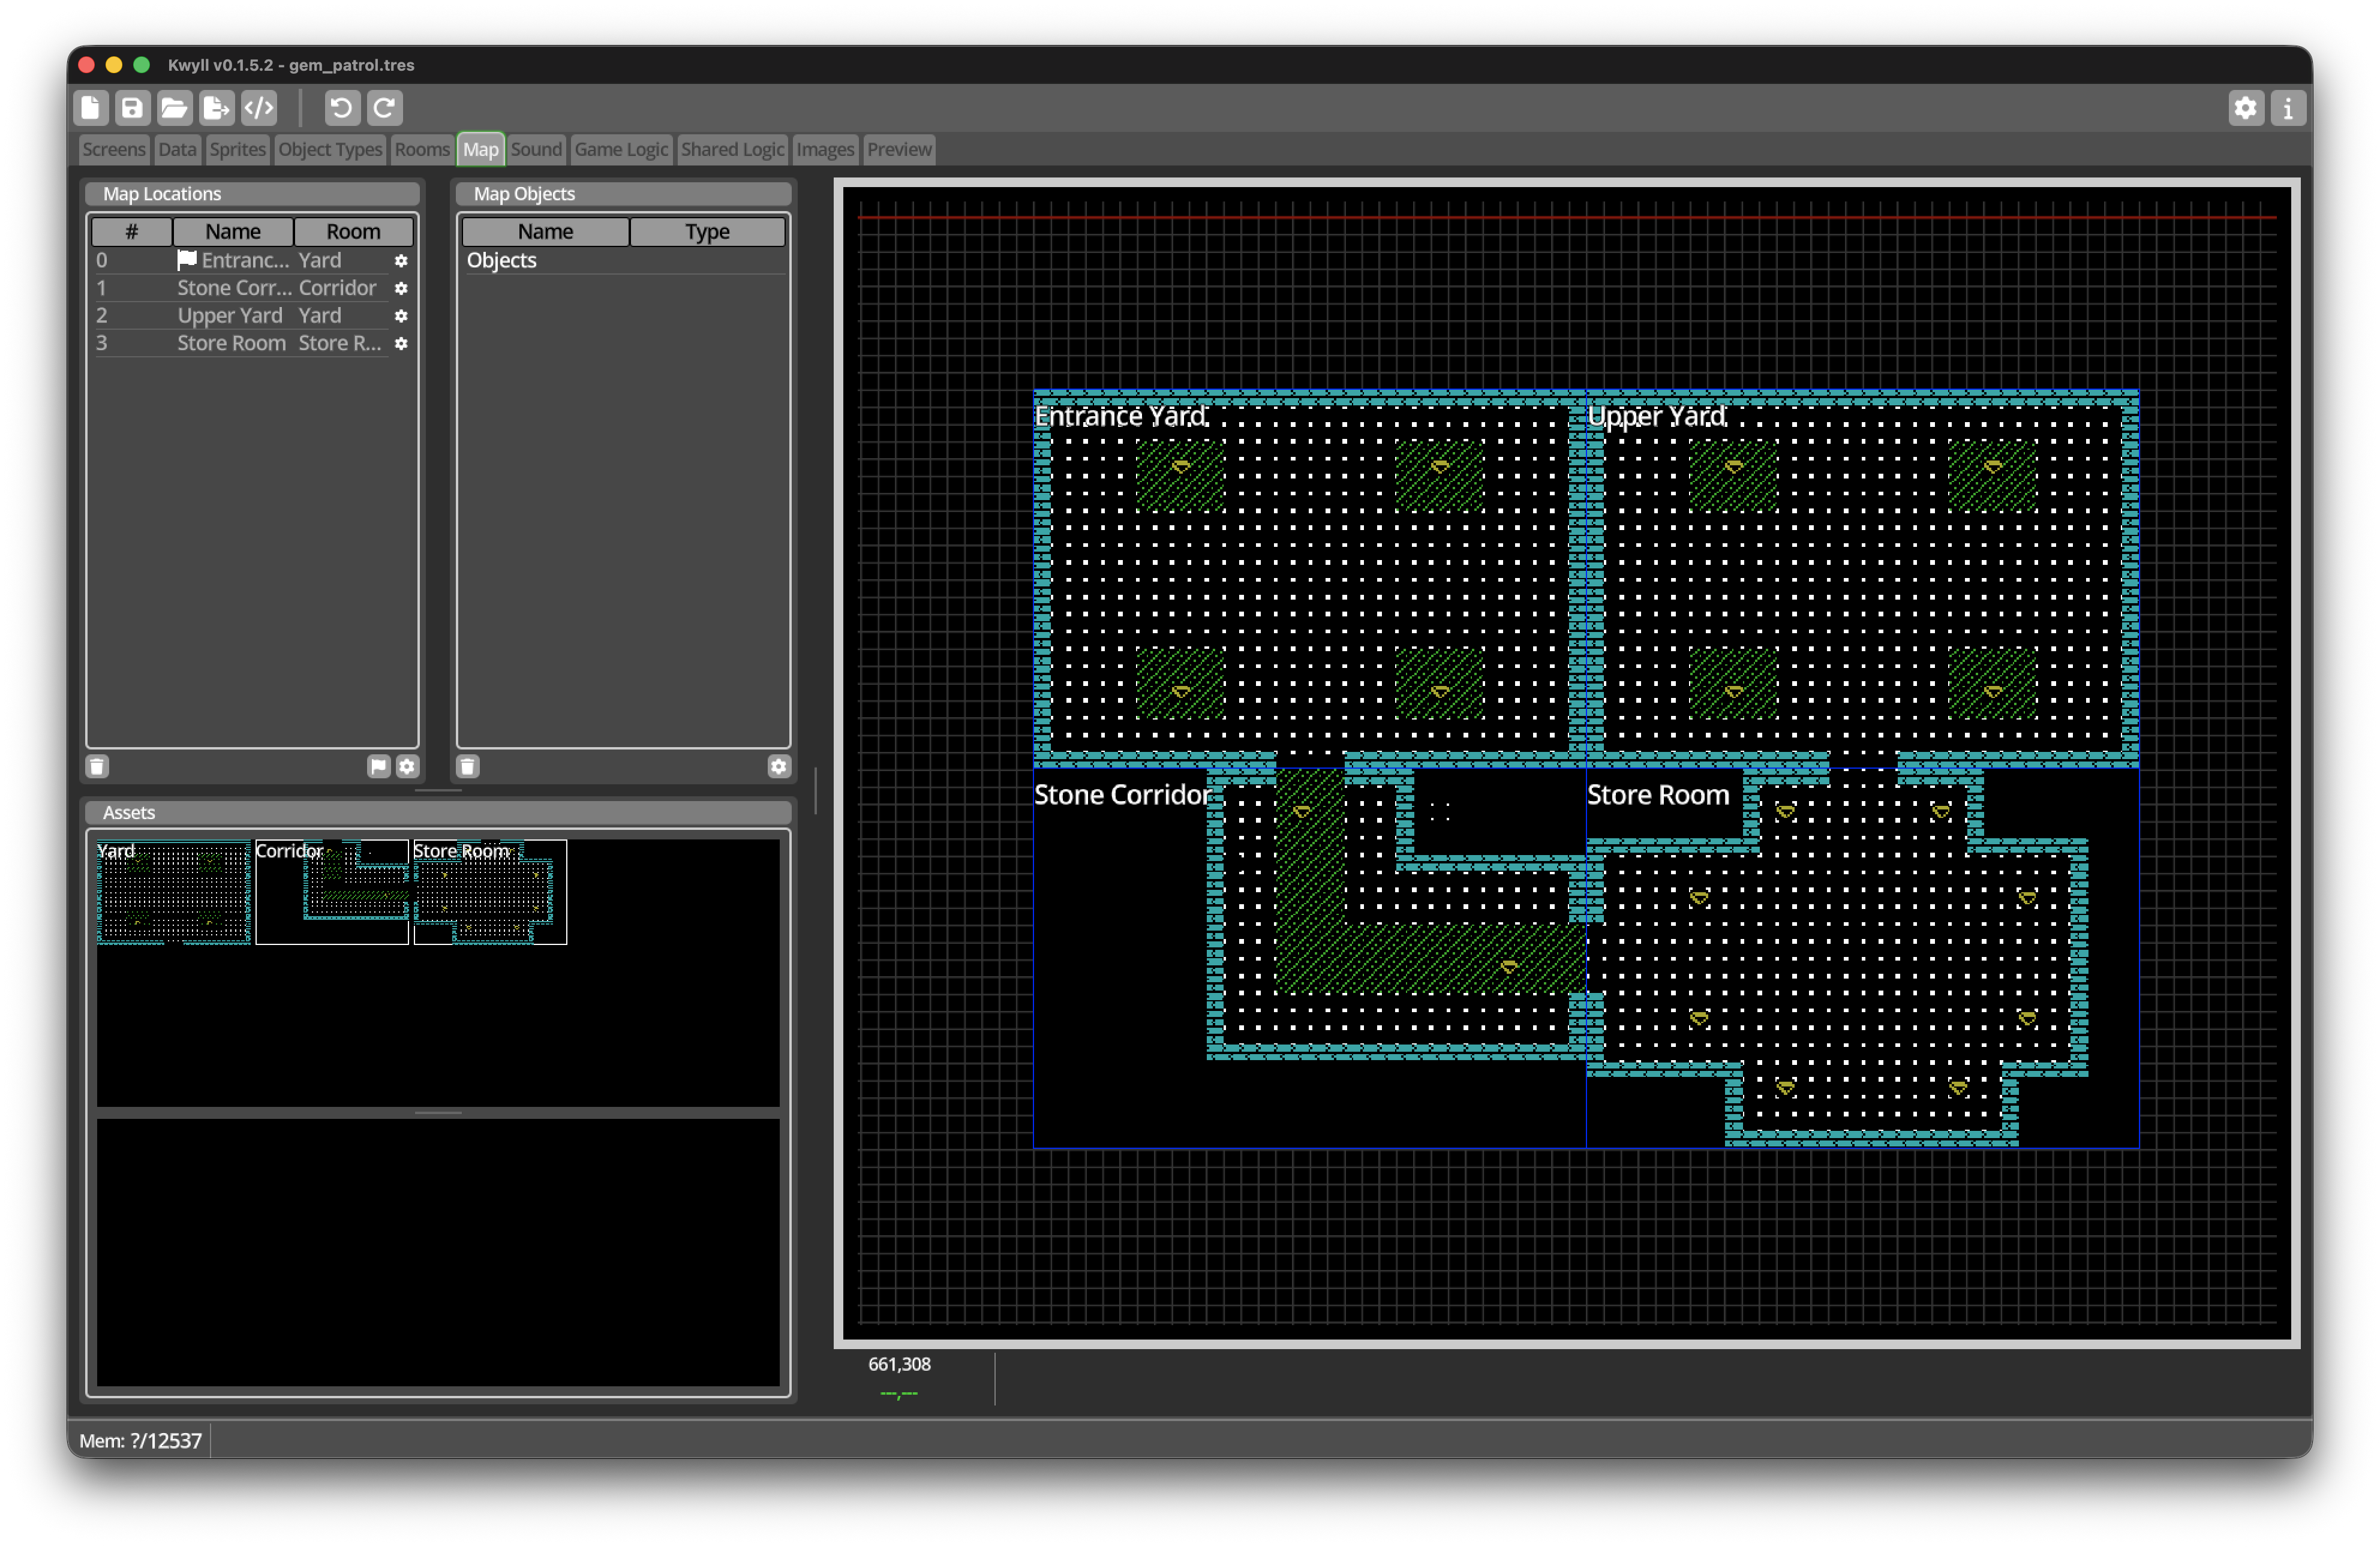
Take a moment to compare Entrance Yard and Upper Yard. They are two Locations, but both refer to the same Yard Room Type. If you return to the Rooms editor and change the Yard tilemap, both Locations will use the updated design.
Later, each Yard Location will nevertheless remember its own collected gems. That works because variable values associated with Room Logic are stored on the individual Location.
Preview the first milestone
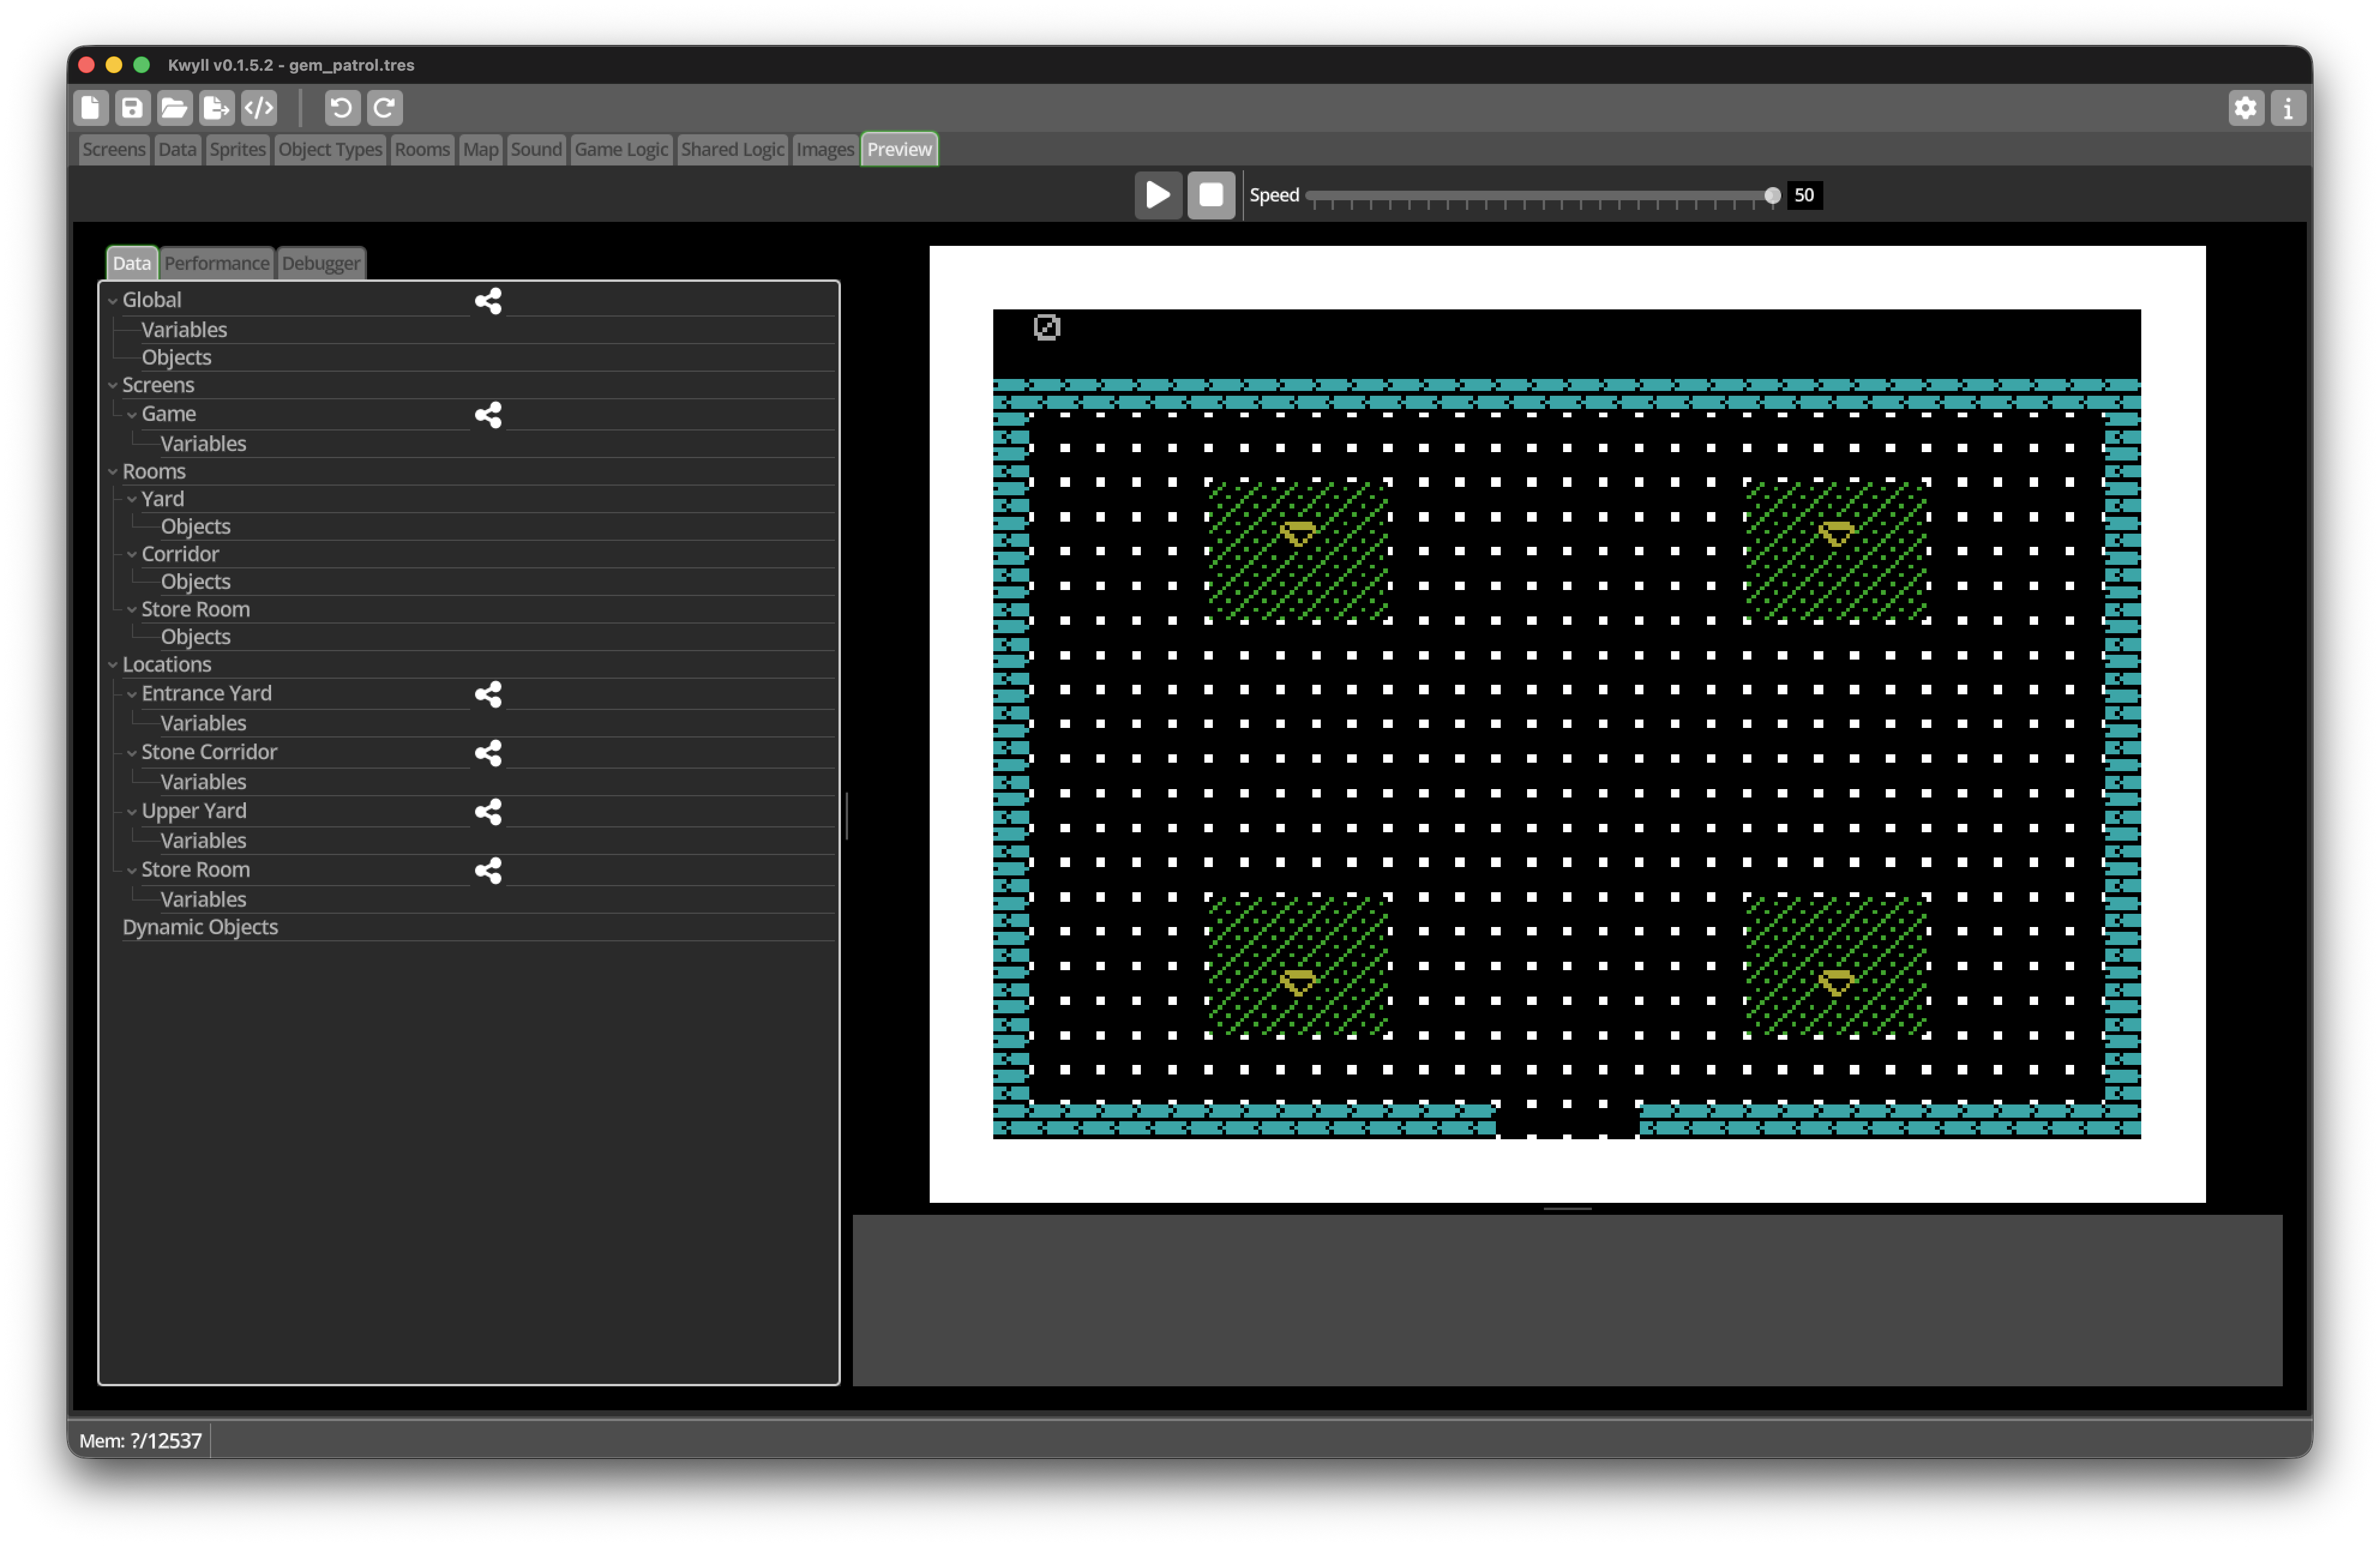
Save the project and open Preview. Start the game.
You should see:
-
the
GameScreen; -
the game window in the position you chose;
-
the
GemCountInstrument showing0; and -
one of the Locations drawn inside the game window.
Nothing moves yet because the project does not contain a Player Object. That is exactly where we expect to be.
Milestone 1 checklist
Before continuing, confirm that:
-
the project is saved as
gem_patrol.tres; -
the game window is 32 cells wide and 22 cells high;
-
the game window is positioned at X
0, Y2on the Screen; -
Gameis both a Game Screen and the Start Screen; -
GemCountis an Integer Instrument with an initial value of0; -
the Wall tile has collision on every side;
-
the Gem tile has Type
1; -
the Wall, Gem, and Decorative floor have the suggested default colours;
-
the project has
Yard,Corridor, andStore RoomRoom Types; -
the Map has four named Locations;
-
Entrance Yard is marked as the Start Location;
-
Entrance Yard and Upper Yard both use the Yard Room Type; and
-
the openings between neighbouring Locations line up.
If your project matches this list, save another copy as
gem_patrol_milestone_1.tres.
Milestone 2: Add the Player
Our second milestone will turn the collection of rooms into a world we can explore. We will draw the Player, create a Player Object Type, place one instance on the Map, and use Logic to move it in four directions.
When this milestone is complete, the Player will move around each Location, stop at solid walls, and travel automatically through matching exits.
Draw the Player sprite
Objects use Sprites rather than Tiles. Tiles are fixed at 8 by 8 pixels, while a Sprite can be larger and can include a mask that allows the room background to show around its shape.
-
Open the Sprites editor.
-
Add a Sprite Sheet.
-
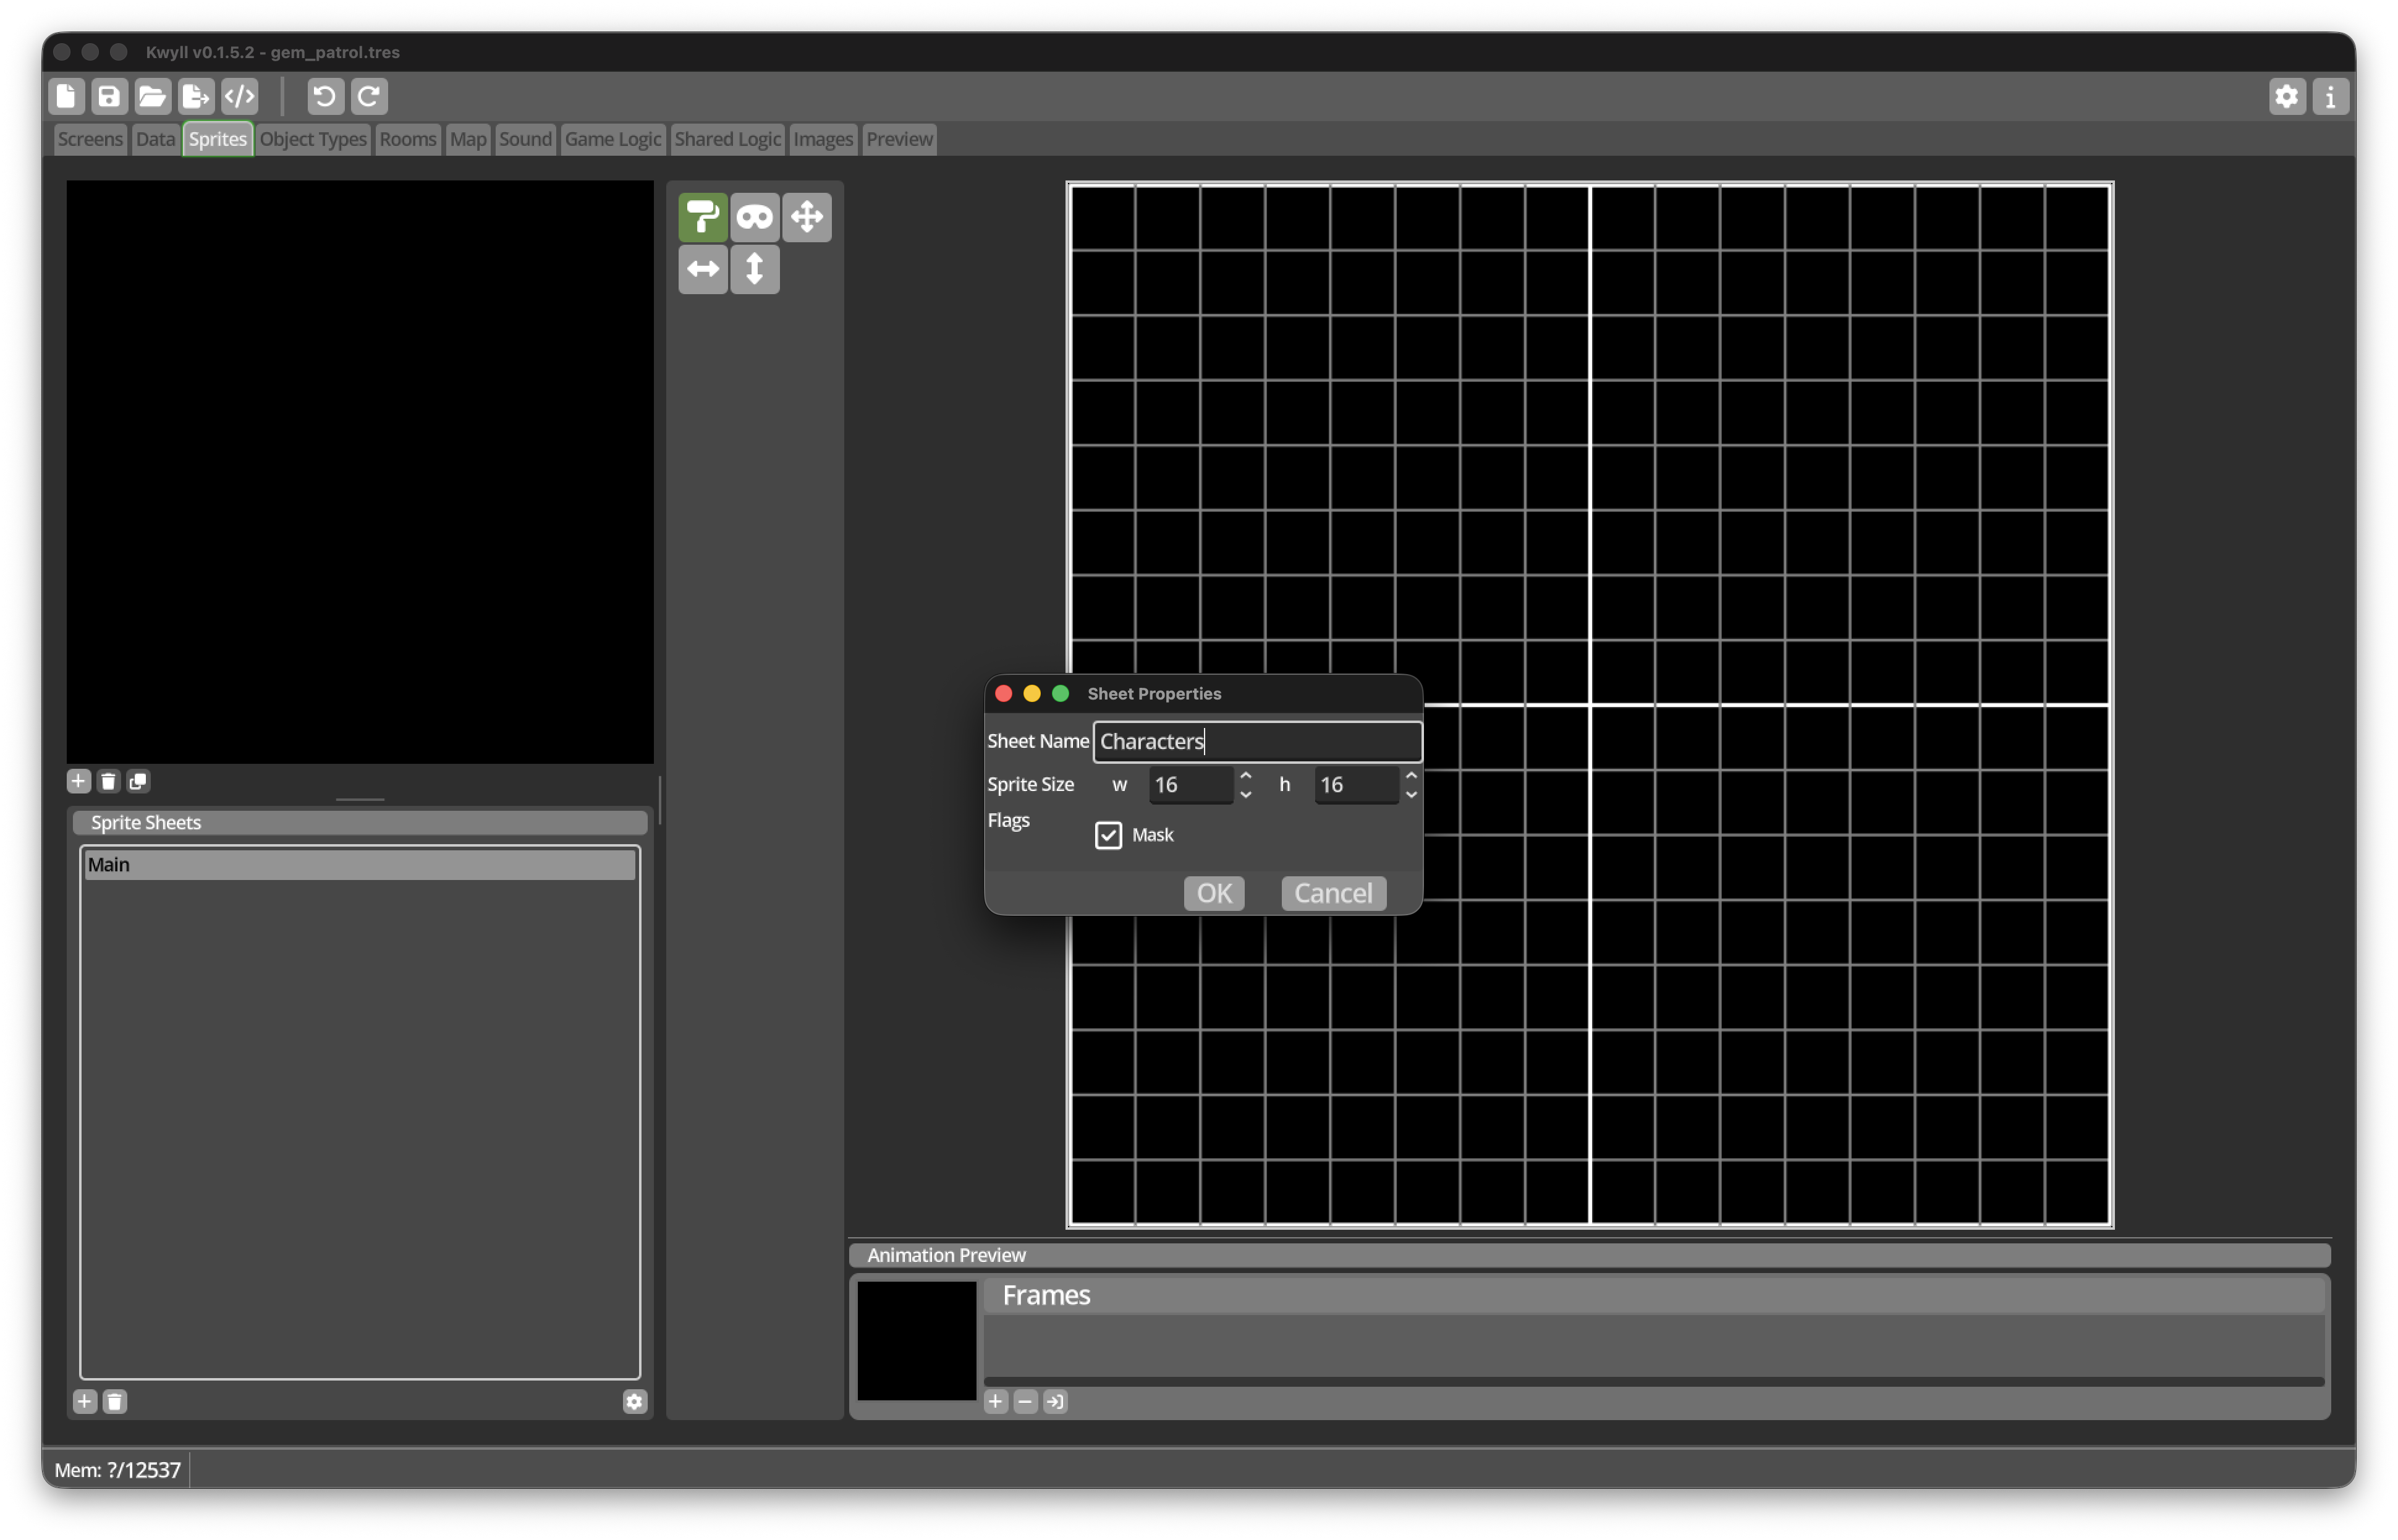
Open its properties and name it
Characters. -
Set the Sprite Width and Height to
16pixels. -
Enable the Mask flag.
-
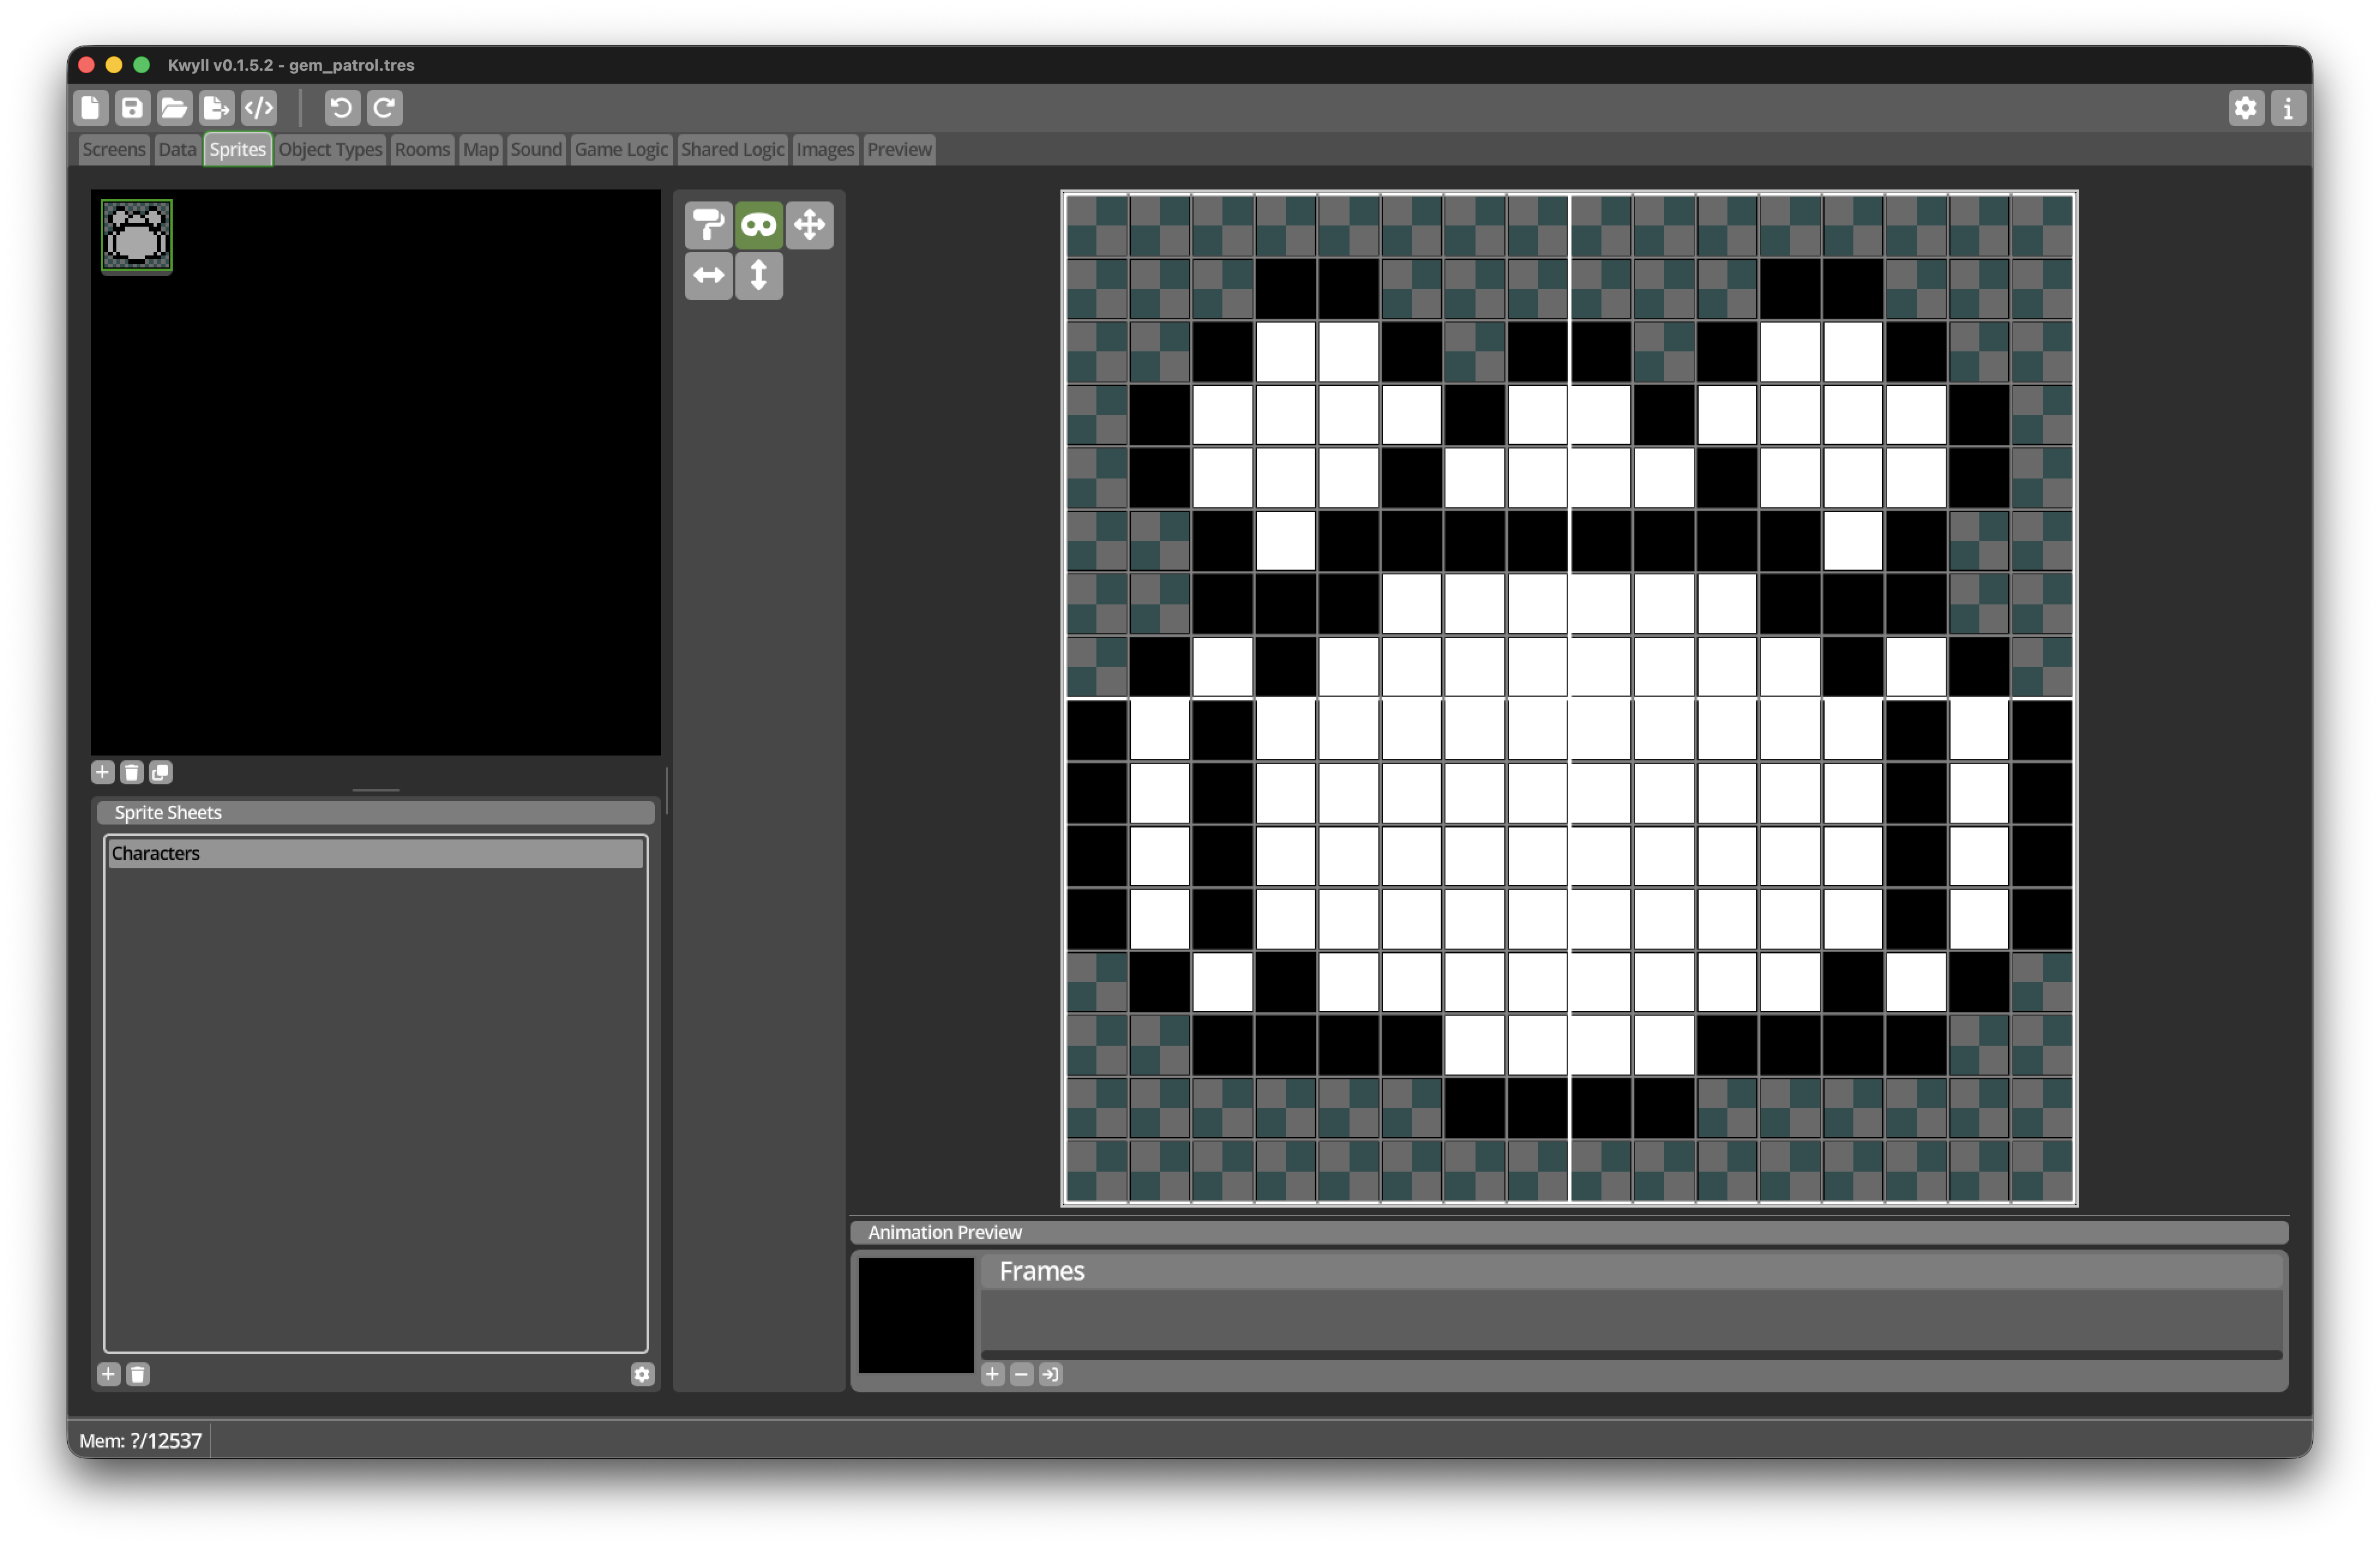
Add one Sprite to the sheet.
-
Draw a simple top-down character in the 16-by-16 grid.
-
Use the mask tool to mask the area around the character.
The artwork does not need to be elaborate. A clear body, head, and one small directional detail are enough. We will use a single image for now so that we can concentrate on movement.
Create the Player Object Type
The Sprite is only the picture. An Object Type combines one or more Sprites with animations, default drawing properties, and Logic.
-
Open the Object Types editor.
-
Add an Object Type.
-
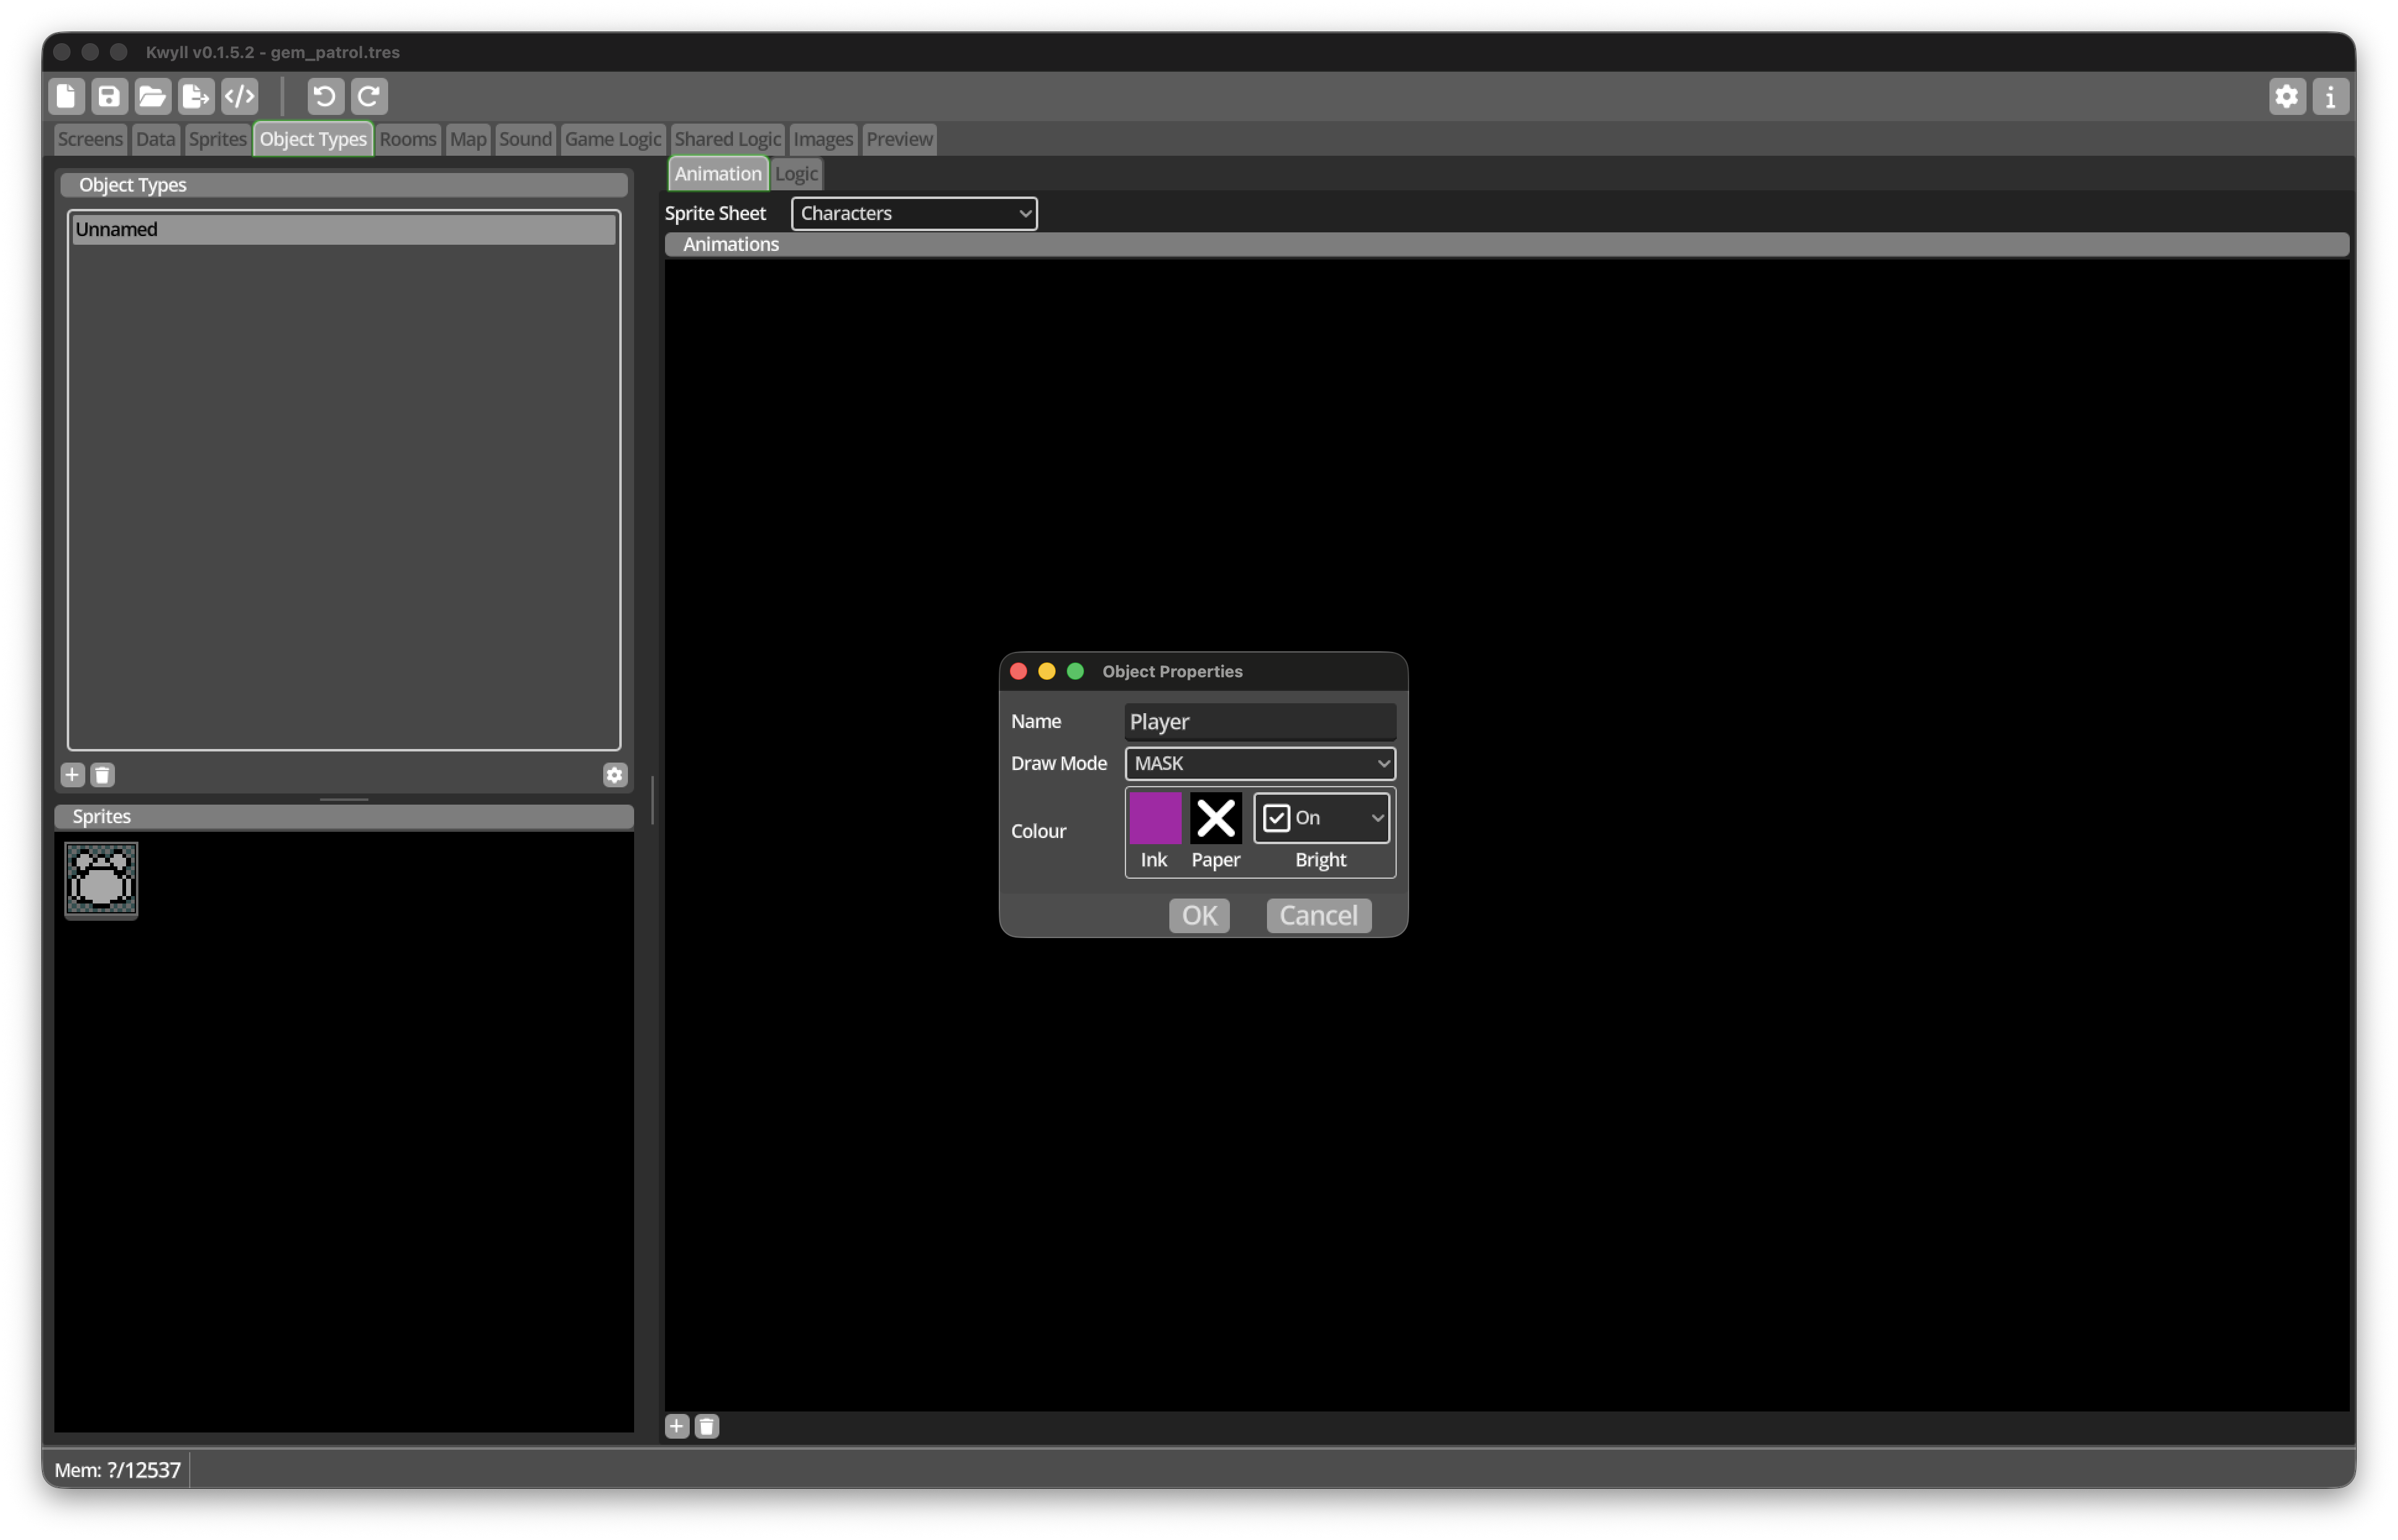
Open its properties and name it
Player. -
Select
Maskas its Draw Mode. -
Set its default Ink to Magenta and enable Bright.
-
Leave its Paper colour unset so that the room background can show through the mask.
-
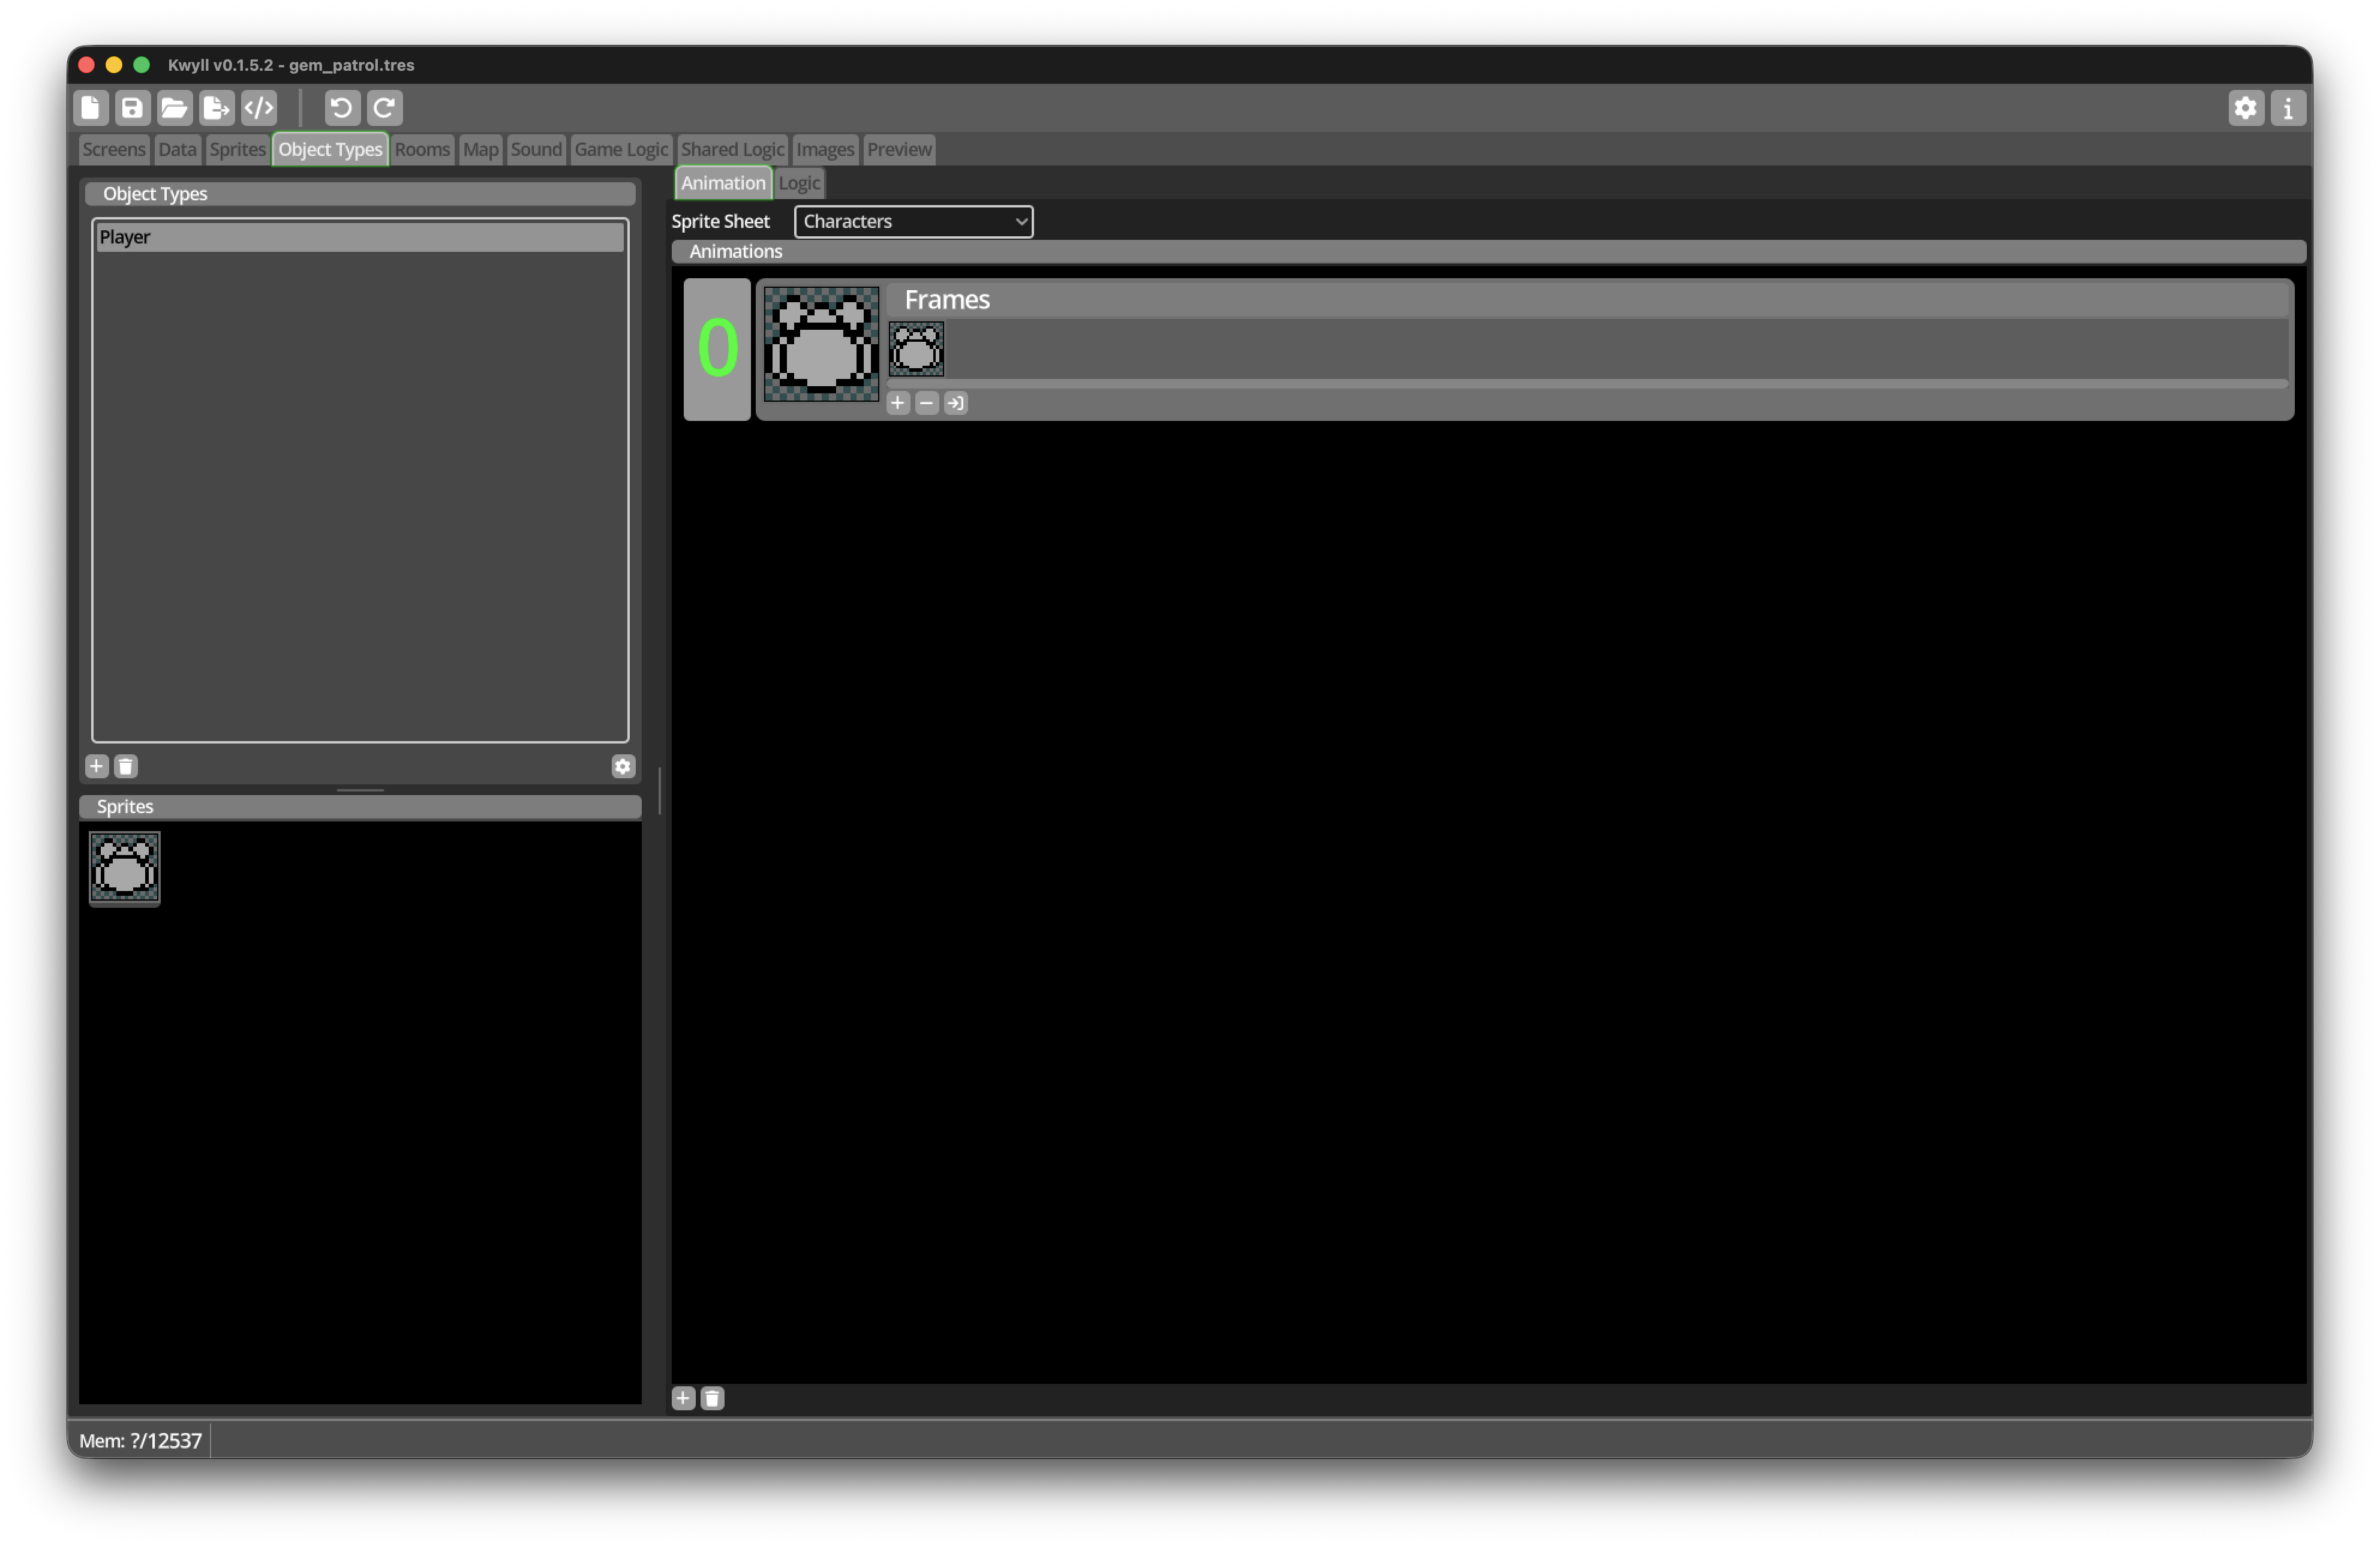
In the Animation tab, select the
CharactersSprite Sheet. -
Add an animation.
-
Add the Player sprite as the animation’s first frame.
This tutorial uses one animation frame for the initial controller. Directional animations can be added later without changing the movement Logic.
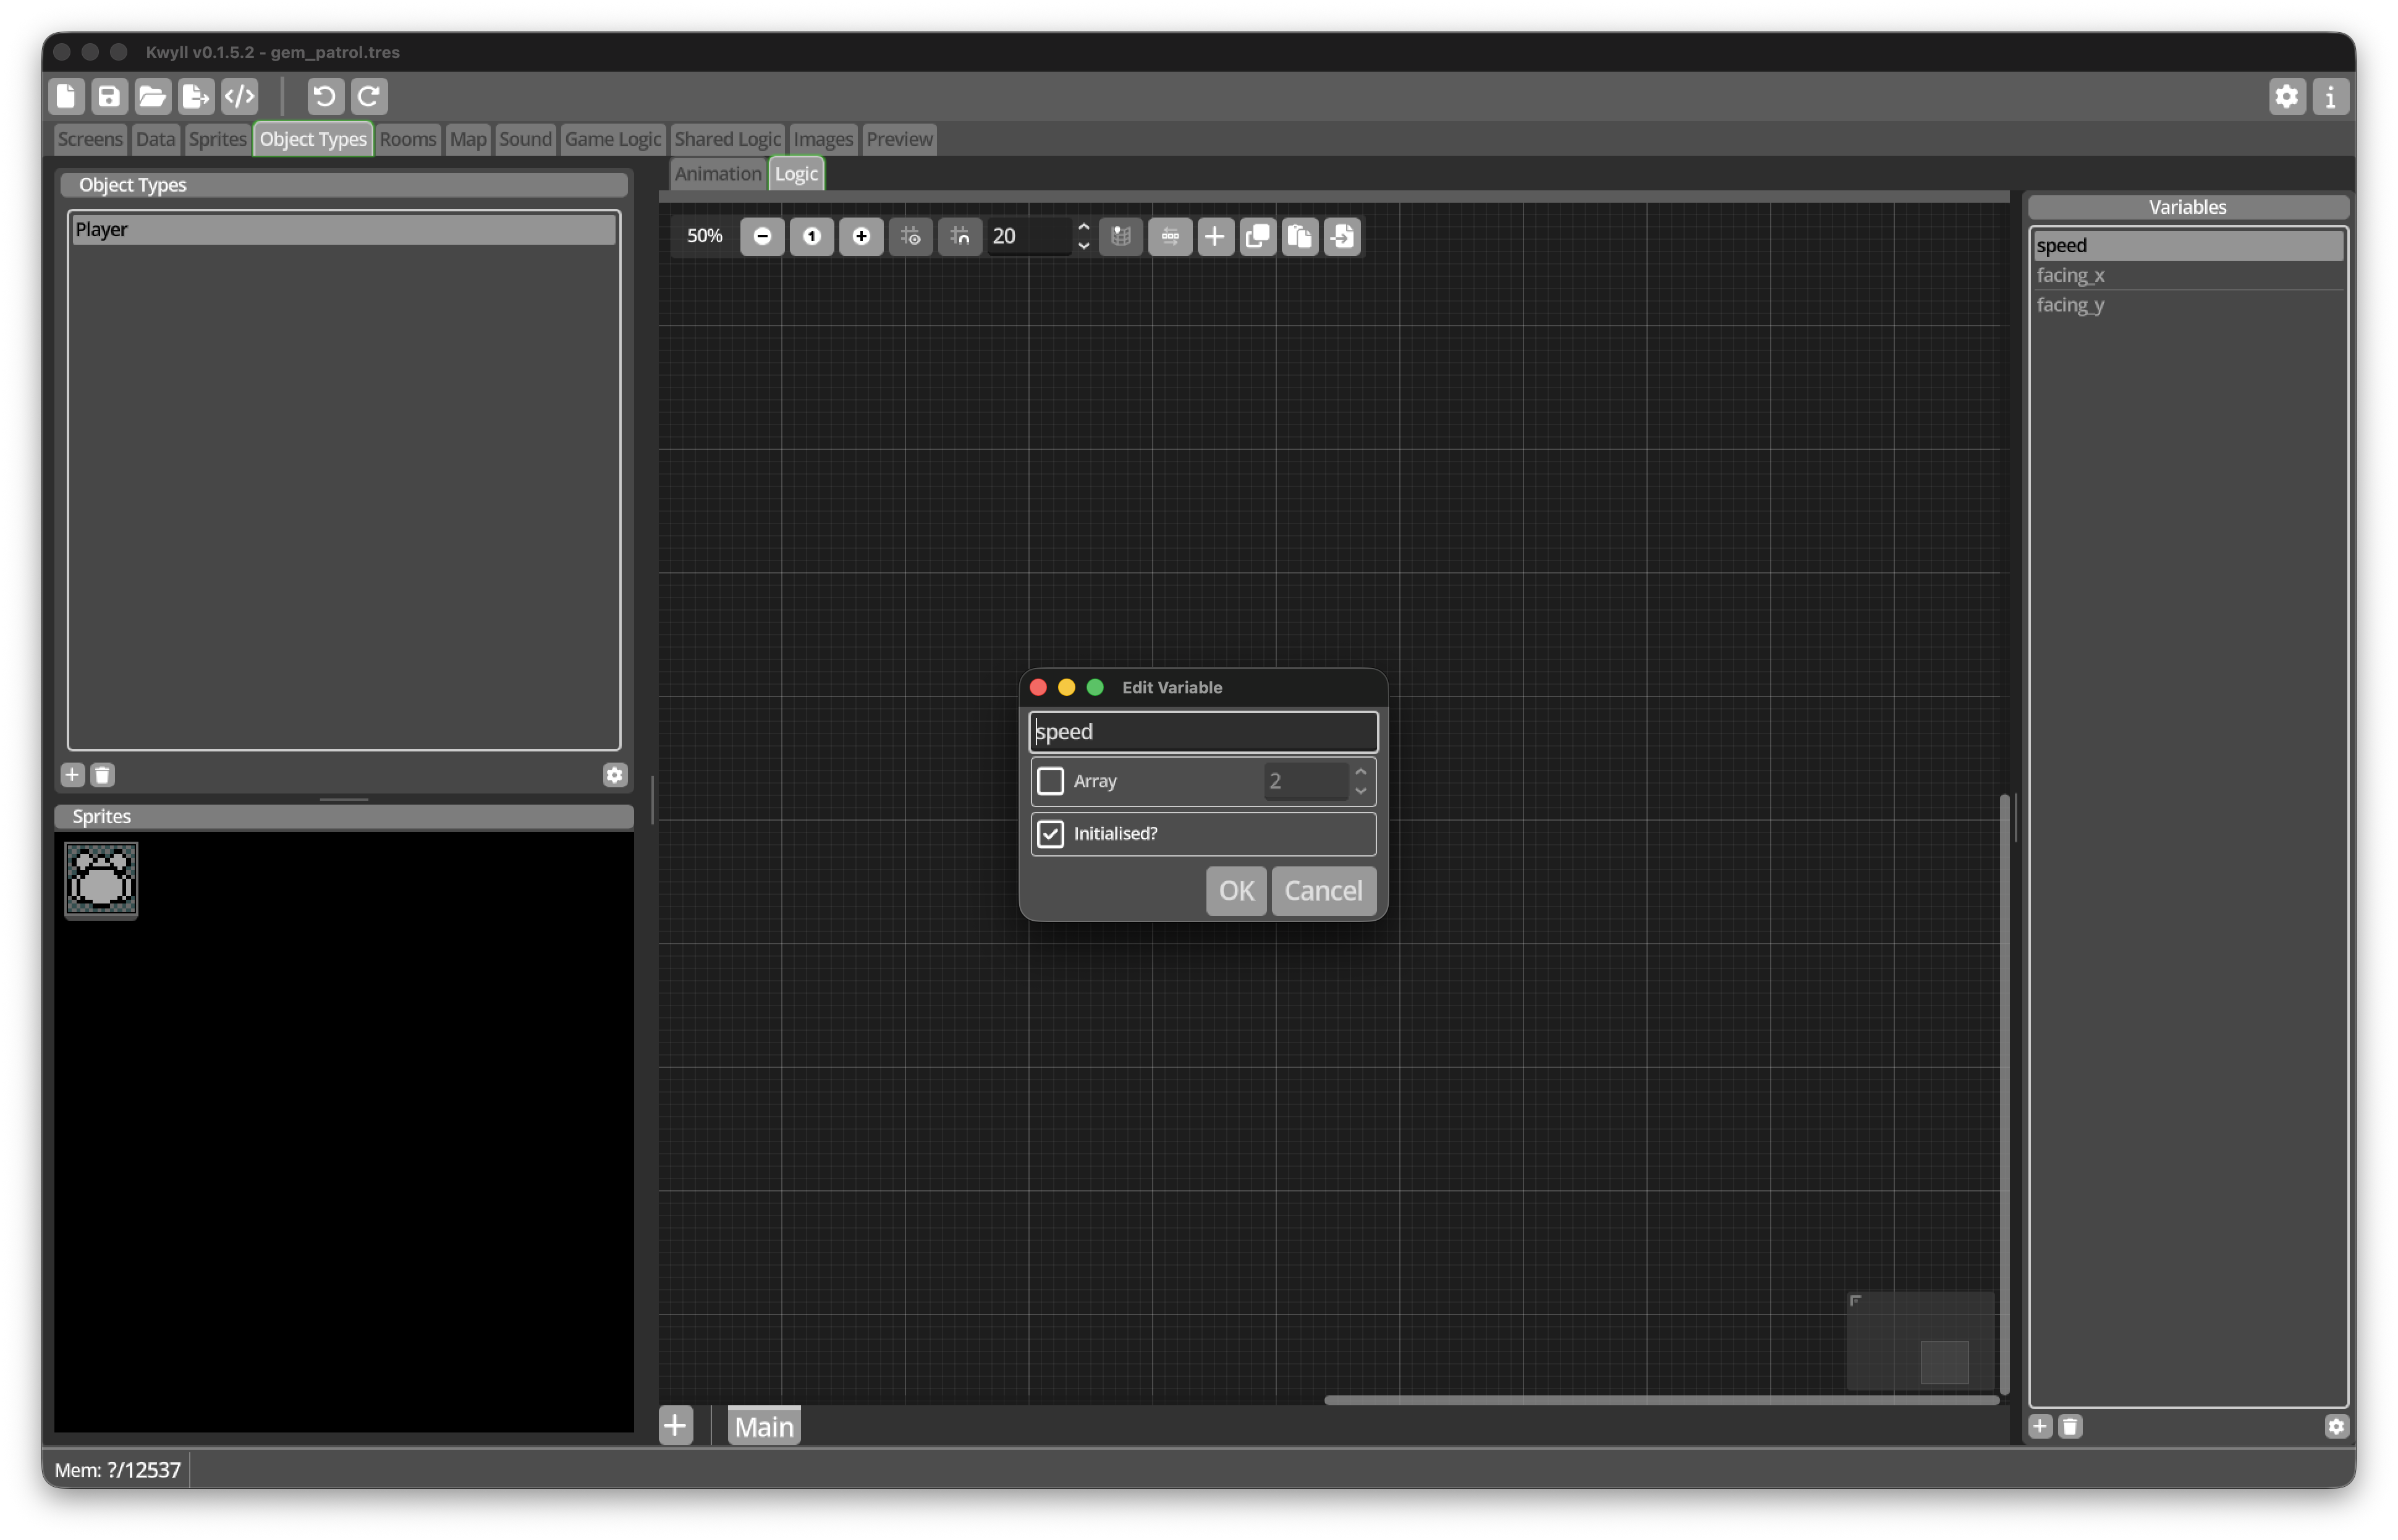
Add Player variables
Variables give Logic somewhere to store numbers. Every instance of an Object Type receives its own values for the variables defined by that type.
Open the Player’s Logic tab. In the Variables panel, add these three variables:
| Variable | Purpose | Initial value |
|---|---|---|
|
Number of pixels moved on each update |
|
|
Horizontal part of the last direction faced |
|
|
Vertical part of the last direction faced |
|
Enable Initialised for each variable. The initial values will be set on the Player Object Instance after we place it on the Map.
facing_x = 0 and facing_y = 1 mean that the Player begins facing down.
These two variables will be used when we add projectiles.
Place a Player instance on the Map
The Player Object Type defines what a Player looks like and what every Player can do. We still need an Object Instance that actually exists in the game.
-
Open the Map editor.
-
Find
Playerin the Assets panel. -
Drag it into Entrance Yard.
-
Place it on an ordinary Floor area, clear of walls, decorations, and gems.
-
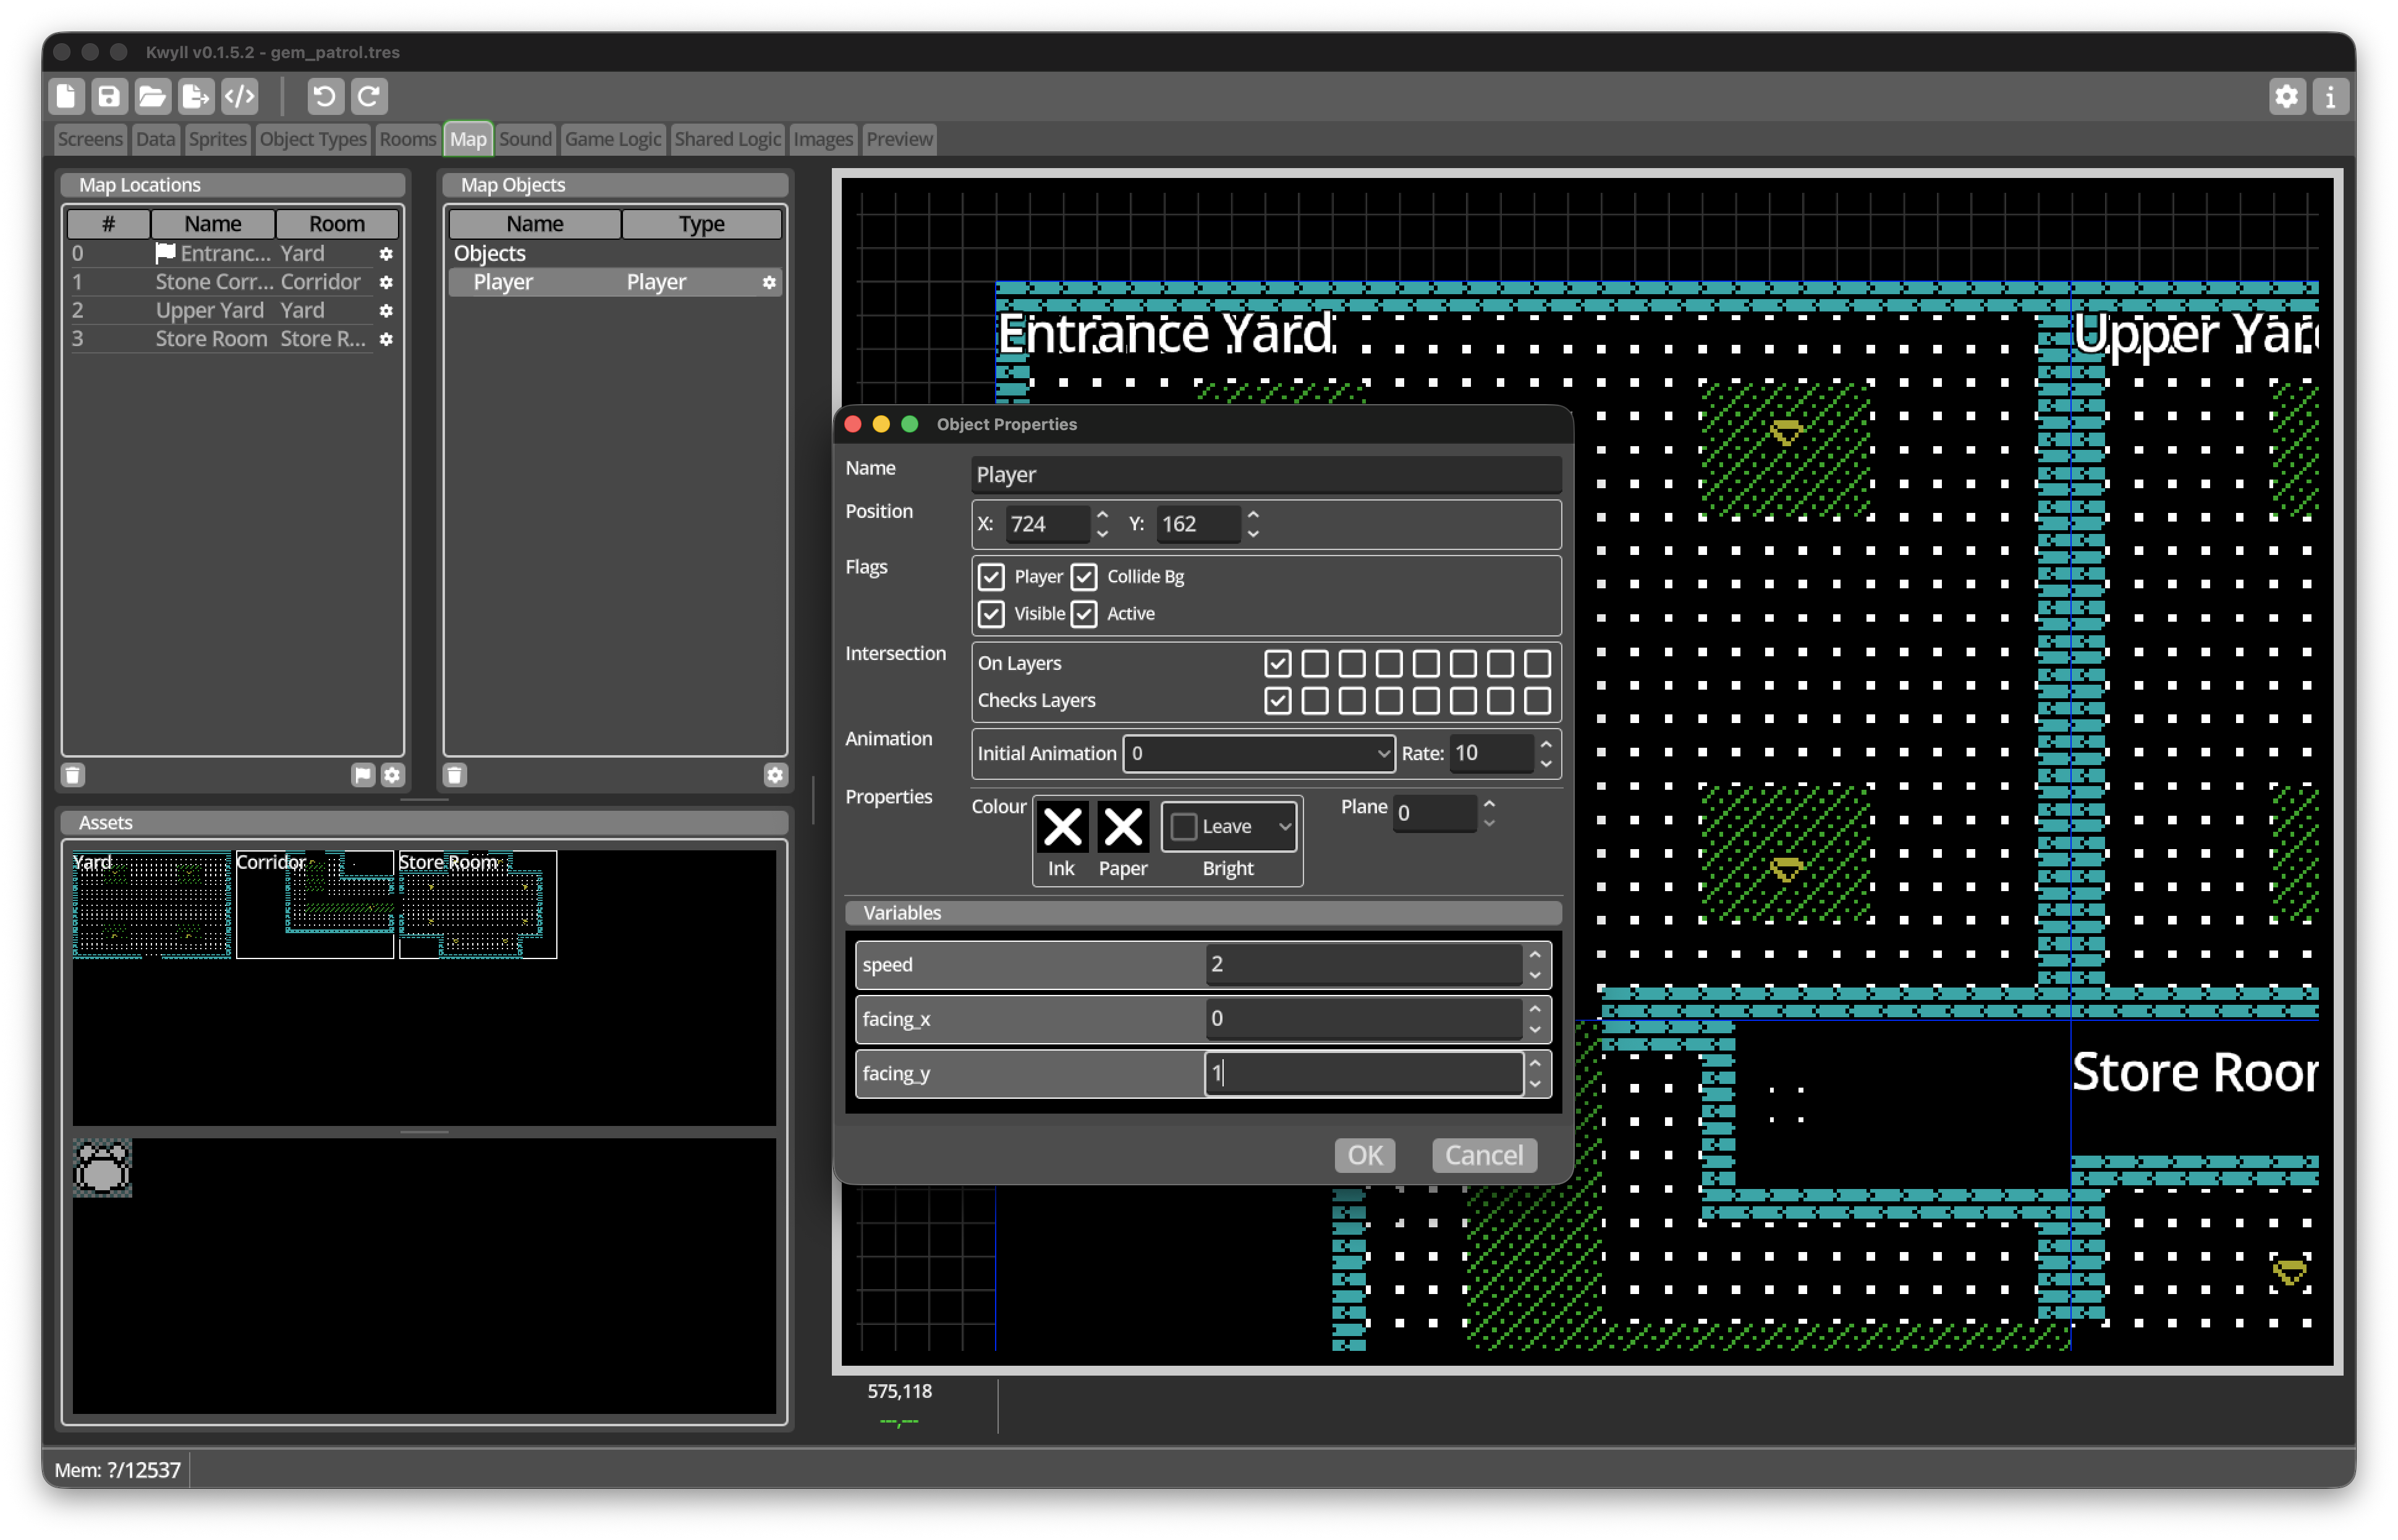
Open the Player instance properties.
-
Keep its name as
Player. -
Enable these flags:
-
Player
-
Collide Bg
-
Visible
-
Active
-
-
Set
speedto2. -
Set
facing_xto0. -
Set
facing_yto1. -
Accept the changes.
The Player flag tells Kwyll that this object controls the current Location. When it crosses an open edge, Kwyll looks for a neighbouring Location on the Map and moves the game there.
The Collide Bg flag makes movement respect the collision settings on our Wall tile. Visible draws the Sprite, while Active allows the instance to take part in object interactions later.
Build four-way movement
Return to the Player Object Type and open its Logic tab.
Kwyll Logic is made from Nodes. White connections control the order in which actions happen. Coloured value connections carry numbers or references between Nodes.
Right-click an empty part of the graph, or press kbd:[Shift+A], to open the node menu. Typing part of a Node’s name is usually the quickest way to find it.
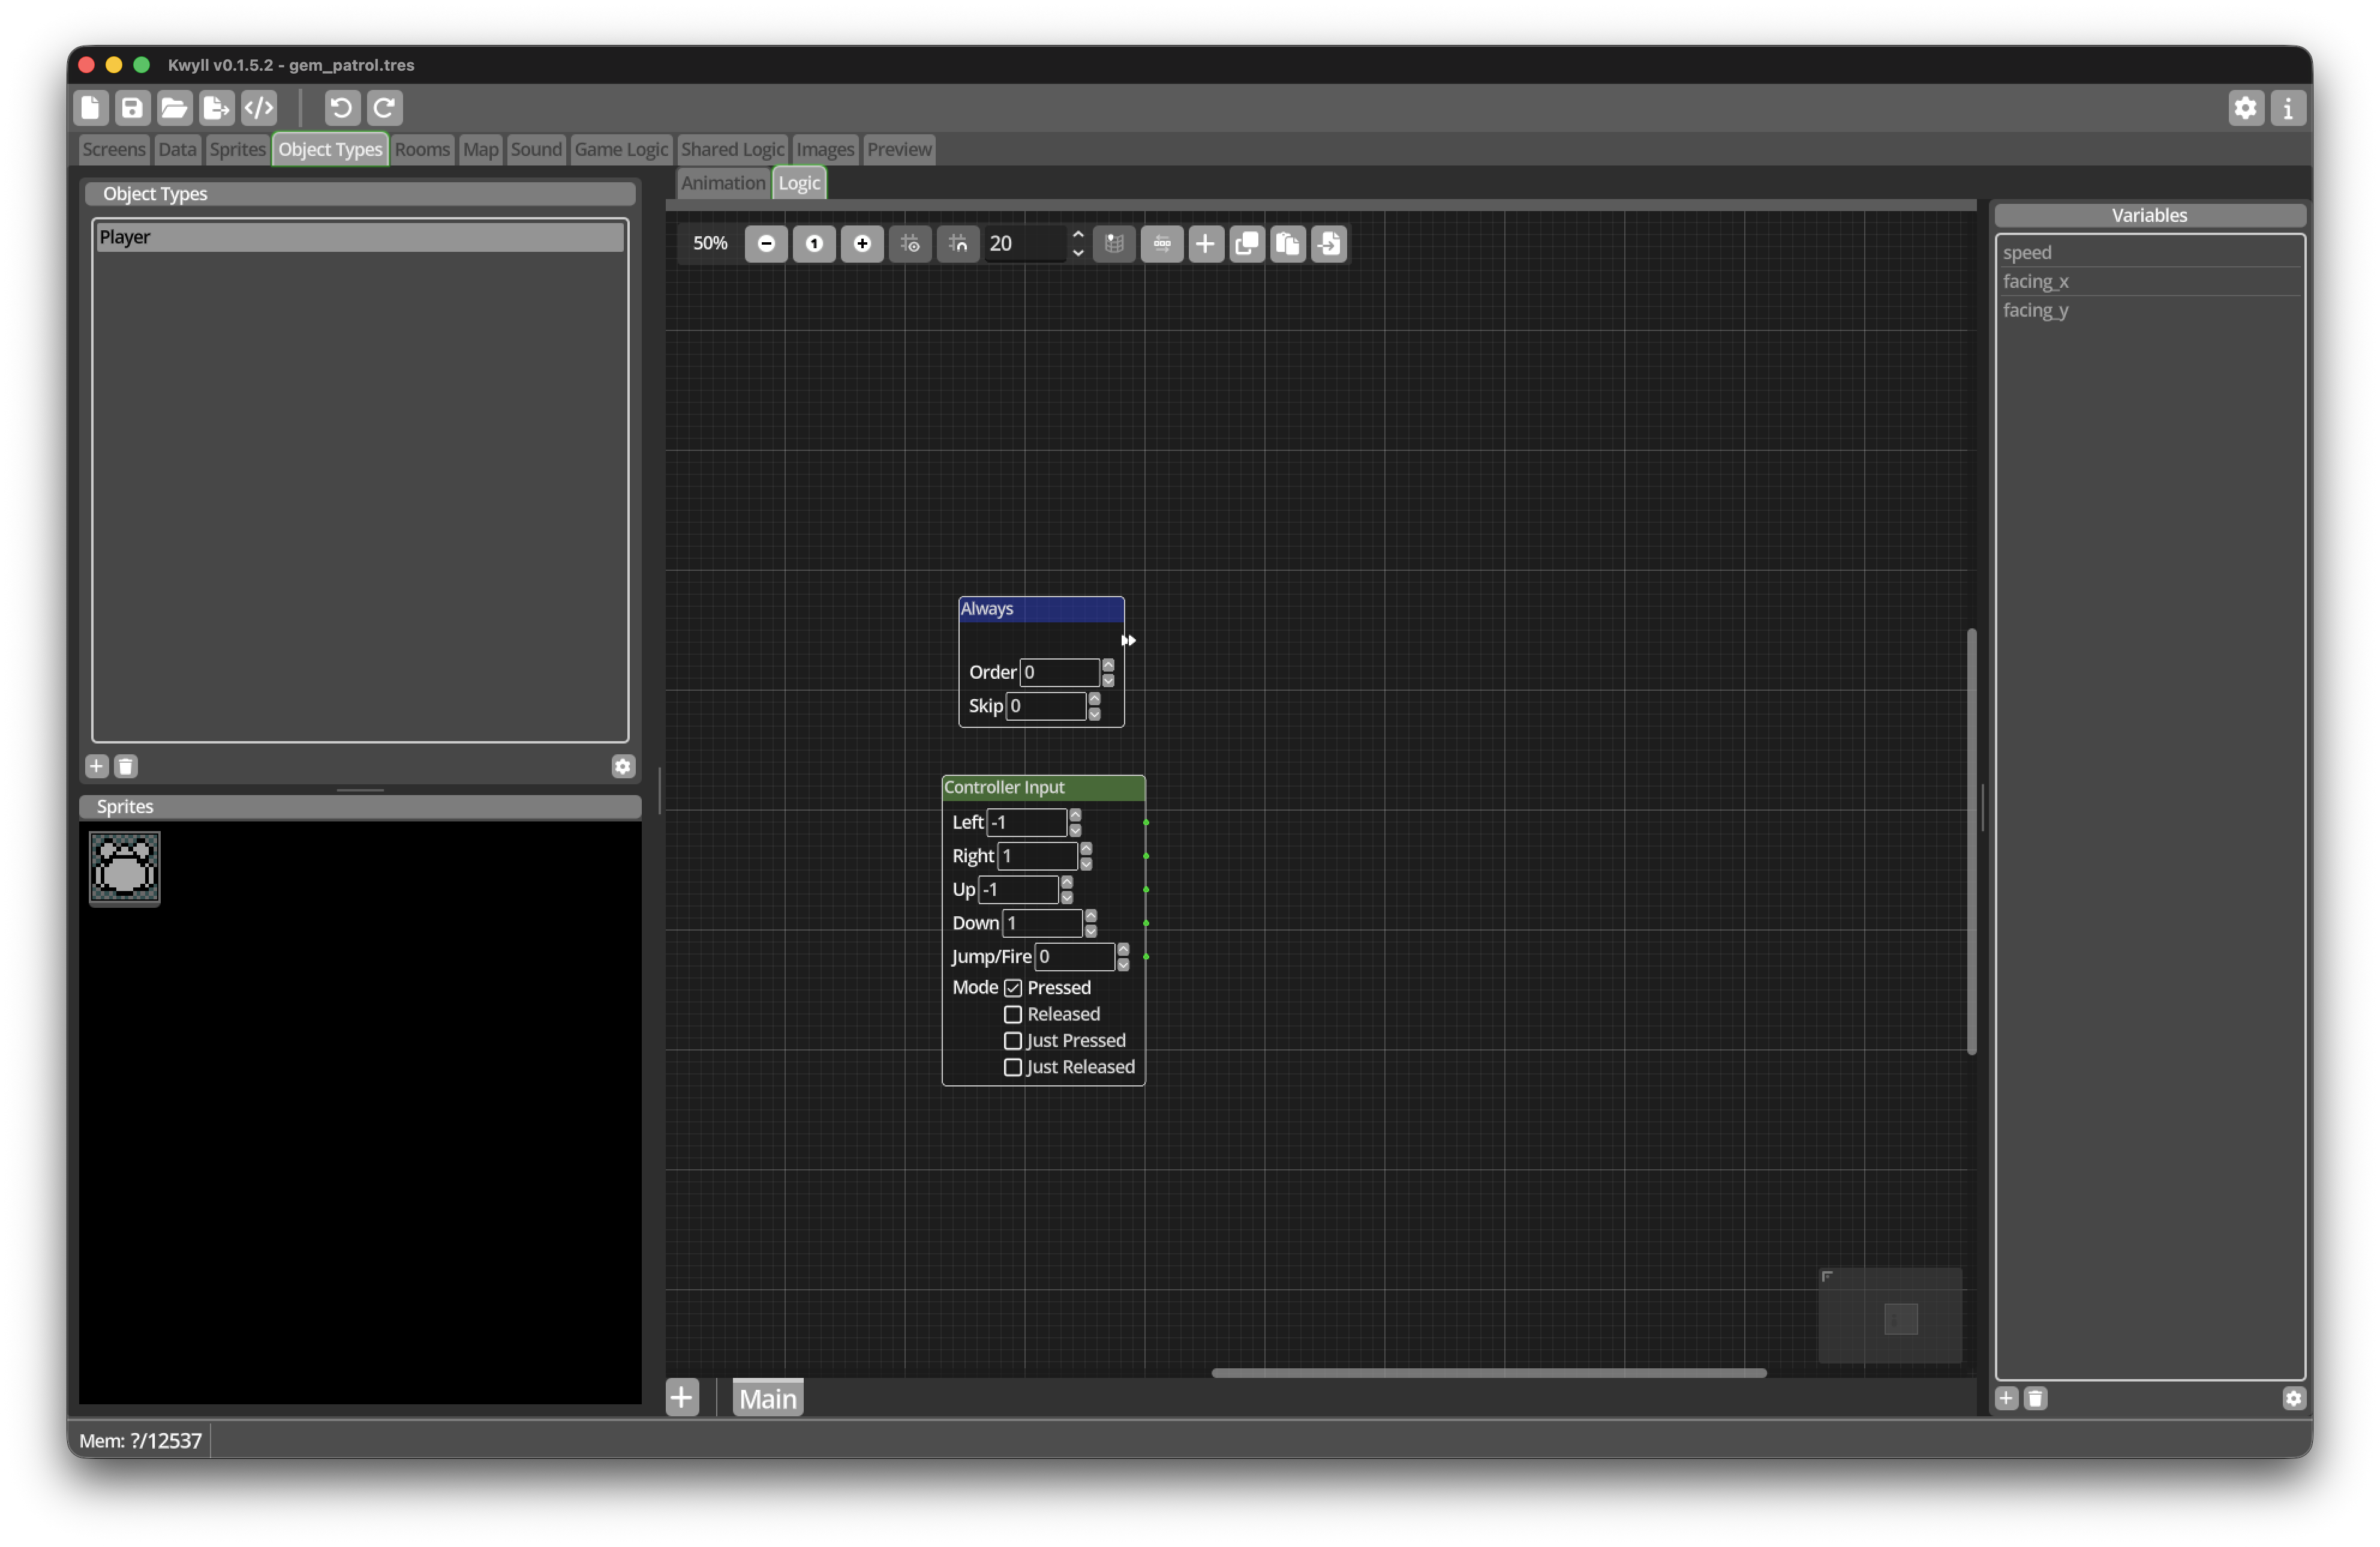
Read the controller
-
Add an
Alwaystrigger. -
Add a
Controller InputNode and keep its Mode set toPressed. -
Set its directional values as follows:
-
Left:
-1 -
Right:
1 -
Up:
-1 -
Down:
1
-
Always starts a flow on every game update. Controller Input produces zero
for a direction that is not pressed and the configured value for a direction
that is pressed.
Using negative values for Left and Up matches Kwyll’s coordinate system: X increases to the right, and Y increases downwards.
Calculate horizontal movement
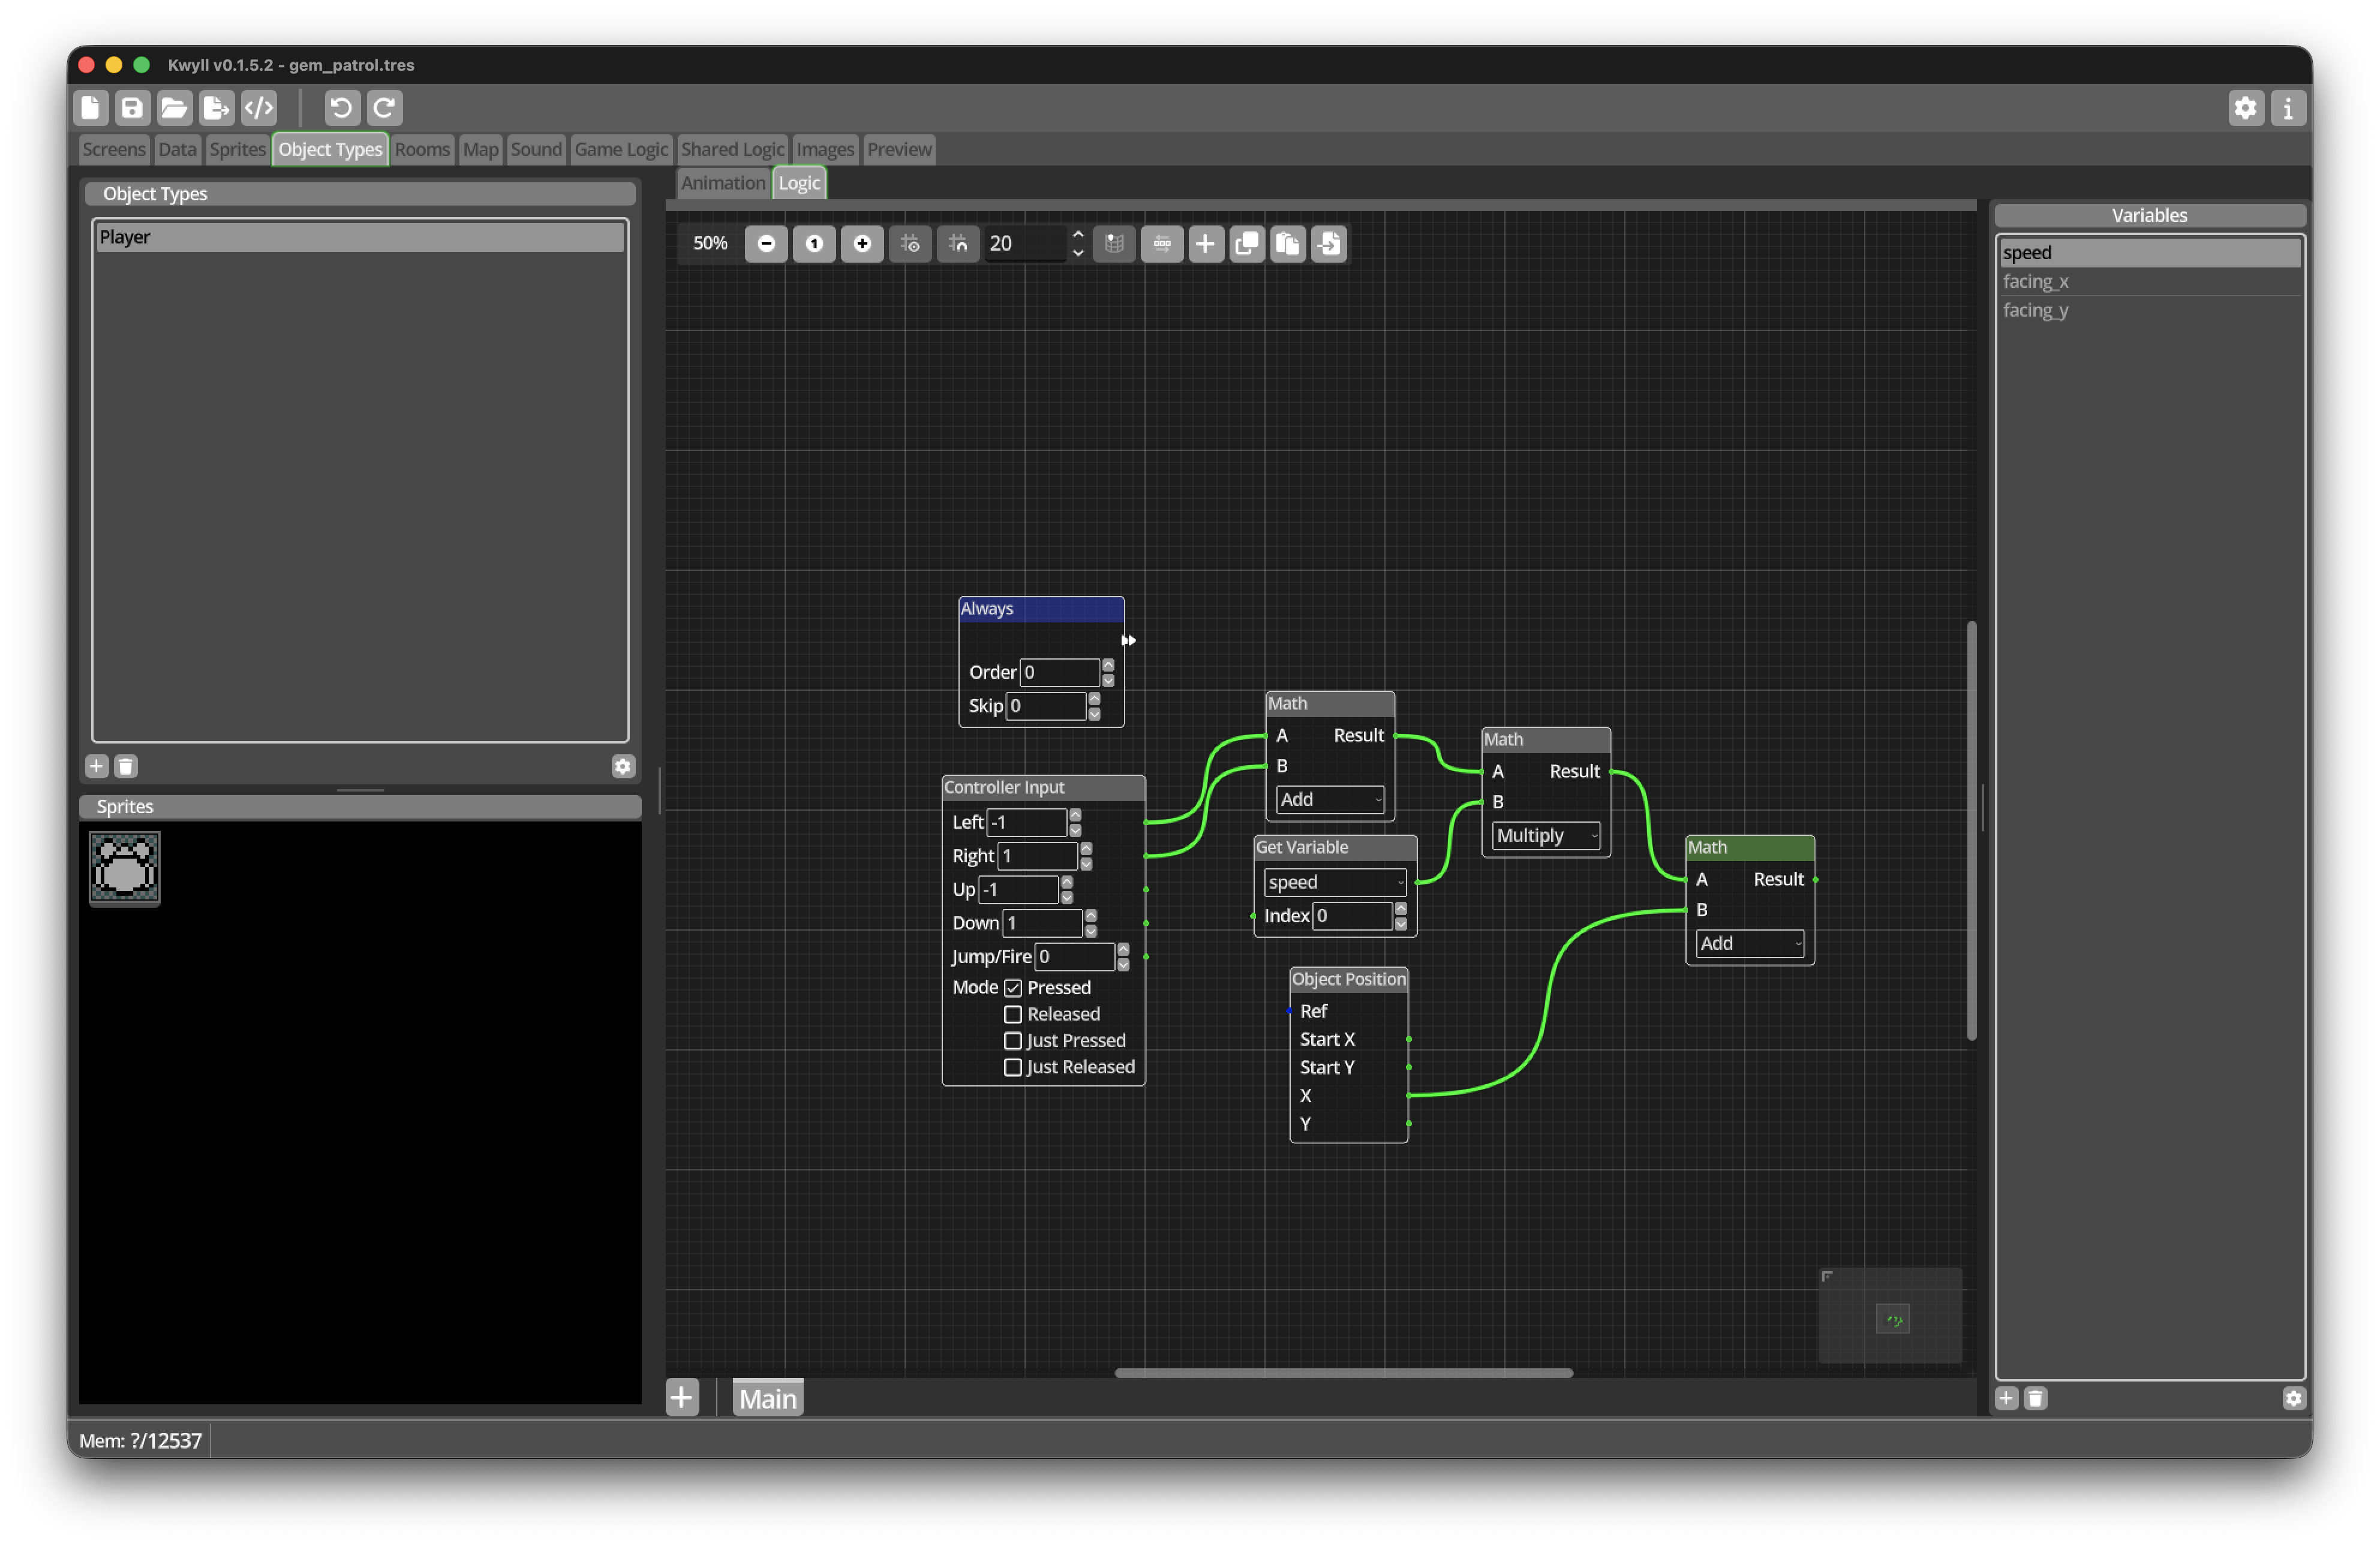
-
Add a
MathNode and set its Operator toAdd. -
Connect Controller Left to its A input.
-
Connect Controller Right to its B input.
-
Add a
Get VariableNode and selectspeed. -
Add another
MathNode and set its Operator toMultiply. -
Connect the result of Left plus Right to one input of the Multiply Node.
-
Connect
speedto its other input. -
Add an
Object PositionNode. -
Add a third
MathNode and set its Operator toAdd. -
Connect the current X output of Object Position to one input.
-
Connect the multiplied movement amount to the other input.
The first addition gives a horizontal direction:
-
Left produces
-1. -
Right produces
1. -
Neither direction produces
0. -
Pressing both directions also produces
0.
Multiplying by speed converts that direction into the number of pixels to
move. Adding it to the current X position produces the requested new X
position.
Calculate vertical movement
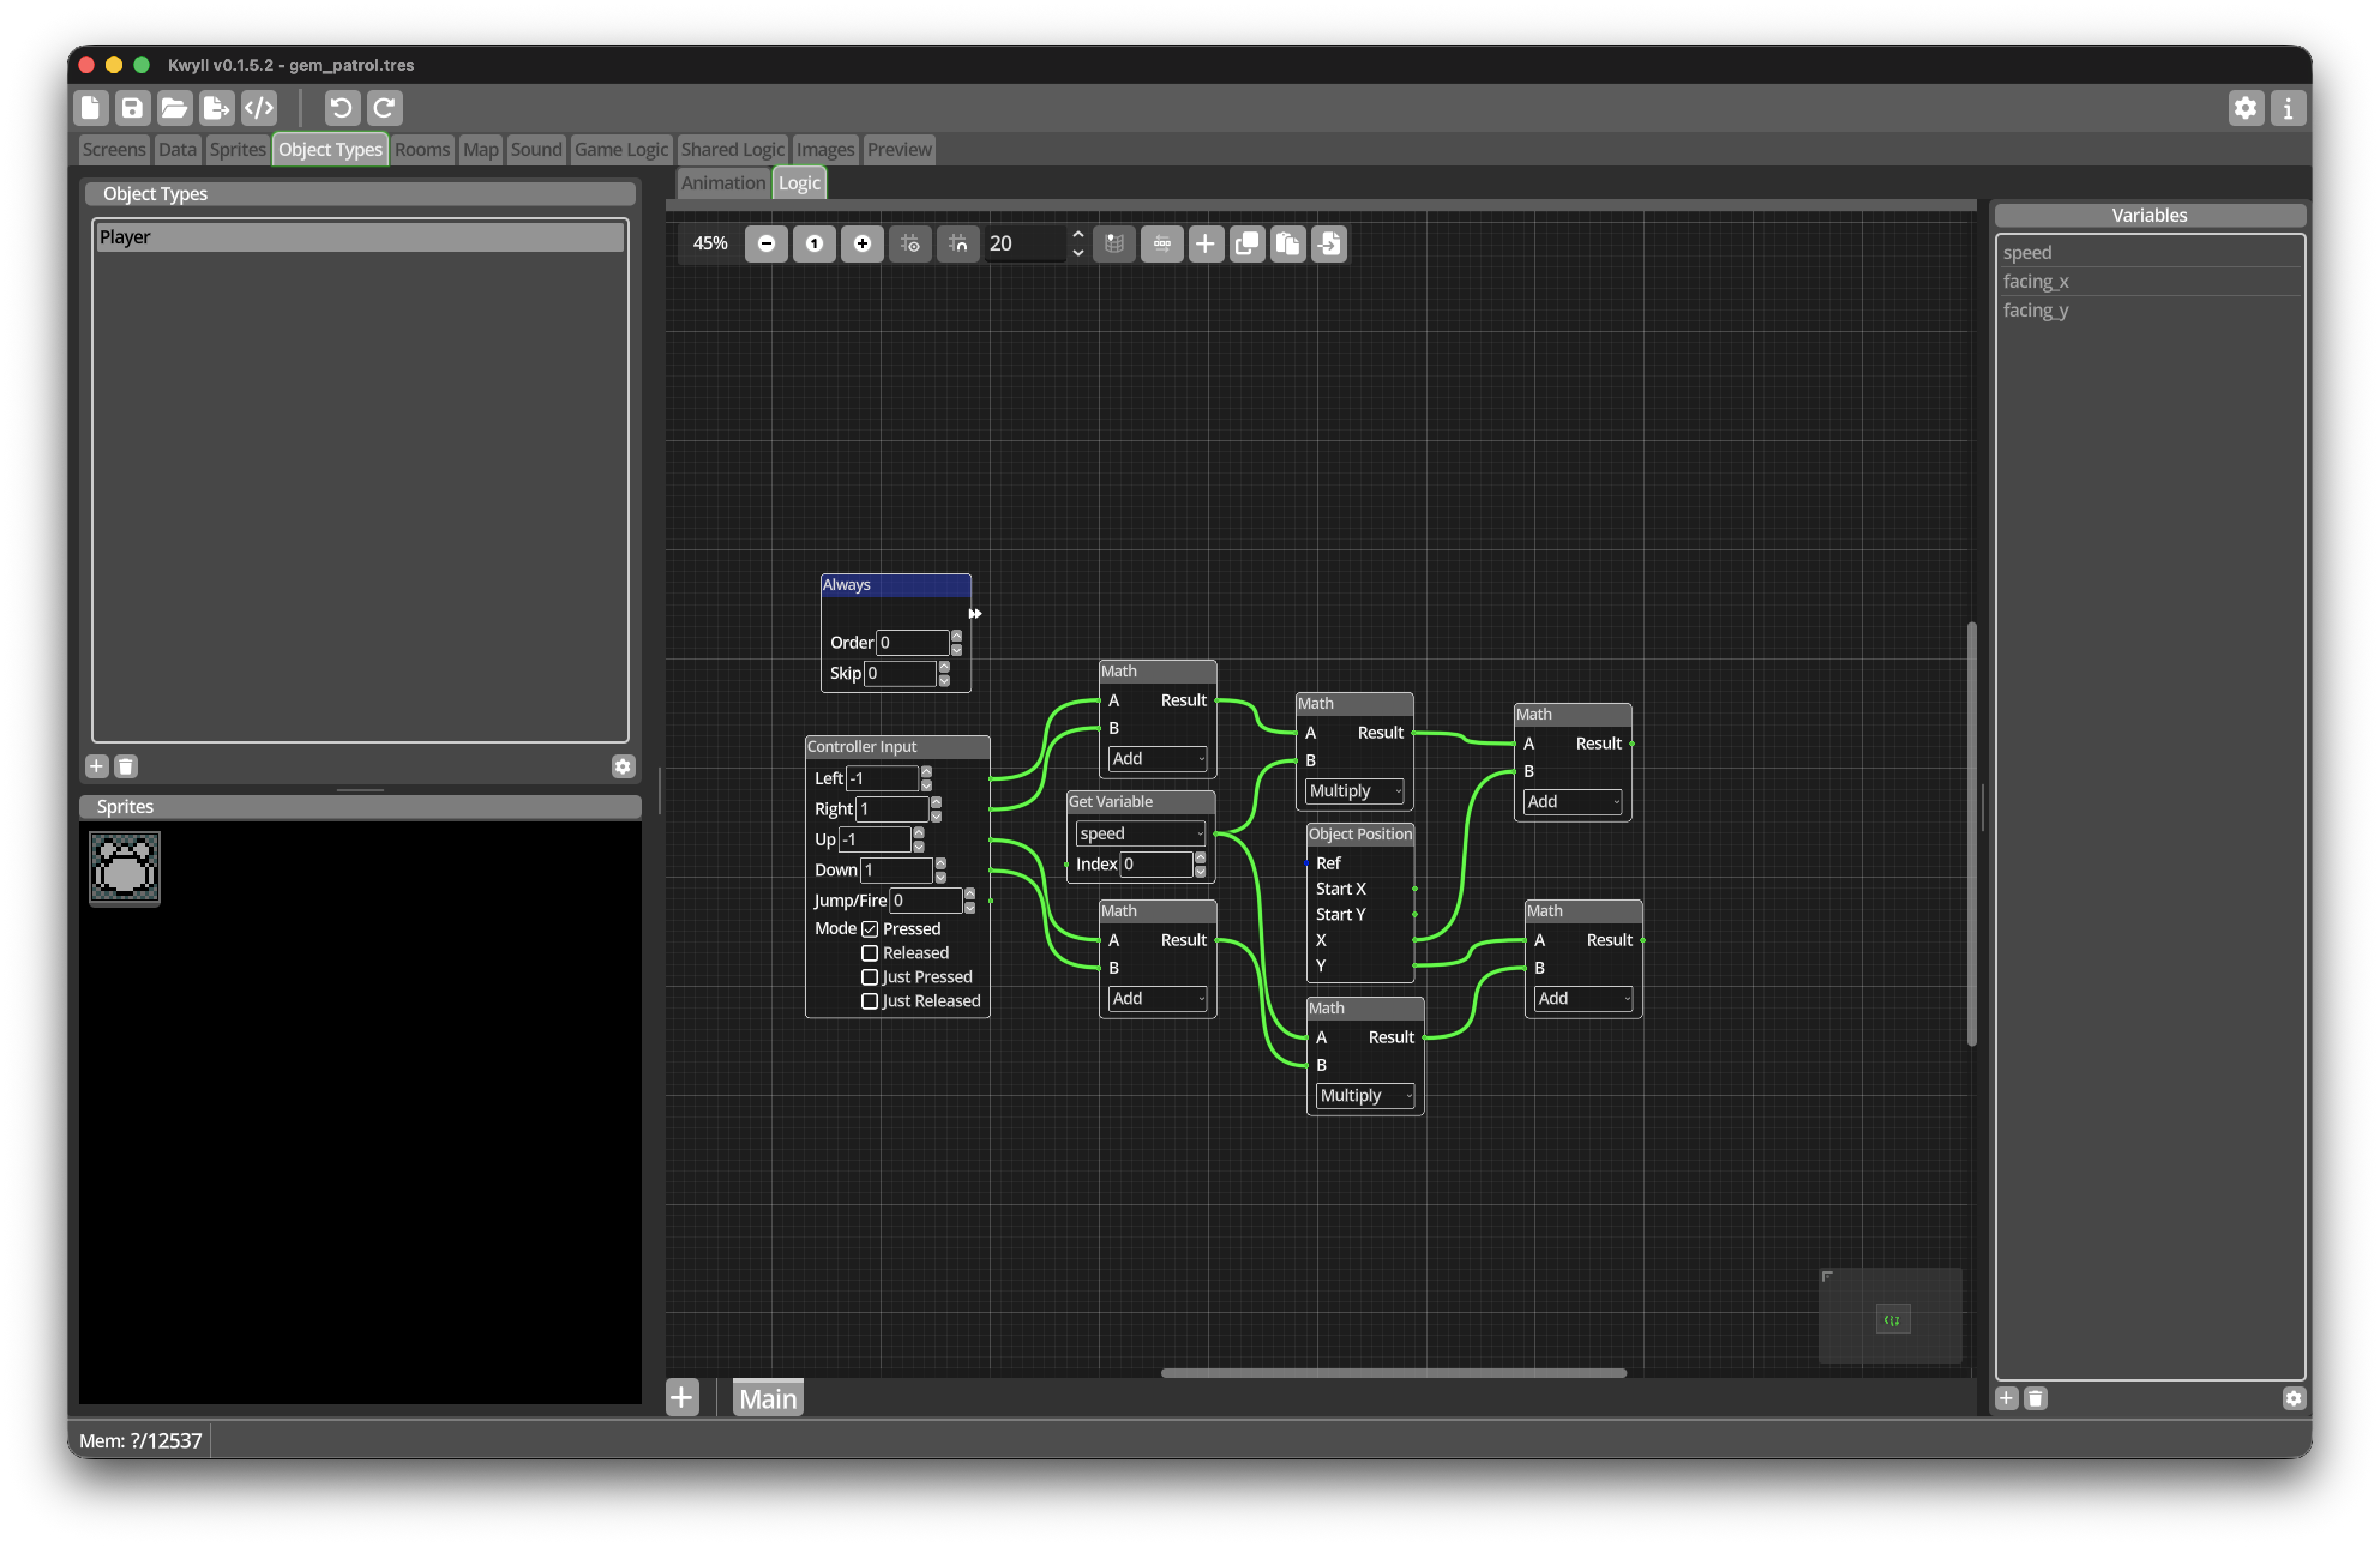
Build the same calculation for Y:
-
Add a
MathNode set toAdd. -
Connect Controller Up and Down to its inputs.
-
Add a
MathNode set toMultiply. -
Connect the Up-plus-Down result and the same
speedvalue to it. -
Add a final
MathNode set toAdd. -
Connect the current Y output of Object Position and the multiplied vertical movement to it.
This produces the requested new Y position. Up subtracts speed and Down adds
it.
Move the Player
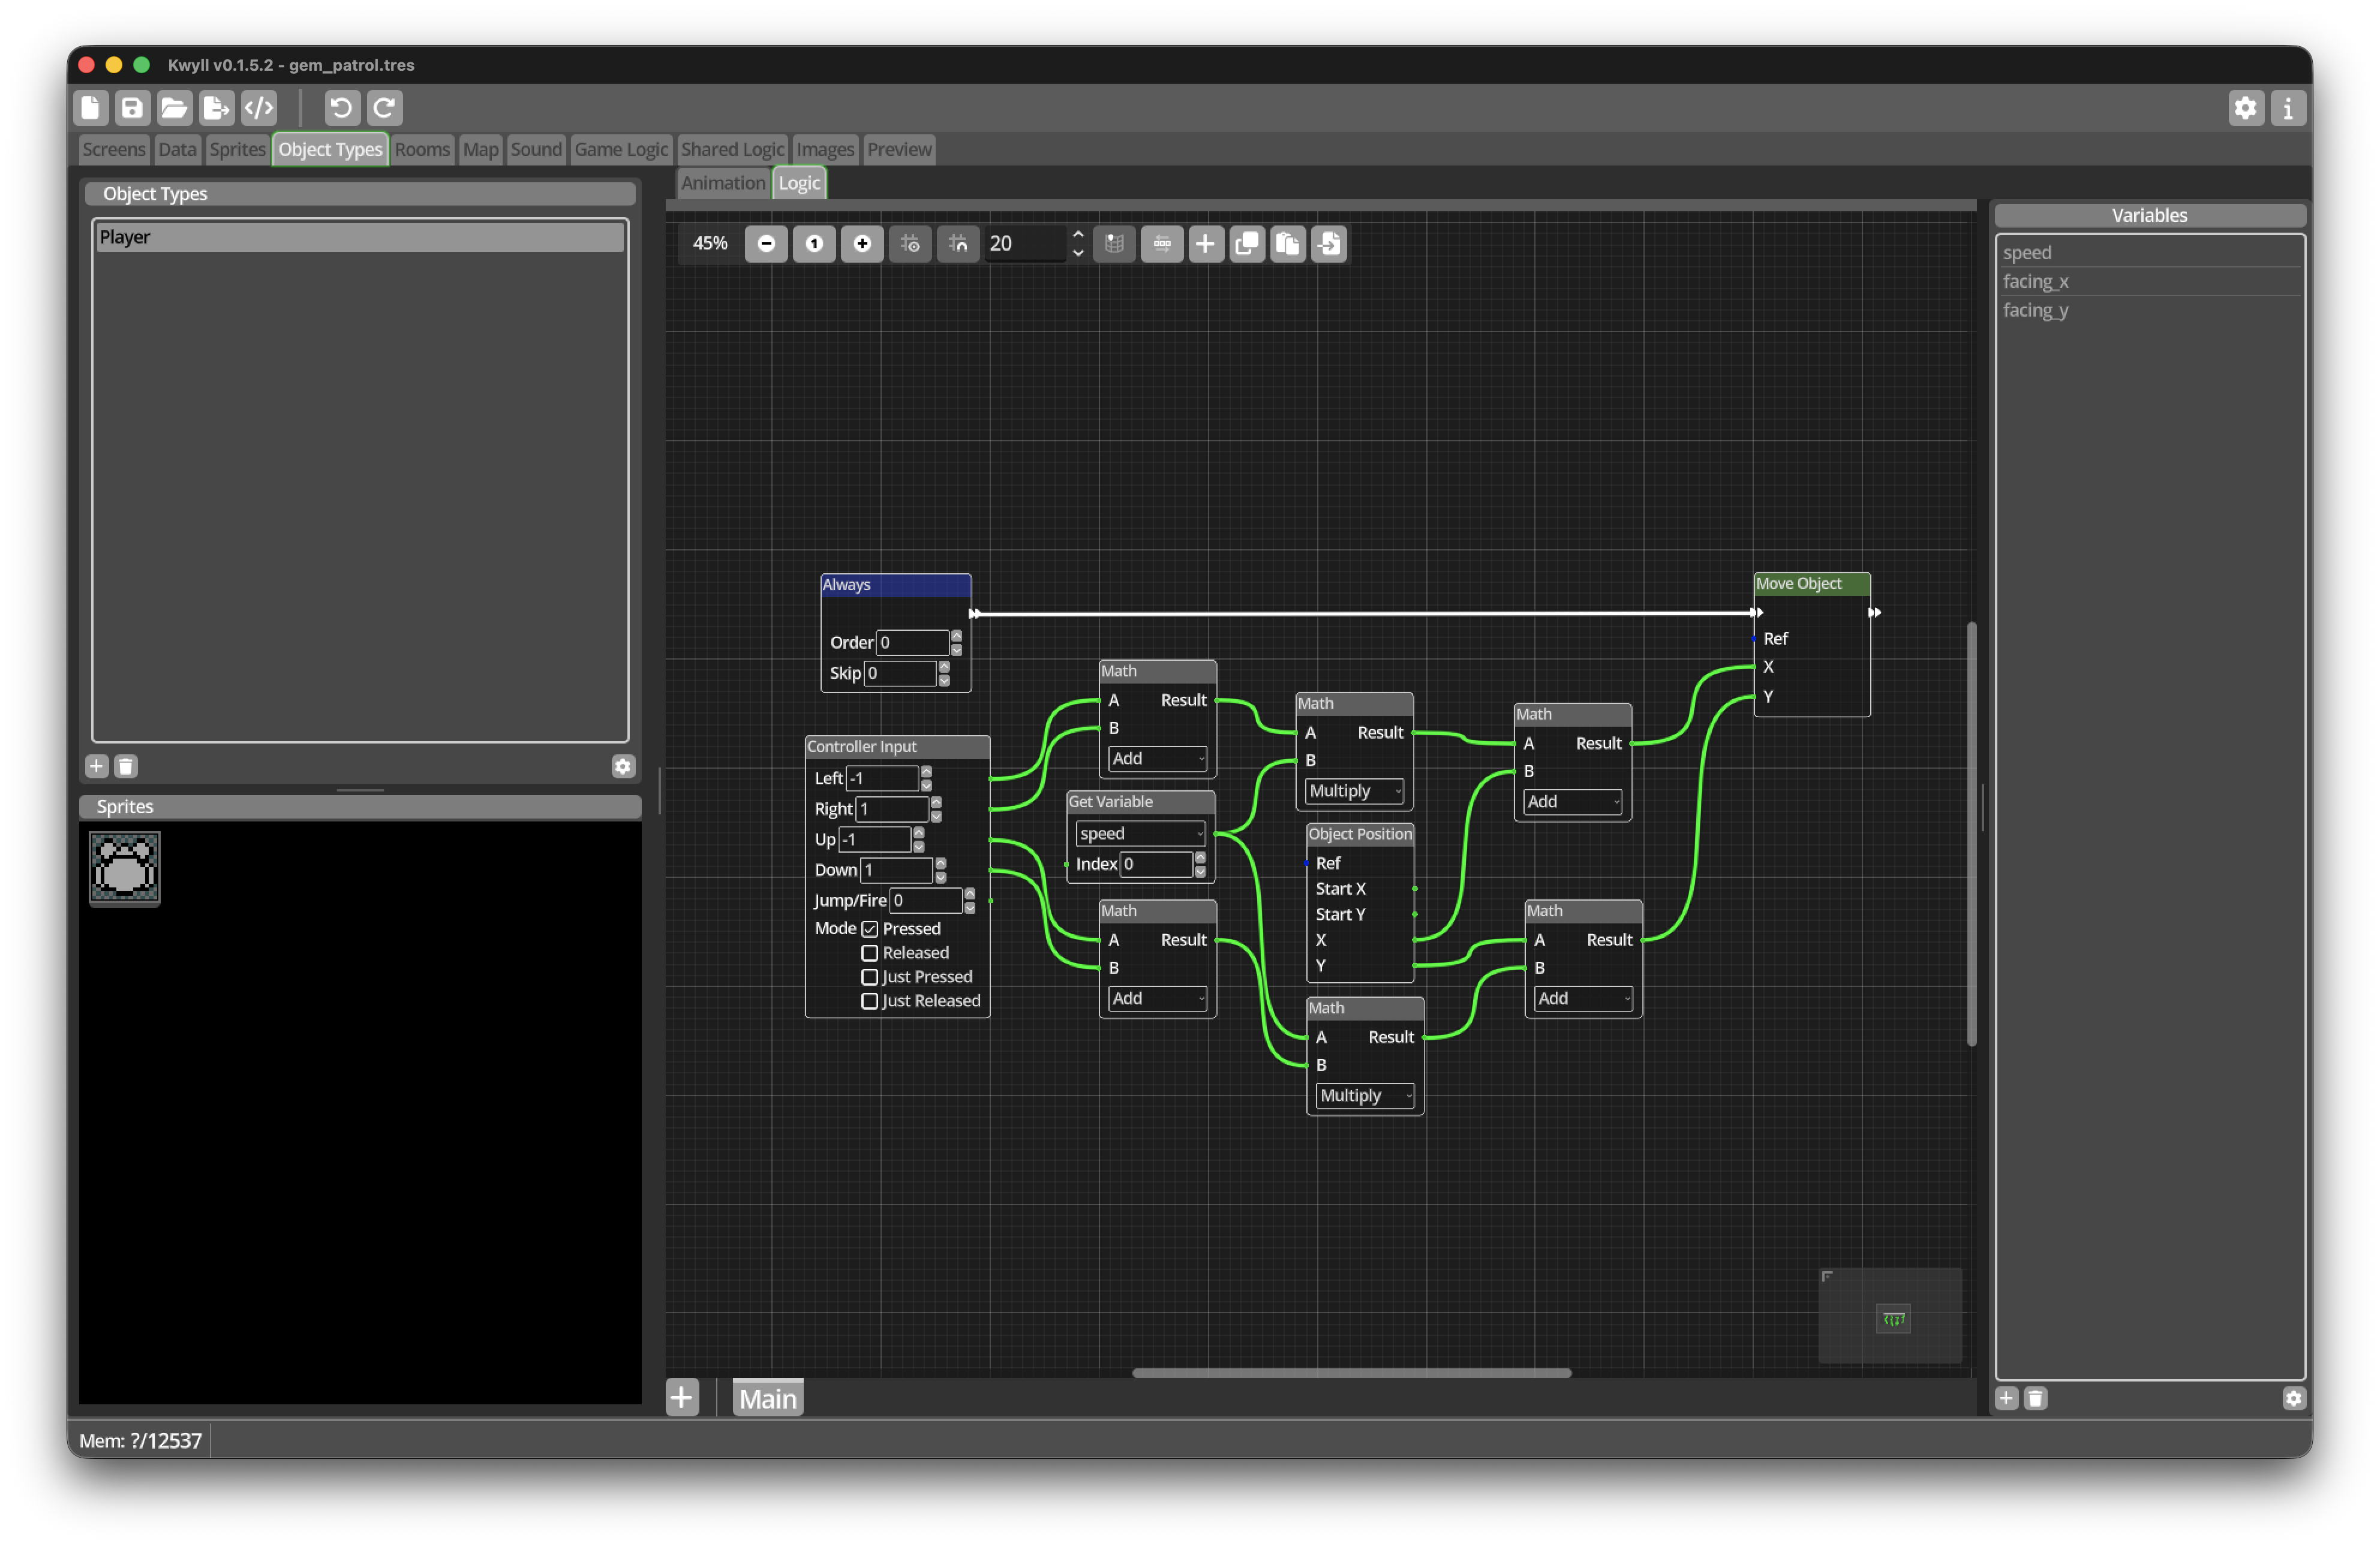
-
Add a
Move ObjectNode. -
Connect the new X calculation to its X input.
-
Connect the new Y calculation to its Y input.
-
Leave Ref unconnected. In Object Logic, an unconnected Ref means the current Object Instance.
-
Connect the white Flow Out port of
Alwaysto the Flow In port ofMove Object.
The value calculations do not need white flow connections. They are evaluated
when Move Object needs their results.
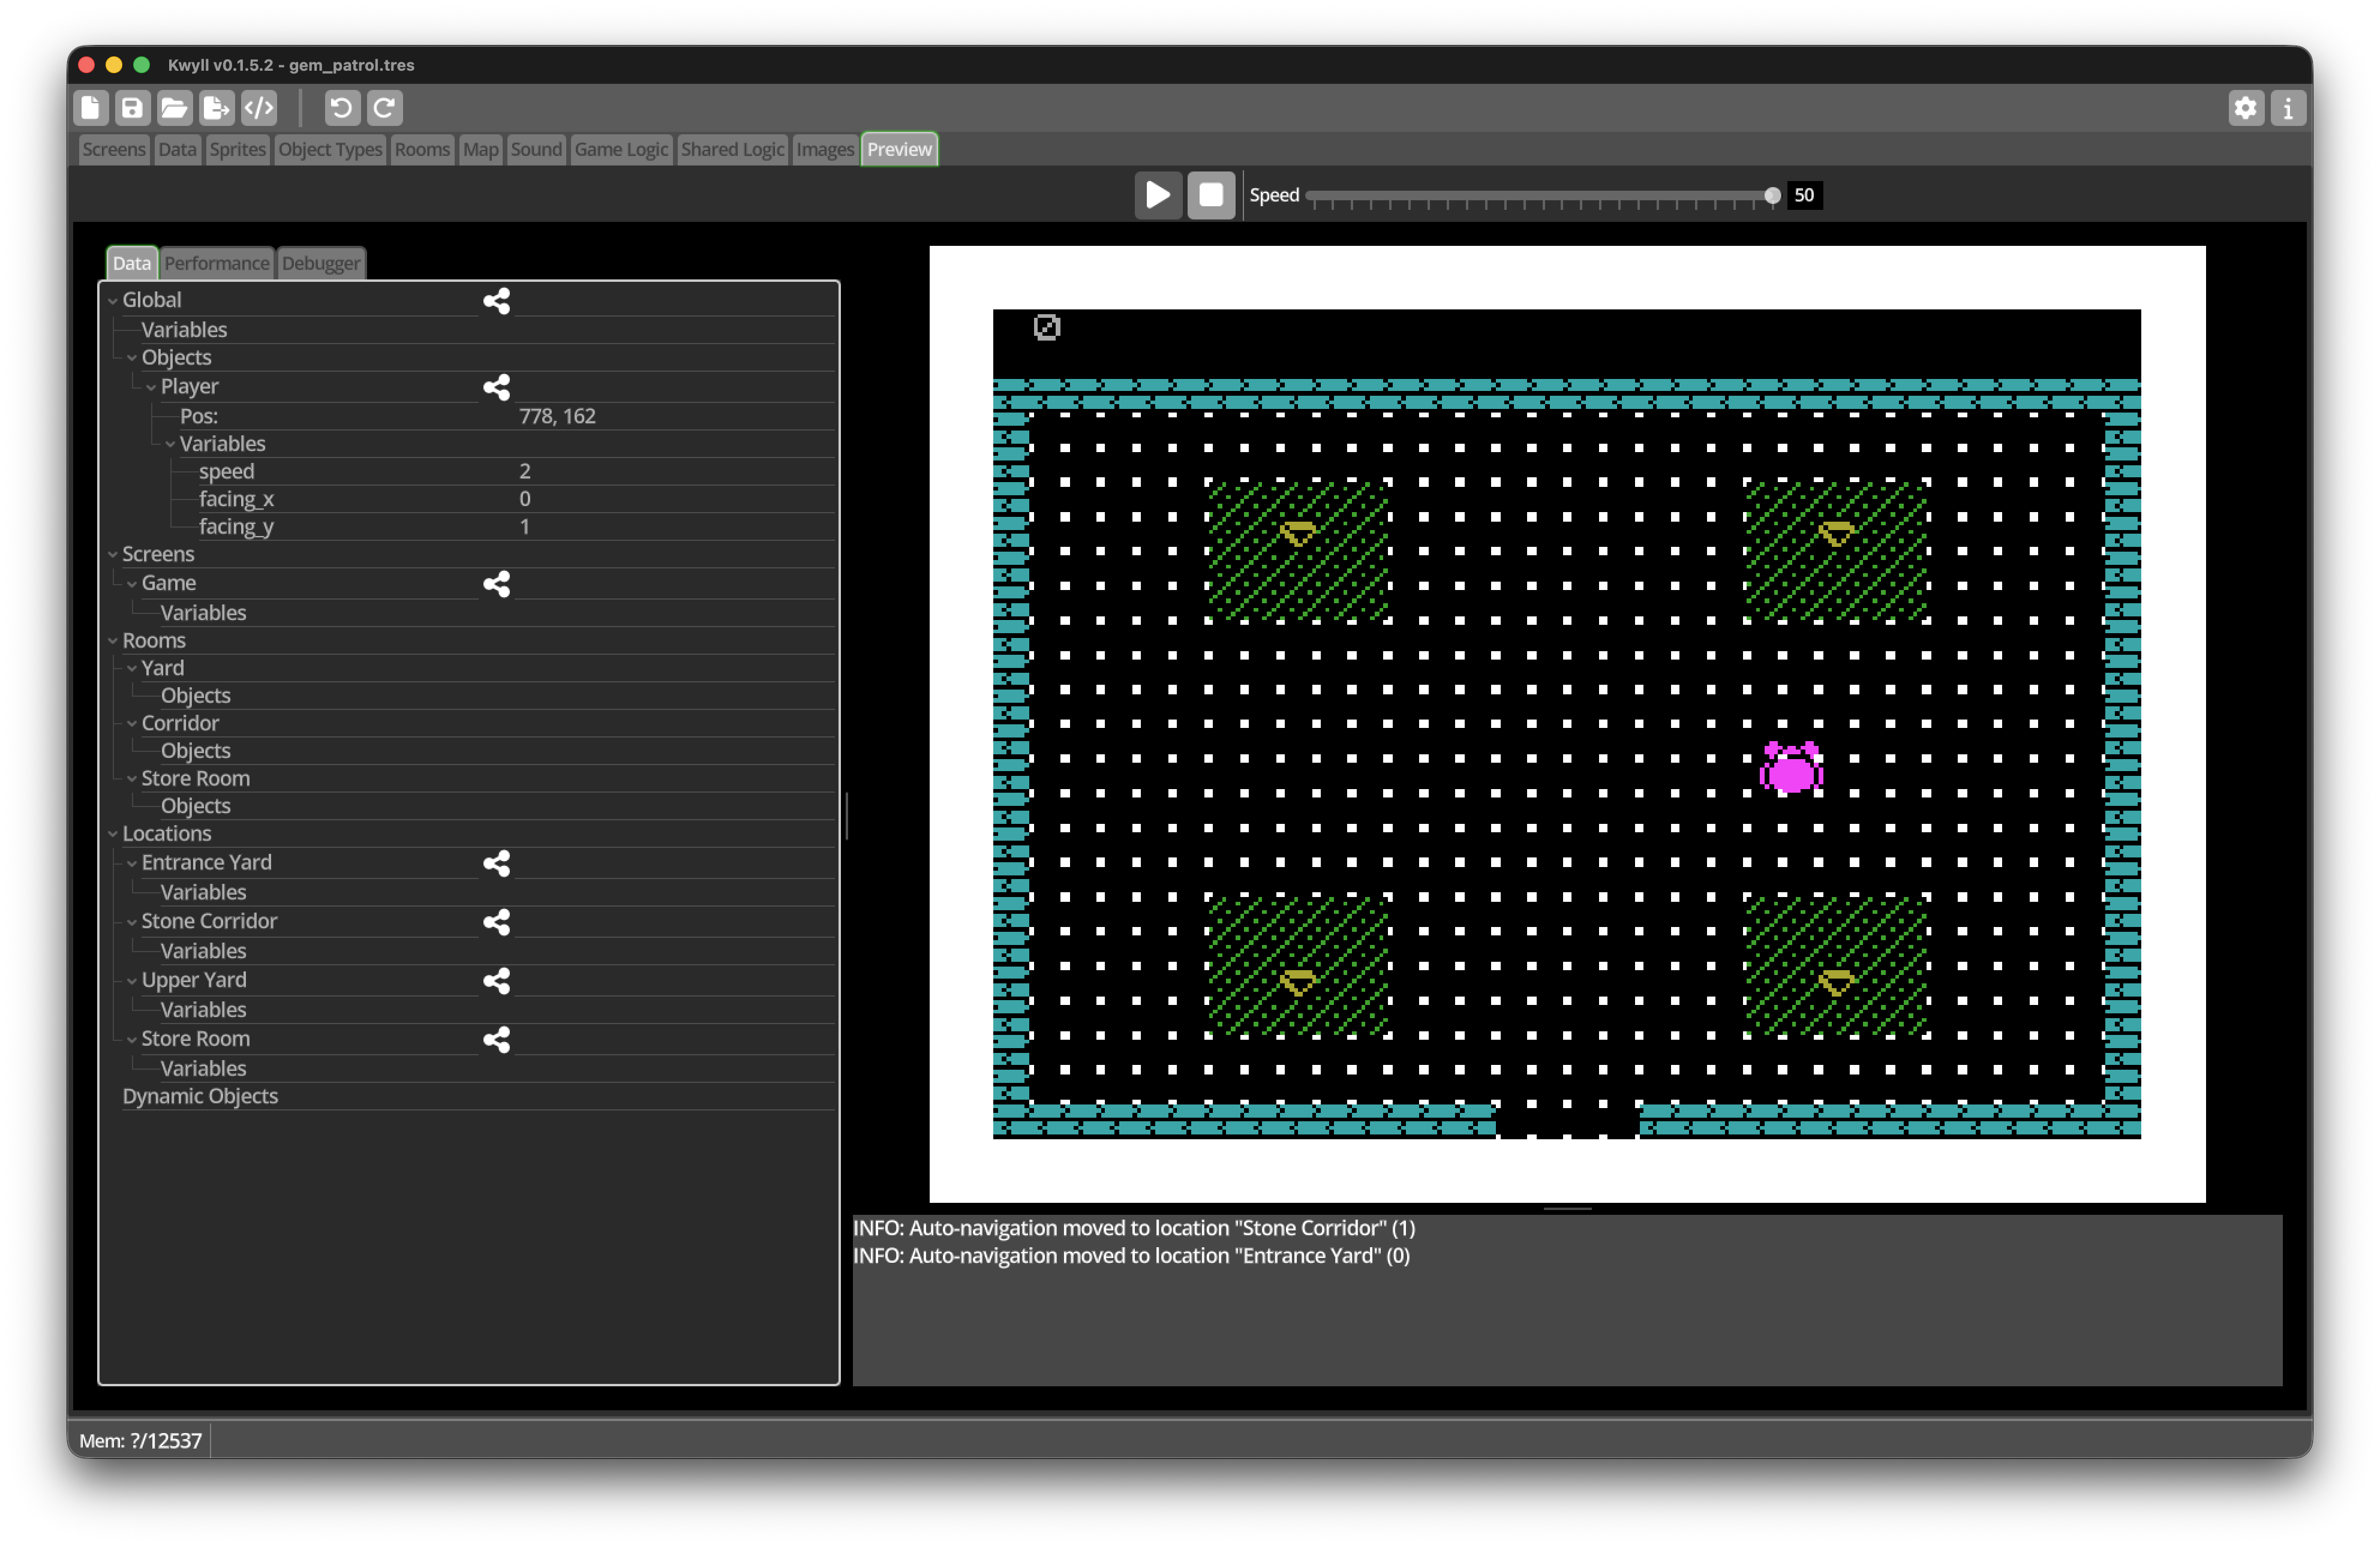
Save the project and test it in Preview.
The Player should:
-
move left, right, up, and down;
-
stop when it reaches a Wall tile; and
-
remain still when no direction is pressed.
Try pressing Left and Right together, then Up and Down together. The opposing values should cancel, leaving no movement on that axis.
Remember the facing direction
When we add projectiles, the game will need to know which way the Player last faced. We will record that now while the controller values are already familiar.
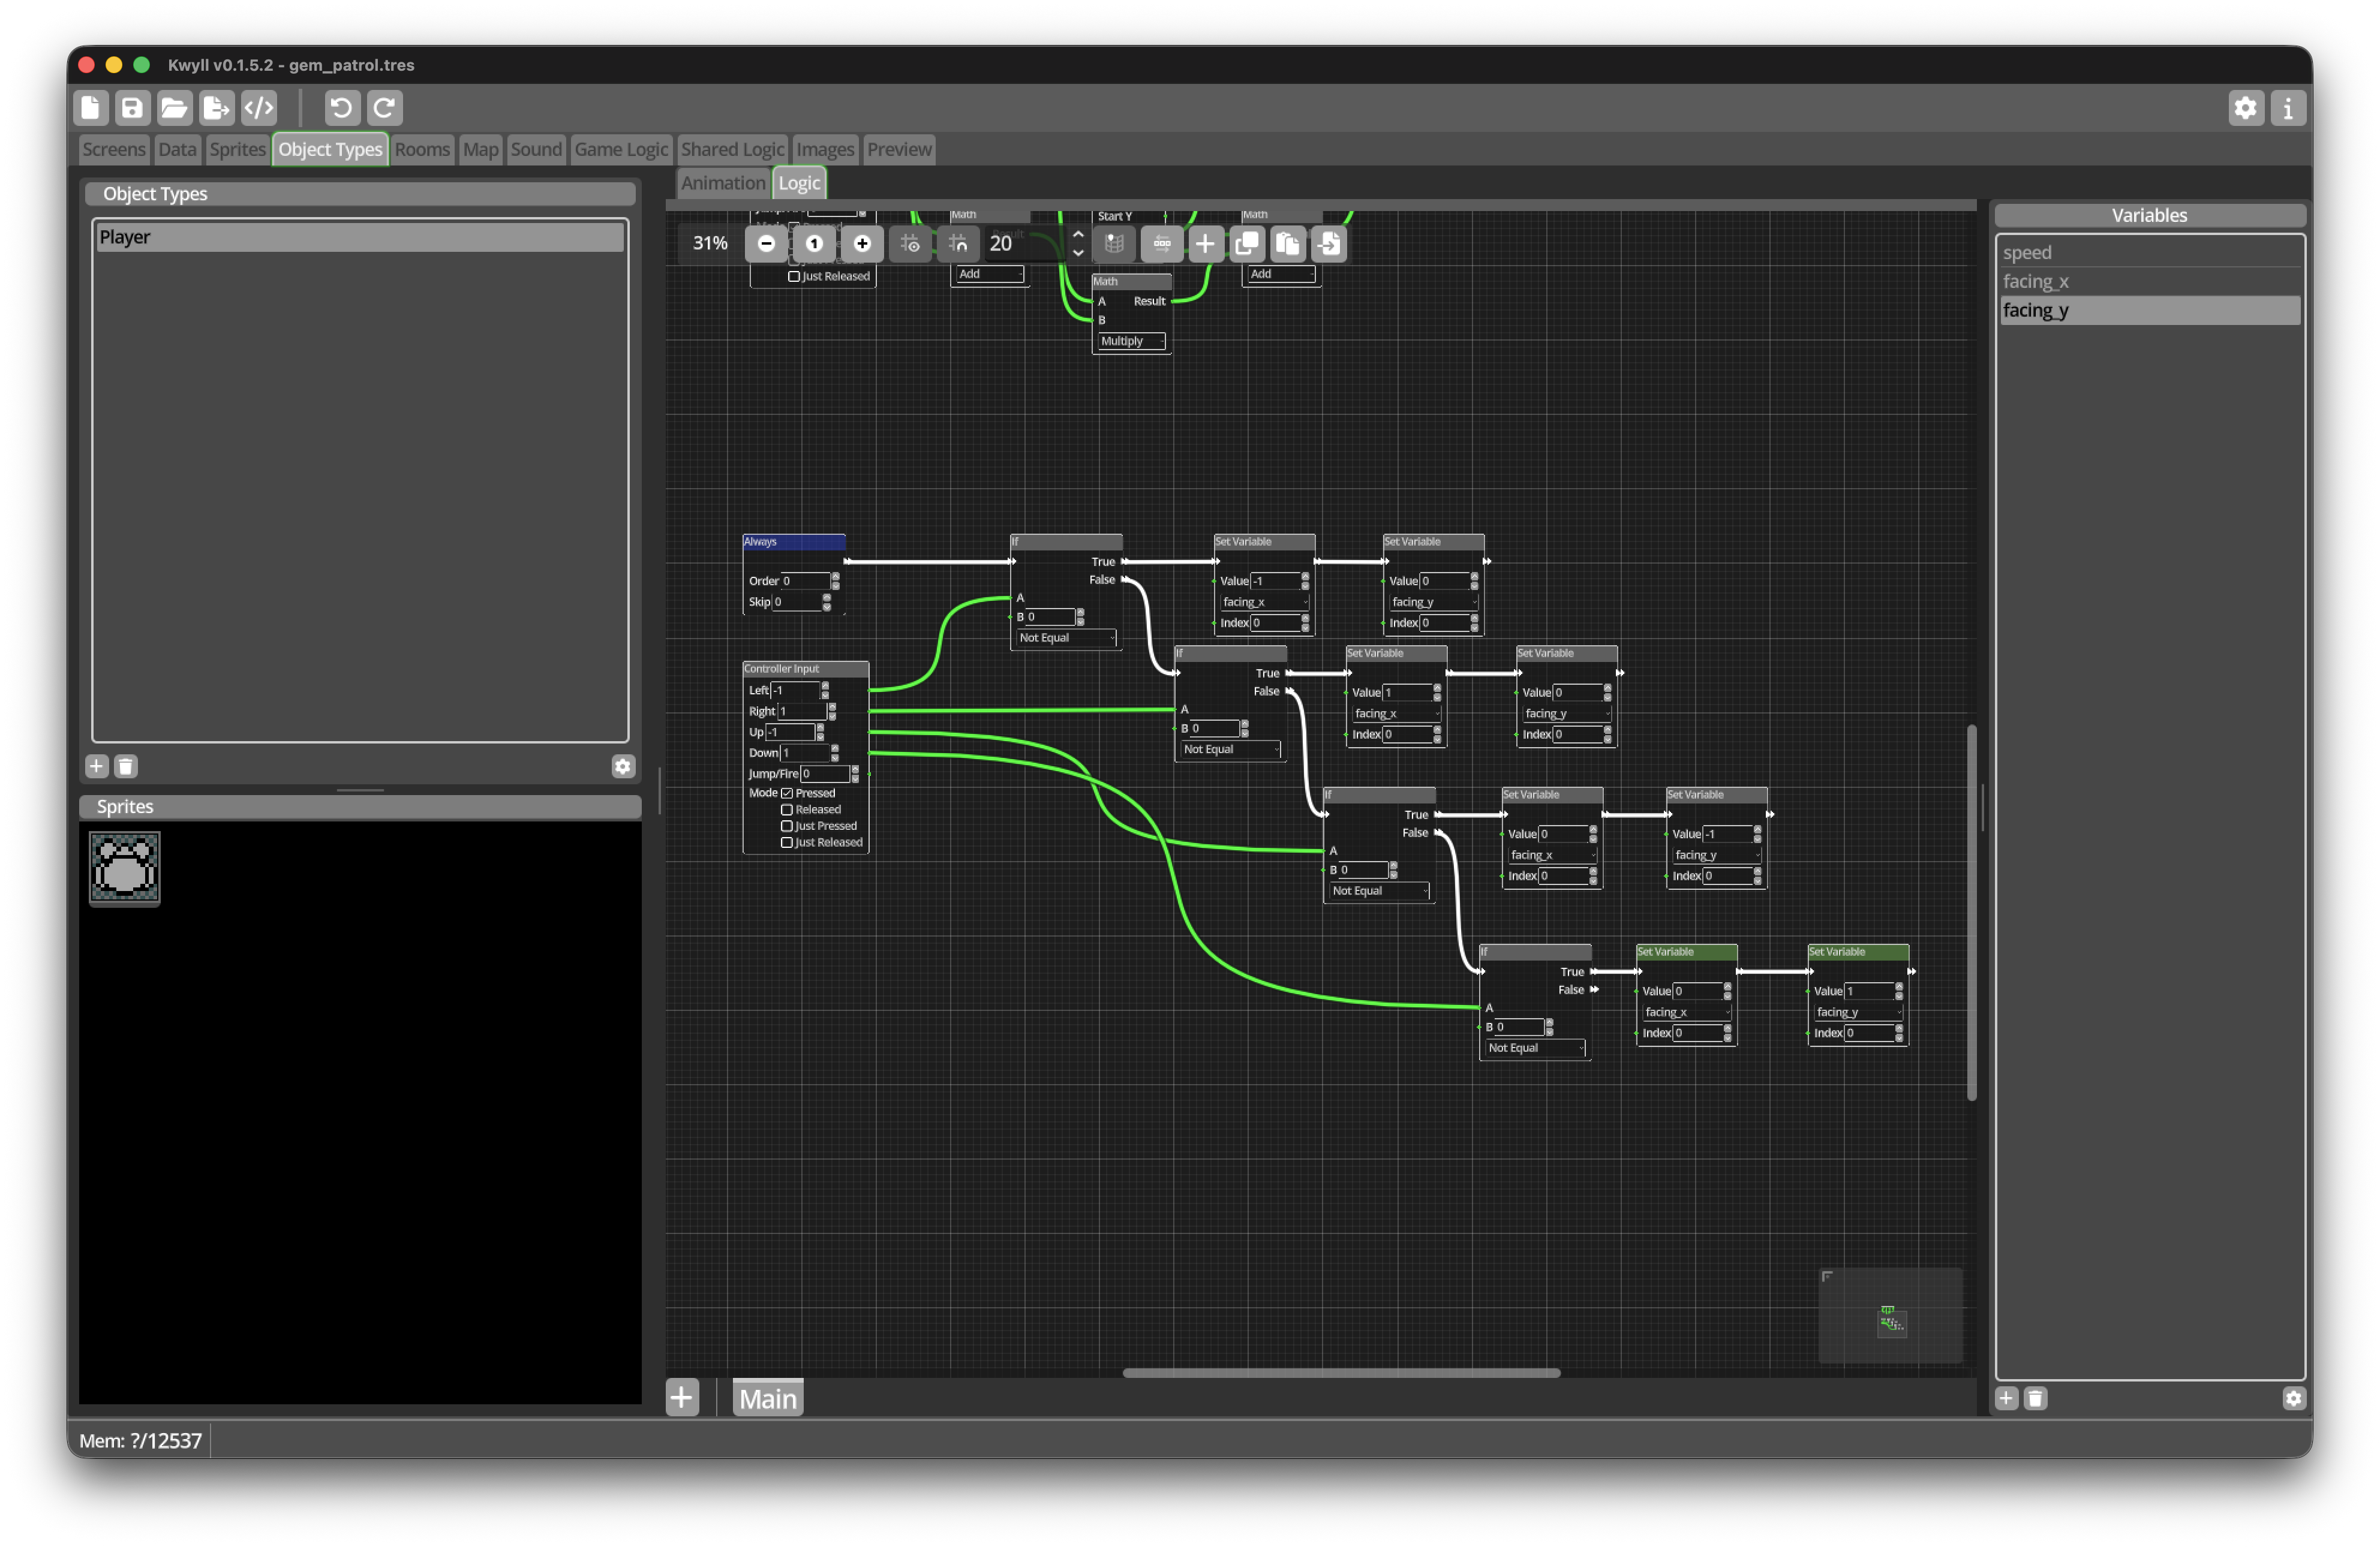
Create a separate Always flow. Add another Controller Input Node using
Mode Pressed, with the same directional values as before.
Build a chain of four If Nodes:
-
Test whether Left is not equal to
0.-
On True, set
facing_xto-1, then setfacing_yto0.
-
-
From the first False output, test whether Right is not equal to
0.-
On True, set
facing_xto1, then setfacing_yto0.
-
-
From that False output, test whether Up is not equal to
0.-
On True, set
facing_xto0, then setfacing_yto-1.
-
-
From that False output, test whether Down is not equal to
0.-
On True, set
facing_xto0, then setfacing_yto1.
-
Connect the second Always trigger to the first If. Connect each False flow
to the next test. Each True branch ends after setting both variables.
Checking the directions in this order also gives diagonal input a predictable facing direction: horizontal input takes priority over vertical input.
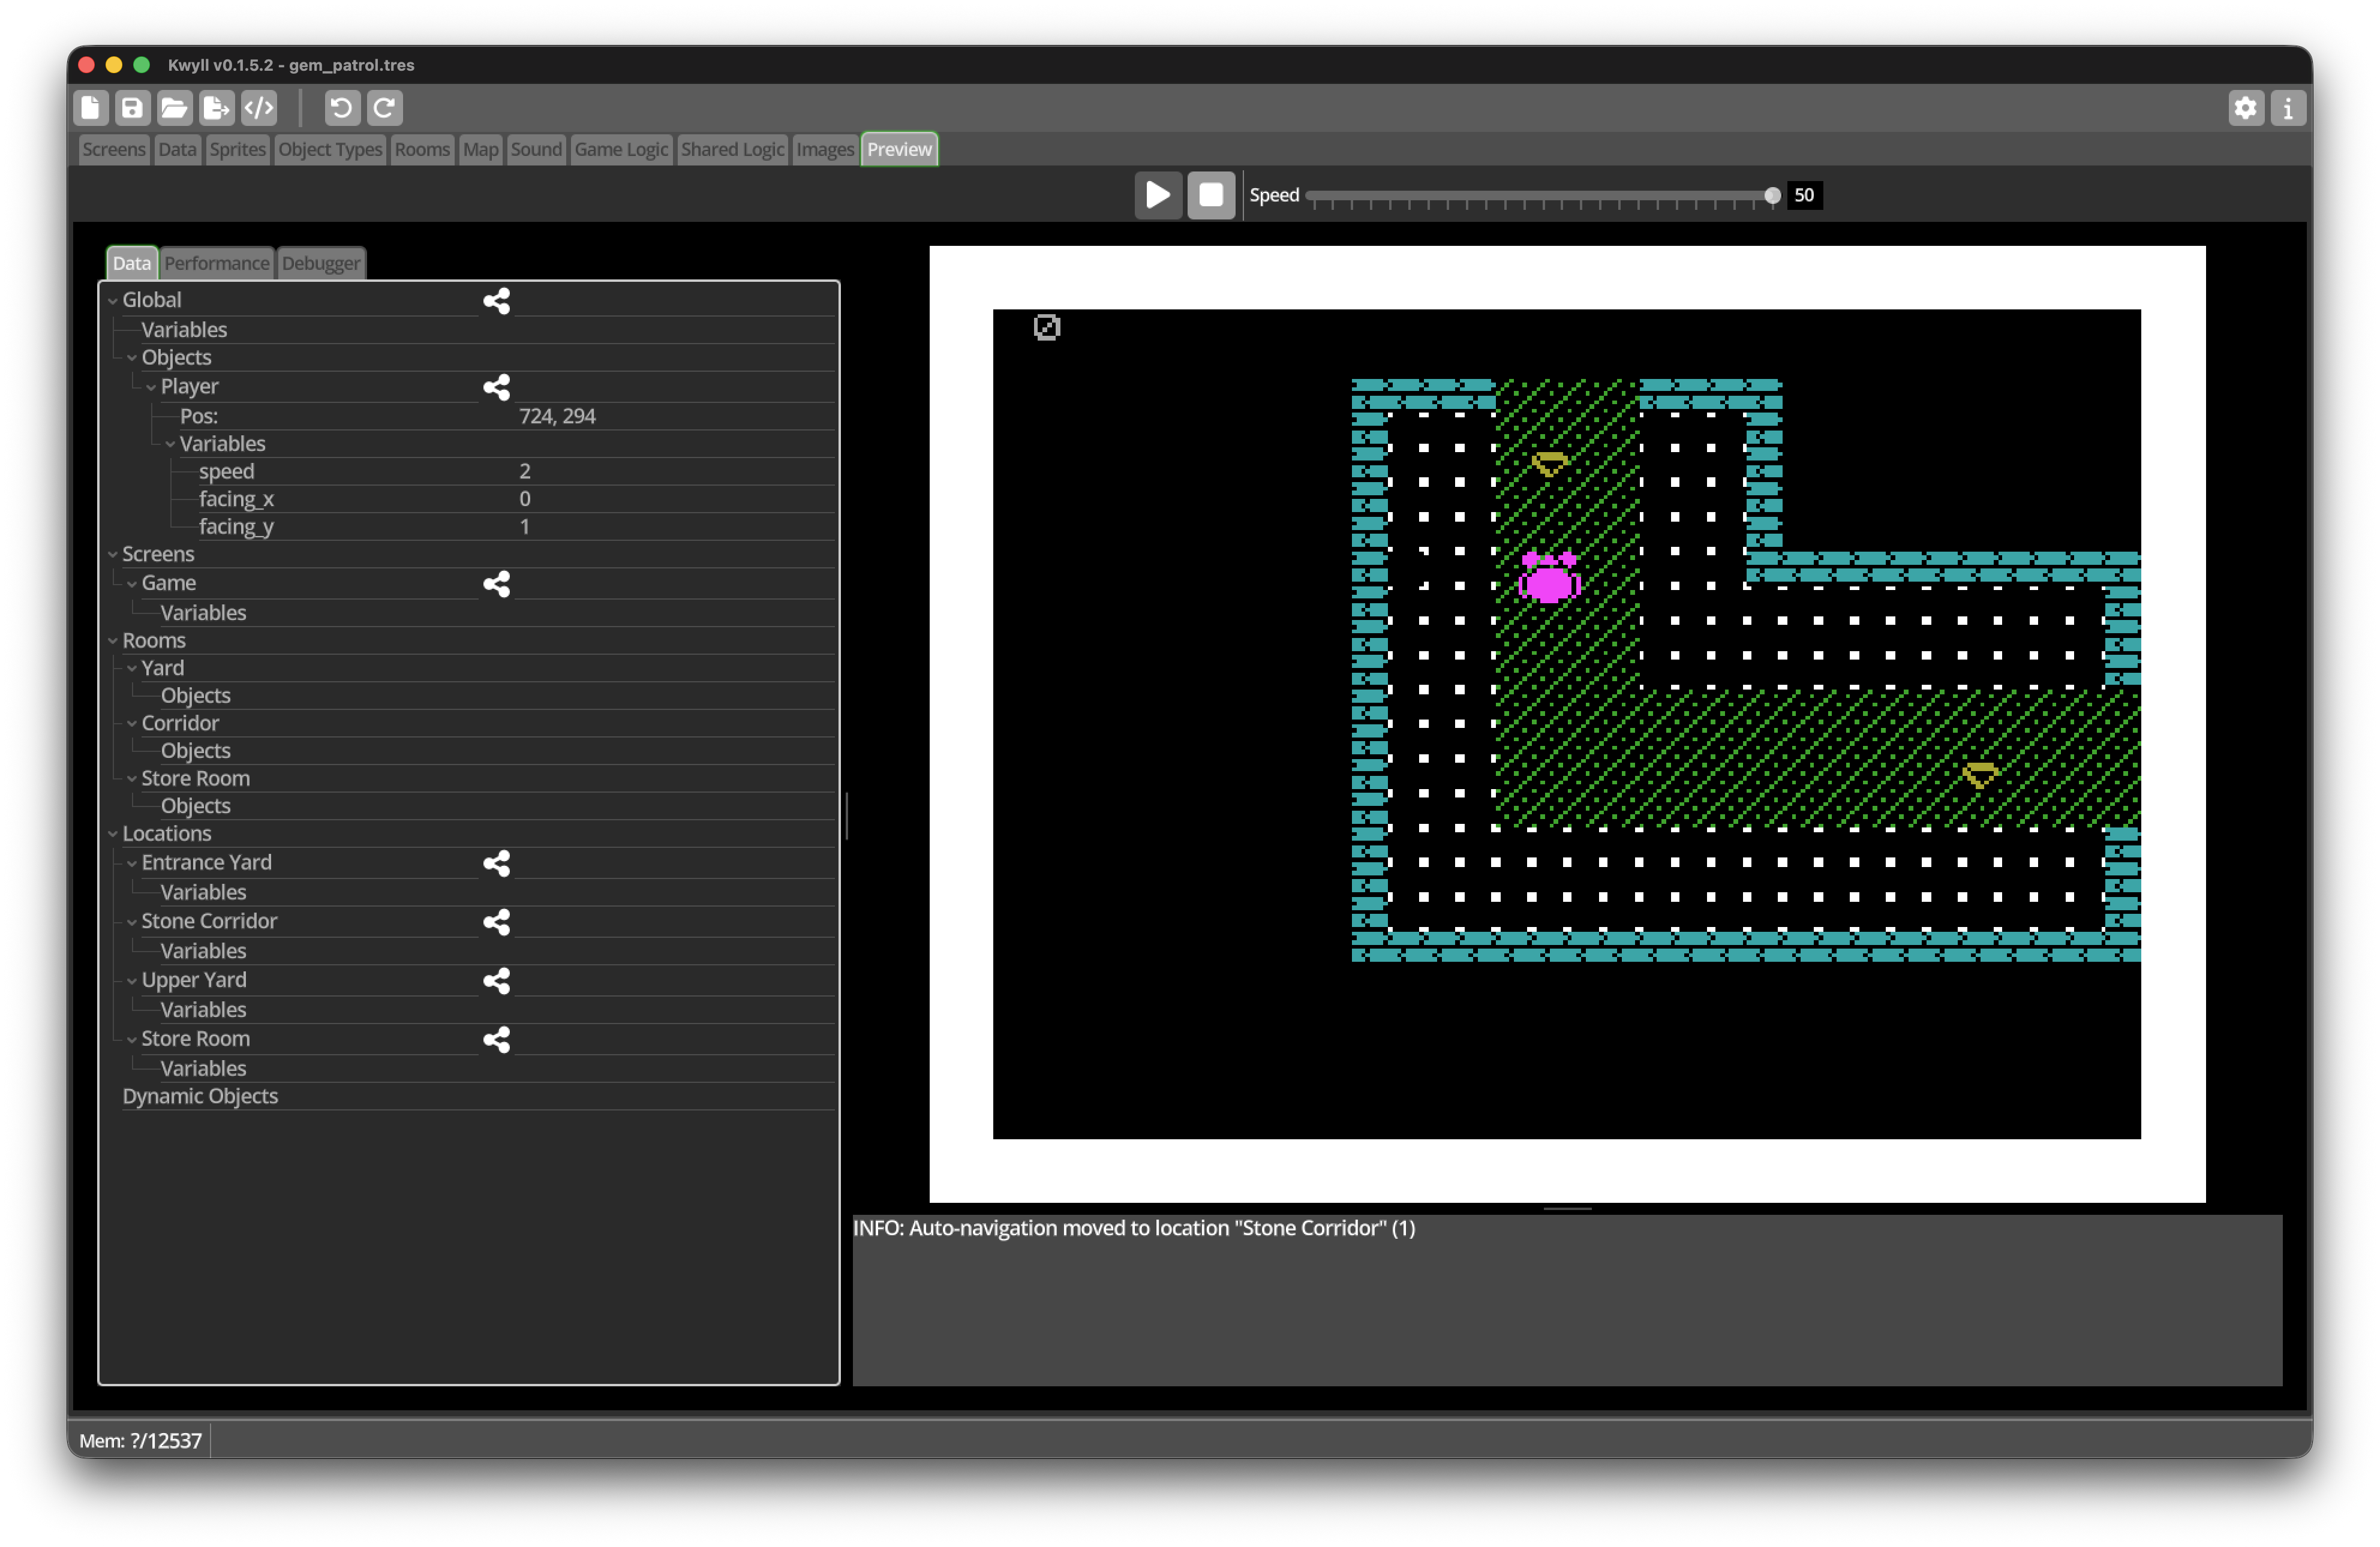
Test movement between Locations
Save and run Preview again.
-
Move down through the opening in Entrance Yard.
-
Confirm that the game changes to Stone Corridor.
-
Move right from Stone Corridor into the Store Room.
-
Move up from the Store Room into Upper Yard.
-
Move down to return to the Store Room.
The Player should appear at the corresponding edge of the new Location and continue to respond to the controller. No explicit change-room Logic is required: the Player flag and the arrangement of Locations on the Map handle this automatically.
Also test the closed edges. Walking into a Wall should stop the Player rather than changing Location.
Milestone 2 checklist
Before continuing, confirm that:
-
the
CharactersSprite Sheet is 16 by 16 and has a mask; -
the
PlayerObject Type uses Mask draw mode and has one animation frame; -
Player Logic defines
speed,facing_x, andfacing_y; -
one Player Object Instance exists on the Map in Entrance Yard;
-
the instance has Player, Collide Bg, Visible, and Active enabled;
-
the Player moves in all four directions;
-
Wall collision stops the Player;
-
the Player can travel through all three connected pairs of Locations; and
-
the facing variables retain the last direction pressed.
Save another copy as gem_patrol_milestone_2.tres.
Milestone 3: Collect and remember gems
In this milestone, the gems will become part of the game rather than just part of the scenery. The Player will react to the Gem tile’s Type, remove the tile, play a sound, and increase the counter at the top of the Screen.
We will also record the coordinates of every collected gem in the current Location. When the Player returns, Room Logic will clear those tiles again so that collected gems do not reappear.
This mechanic uses four different places where Kwyll can run Logic:
| Logic | Responsibility |
|---|---|
Player Object |
Detect the Gem tile and begin the collection flow |
Room |
Remember which gem coordinates were collected in each Location |
Game |
Keep the total number of collected gems |
Screen |
Display the total in the |
This may sound like several moving parts, but each part has one small, well-defined job. We will build and test them one at a time.
Create the collection sound
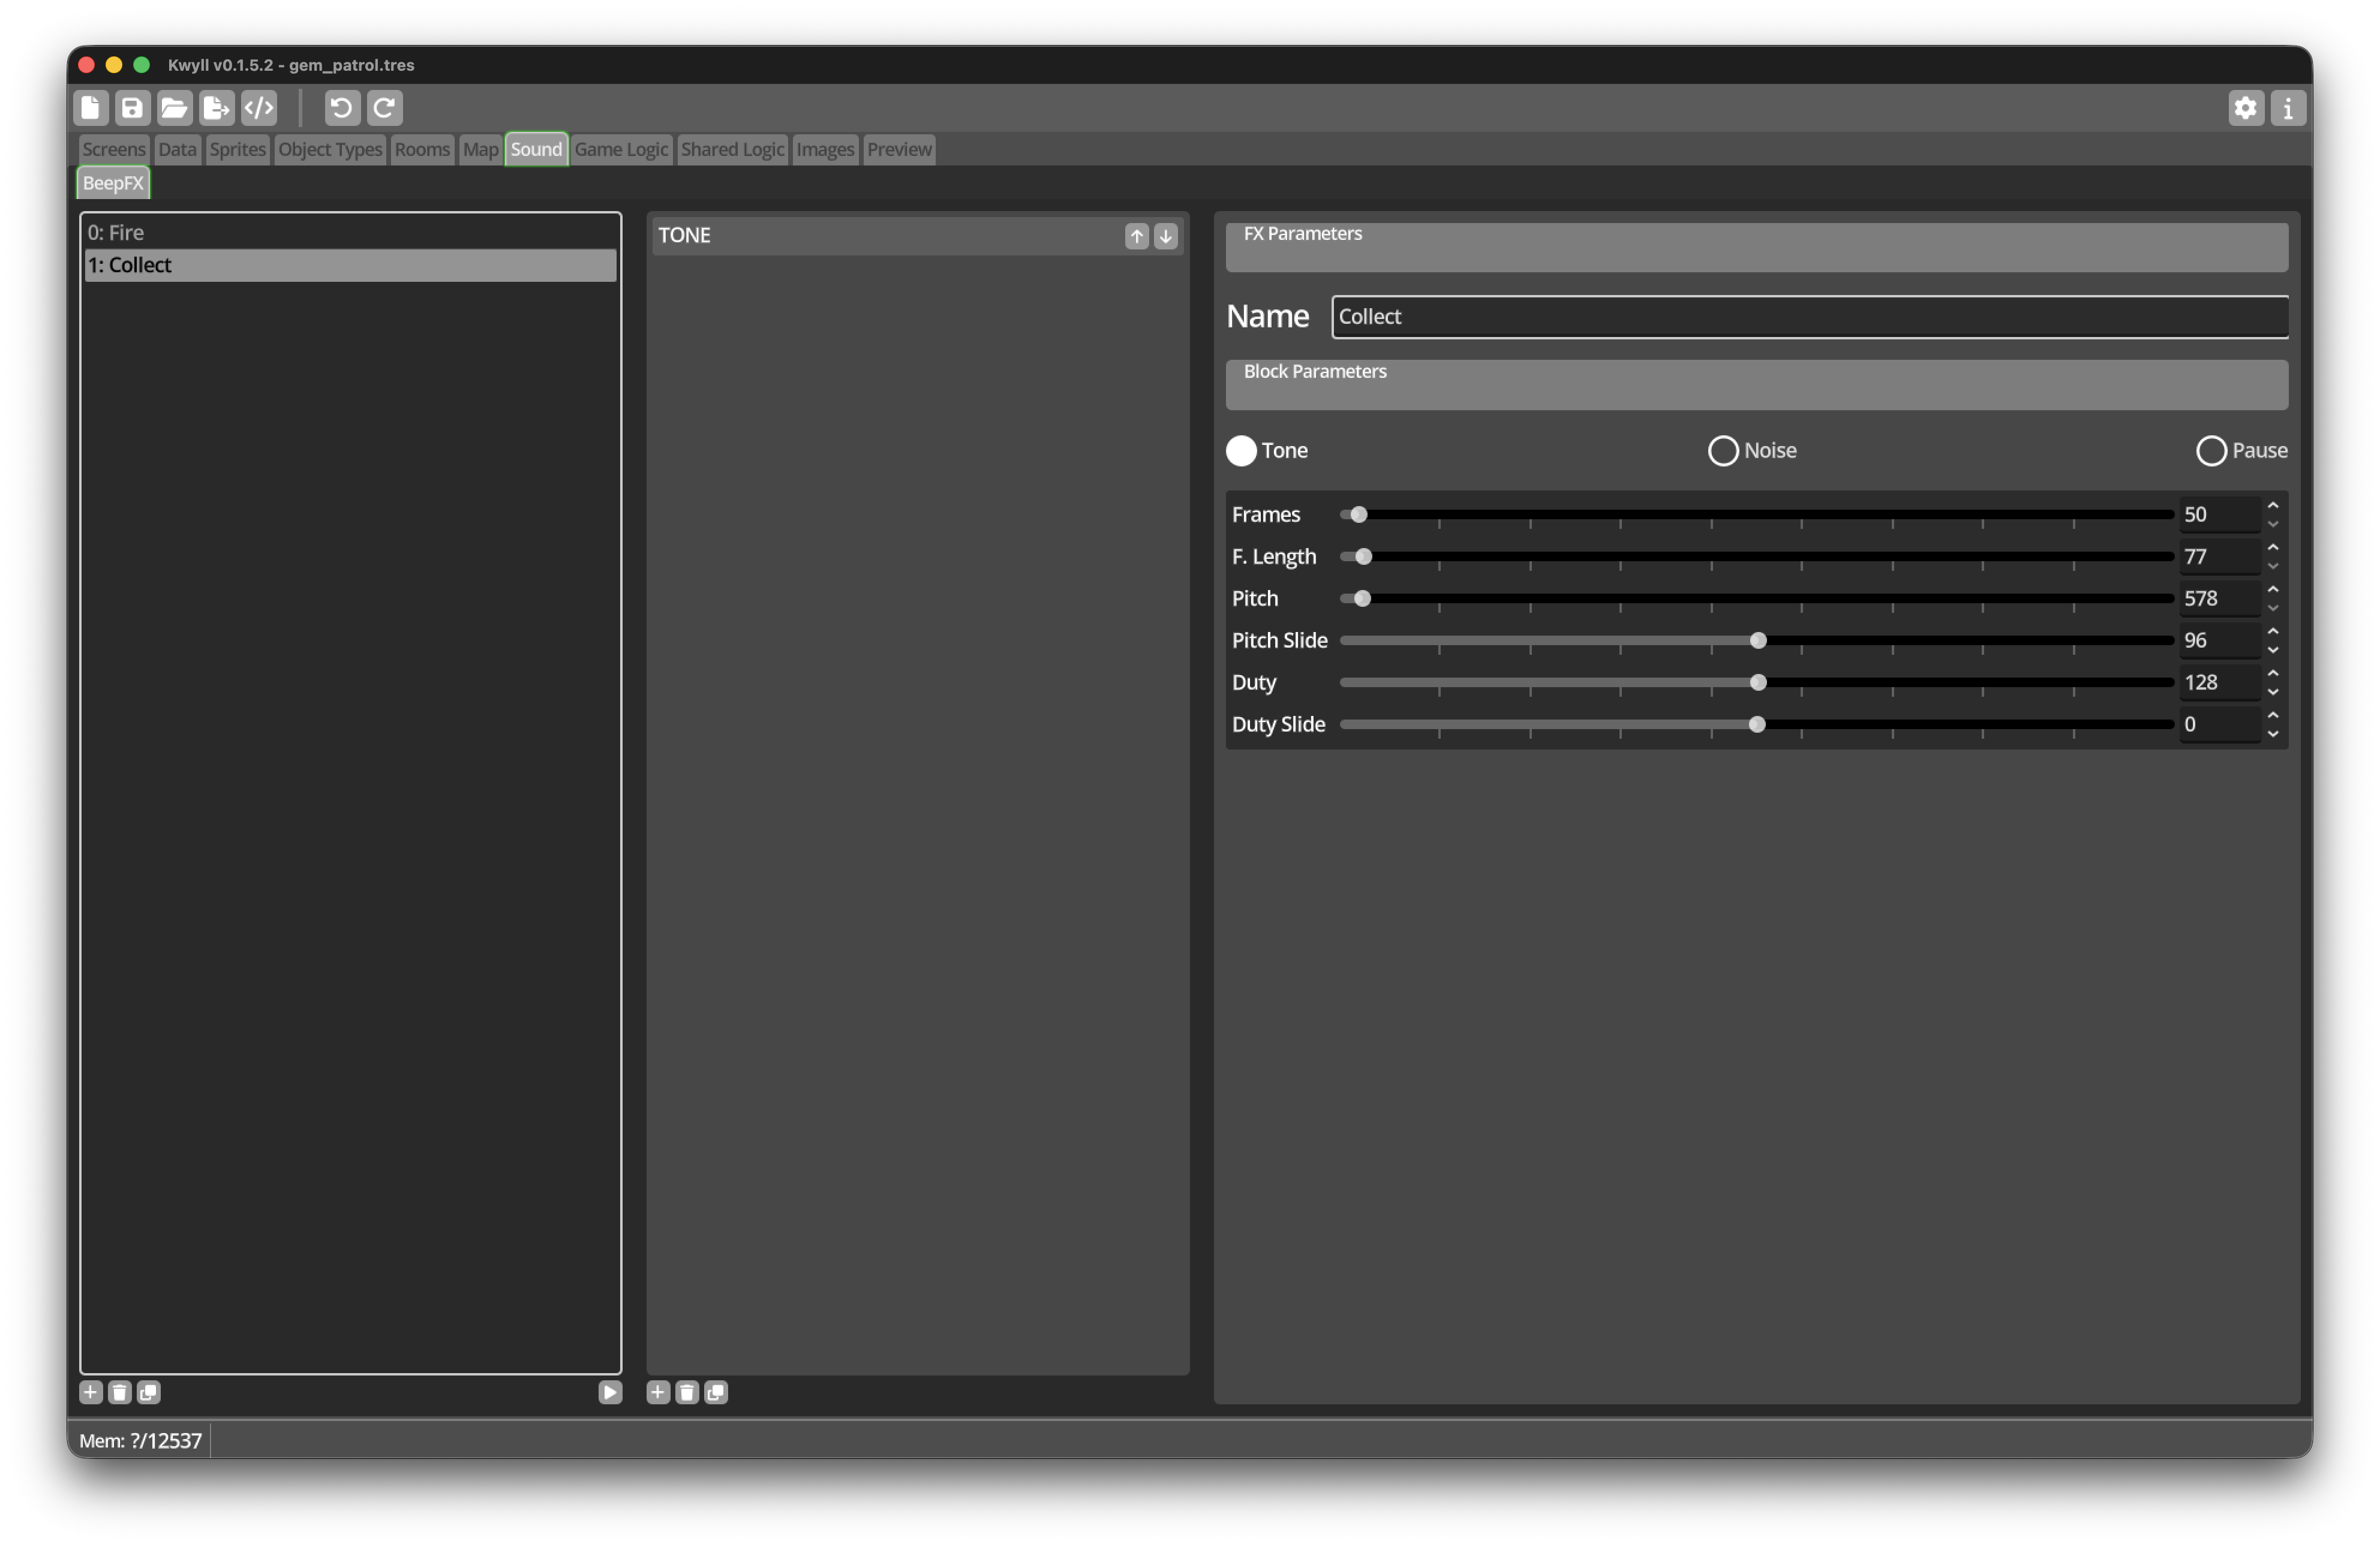
-
Open the Sound editor.
-
Open the Beep FX section.
-
Add a sound effect and name it
Collect. -
Add a short, bright block or note sequence.
-
Use the play control to listen to it.
Keep the effect brief. It may play several times in quick succession while the Player moves through a group of gems.
Detect a Gem tile
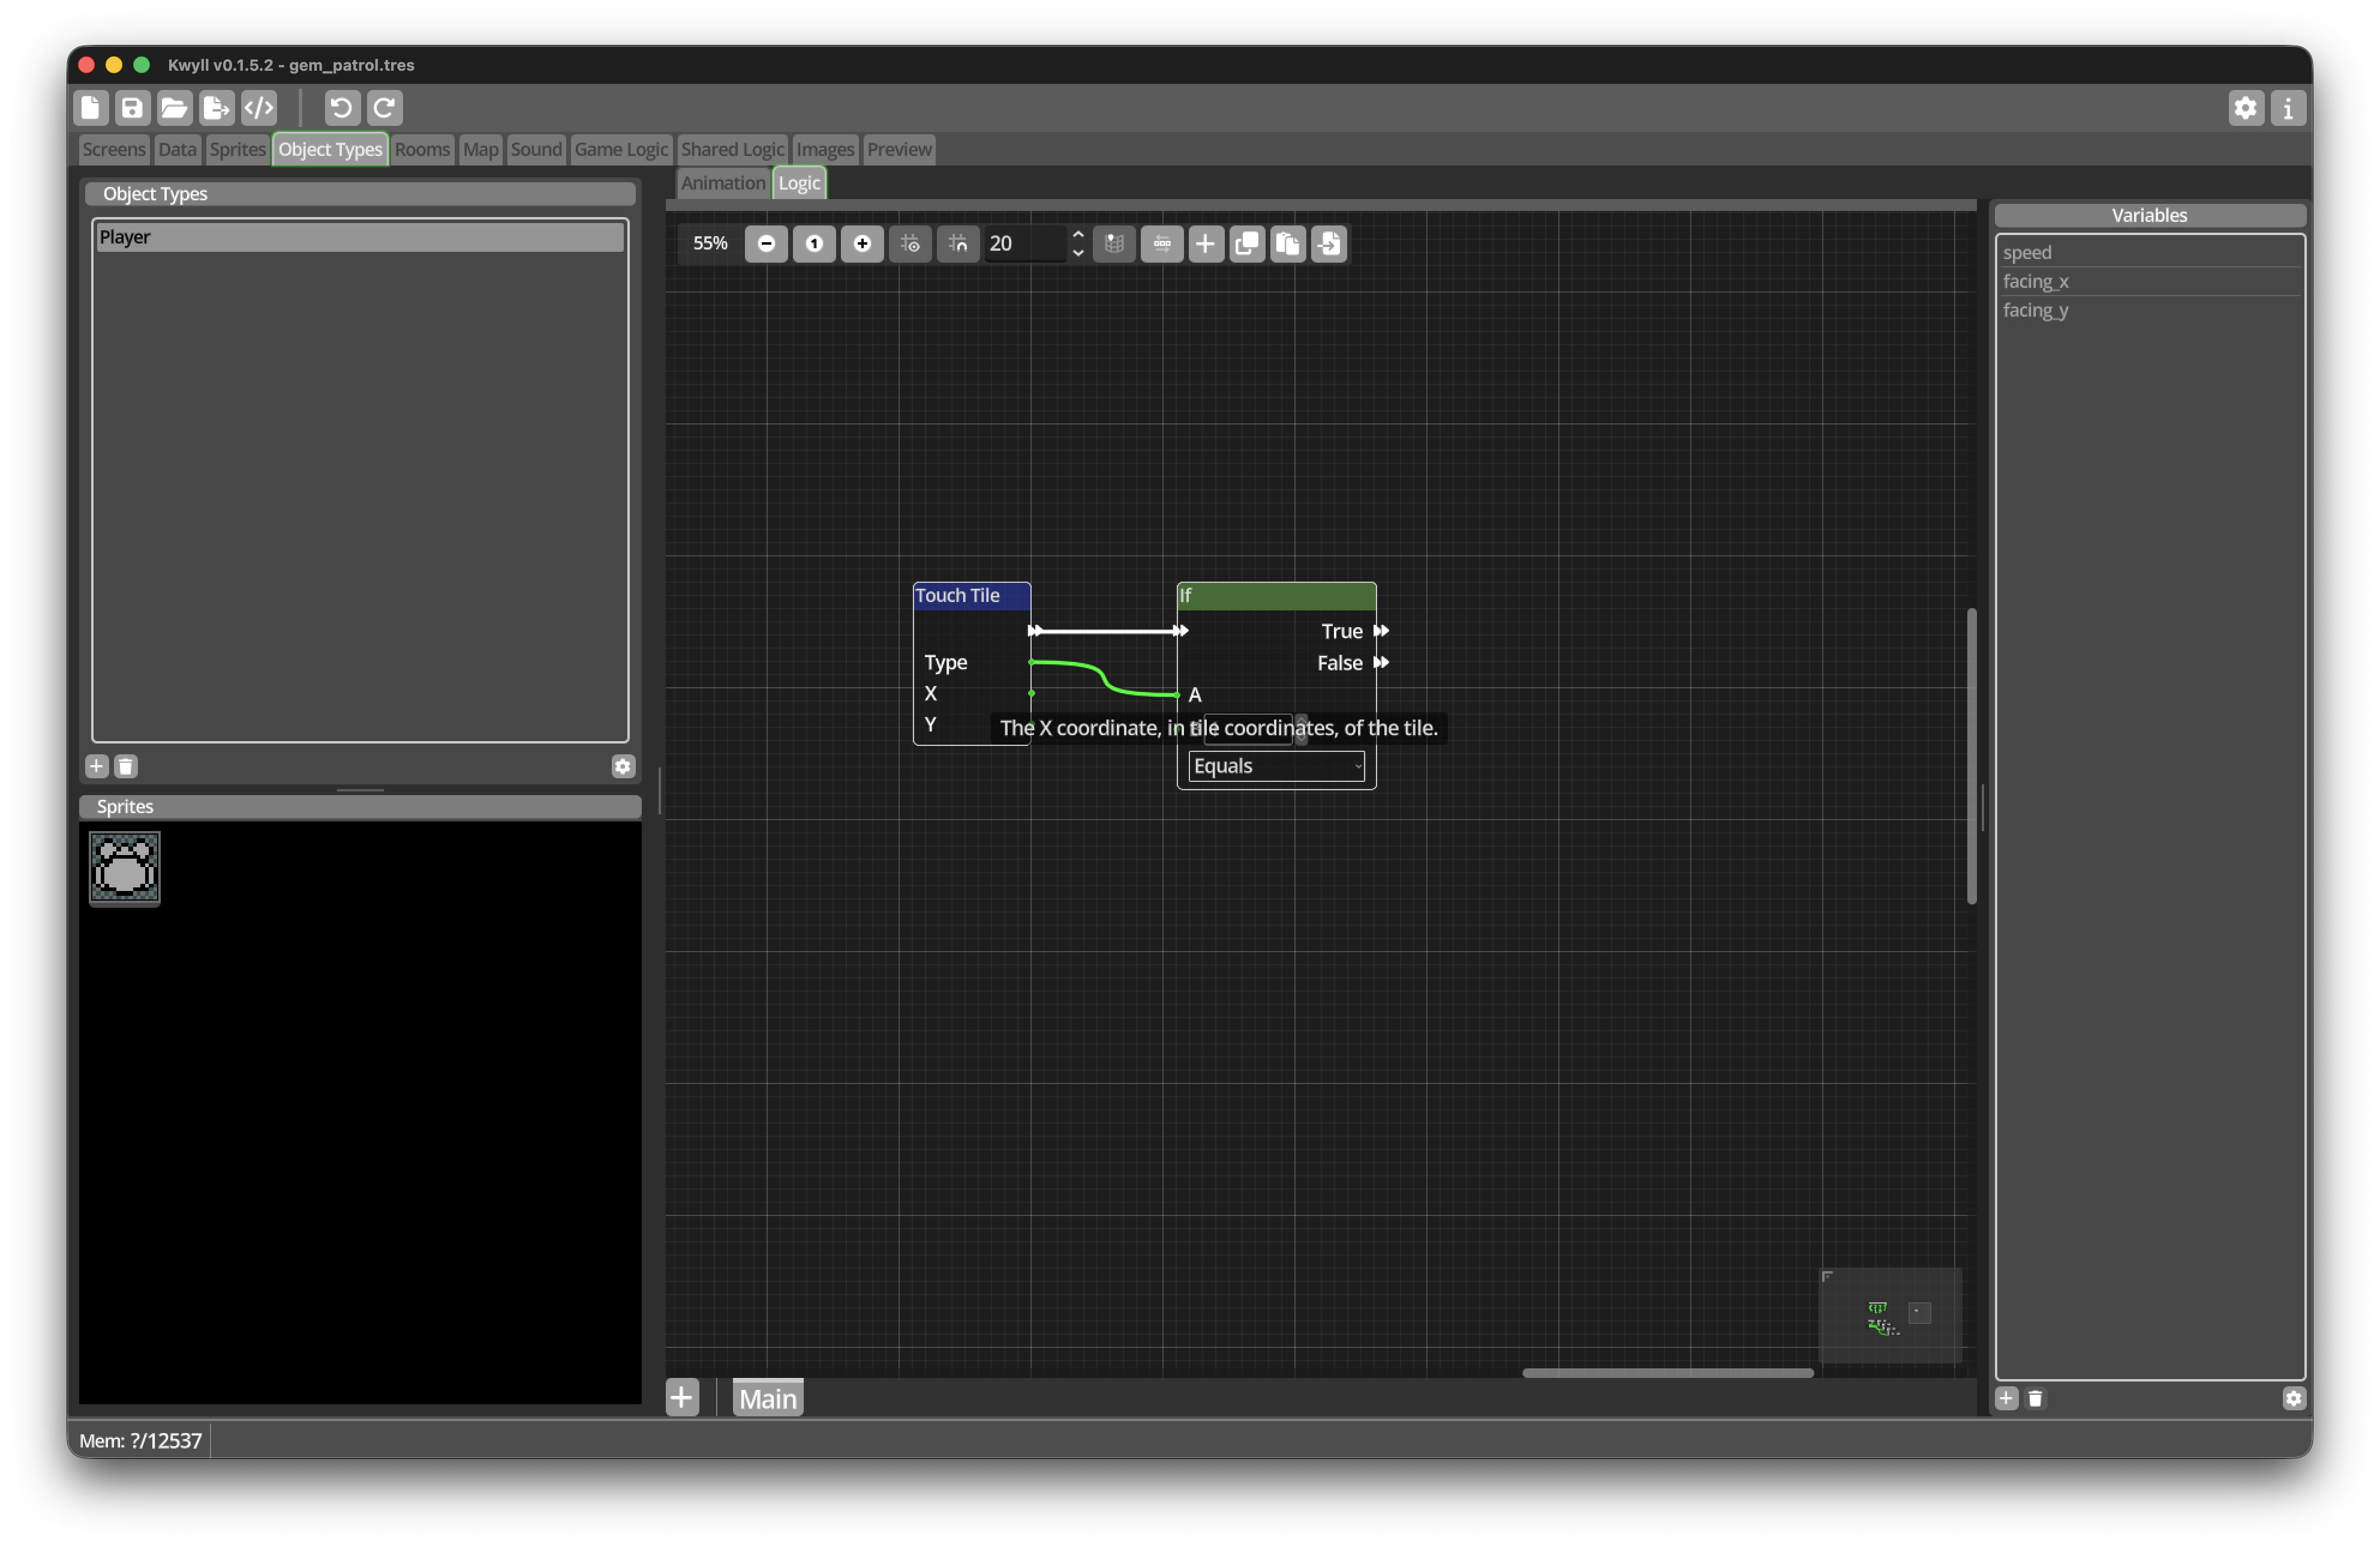
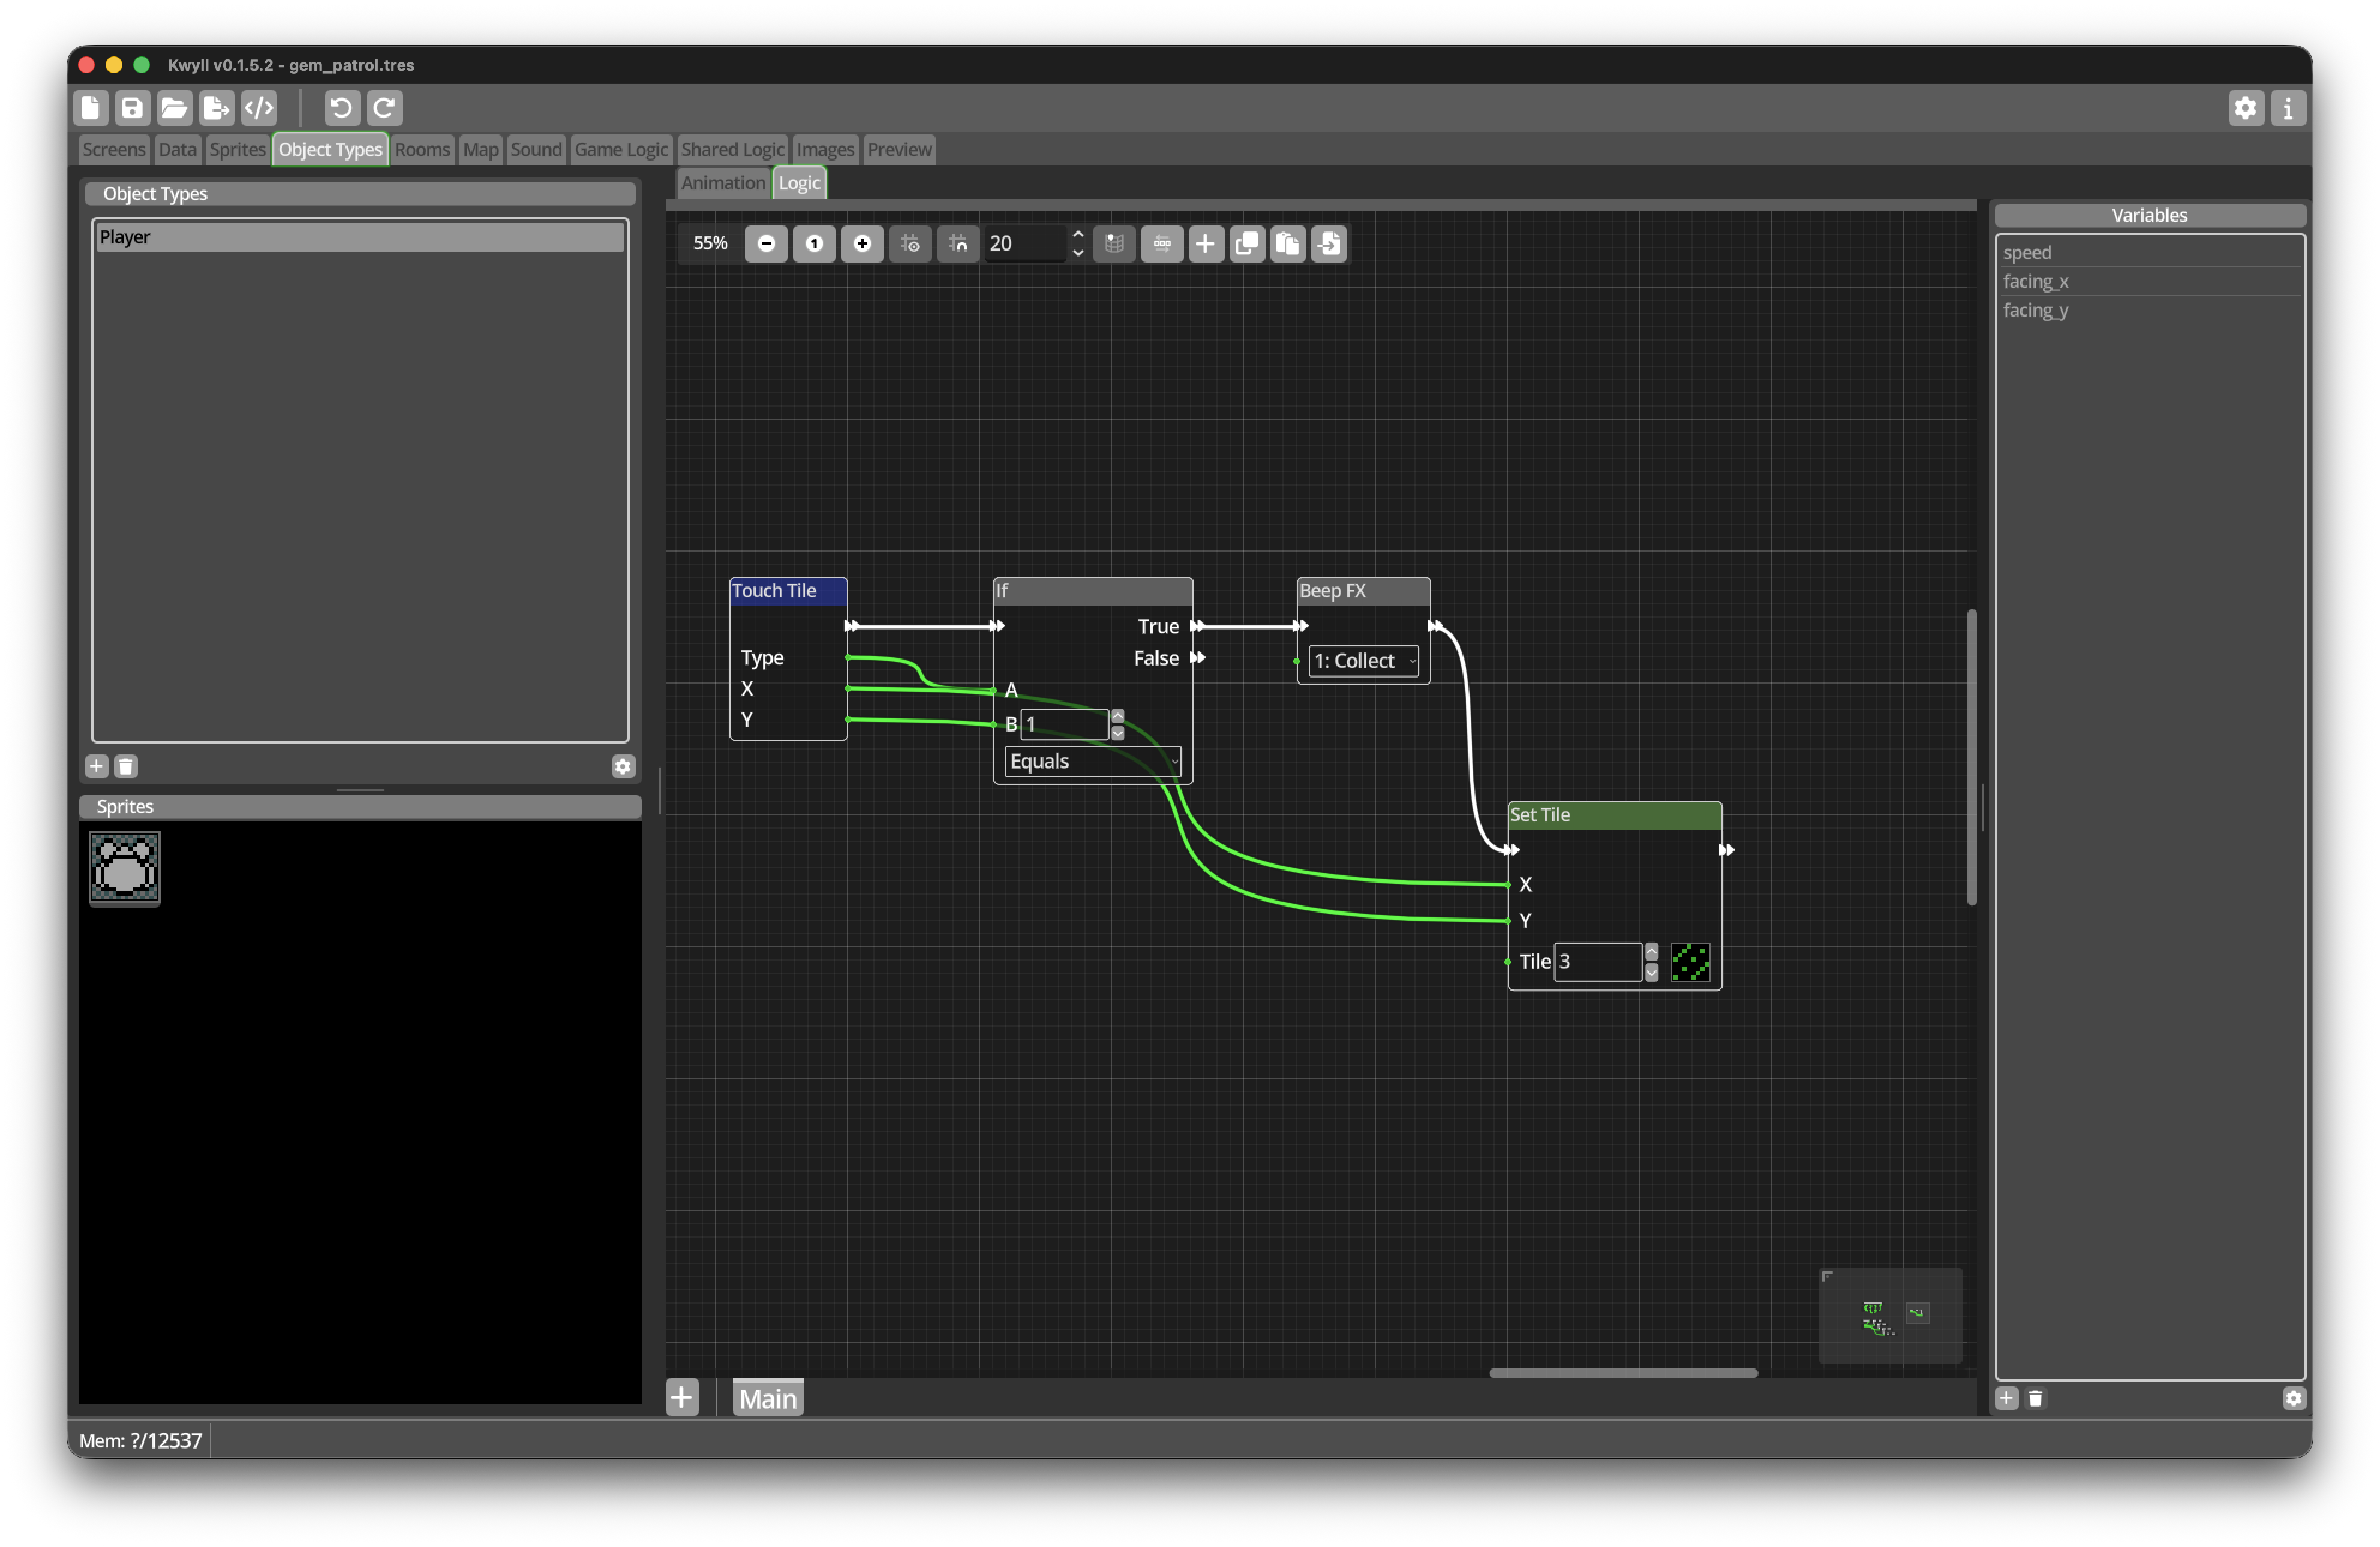
Open the Player Object Type and return to its Logic graph. Find an empty area
away from the movement flows.
-
Add a
Touch Tiletrigger. -
Add an
IfNode. -
Connect the Type output of
Touch Tileto A on theIf. -
Leave B set to
1. -
Set the Comparison to
Equal. -
Connect the white Flow Out of
Touch Tileto the Flow In ofIf.
The Gem tile was given Type 1 in Milestone 1. Touch Tile runs when the
Player’s bounding rectangle touches a tile with a non-zero Type, and the If
ensures that this flow handles only gems.
Remove the touched Gem
-
Add a
Beep FXNode and selectCollect. -
Connect the True flow of the
IftoBeep FX. -
Add a
Set TileNode afterBeep FX. -
Connect X from
Touch Tileto X onSet Tile. -
Connect Y from
Touch Tileto Y onSet Tile. -
Set Tile to
3, the index of our Decorative floor tile.
The gems in our rooms were painted over Decorative floor areas, so replacing a
gem with tile 3 reveals the surface that was visually beneath it. If your
Decorative floor has a different index, use that index instead.
The Gem disappears immediately because its tilemap cell is replaced with
Decorative floor. The replacement also prevents the collection flow from running again
on the following update: Floor has Type 0, so Touch Tile no longer
triggers for that cell.
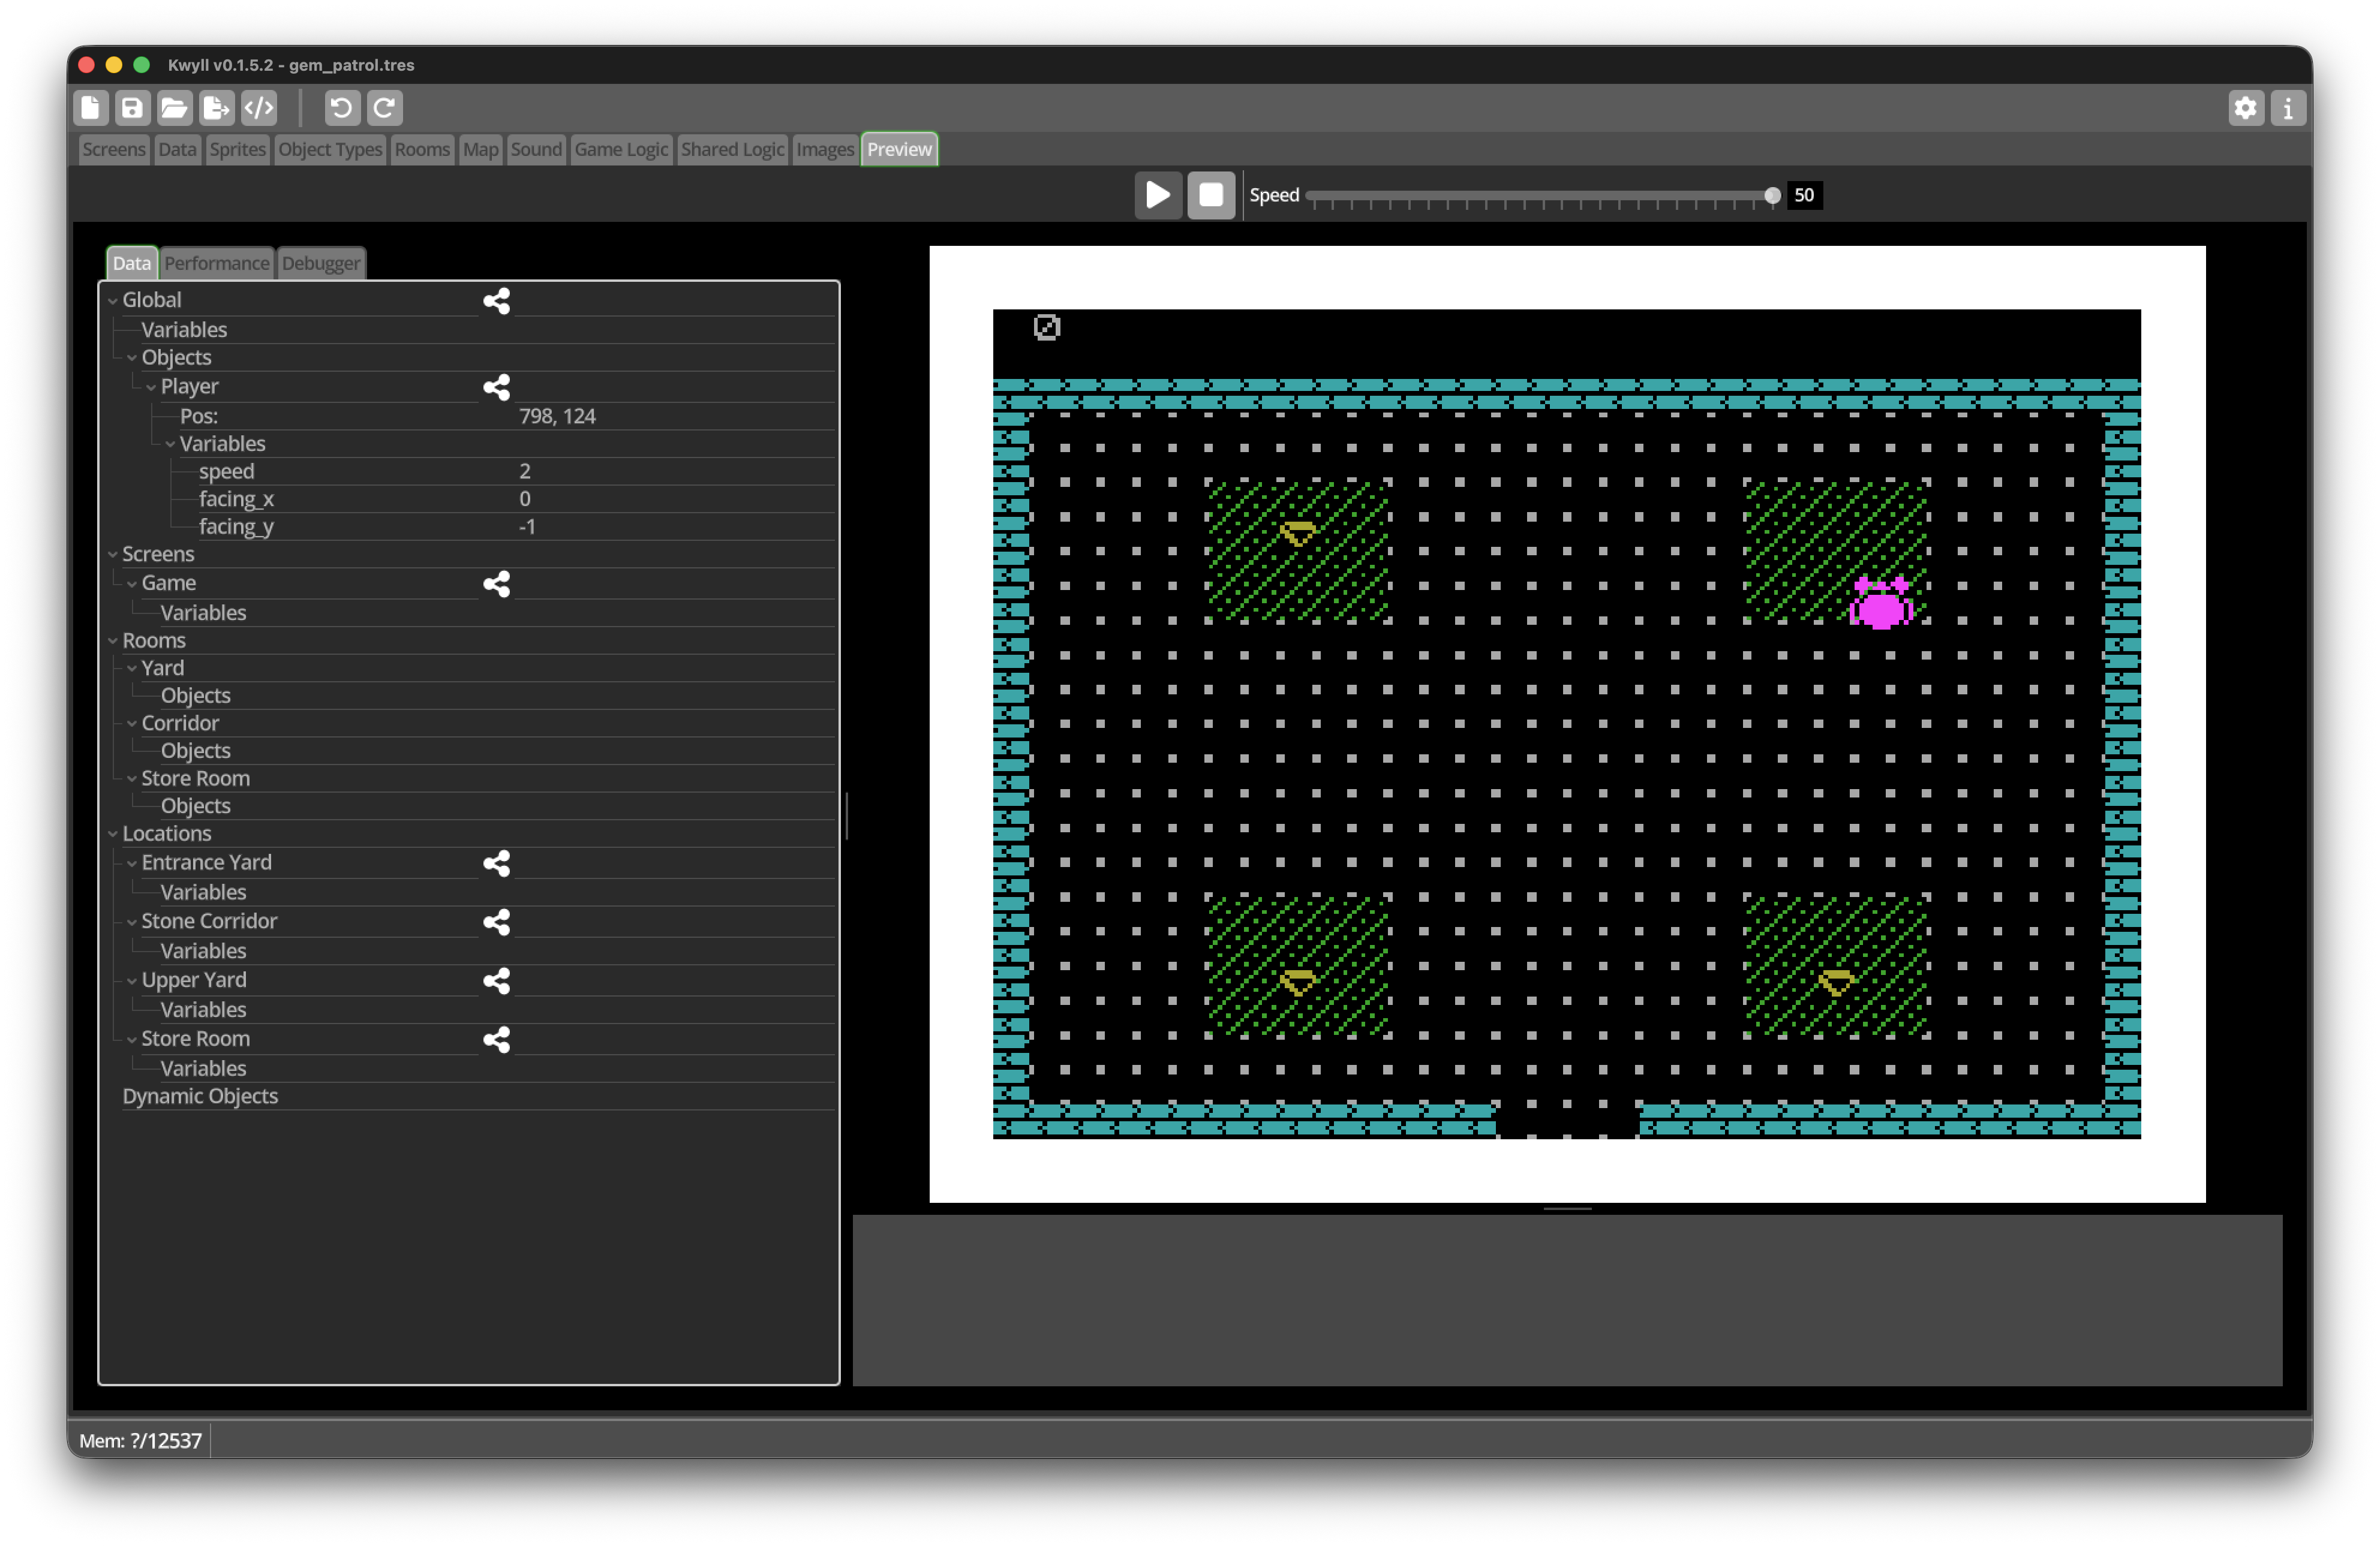
Save and test the game now. Touching a gem should play the sound and replace
the gem with Floor. The counter will still show 0, and the gem will return
after leaving and re-entering the Location. Both behaviours are expected at
this stage.
Send collection messages
We now need to tell two other parts of the project what happened:
-
Game Logic needs to increase the total.
-
Room Logic needs the tile’s X and Y coordinates.
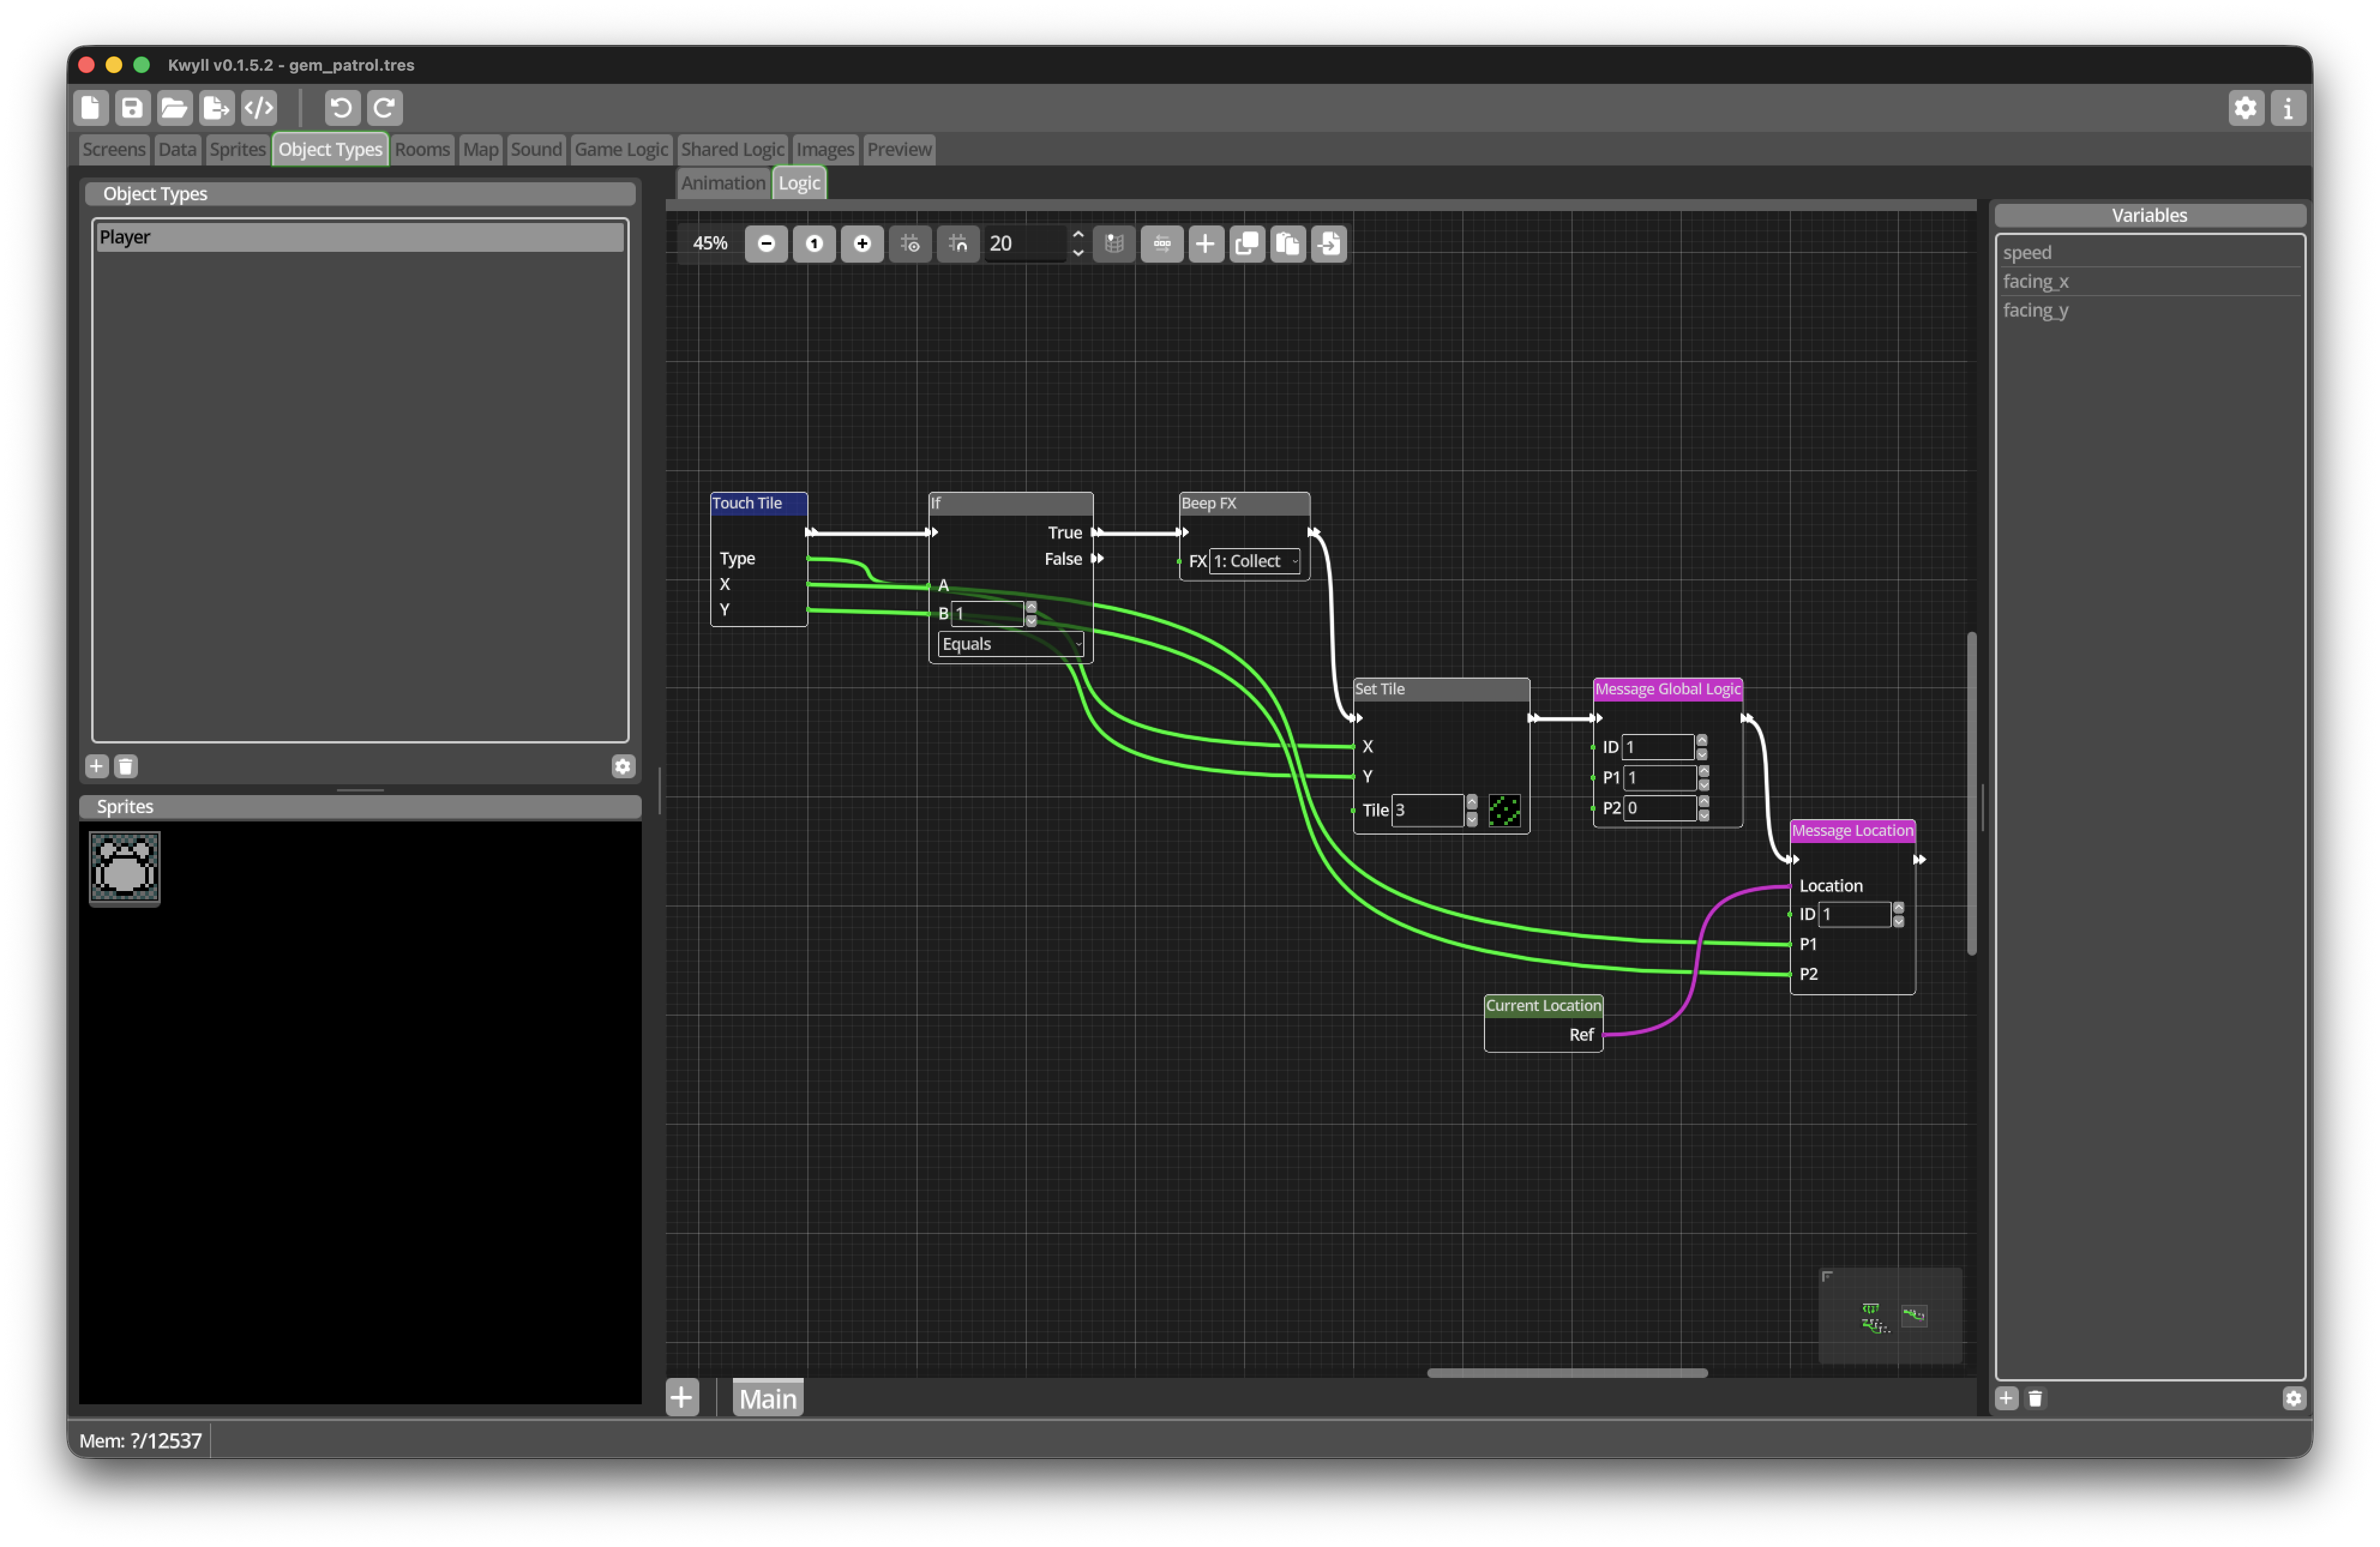
We will use message ID 1 to mean “a gem was collected” in all four Logic
areas.
-
Add a
Message Global LogicNode afterSet Tile. -
Set its ID to
1. -
Set P1 to
1, the amount to add to the total. -
Add a
Message LocationNode afterMessage Global Logic. -
Set its ID to
1. -
Connect X from
Touch Tileto P1 onMessage Location. -
Connect Y from
Touch Tileto P2 onMessage Location. -
Add a
Current LocationNode. -
Connect its location reference output to Location on
Message Location.
Message Location needs an explicit Location reference because this flow is
running on the Player Object, not in Room Logic. Current Location provides
the Location the Player is presently exploring.
The complete white flow should now be:
Touch Tile -> If Type is 1 -> Beep FX -> Set Tile
           -> Message Global Logic -> Message Location
Store the total in Game Logic
Open the Game Logic editor.
-
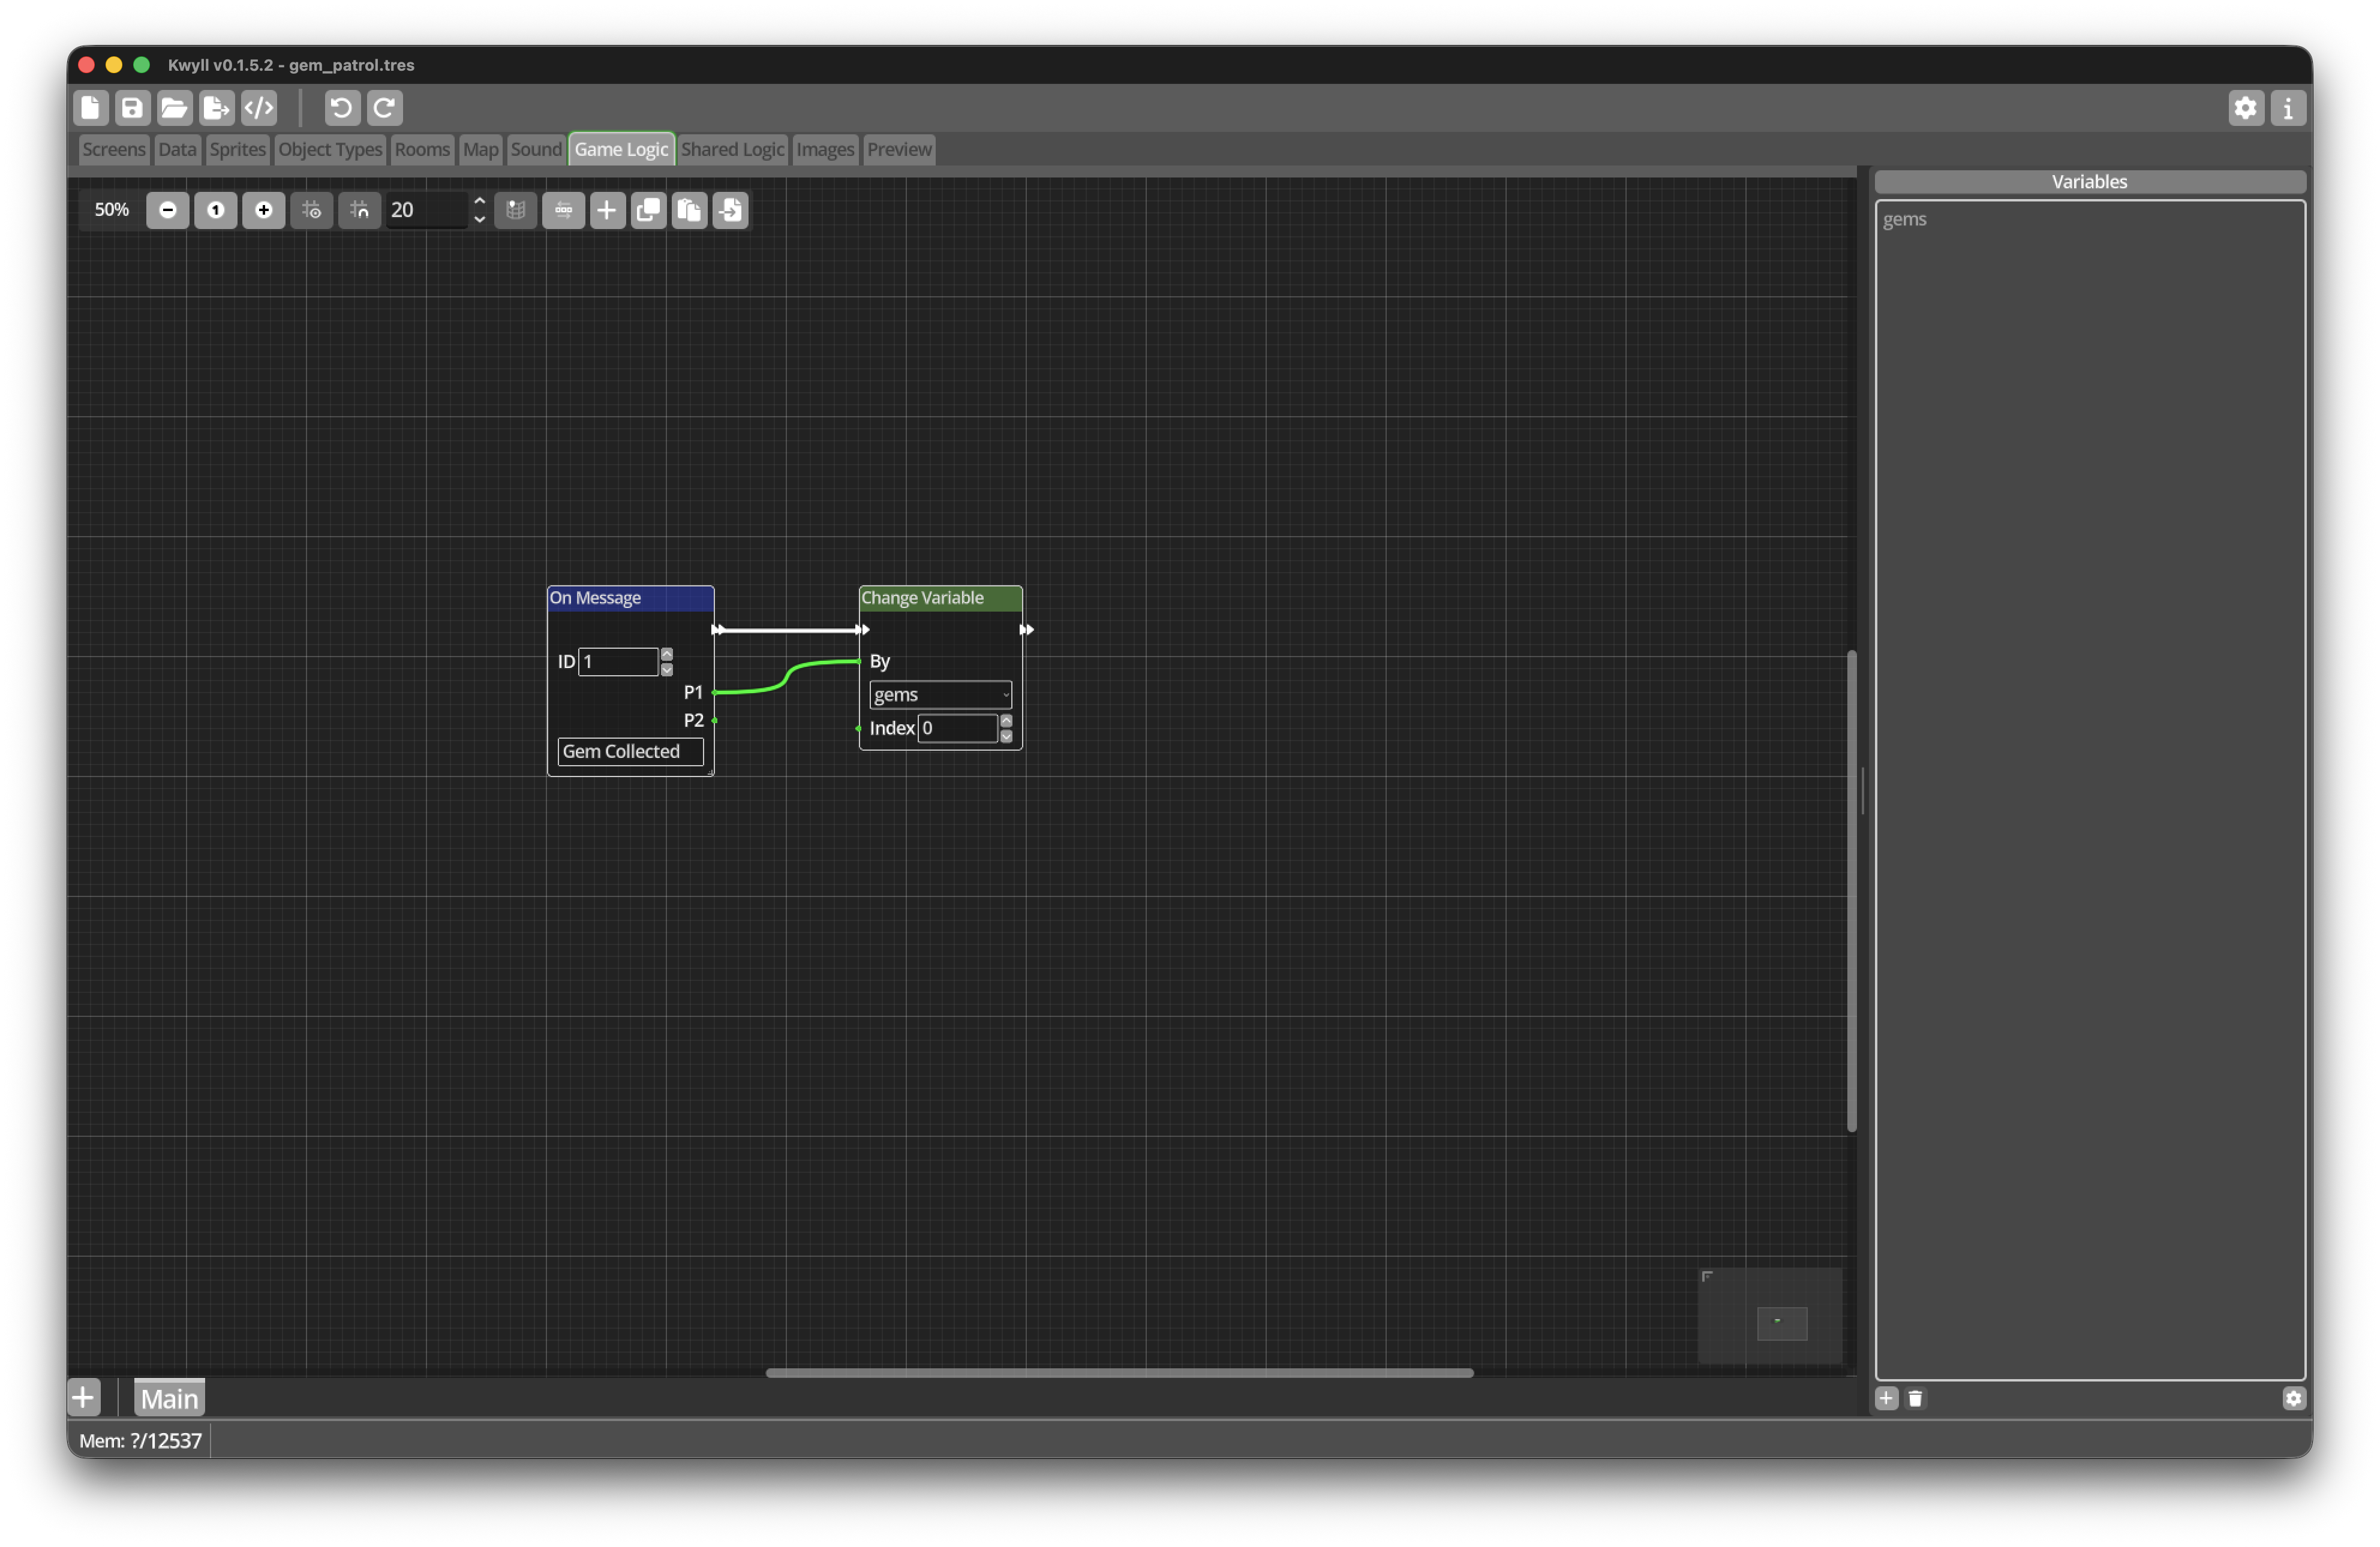
Add an initialised variable named
gems. -
Give it an initial value of
0. -
Add an
On Messagetrigger. -
Set its ID to
1. -
Give it the descriptive name
Gem collectedif the Node provides a name field. -
Add a
Change VariableNode and selectgems. -
Connect P1 from
On Messageto By onChange Variable. -
Connect the white flow from
On MessagetoChange Variable.
Each collection message sends 1 in P1, so Change Variable increases the
total by one.
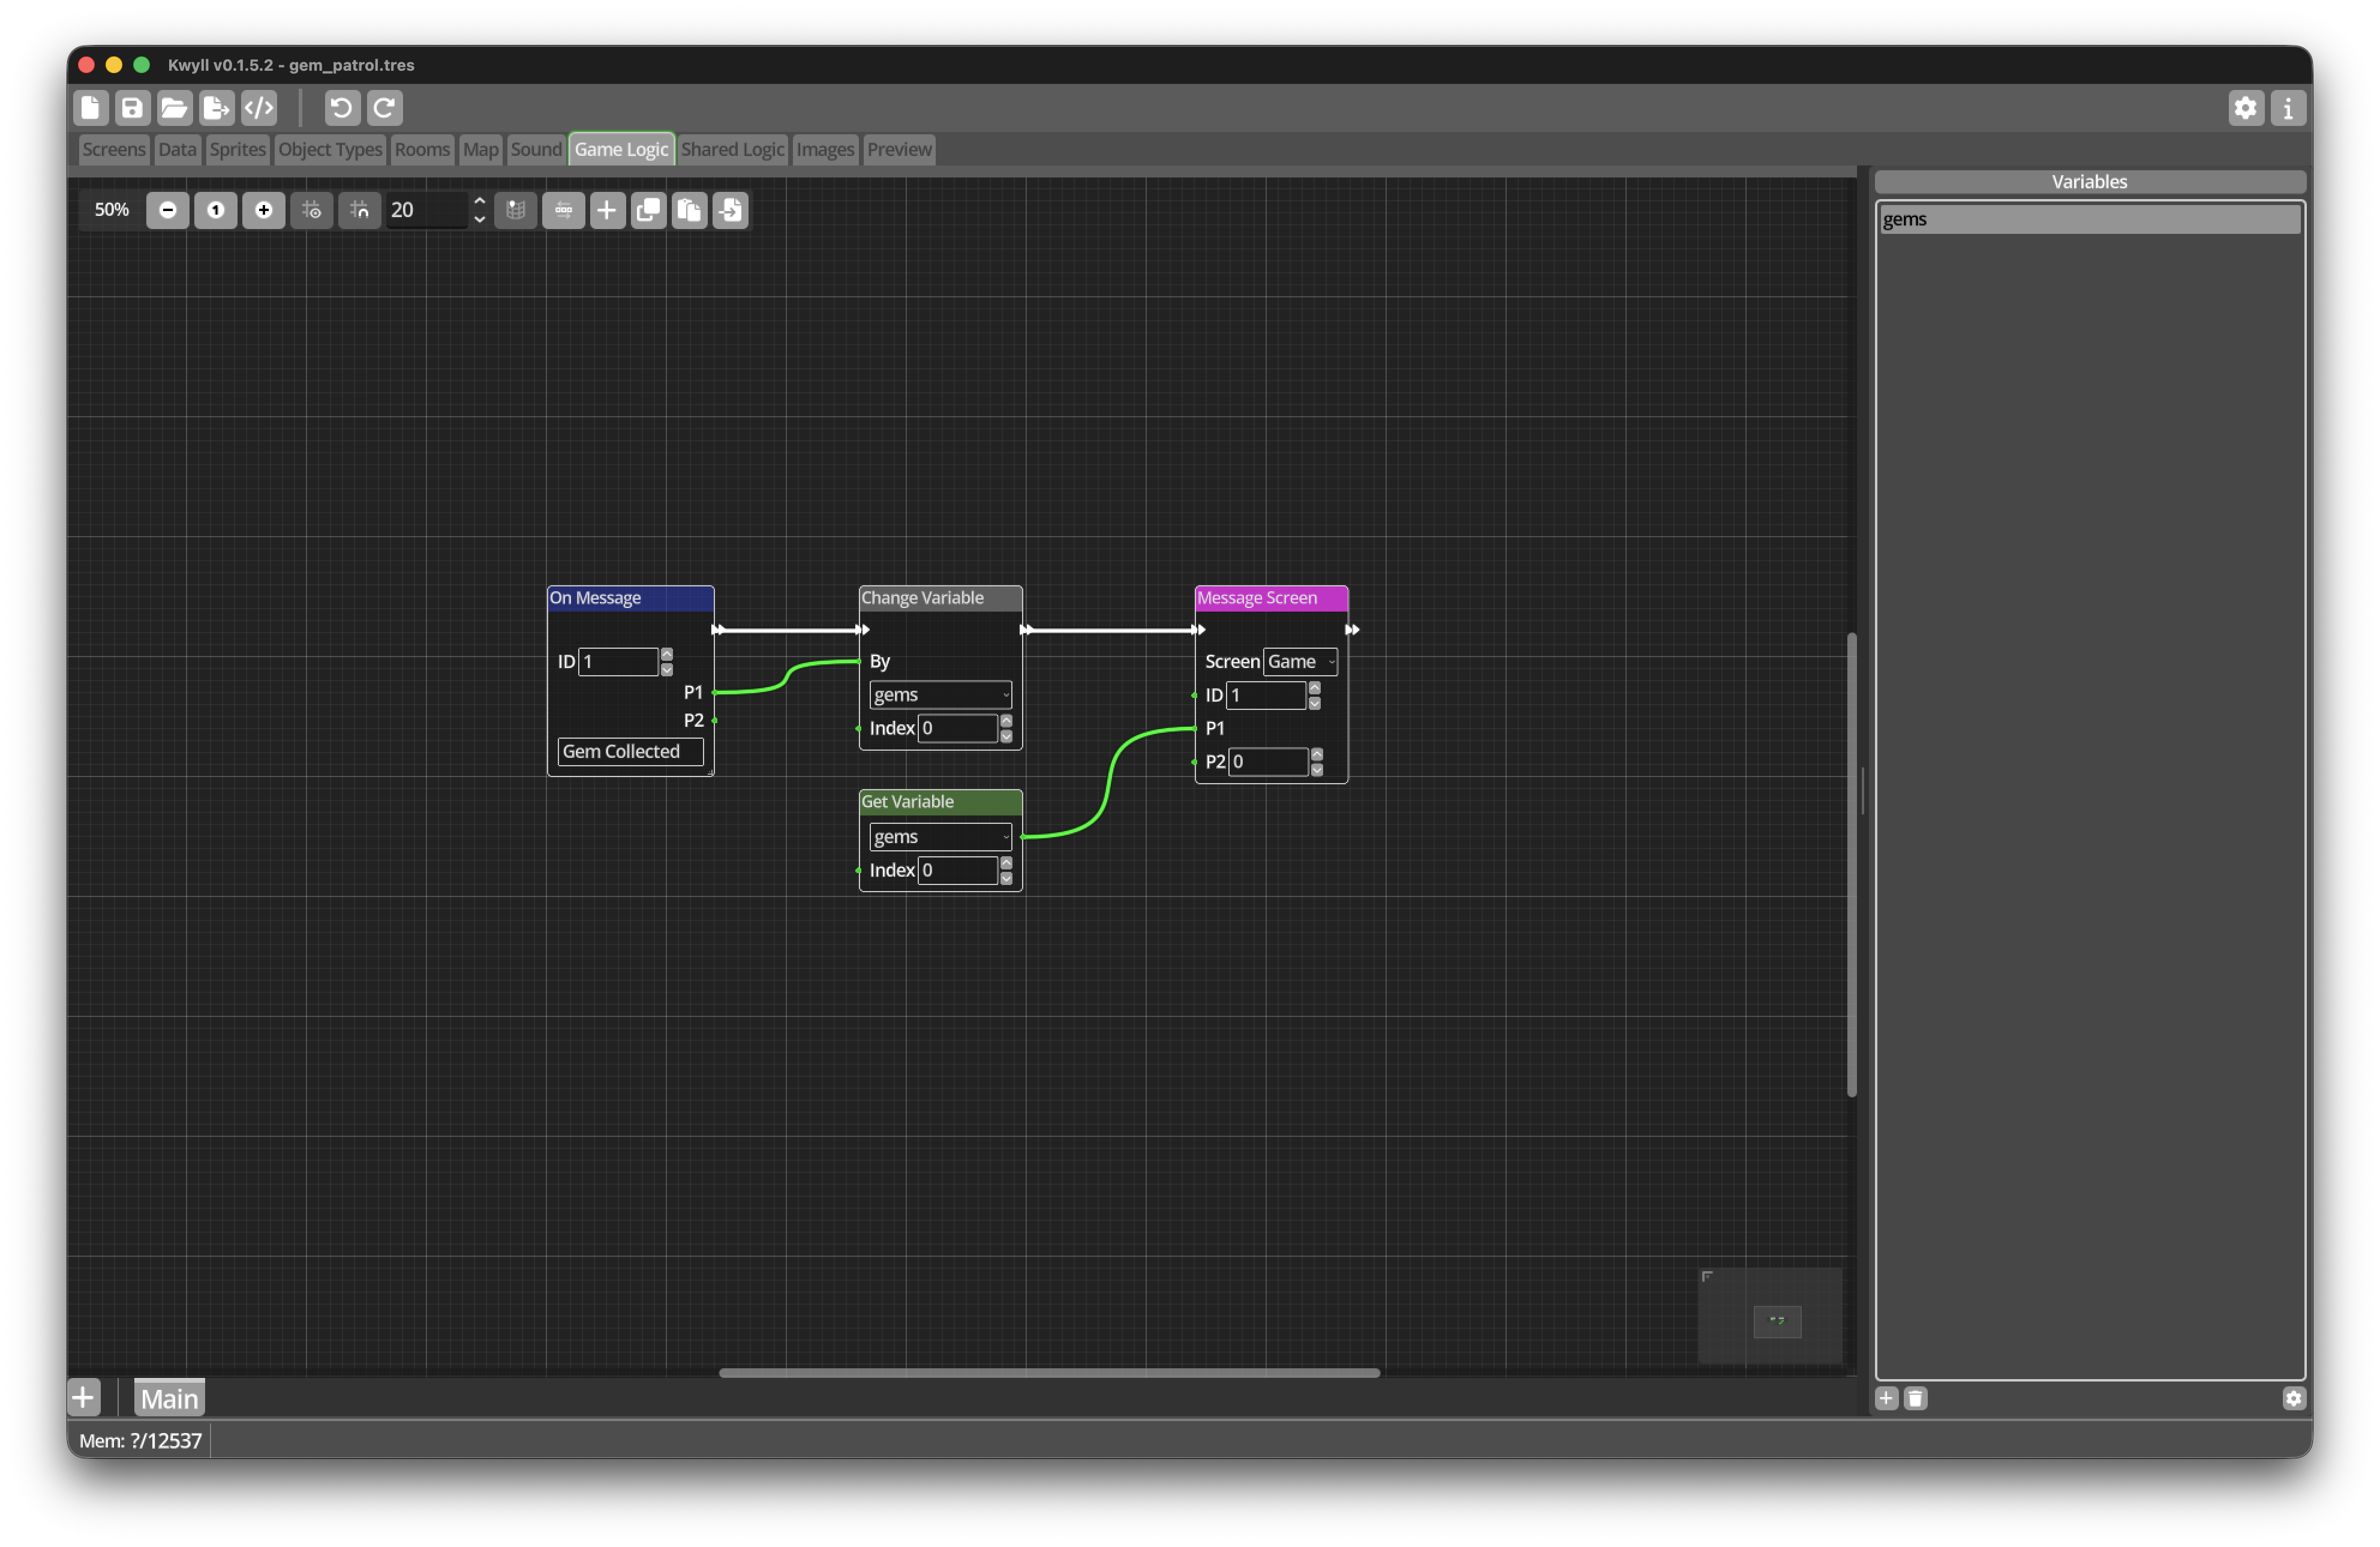
Send the new total to the Screen
Still in Game Logic:
-
Add a
Get VariableNode and selectgems. -
Add a
Message ScreenNode afterChange Variable. -
Select the
GameScreen. -
Set its ID to
1. -
Connect the
gemsvalue to P1 onMessage Screen. -
Connect the Flow Out of
Change Variableto the Flow In ofMessage Screen.
The message is sent after the variable changes, so P1 contains the new total.
Update the GemCount Instrument
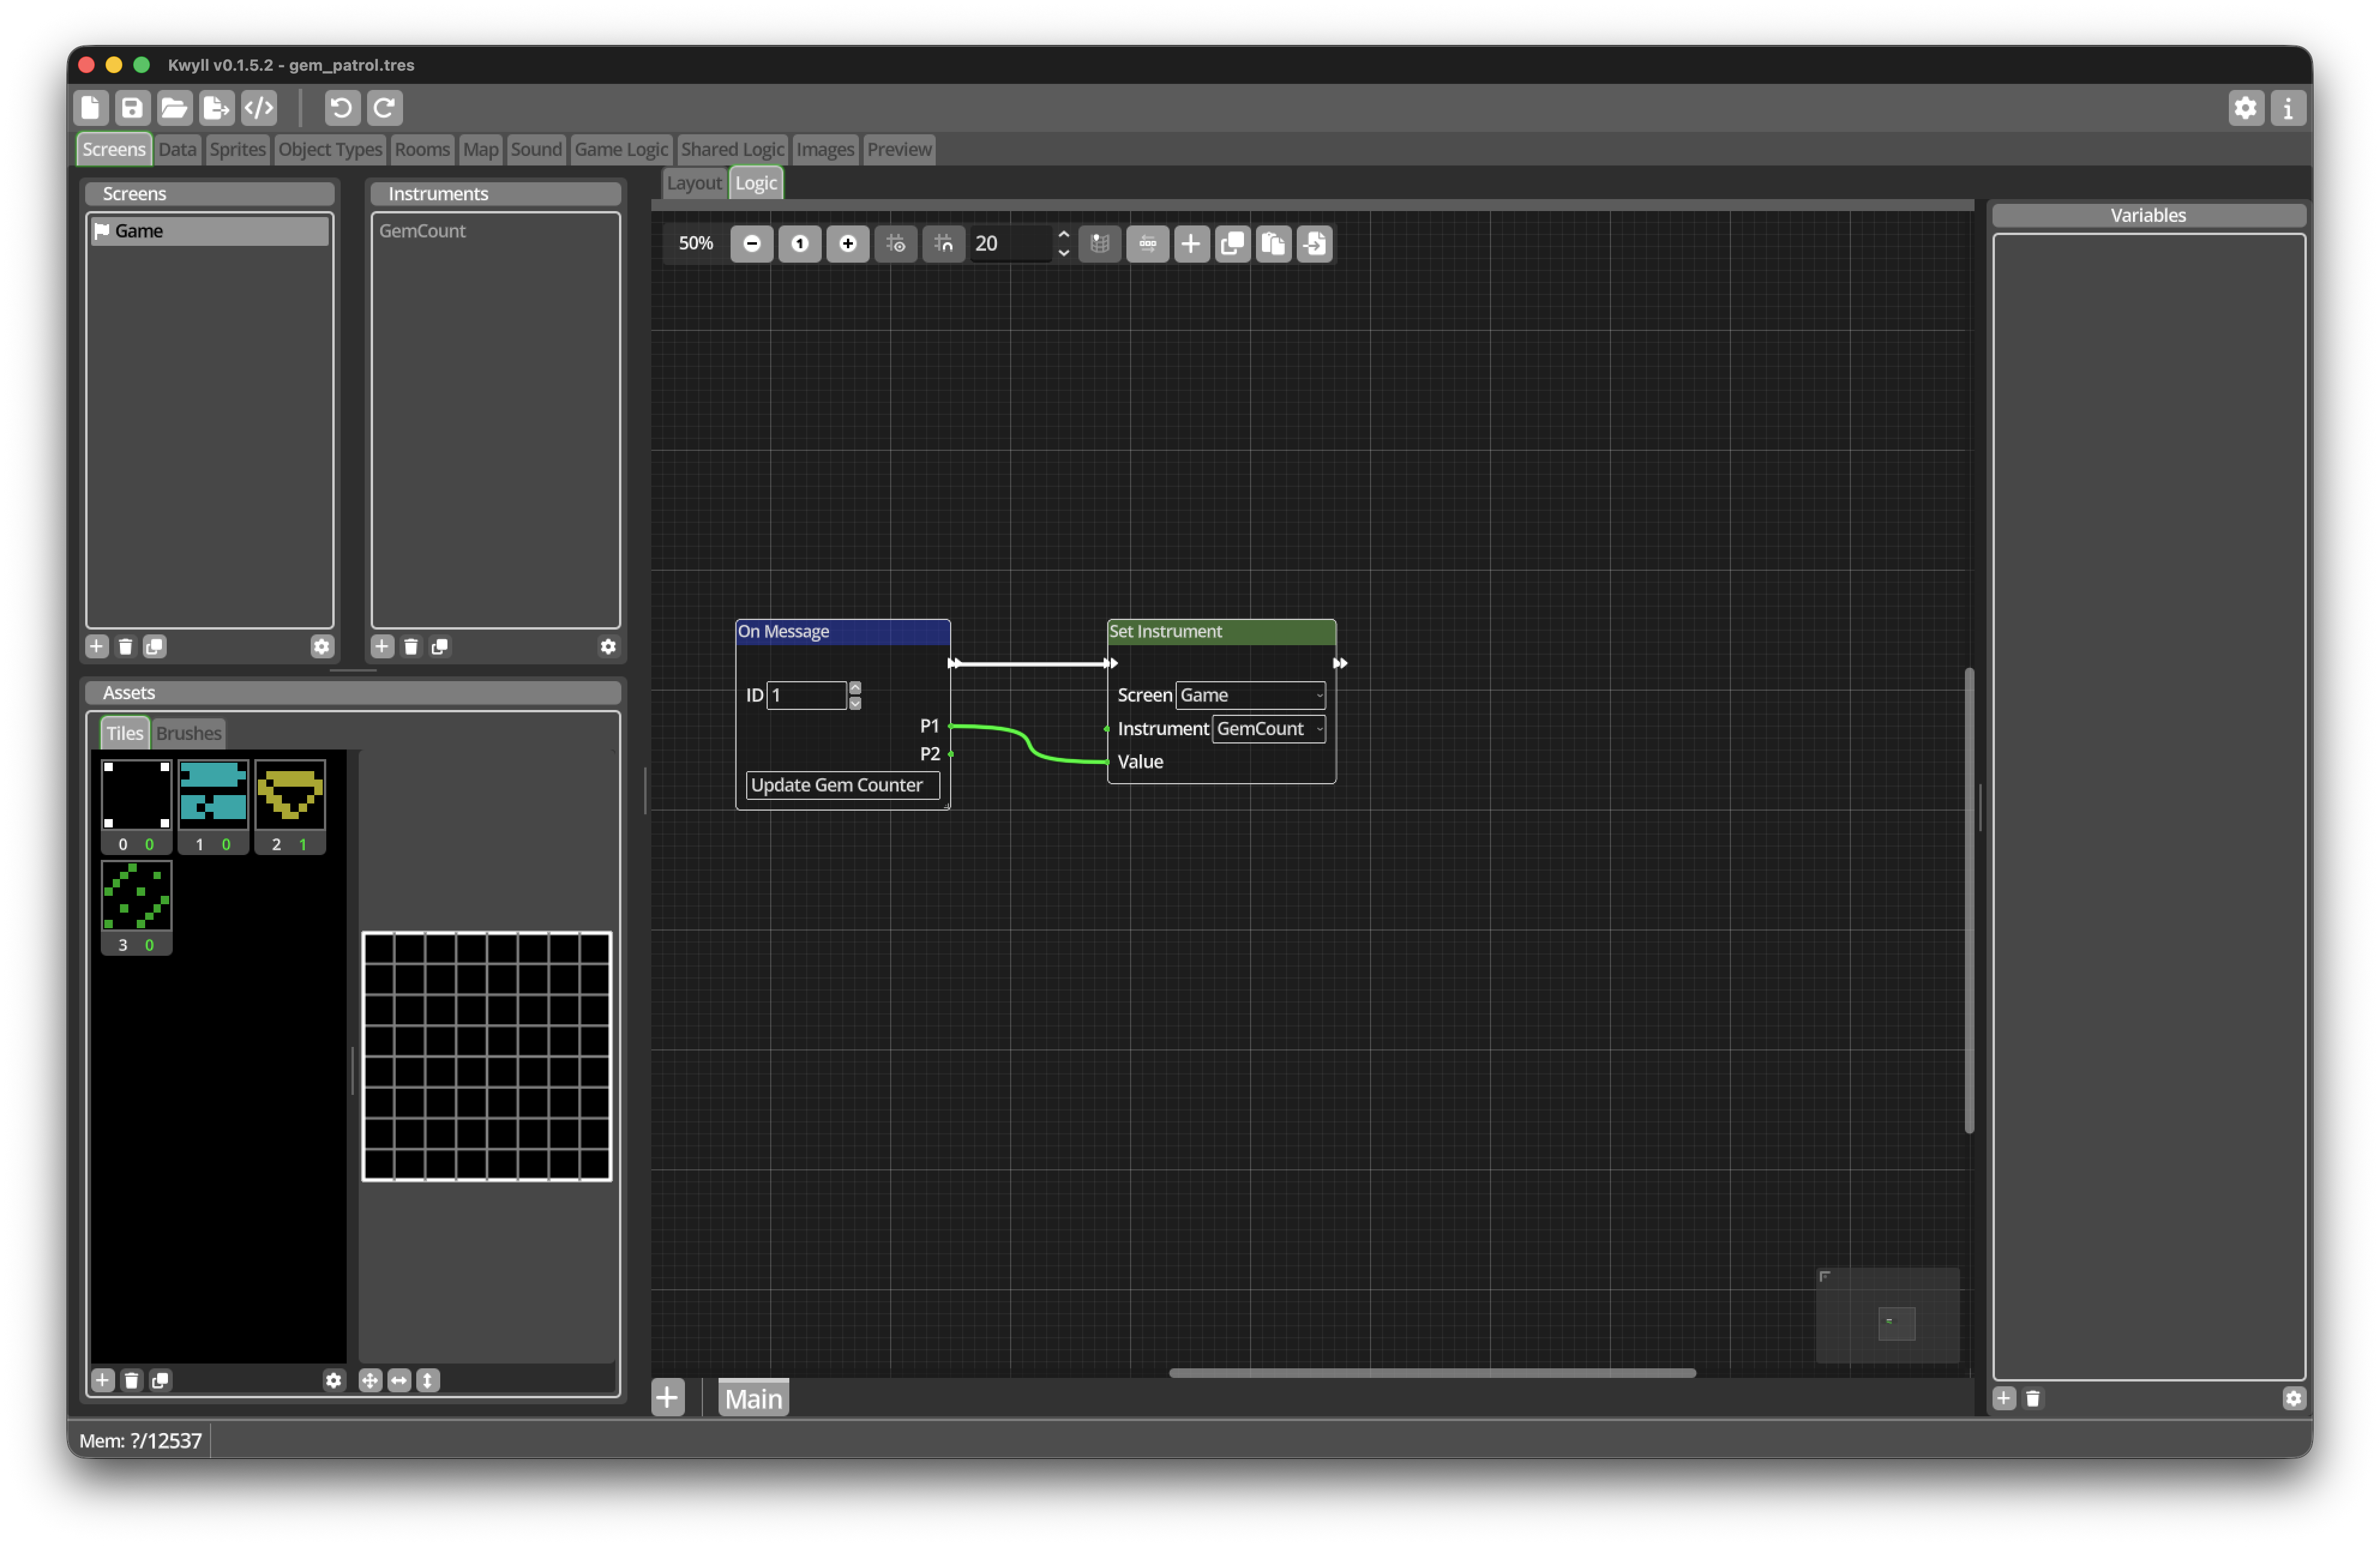
Open the Game Screen and select its Logic tab.
-
Add an
On Messagetrigger. -
Set its ID to
1. -
Give it the descriptive name
Update gem counterif available. -
Add a
Set InstrumentNode. -
Select
GemCountas the Instrument. -
Connect P1 from
On Messageto Value onSet Instrument. -
Connect the white flow from
On MessagetoSet Instrument.
Screen Logic does not own the total. It simply displays the value supplied by Game Logic.
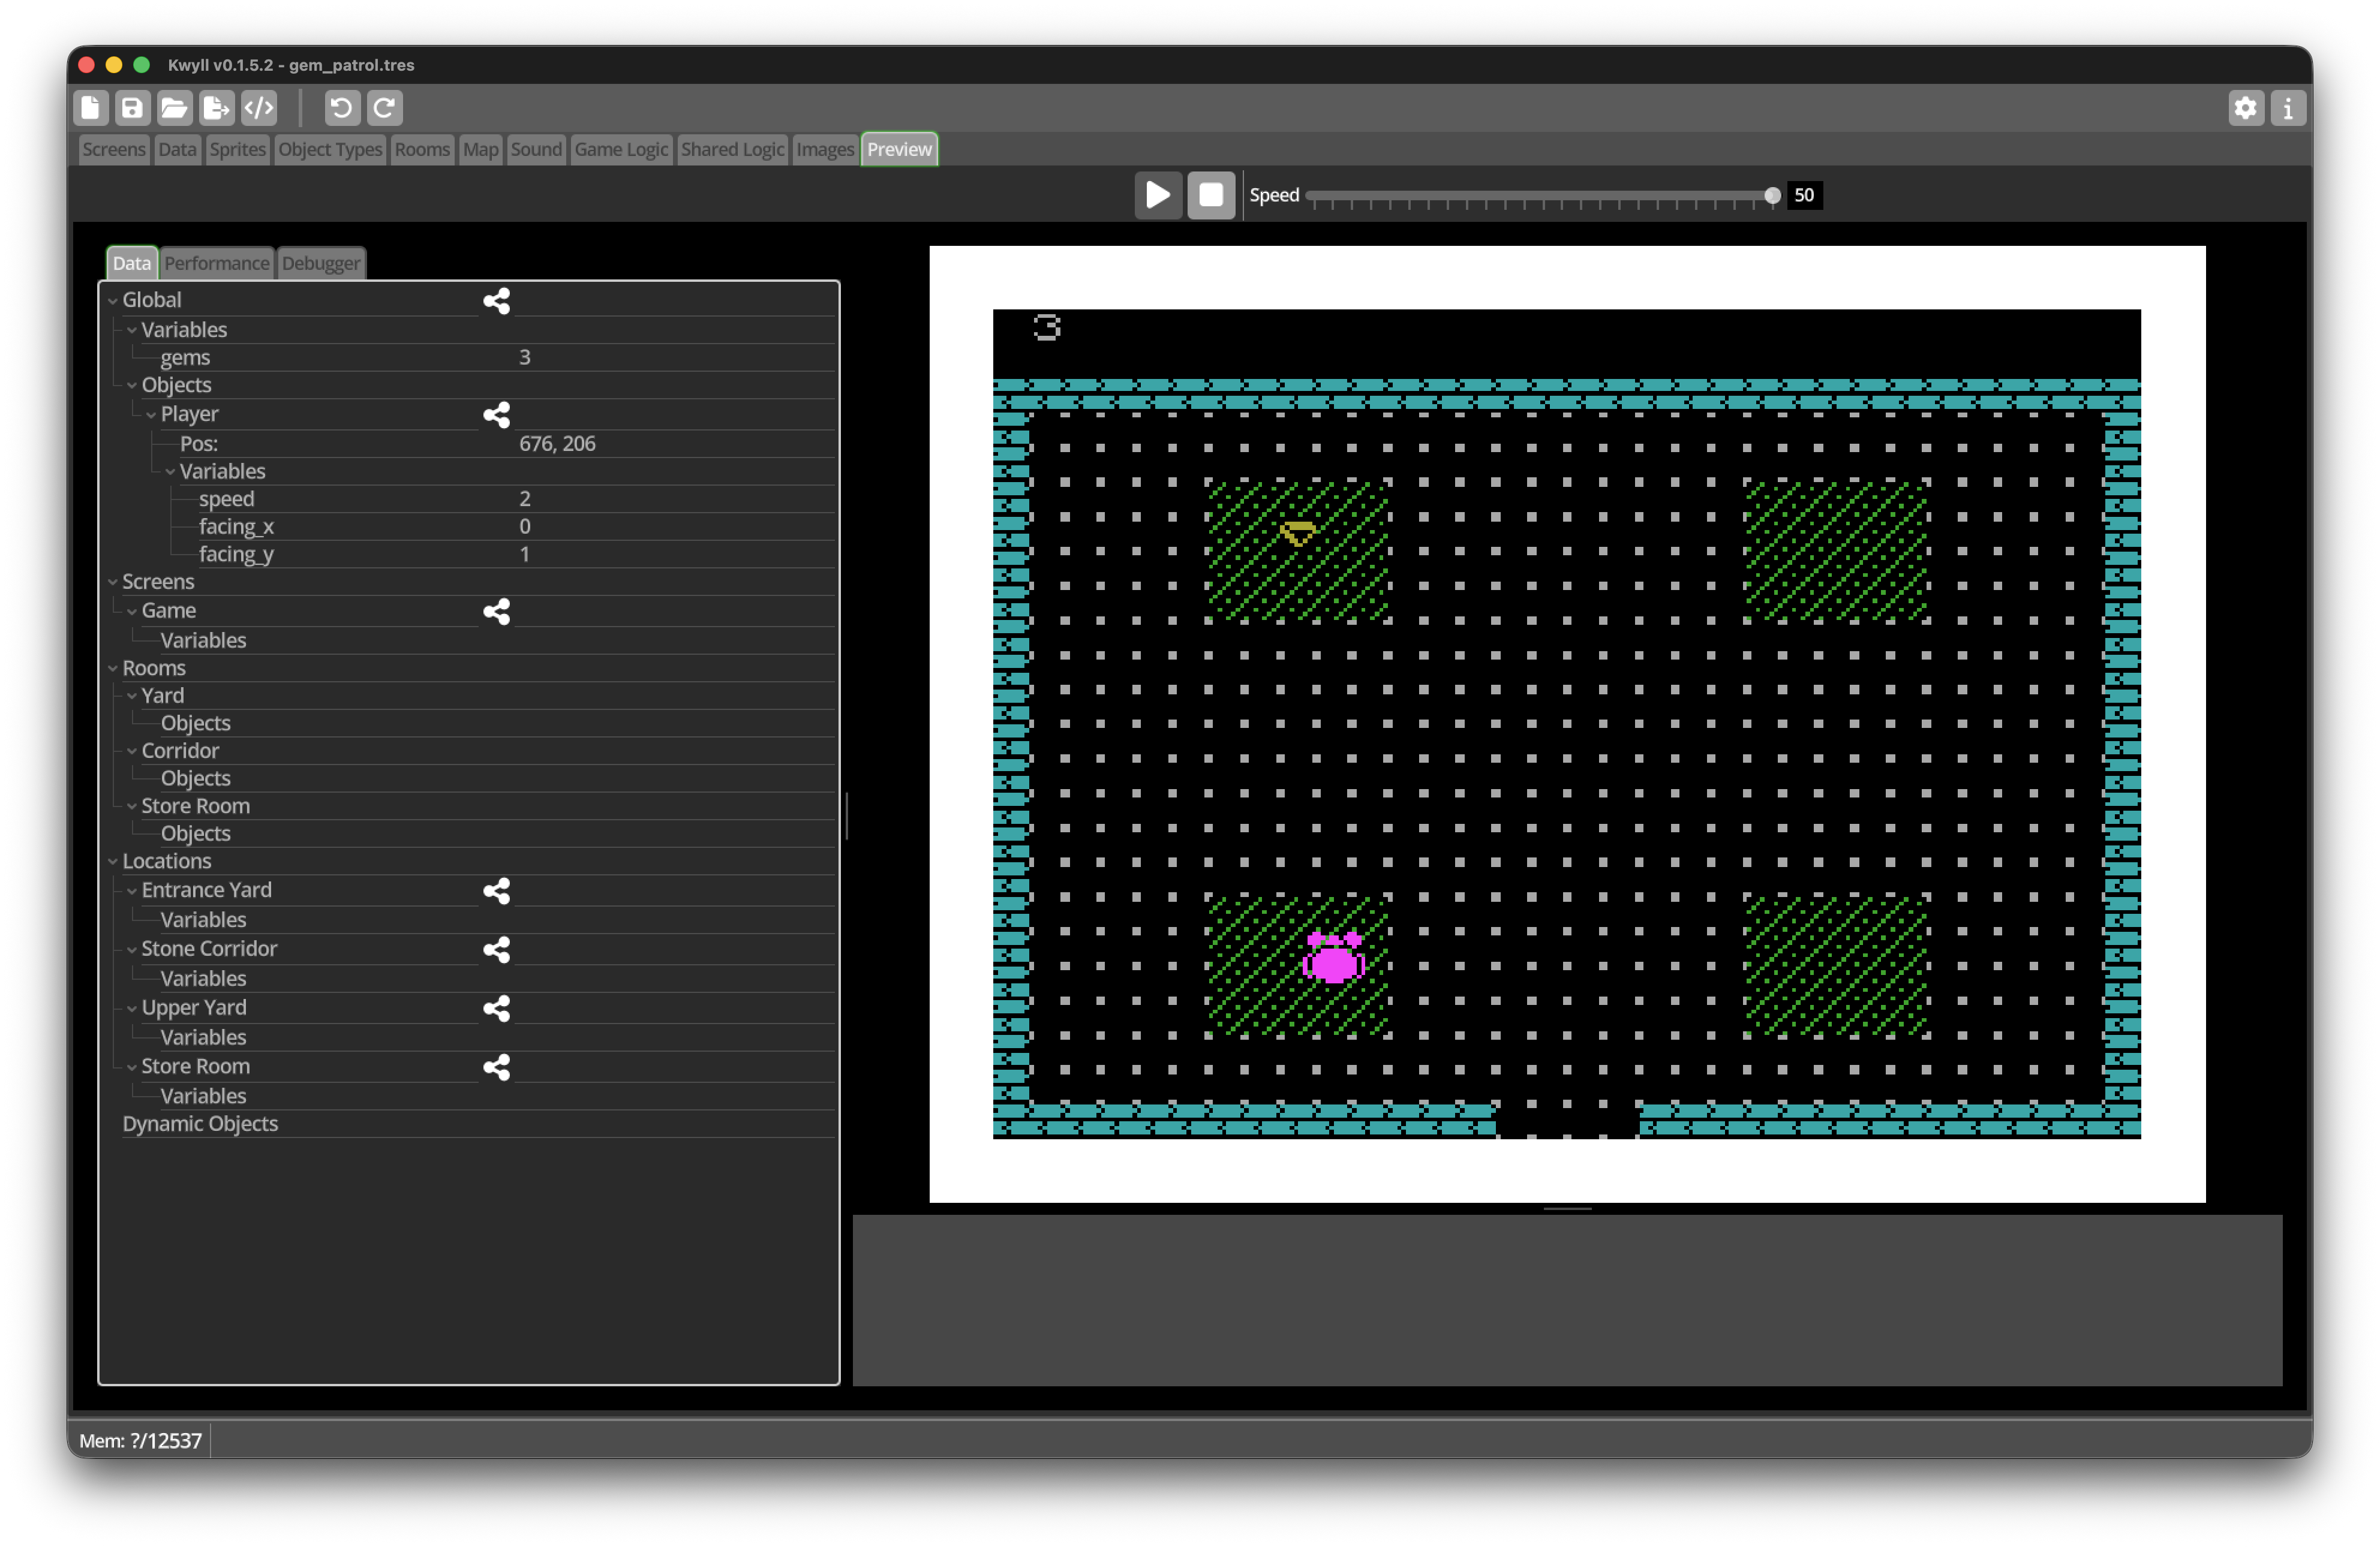
Save and test again. Collect two gems and check that GemCount changes from
0 to 1, then to 2.
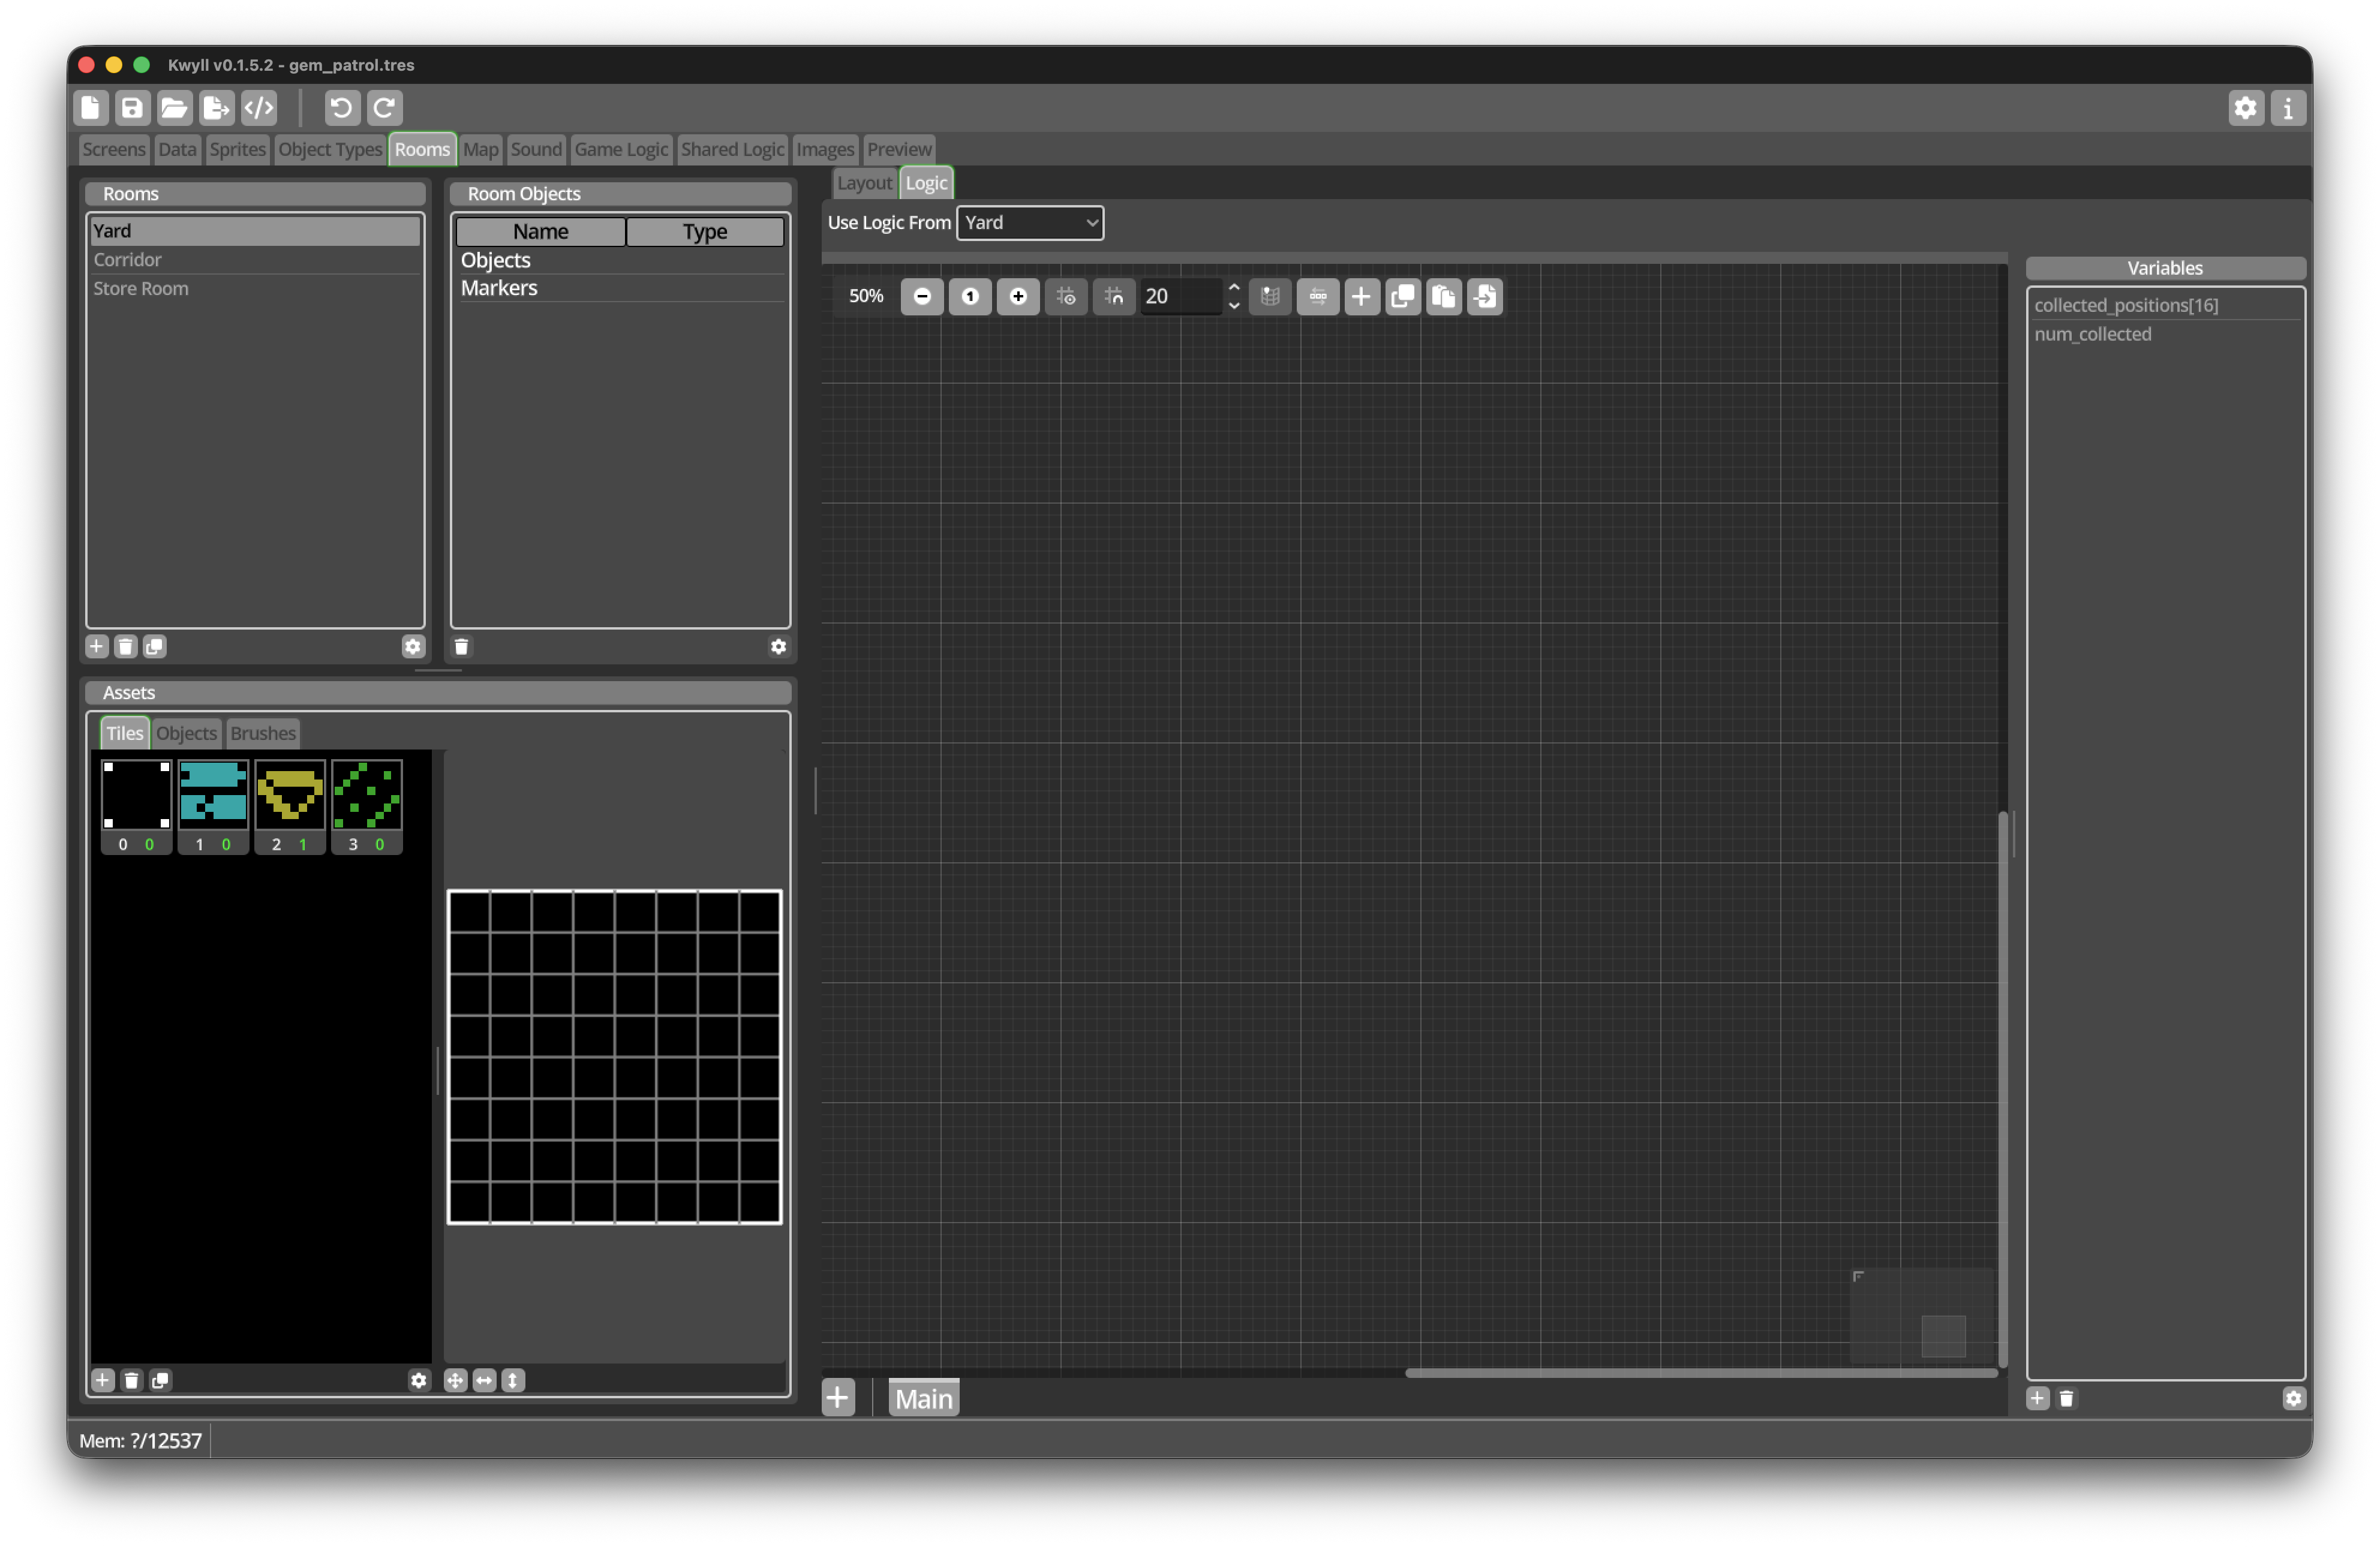
Give Room Logic somewhere to remember gems
We will build the persistence Logic on Yard, then let the other two Room
Types share it.
Open the Yard Room Type and select its Logic tab. Add these initialised
variables:
| Variable | Kind | Purpose |
|---|---|---|
|
Array of length |
Stores up to eight X/Y coordinate pairs |
|
Integer |
Stores how many coordinate pairs are in use |
Set every initial value to 0.
Each gem requires two array entries: one for X and one for Y. An array length of 16 therefore has room for eight gems in one Location, which is enough for the rooms in this tutorial.
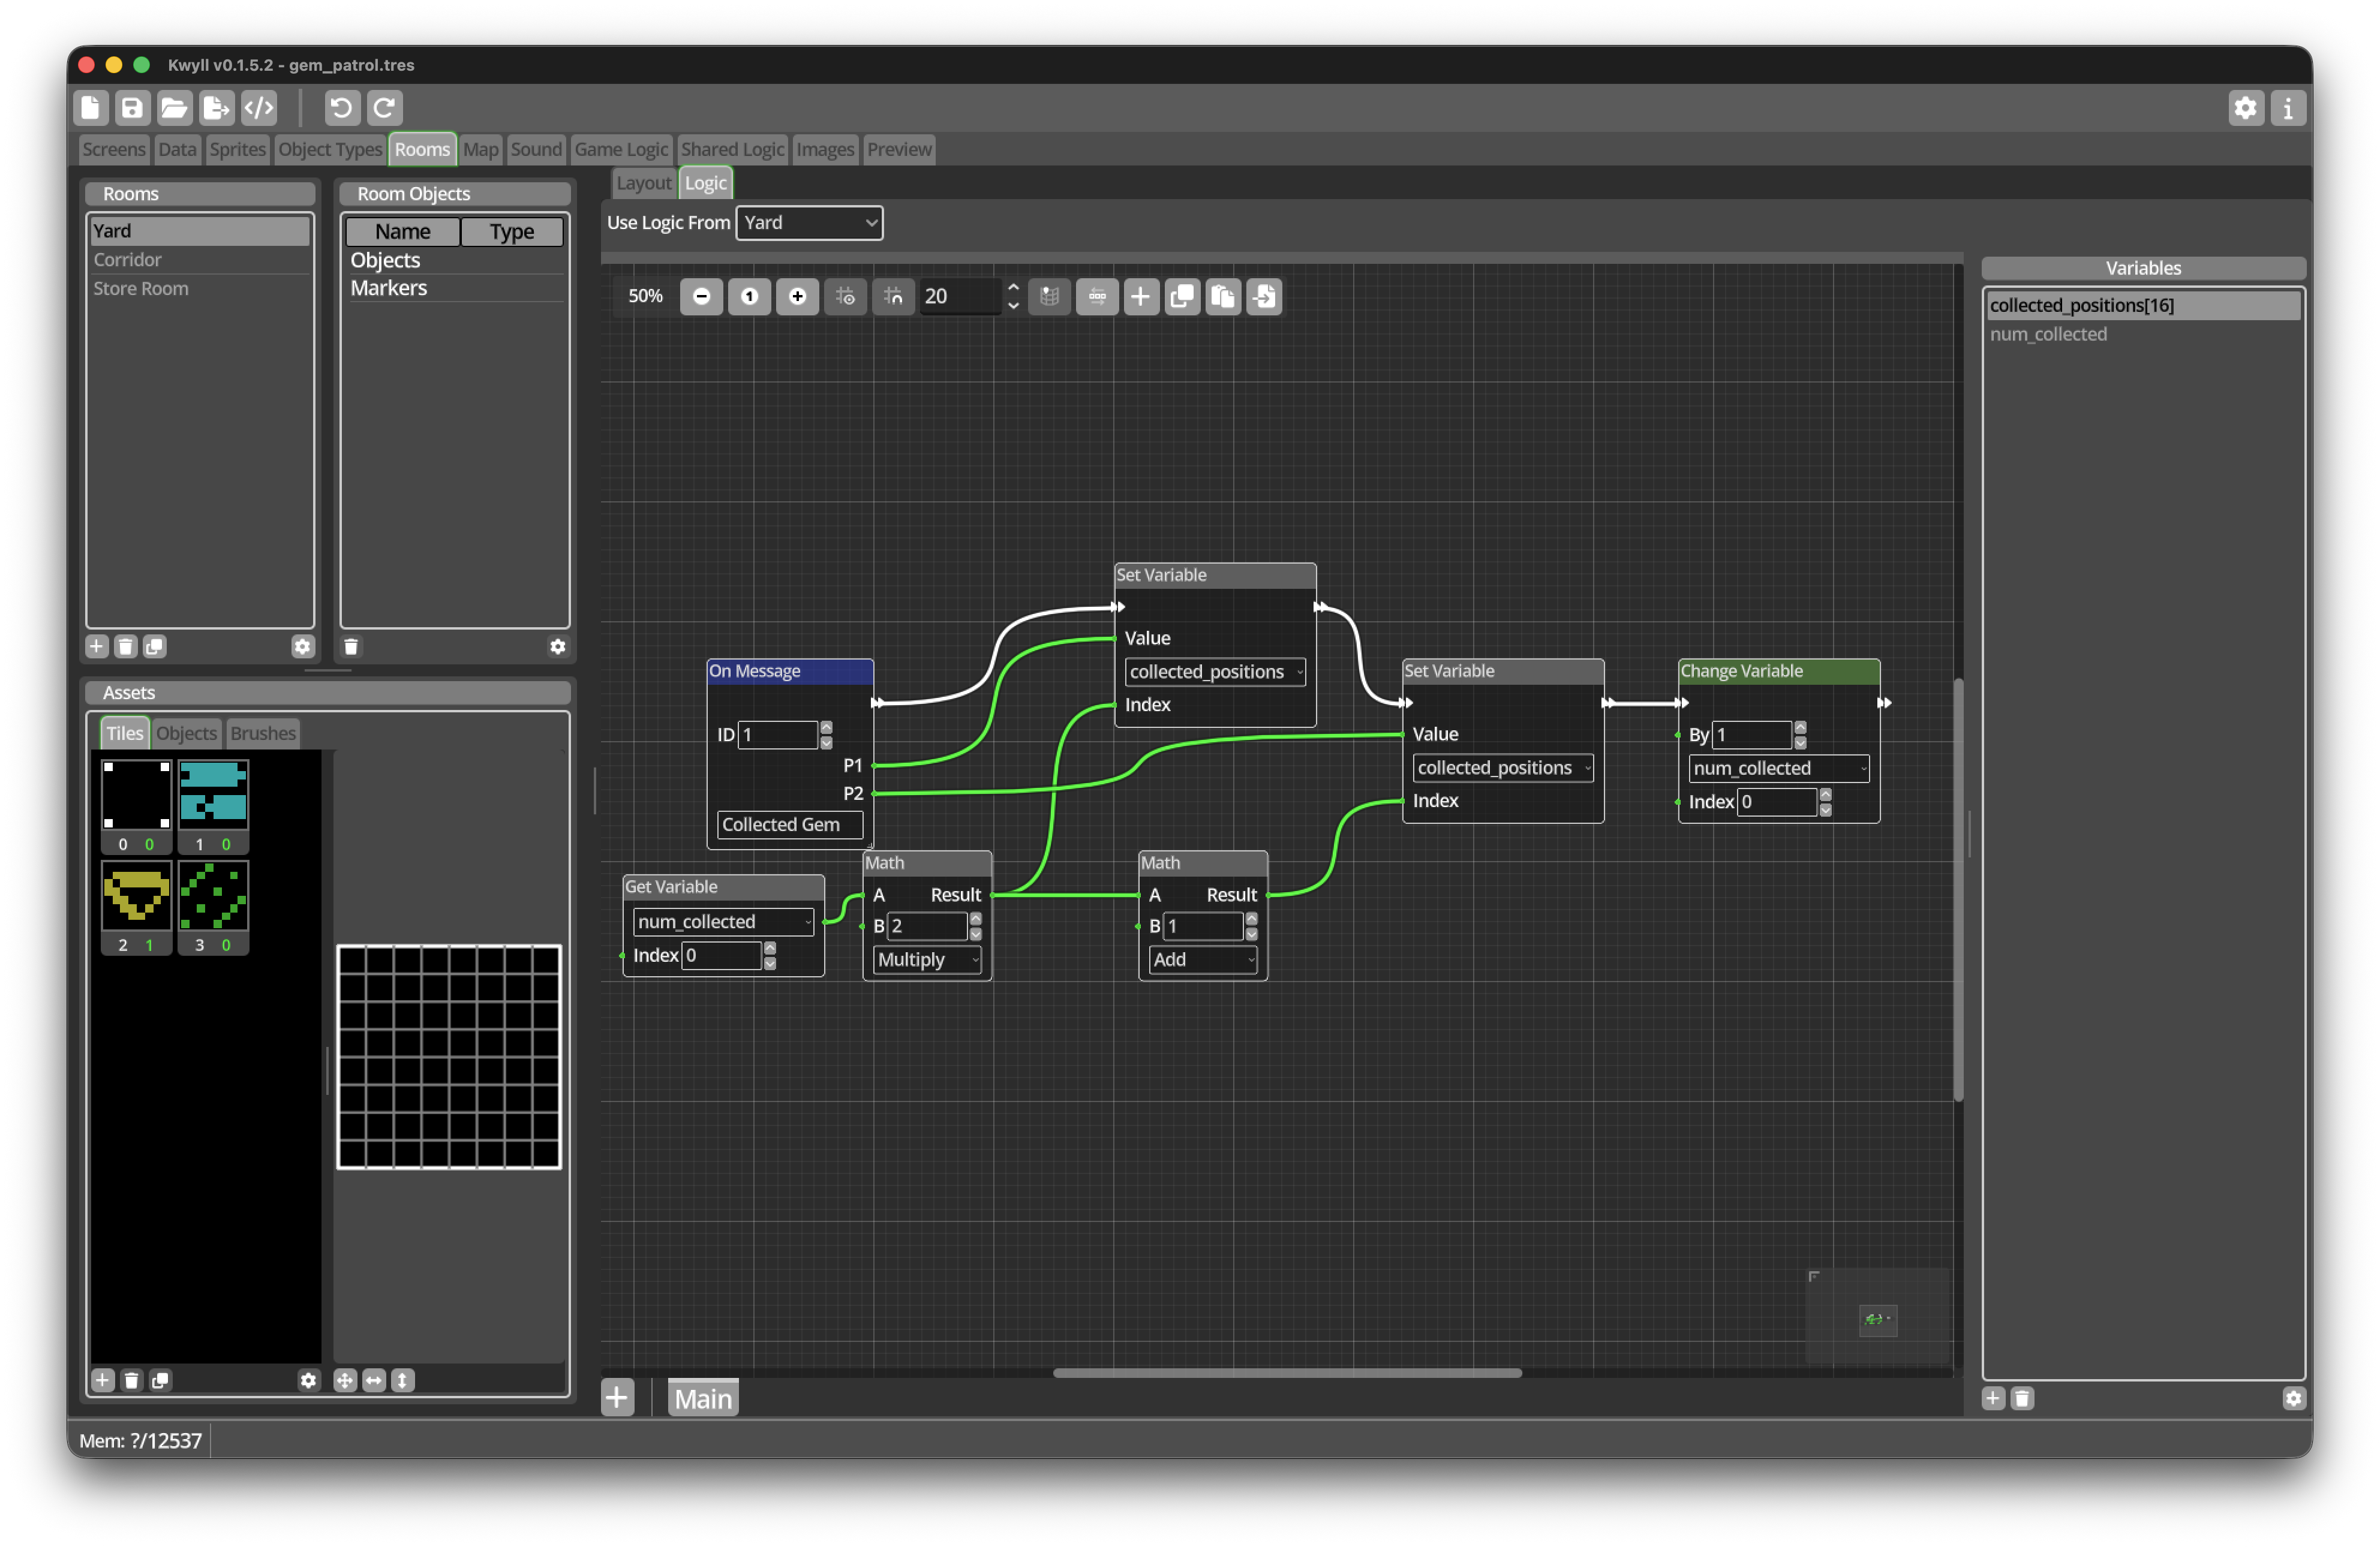
Record a collected position
In Yard Logic:
-
Add an
On Messagetrigger with ID1. -
Give it the descriptive name
Remember collected gemif available. -
Add a
Get VariableNode and selectnum_collected. -
Add a
MathNode set toMultiply, with B set to2. -
Connect
num_collectedto A.
The result is the first free array index. For example, if two gems have
already been collected, num_collected is 2 and the next pair begins at
index 4.
-
Add a
Set VariableNode and selectcollected_positions. -
Connect P1 from
On Messageto Value. -
Connect the multiplication result to Index.
-
Connect the white flow from
On Messageto thisSet Variable.
This stores the X coordinate.
-
Add another
MathNode set toAdd, with B set to1. -
Connect the multiplication result to A.
-
Add a second
Set VariableNode forcollected_positions. -
Connect P2 from
On Messageto Value. -
Connect the plus-one result to Index.
-
Connect the first
Set Variableflow to the second.
This stores the Y coordinate in the following array entry.
-
Add a
Change VariableNode after the secondSet Variable. -
Select
num_collectedand set By to1.
The count is increased only after both coordinates have been stored.
Remove remembered gems when entering a Location
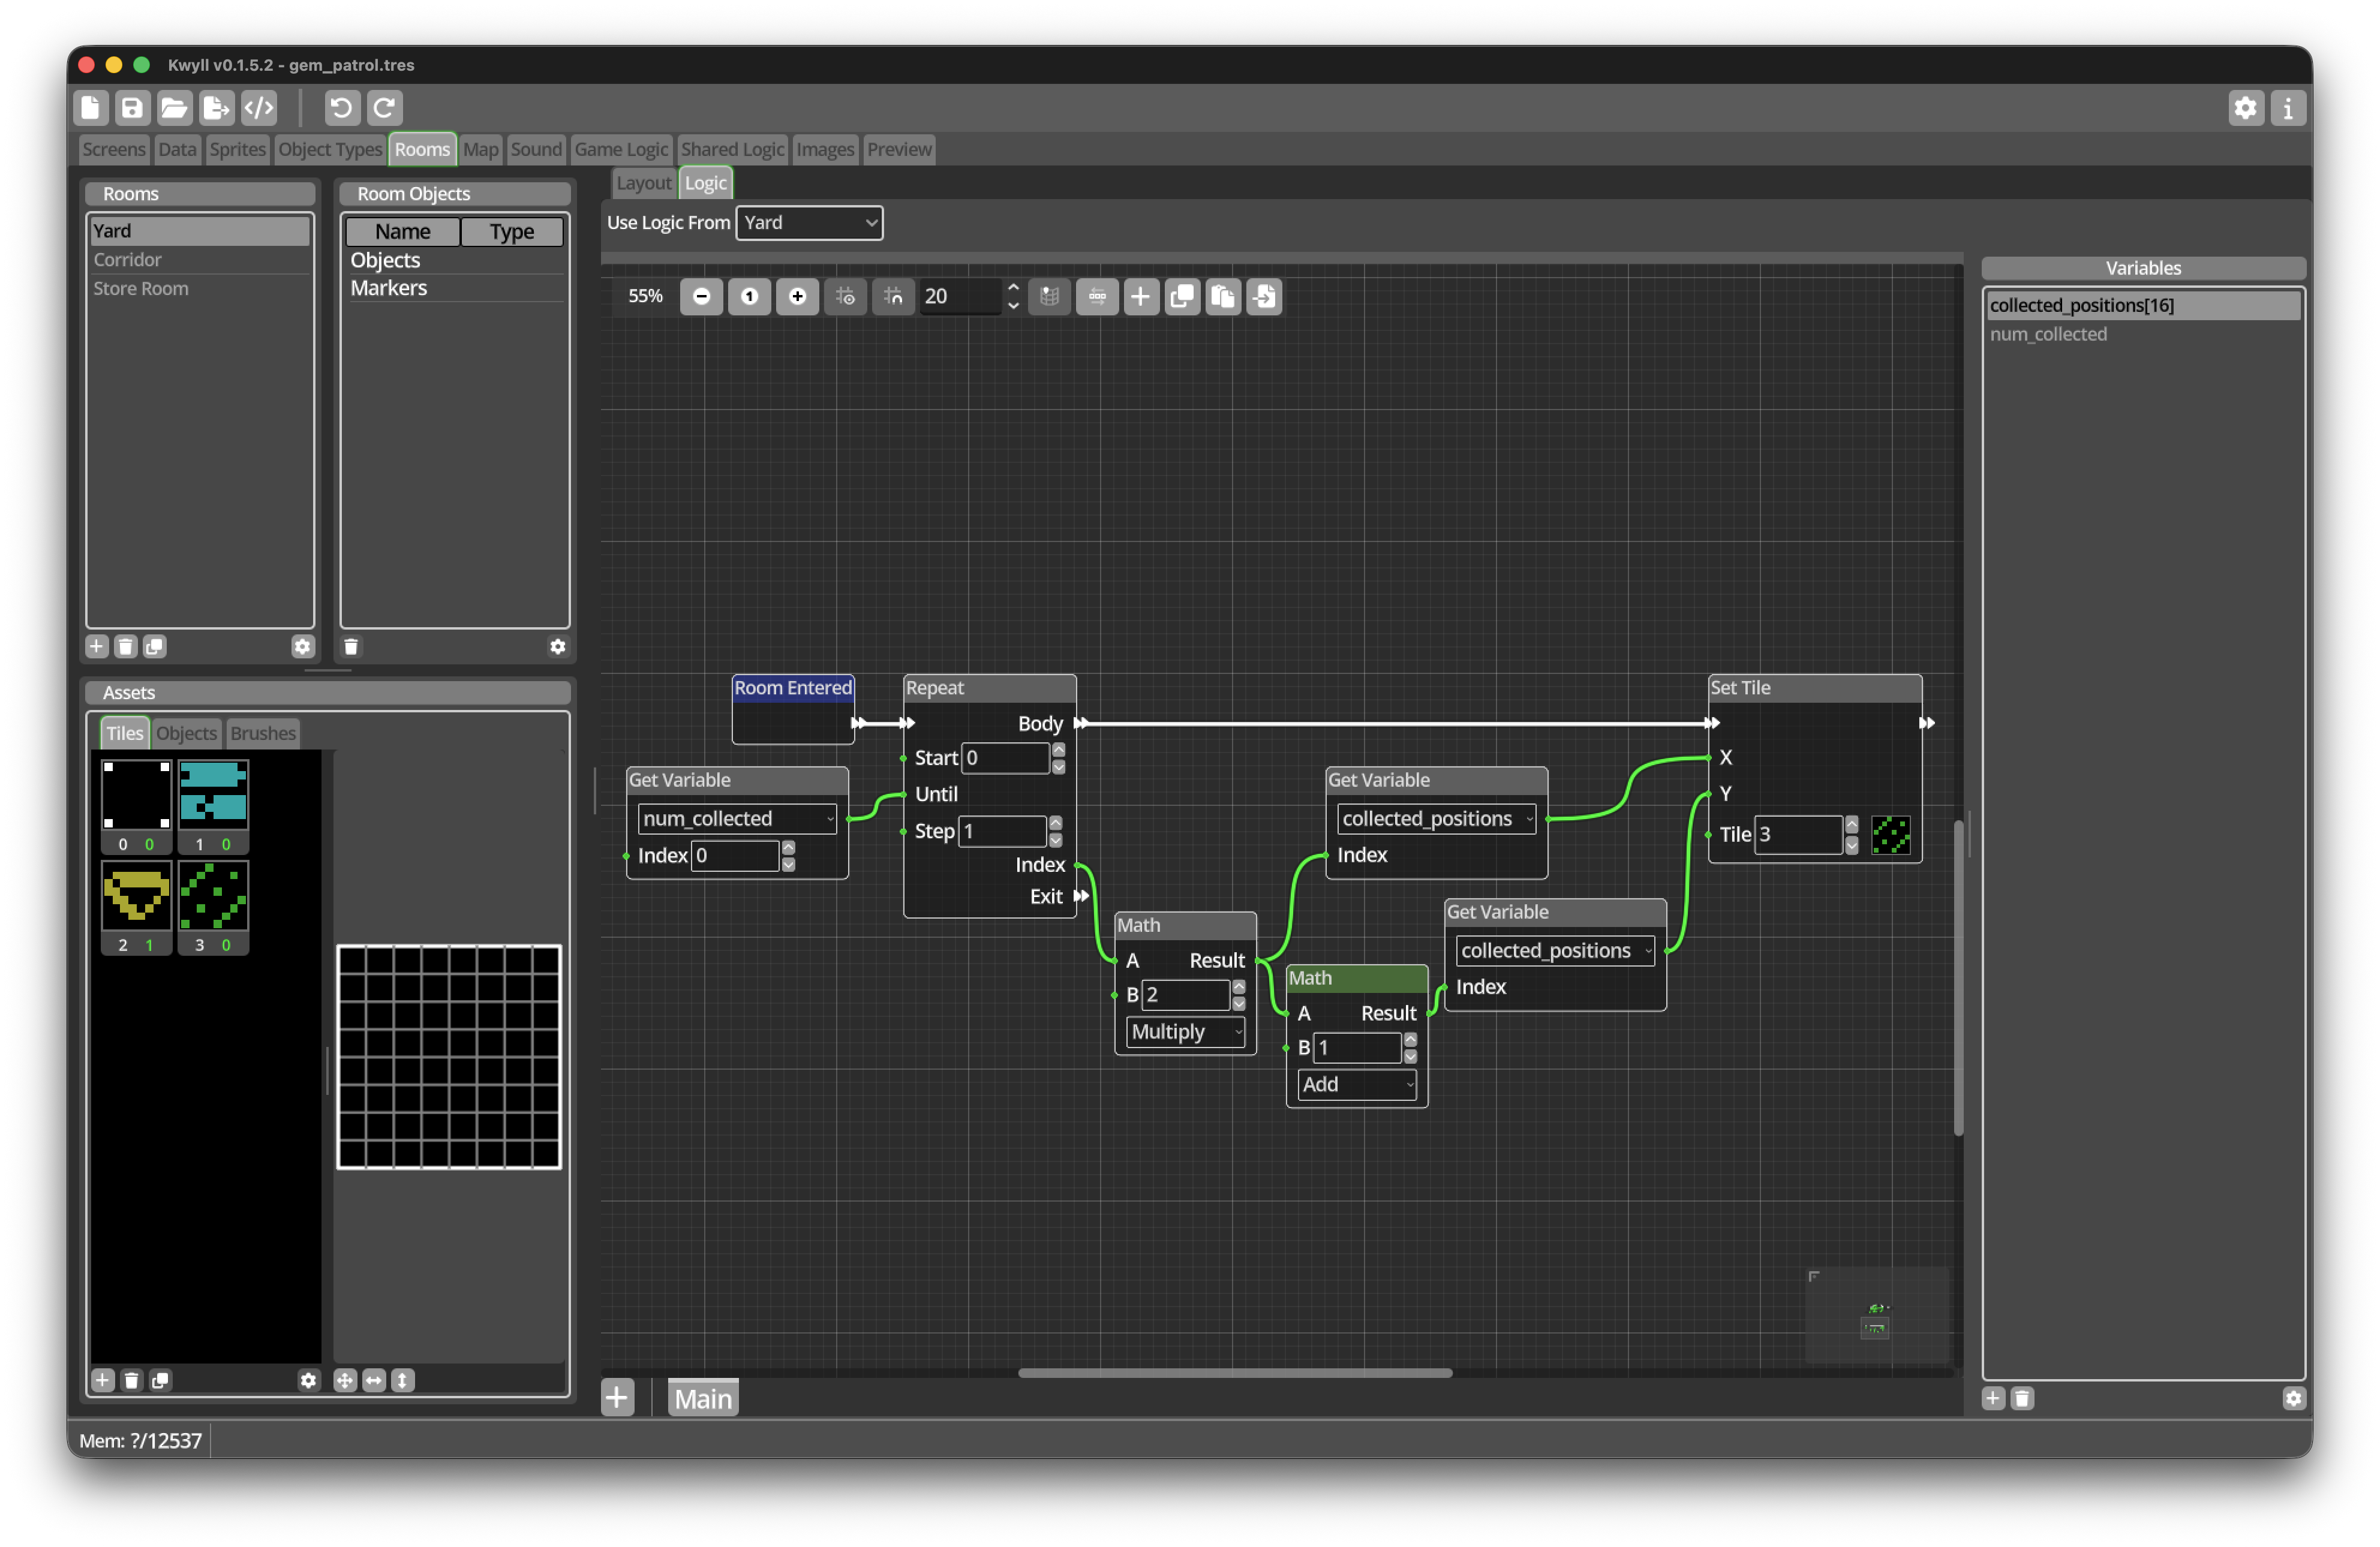
Still in Yard Logic:
-
Add a
Room Enteredtrigger. -
Add a
RepeatNode. -
Connect
Room EnteredtoRepeat. -
Set Start to
0and Step to1. -
Add a
Get VariableNode fornum_collected. -
Connect its output to Until on
Repeat.
The Repeat body runs once for every remembered gem.
-
Add a
MathNode set toMultiply, with B set to2. -
Connect Index from
Repeatto A. -
Add a
Get VariableNode forcollected_positions. -
Connect the multiplication result to its Index.
This reads the stored X coordinate.
-
Add a
MathNode set toAdd, with B set to1. -
Connect the multiplication result to A.
-
Add a second
Get VariableNode forcollected_positions. -
Connect the plus-one result to its Index.
This reads the stored Y coordinate.
-
Add a
Set TileNode. -
Set Tile to the Decorative floor tile index,
3in this project. -
Connect the first array value to X.
-
Connect the second array value to Y.
-
Connect Body from
Repeatto the Flow In ofSet Tile.
Leave the Flow Out of Set Tile unconnected. When the body ends, Repeat
advances its Index and begins the next iteration.
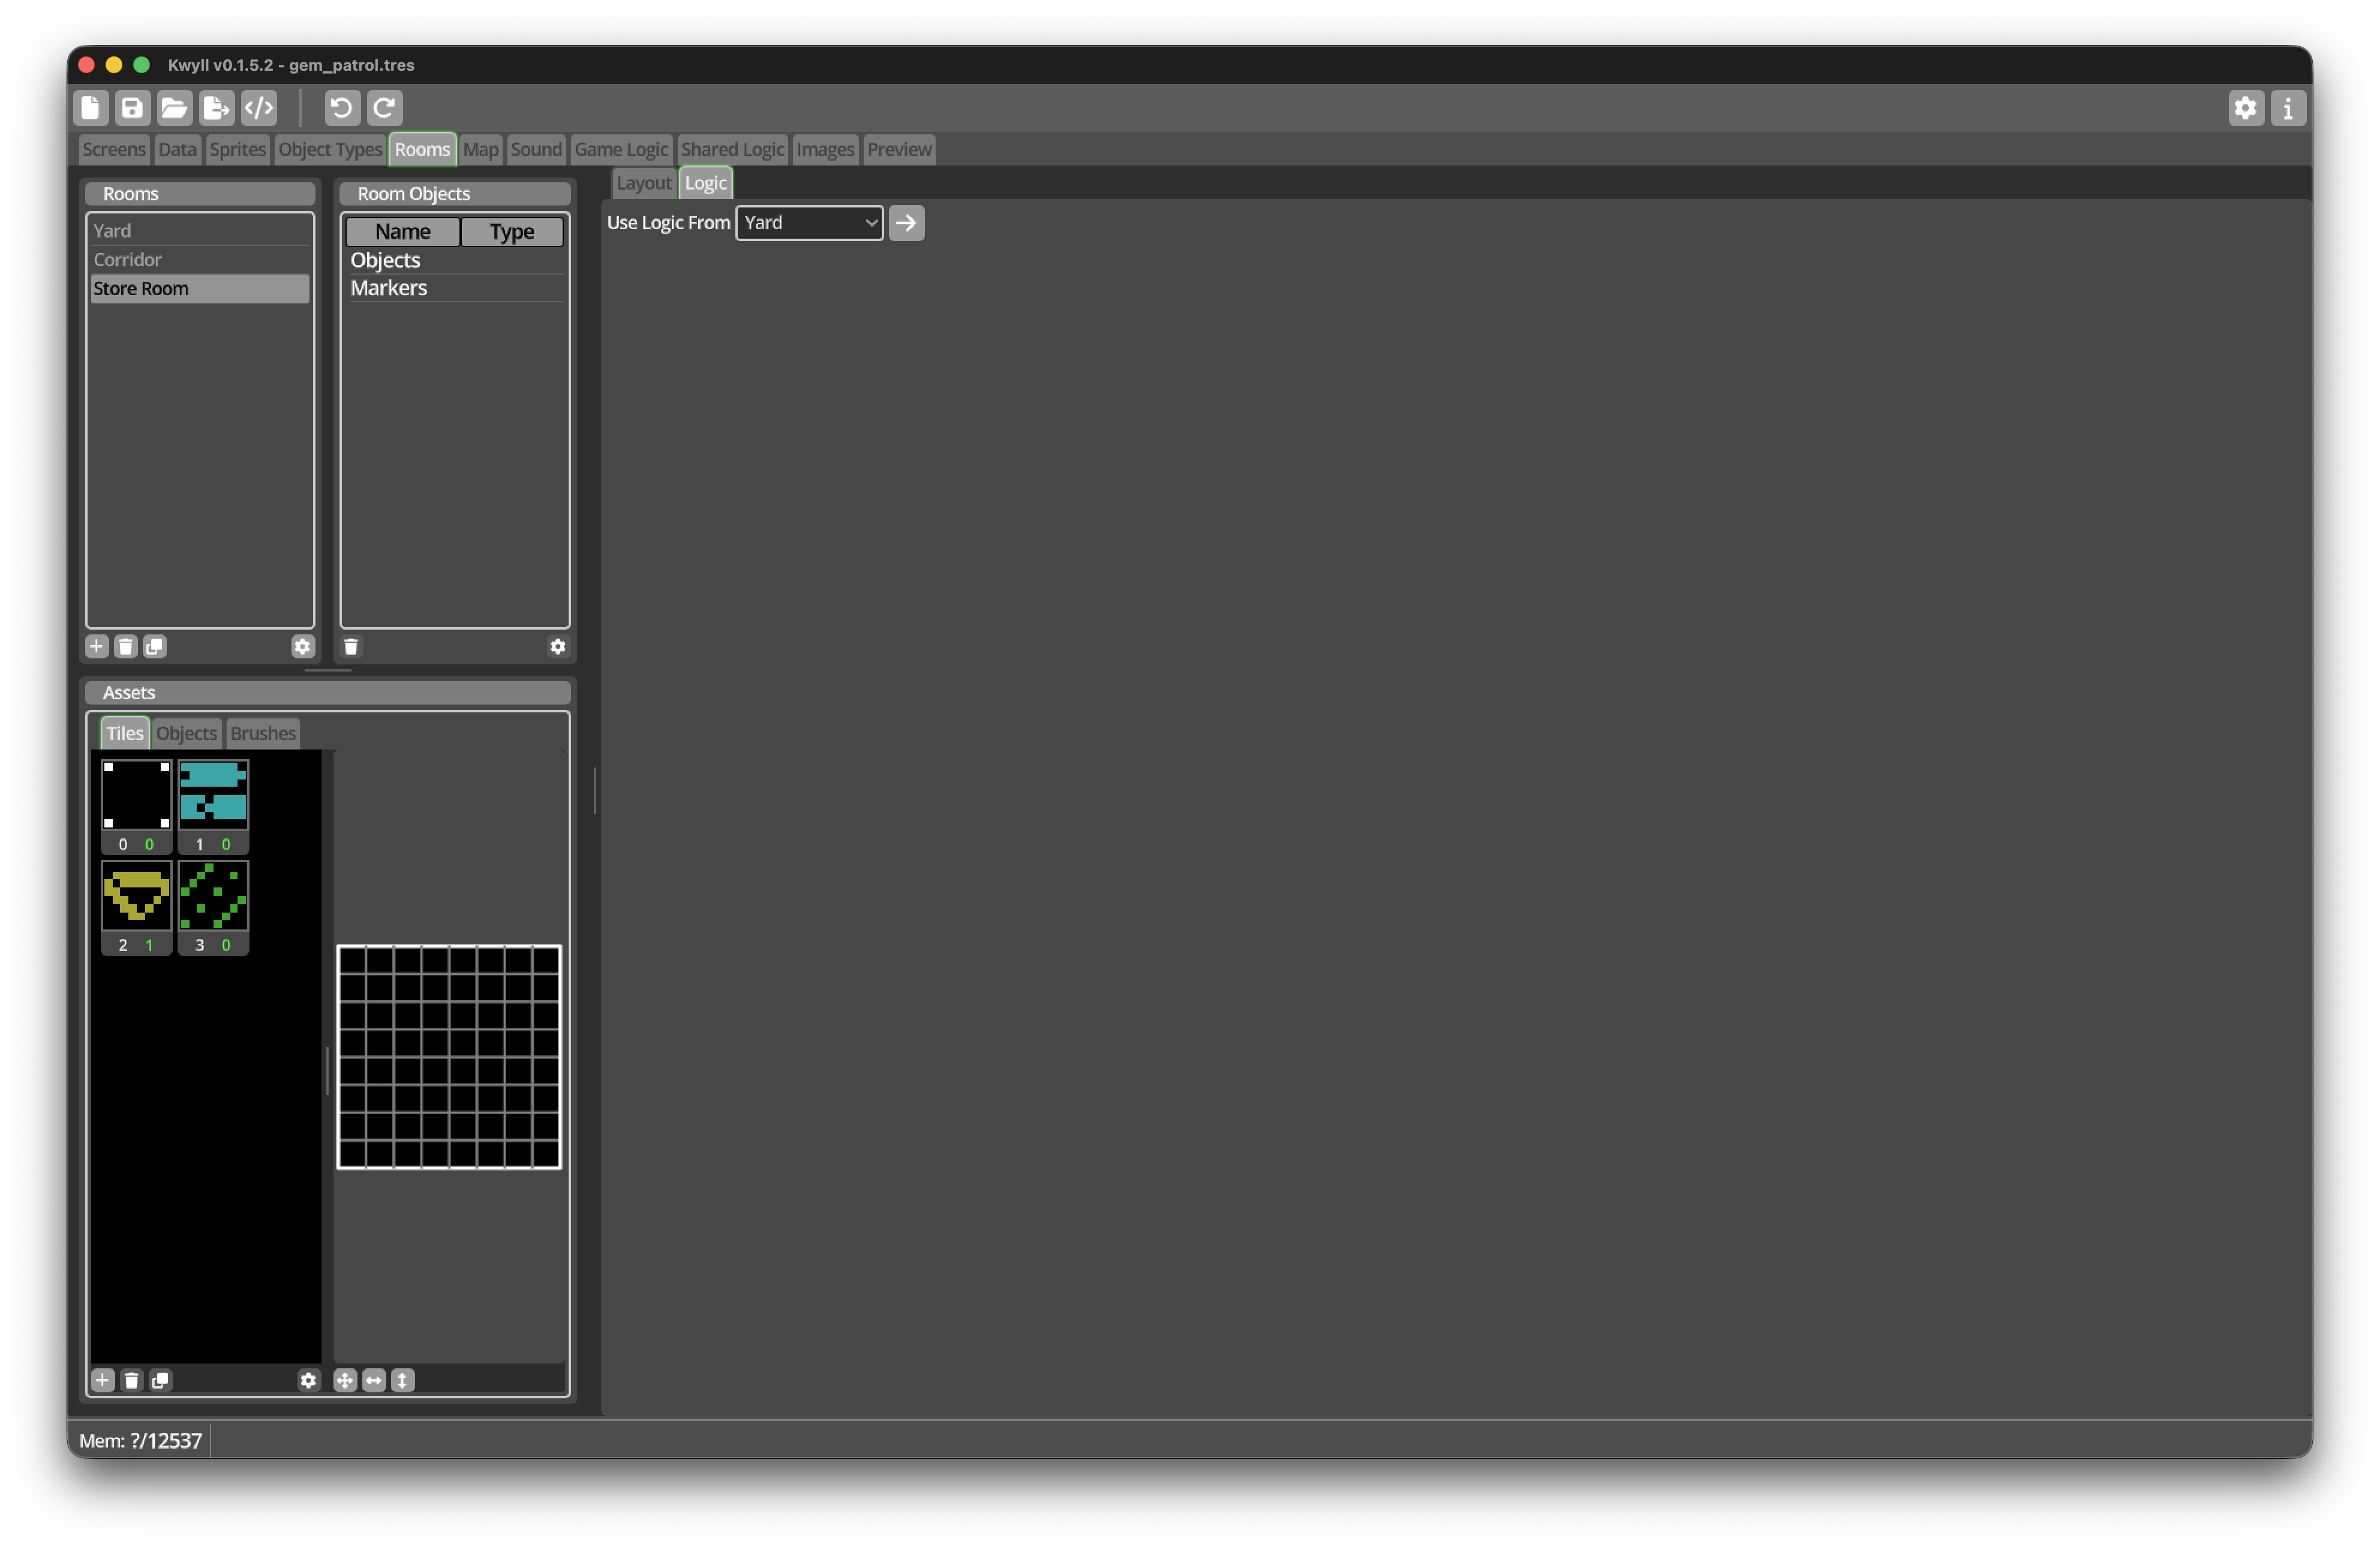
Share the persistence Logic with every Room Type
The persistence flow does not depend on the layout of Yard. Corridor and Store Room can reuse it.
-
Select the
CorridorRoom Type and open its Logic tab. -
In Use Logic From, choose
Yard. -
Select the
Store RoomRoom Type. -
In Use Logic From, choose
Yard.
All three Room Types now use the same Room Logic and variable declarations.
Each Location still receives its own values. In particular, Entrance Yard and
Upper Yard share the Yard Room Type and its Logic, but their
collected_positions arrays remain independent.
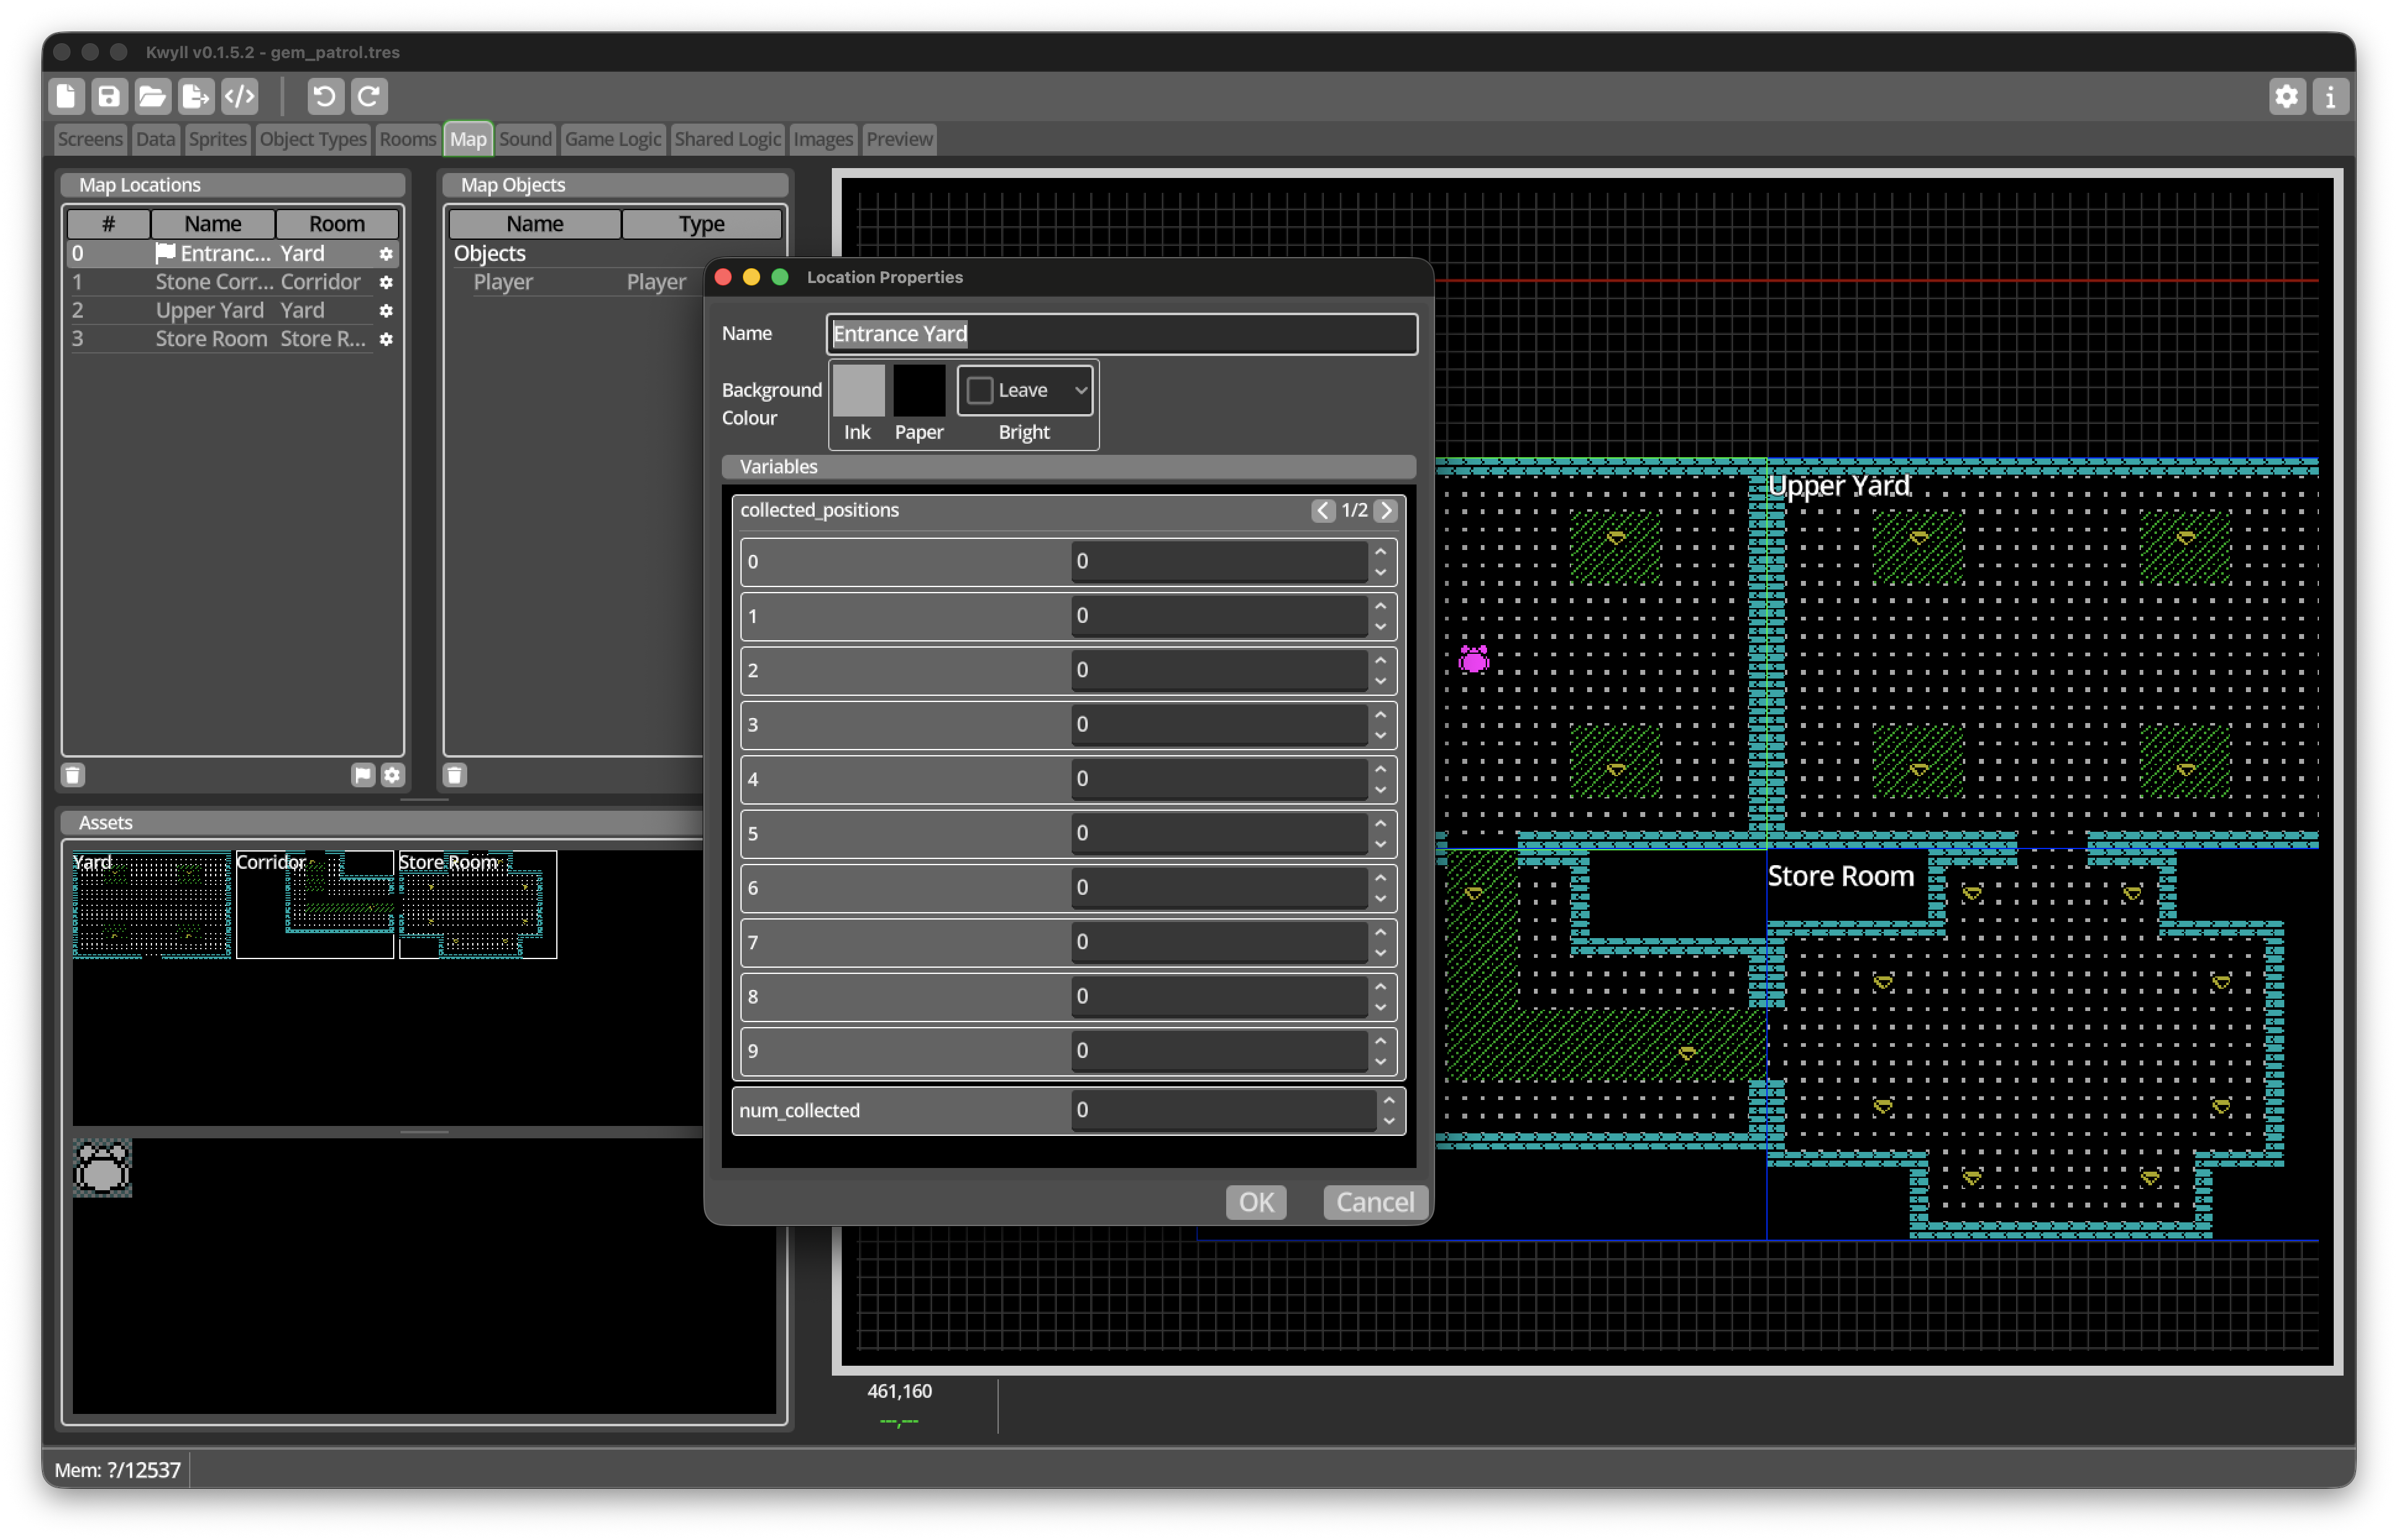
Open the Map and inspect the properties of all four Locations. Confirm that each has:
-
a
collected_positionsarray containing sixteen zeroes; and -
num_collectedset to0.
Test collection persistence
Save and run Preview. Use this test route:
-
Collect one gem in Entrance Yard.
-
Note the value in
GemCount. -
Move down into Stone Corridor.
-
Return to Entrance Yard.
-
Confirm that the collected gem is still gone.
-
Move through Stone Corridor and Store Room to Upper Yard.
-
Confirm that Upper Yard’s gems are still present even though it uses the same Yard Room Type.
-
Collect a gem in Upper Yard.
-
Return to Entrance Yard and confirm that each Yard remembers its own collected positions.
The total in GemCount should continue increasing across all Locations.
In Preview’s Data panel, expand the Locations and compare
num_collected for Entrance Yard and Upper Yard. Their different values make
the per-Location state visible.
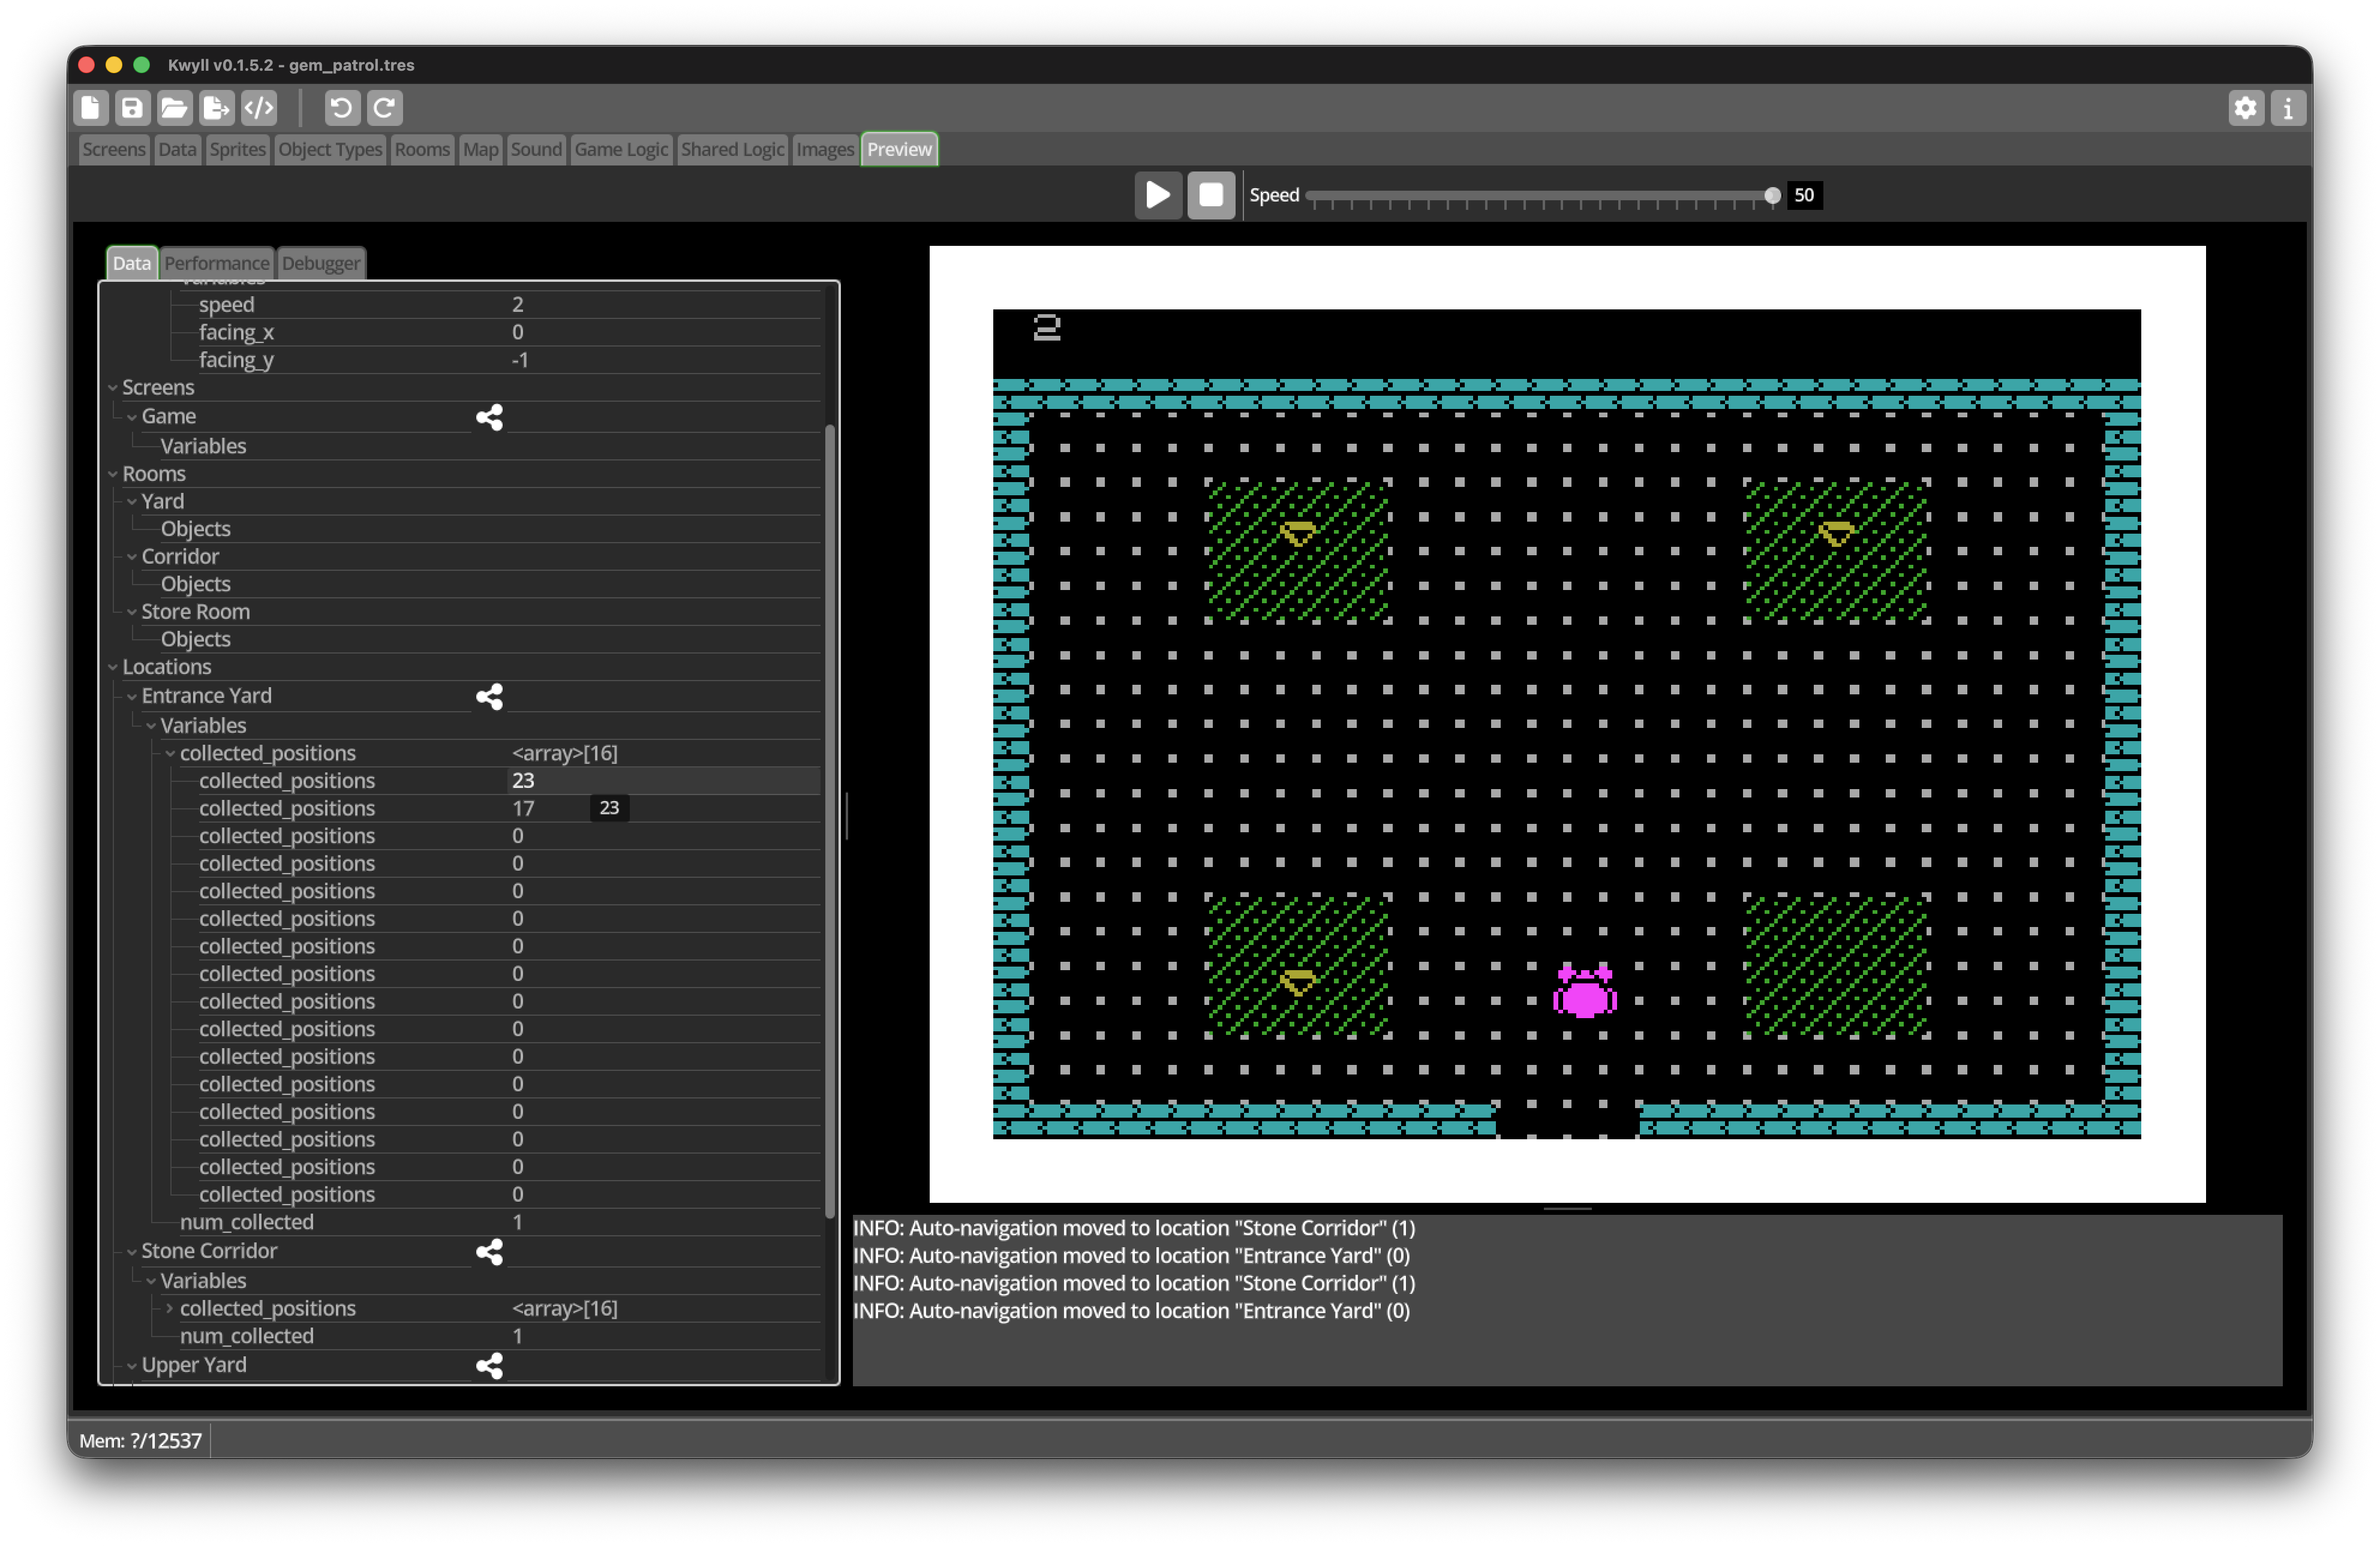
How the collection message travels
When the Player touches a gem, the information follows two paths:
Player -> Game Logic -> Game Screen -> GemCount
   |
   +----> Current Location -> stored X/Y position
The first path manages a value that belongs to the whole game. The second stores state belonging to one Location. This division is one of the key principles of organising Logic in Kwyll.
Milestone 3 checklist
Before continuing, confirm that:
-
touching a Gem tile plays
Collect; -
the touched tile changes to Floor;
-
each gem increases the Game Logic
gemsvariable once; -
GemCountdisplays the updated total; -
Yard defines
collected_positions[16]andnum_collected; -
Corridor and Store Room use Yard’s Room Logic;
-
returning to a Location does not restore collected gems;
-
the two Yard Locations remember their state independently; and
-
the gem total continues across Location changes.
Save another copy as gem_patrol_milestone_3.tres.
Milestone 4: Add moving enemies
In this milestone, we will create one Enemy Object Type and use it twice. One Enemy instance will patrol horizontally in Stone Corridor, while another will patrol vertically in the Store Room.
Both instances will share the same Sprite, animation, and Logic. Different initial variable values will give each one its own movement direction. This is the same Object Type and Object Instance relationship that we introduced with the Player, but the Enemies will be Room Objects rather than a Map Object.
Draw the Enemy sprite
-
Open the Sprites editor.
-
Select the
CharactersSprite Sheet. -
Add a second Sprite.
-
Draw a simple enemy in the 16-by-16 grid.
-
Add a mask around its shape.
Make the Enemy visually distinct from the Player. A pointed, angular, or one-eyed design works well at this size.
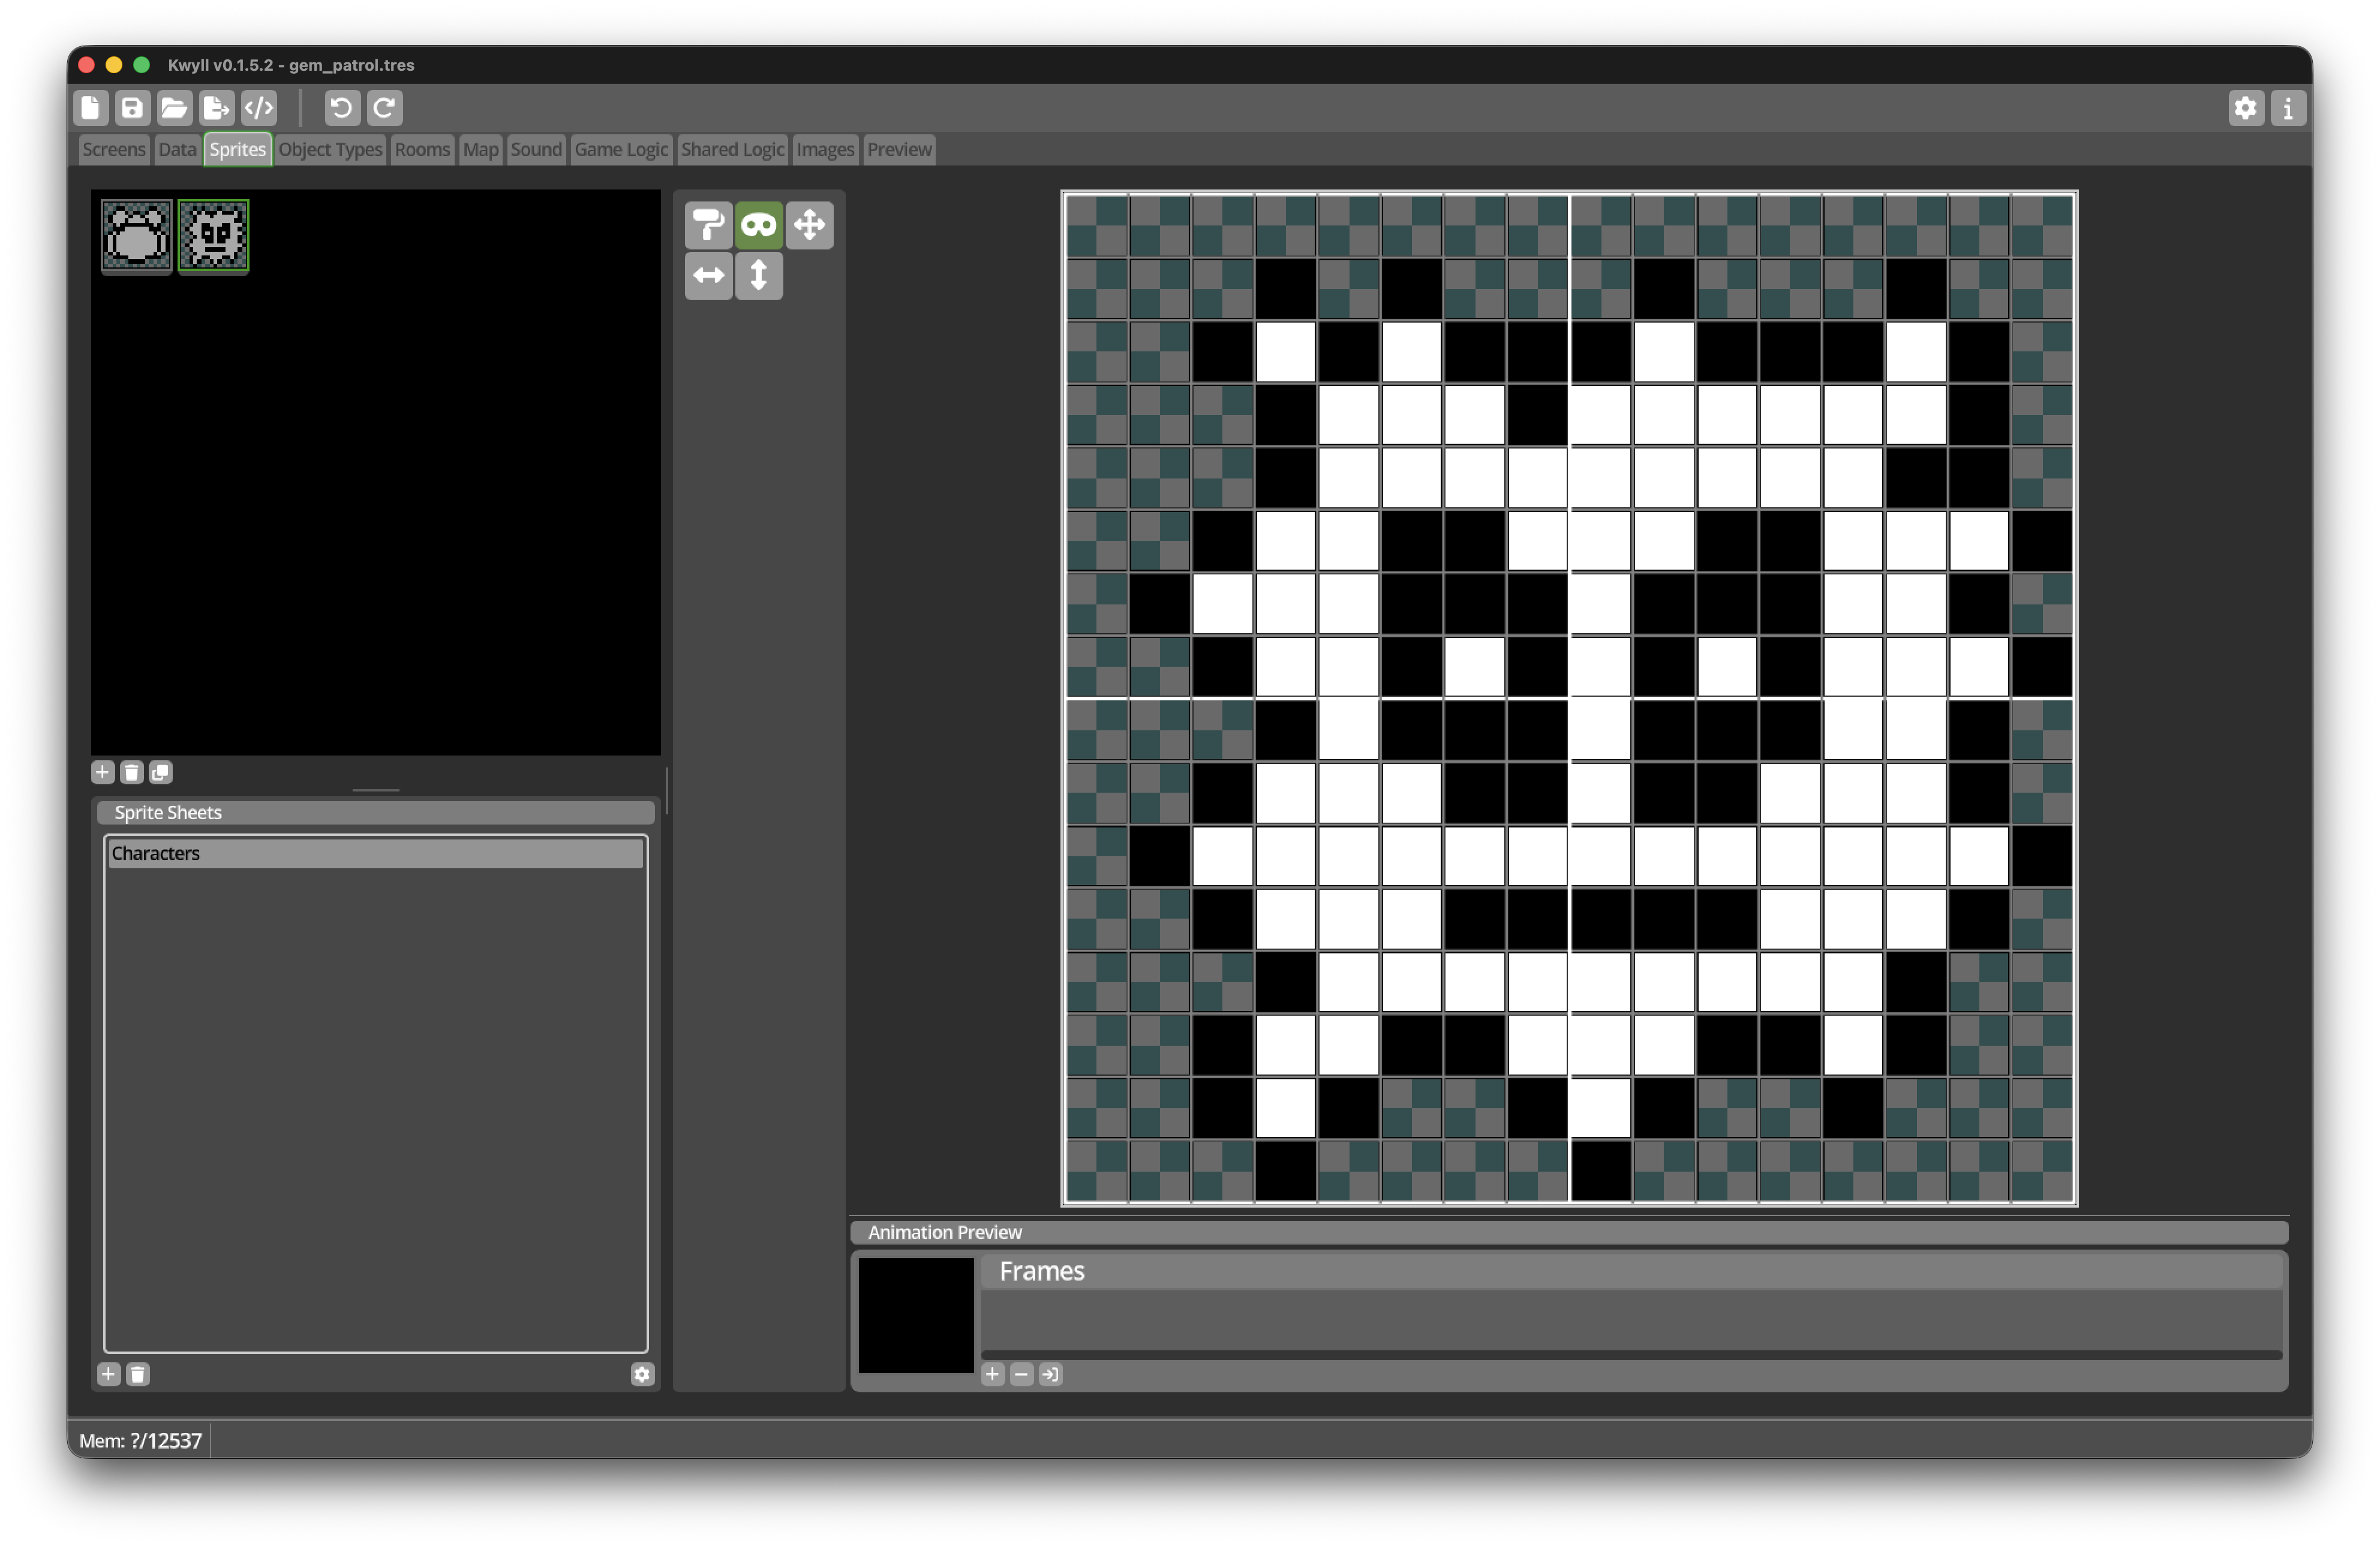
Create the Enemy Object Type
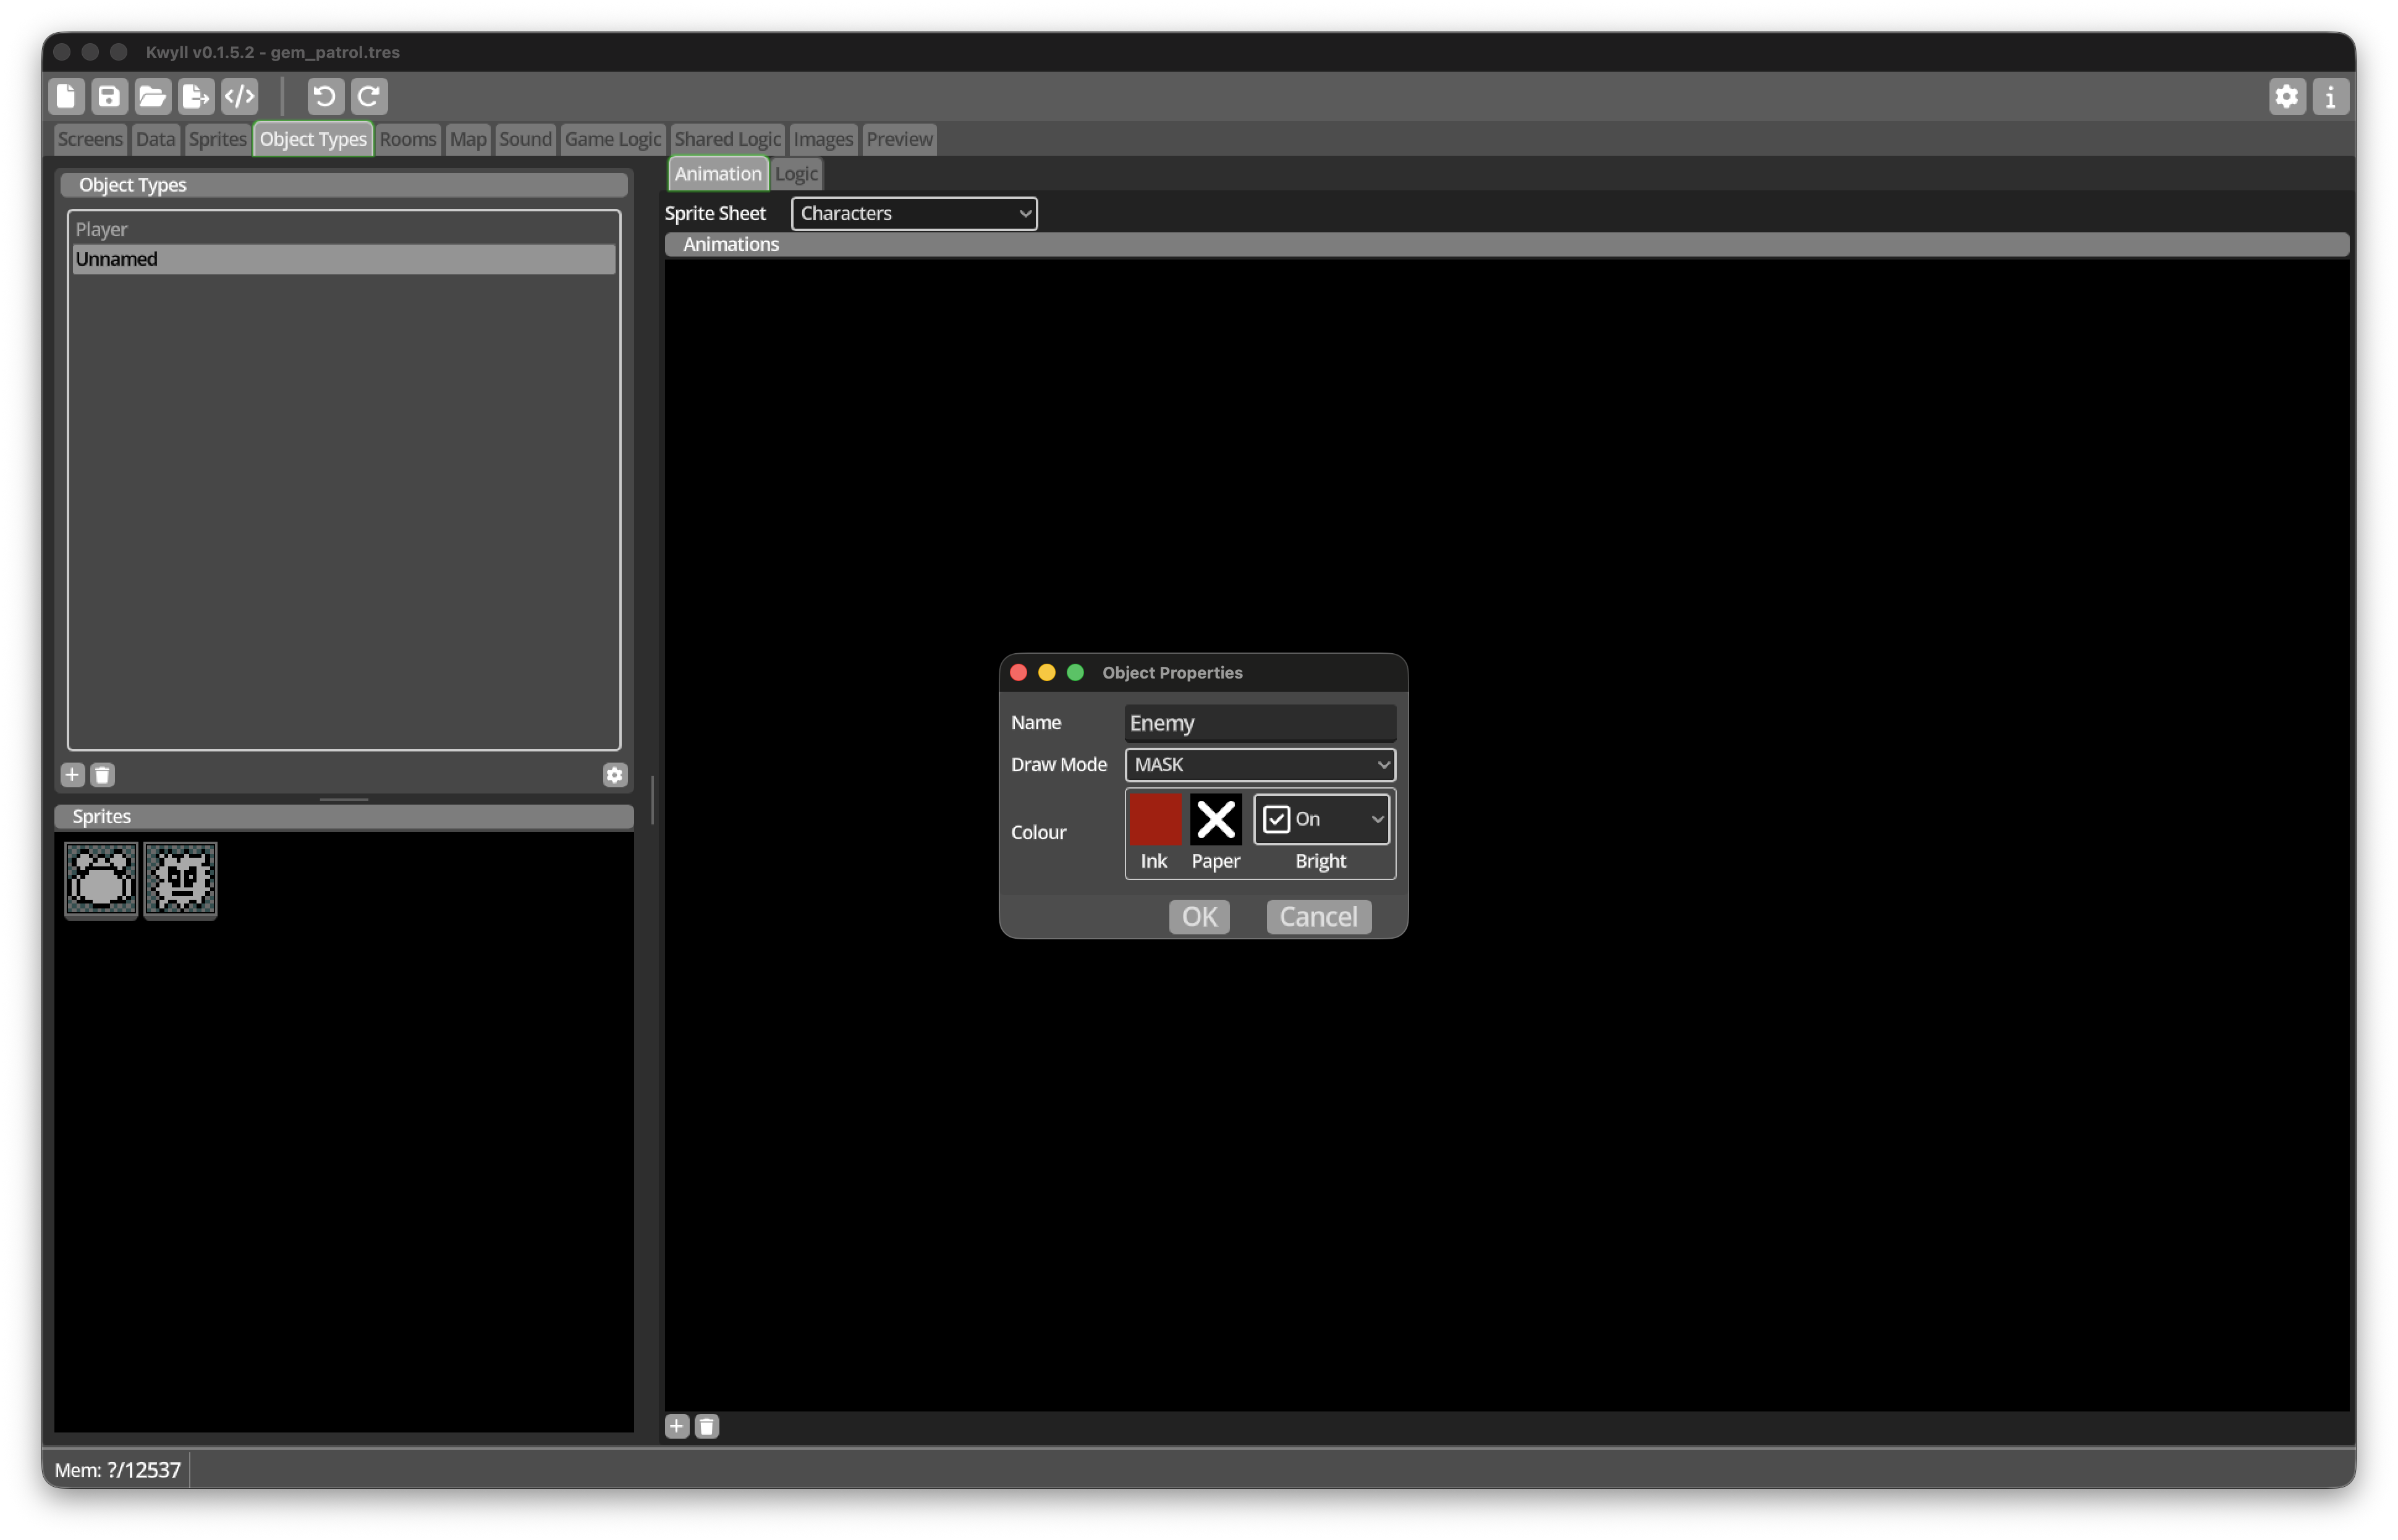
-
Open the Object Types editor.
-
Add an Object Type and name it
Enemy. -
Set its Draw Mode to
Mask. -
Set its default Ink to Red and enable Bright.
-
Leave Paper unset.
-
Select the
CharactersSprite Sheet. -
Add one animation with the Enemy sprite as its first frame.
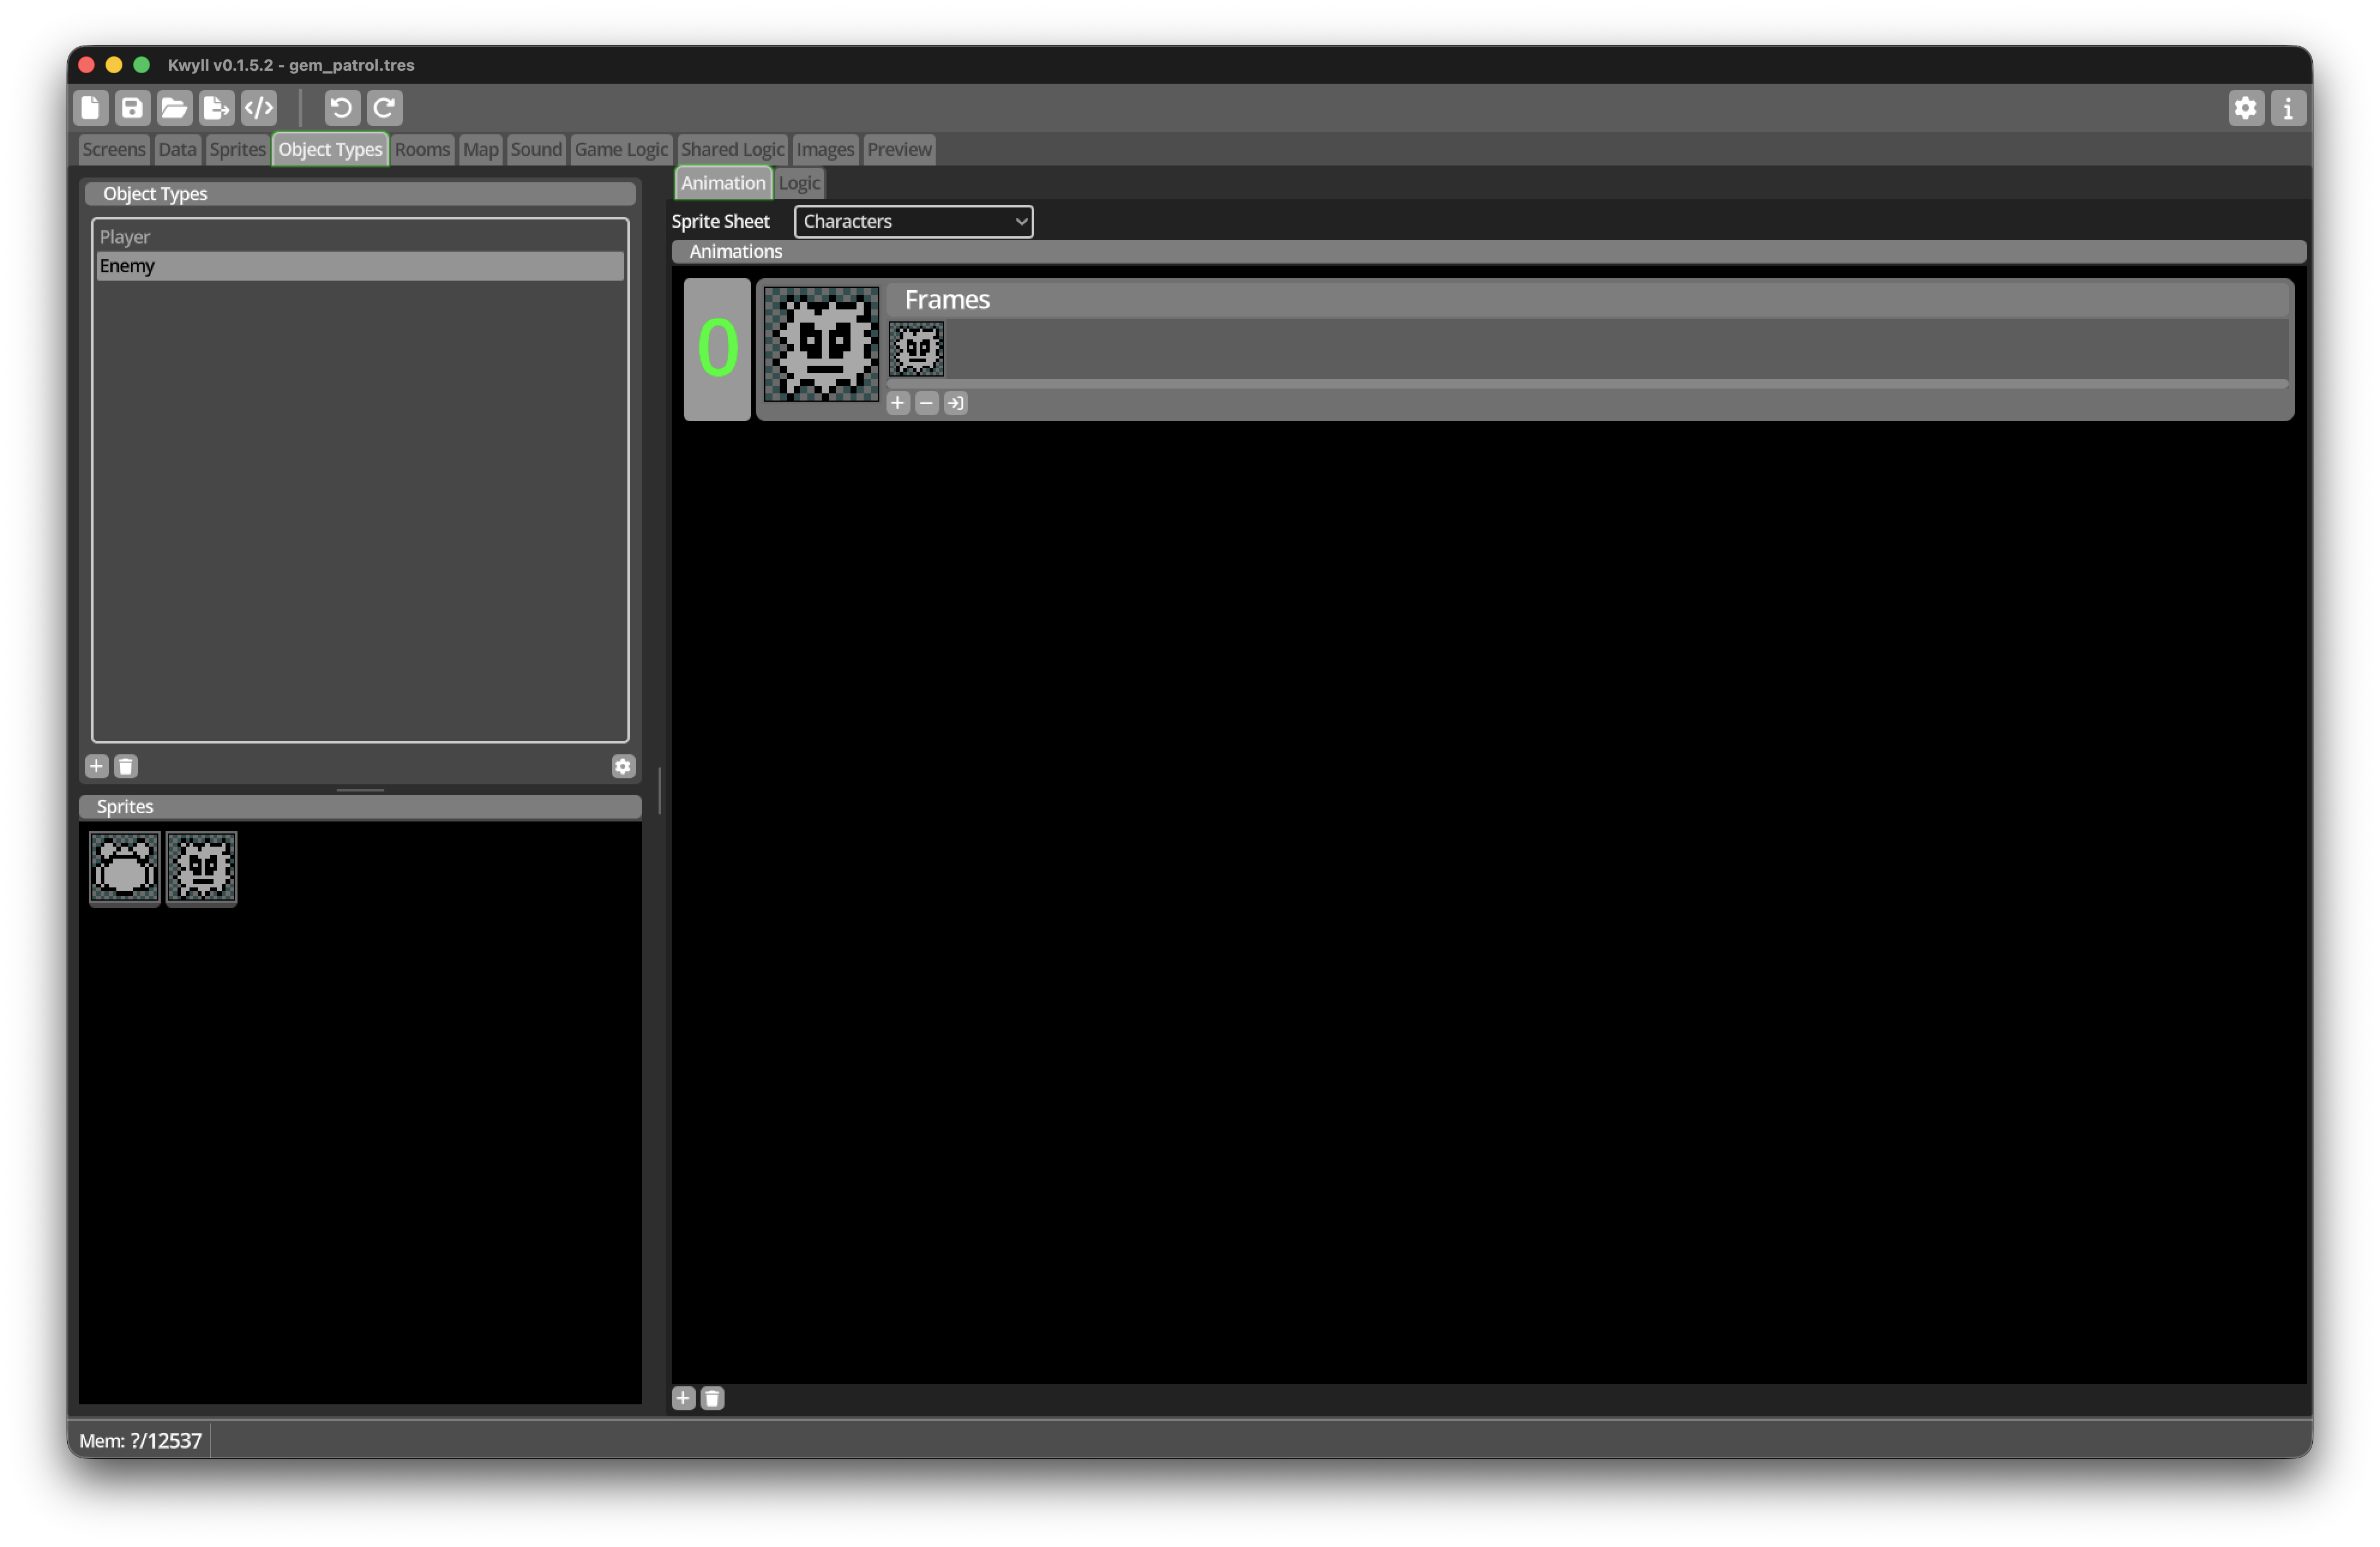
Add Enemy movement variables
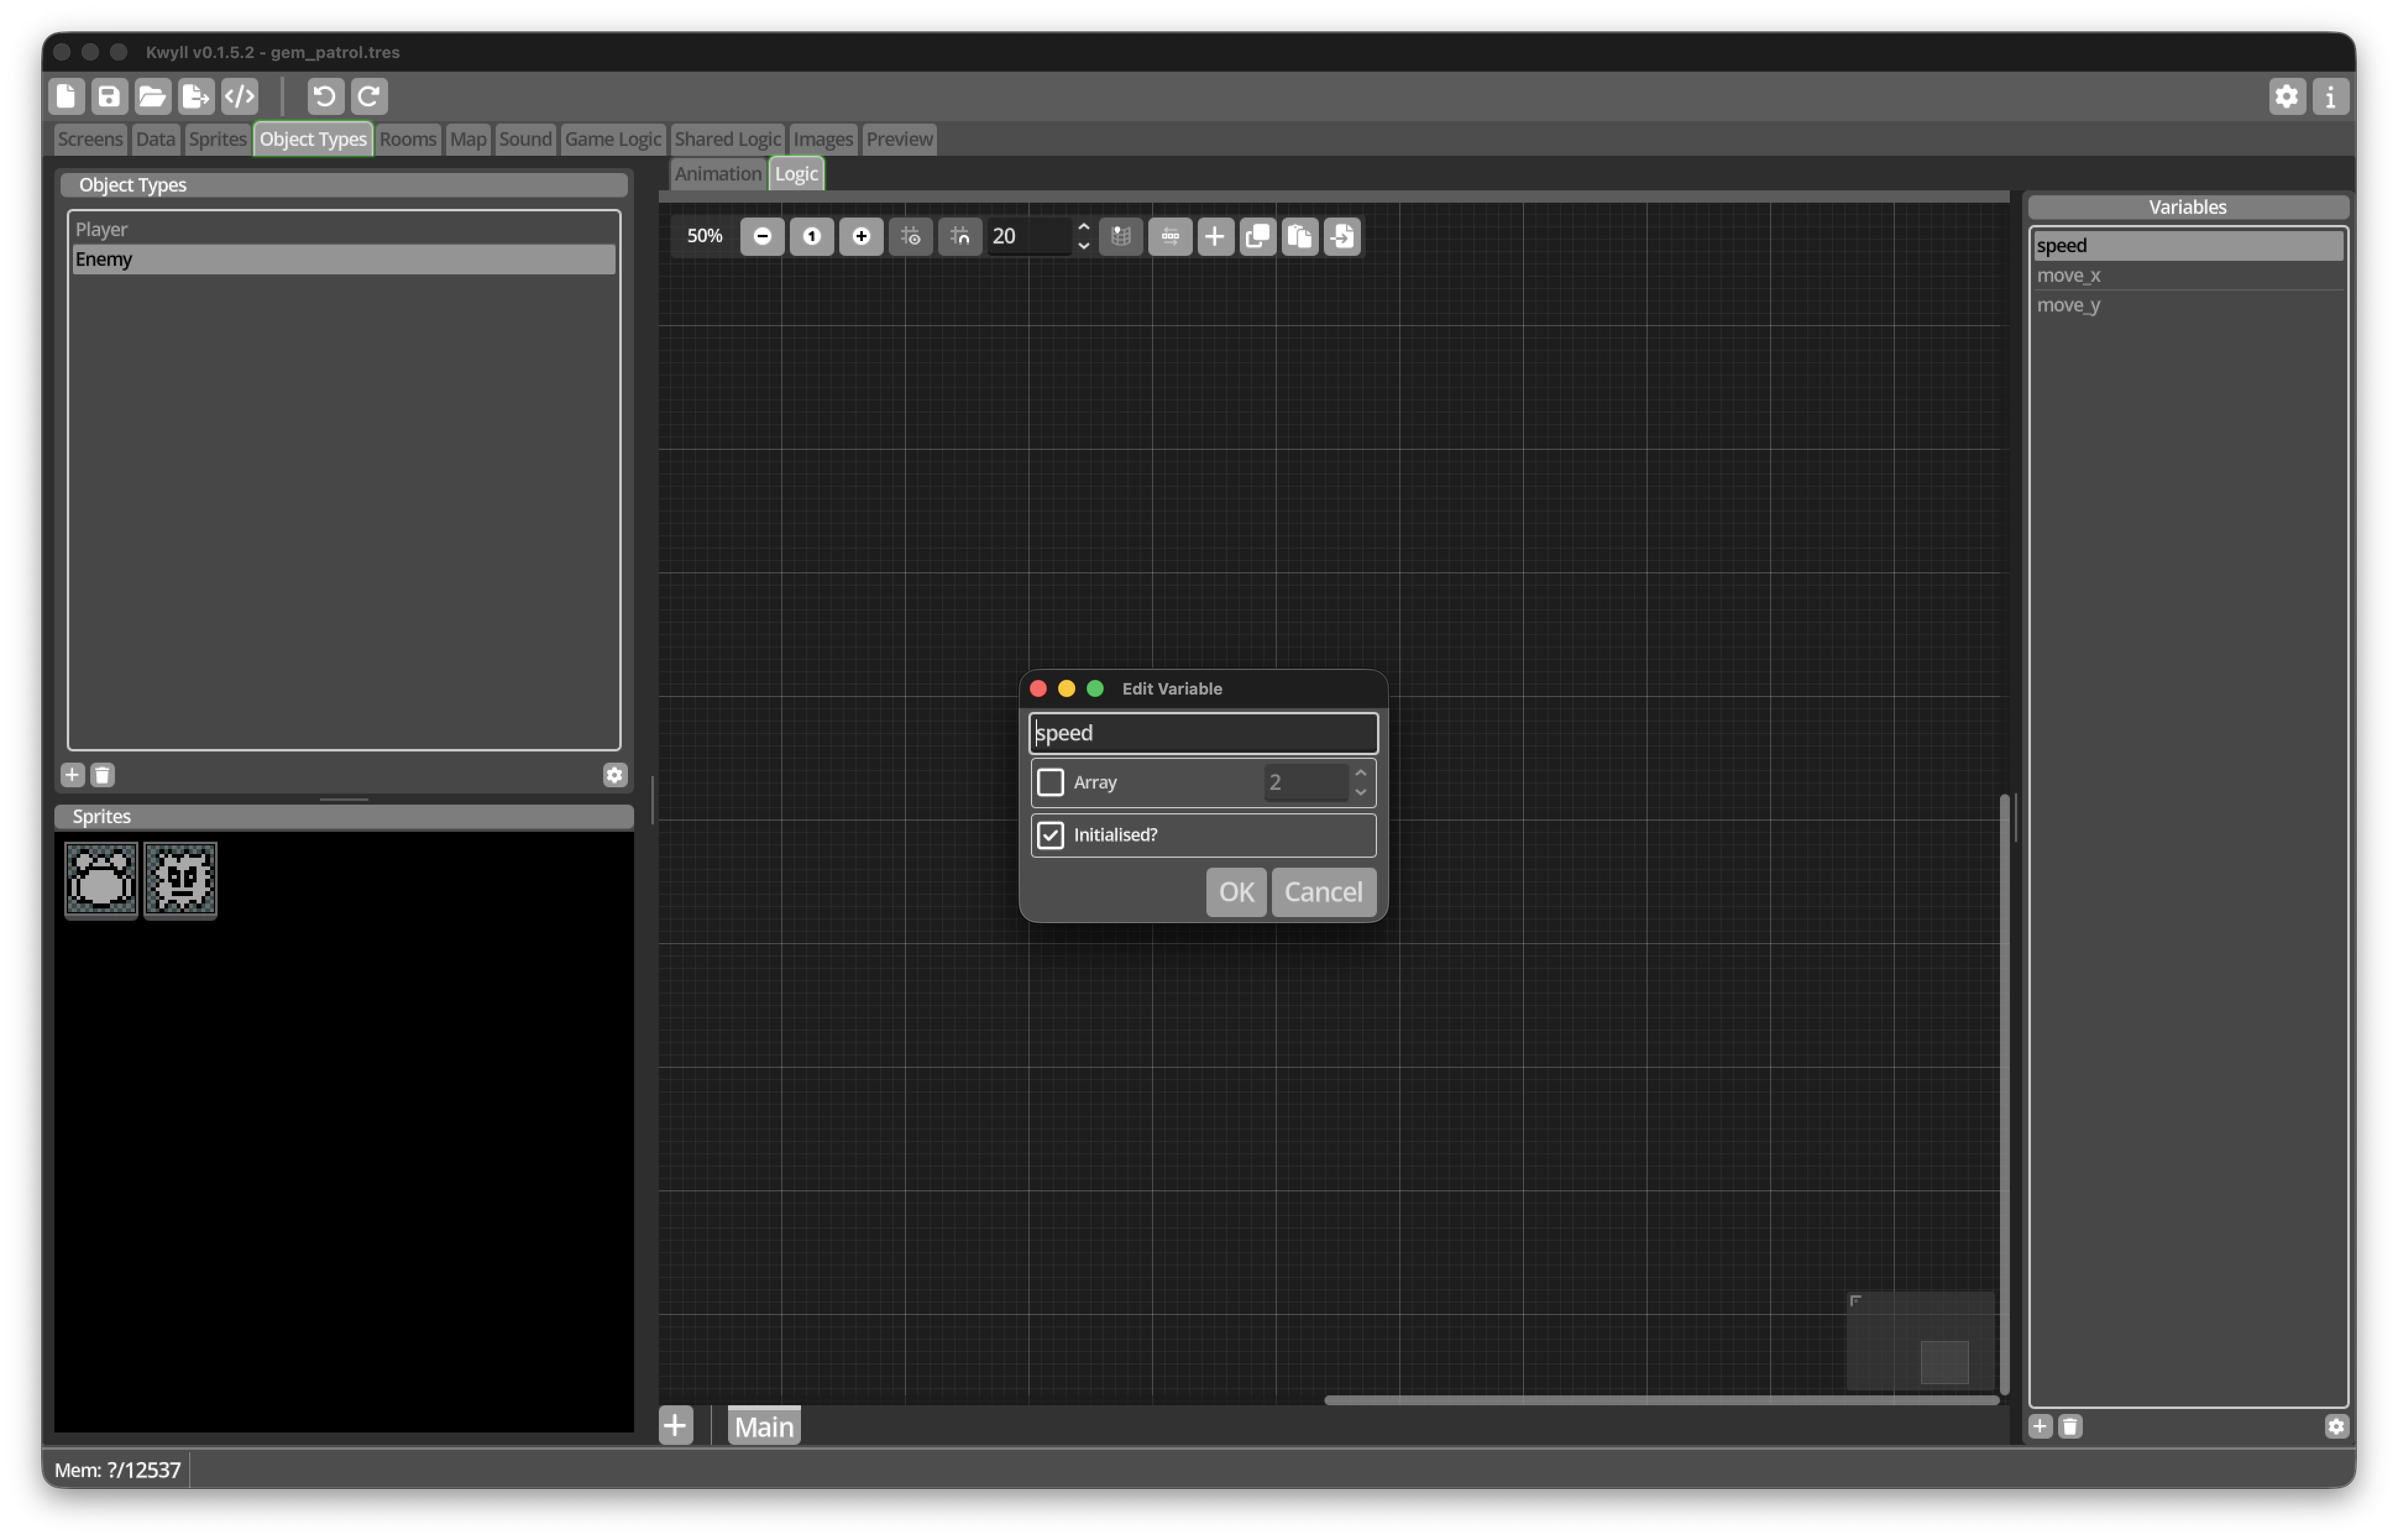
Open the Enemy’s Logic tab and add three initialised integer variables:
| Variable | Purpose | Example value |
|---|---|---|
|
Pixels moved on each update |
|
|
Horizontal direction |
|
|
Vertical direction |
|
The Logic will multiply each direction by speed. A zero direction means no
movement on that axis.
Build the Enemy movement flow
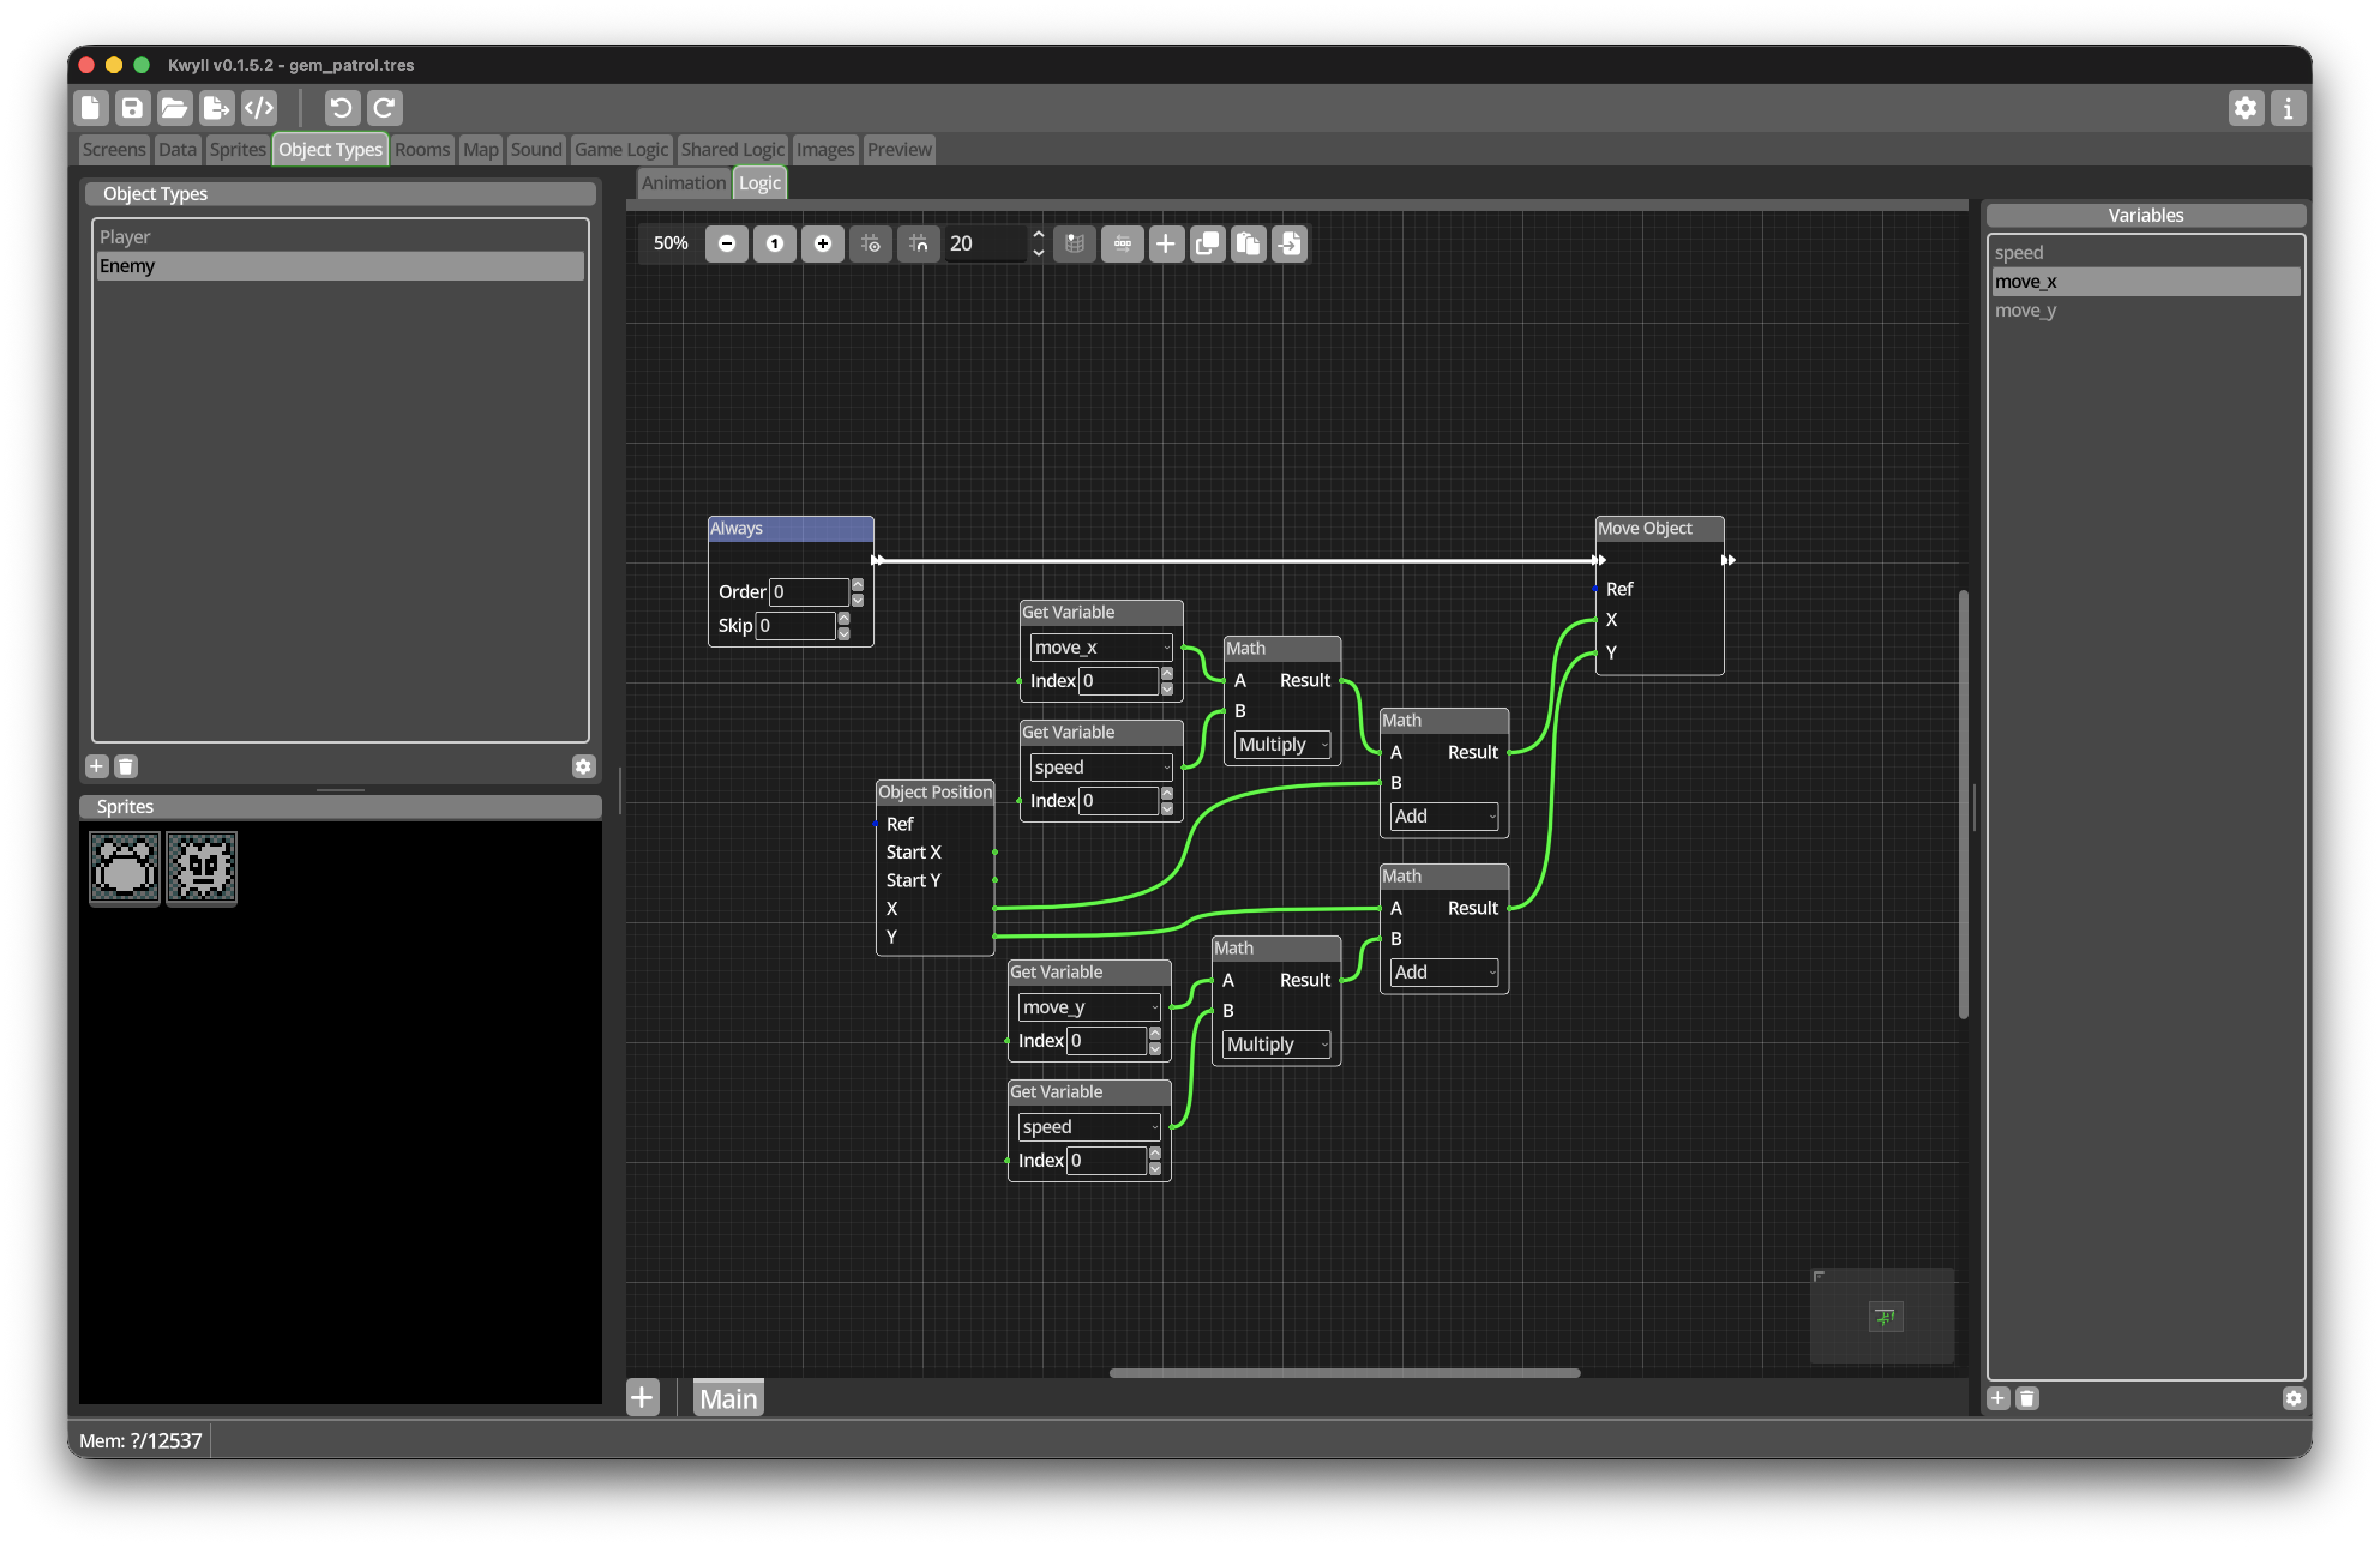
The calculation is a smaller version of the Player movement graph. There is no Controller Input because the Enemy gets its direction from variables.
-
Add an
Alwaystrigger. -
Add an
Object PositionNode. -
Add a
Get VariableNode forspeed. -
Add a
Get VariableNode formove_x. -
Add a
MathNode set toMultiply. -
Connect
move_xandspeedto its inputs. -
Add another
MathNode set toAdd. -
Connect current X from
Object Positionand the multiplied horizontal movement to its inputs.
This produces the requested new X position.
-
Add a
Get VariableNode formove_y. -
Add a second
MathNode set toMultiply. -
Connect
move_yand the samespeedvalue to its inputs. -
Add another
MathNode set toAdd. -
Connect current Y and the multiplied vertical movement to its inputs.
This produces the requested new Y position.
-
Add a
Move ObjectNode. -
Connect the two final results to its X and Y inputs.
-
Leave Ref unconnected so that the current Enemy instance is moved.
-
Connect
AlwaystoMove Objectwith a white flow connection.
Reverse direction at a wall
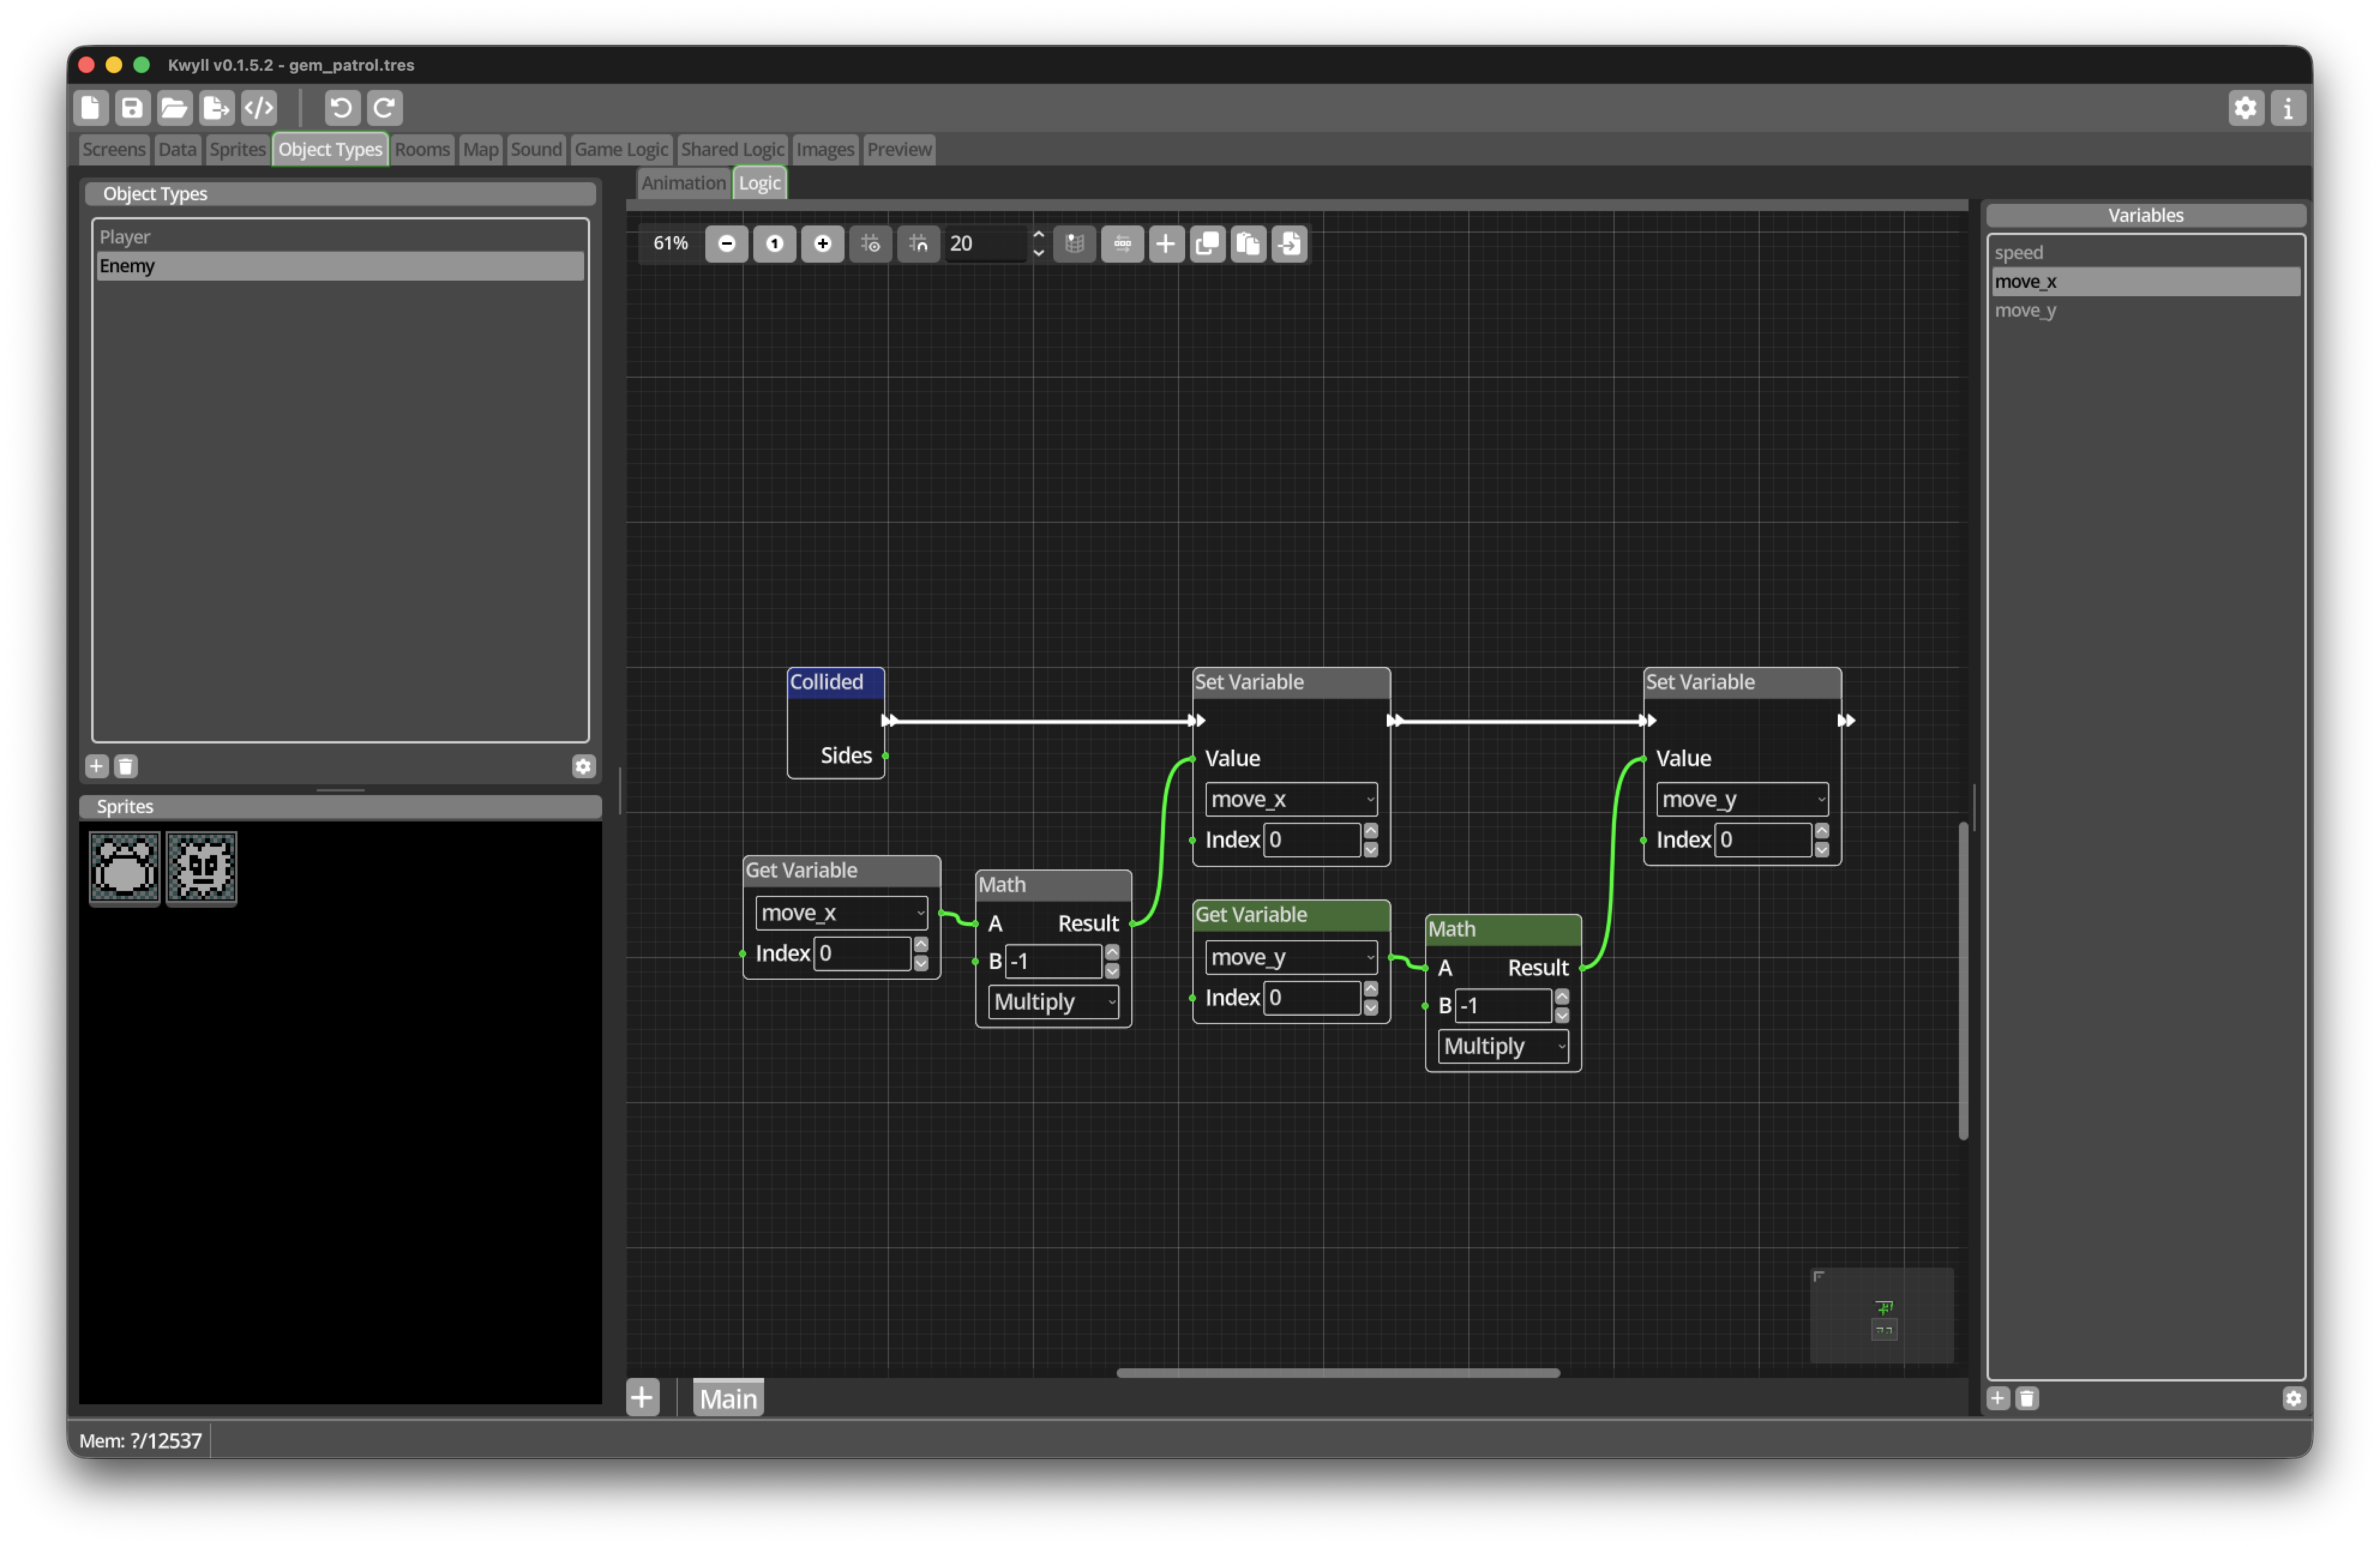
The Enemy instances will have Collide Bg enabled. When Move Object tries
to move one into a solid Wall tile, Kwyll prevents the movement and runs the
Enemy’s Collided trigger.
We will reverse both direction variables. One of them is zero for each Enemy,
and zero multiplied by -1 remains zero.
-
Add a
Collidedtrigger in another area of the Enemy graph. -
Add a
Get VariableNode formove_x. -
Add a
MathNode set toMultiply, with B set to-1. -
Connect
move_xto A. -
Add a
Set VariableNode formove_x. -
Connect the multiplication result to Value.
-
Connect
Collidedto thisSet Variable. -
Add a
Get VariableNode formove_y. -
Add another
MathNode set toMultiply, with B set to-1. -
Connect
move_yto A. -
Add a
Set VariableNode formove_y. -
Connect the second multiplication result to Value.
-
Connect the first
Set Variableflow to the second.
The Sides output of Collided is not needed for this simple patrol. A more
advanced controller could inspect it and reverse only the axis that hit a
wall.
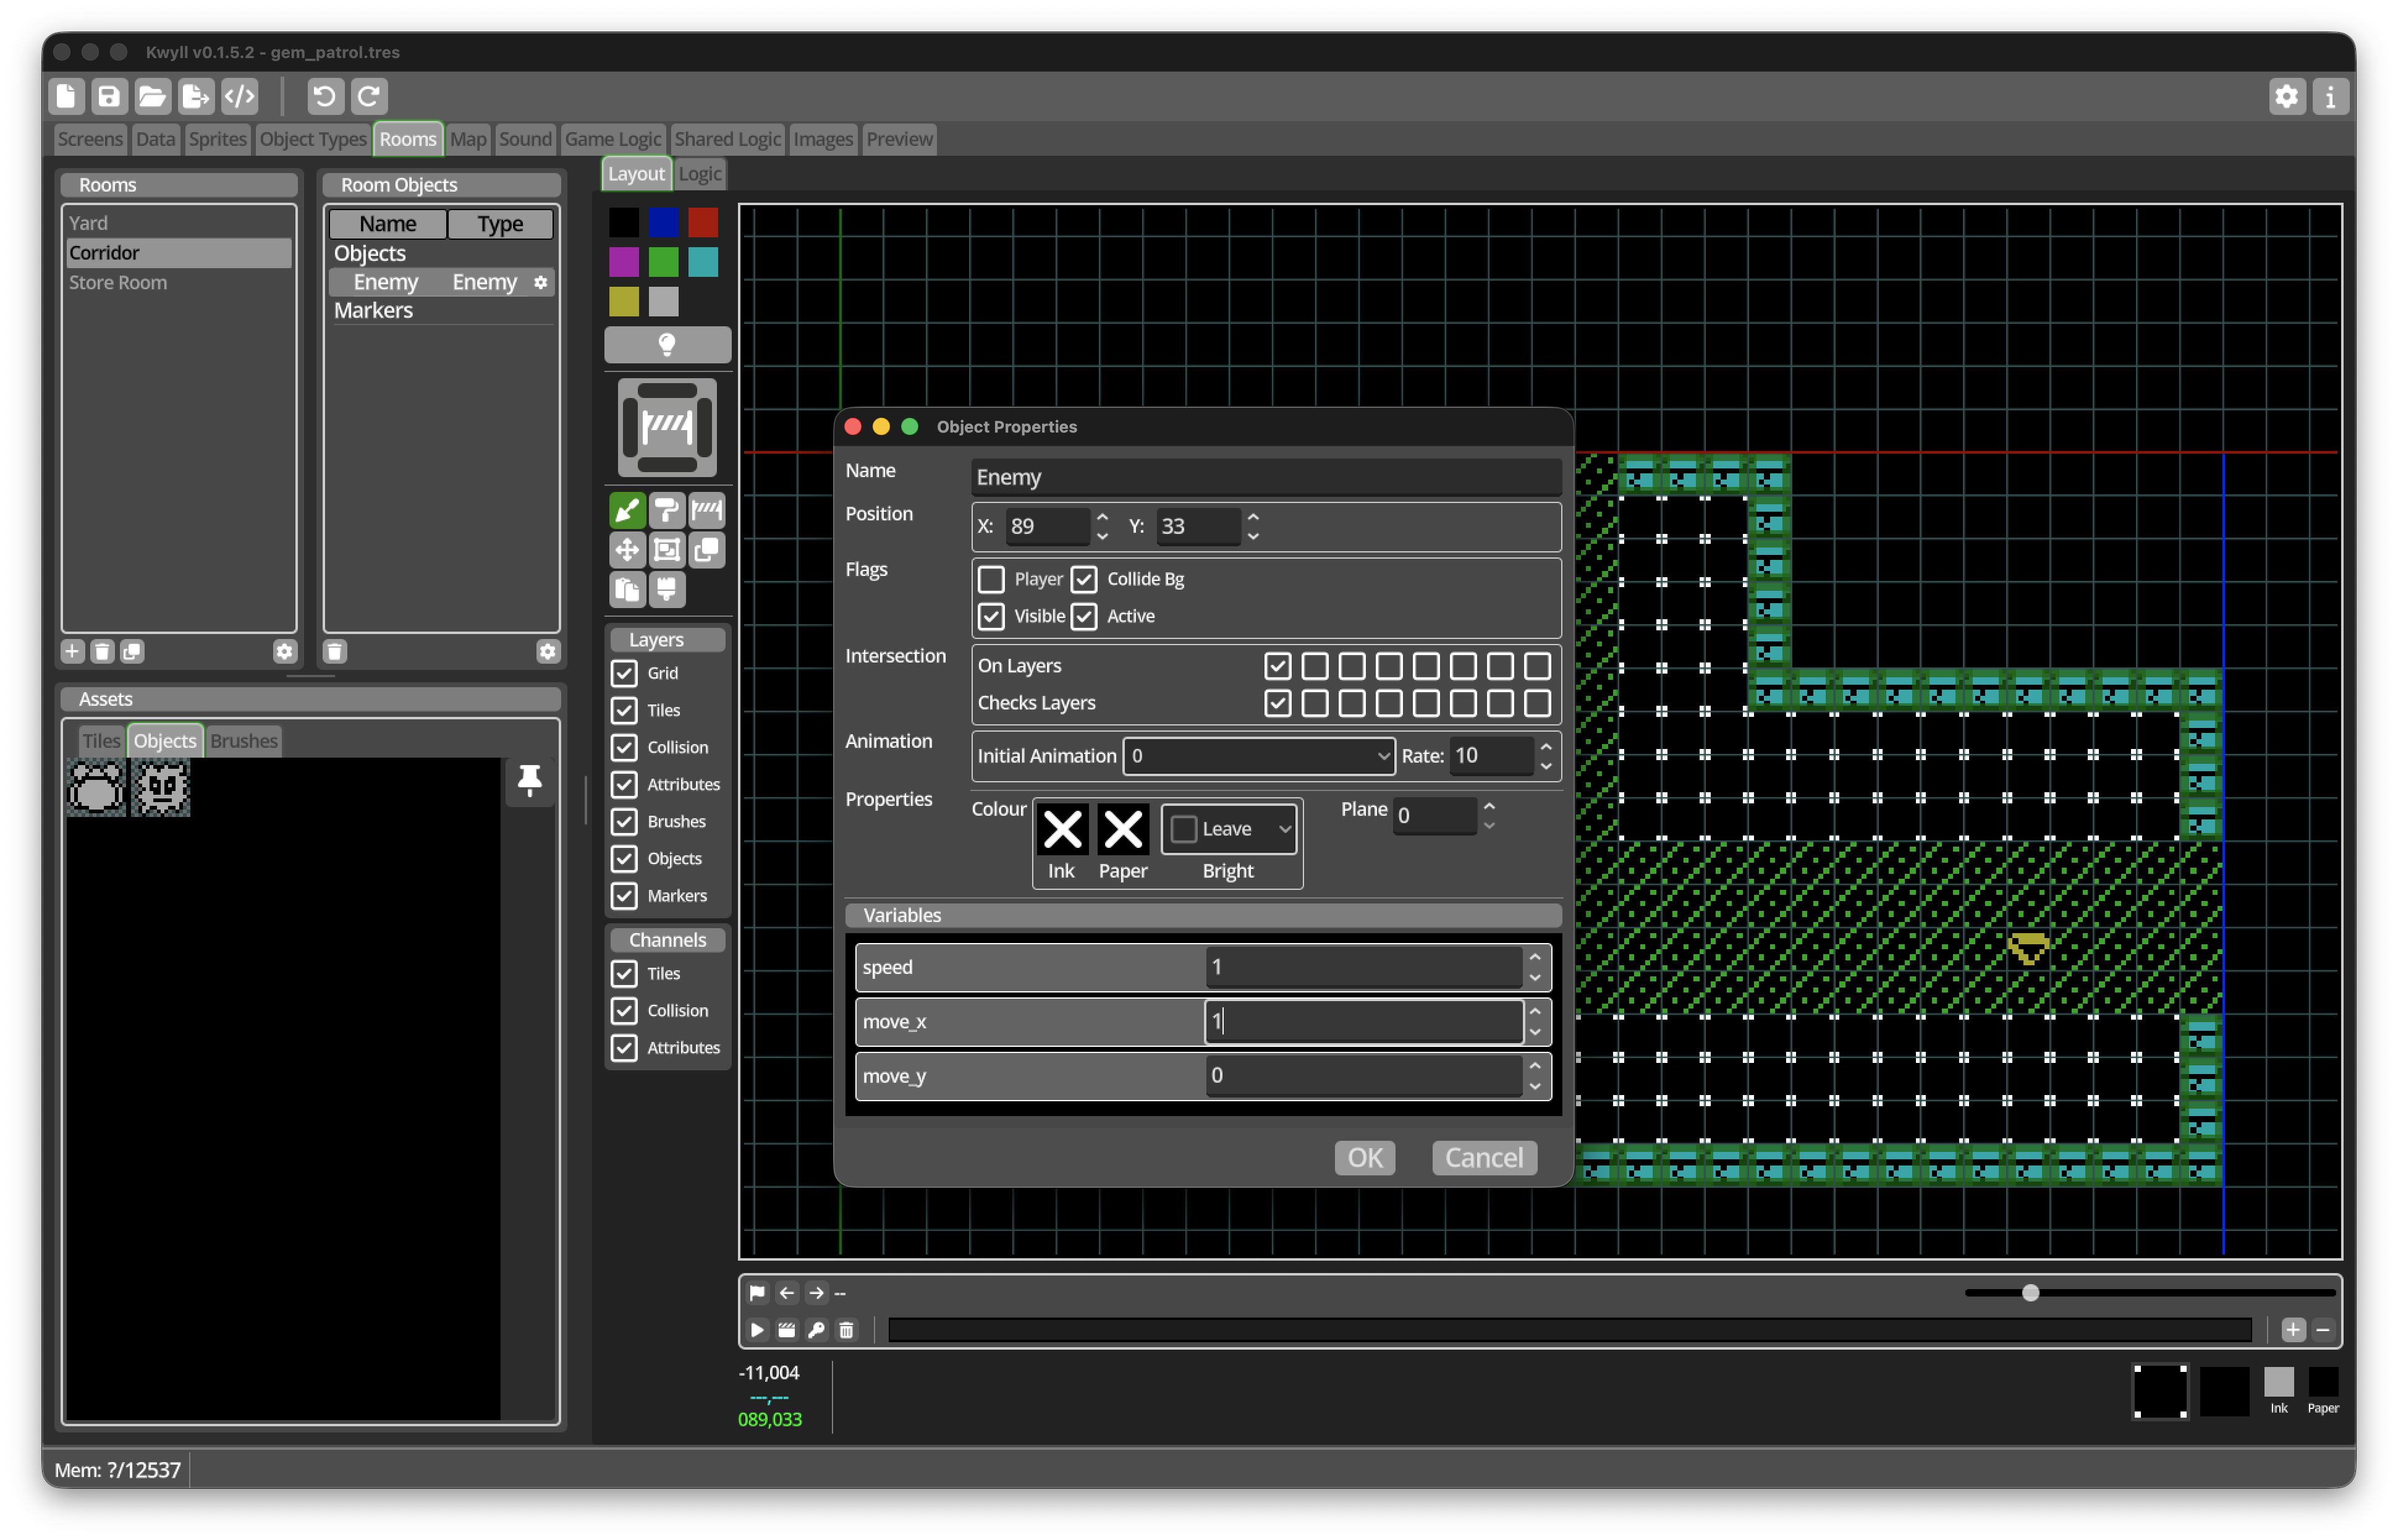
Place a horizontal Enemy in Corridor
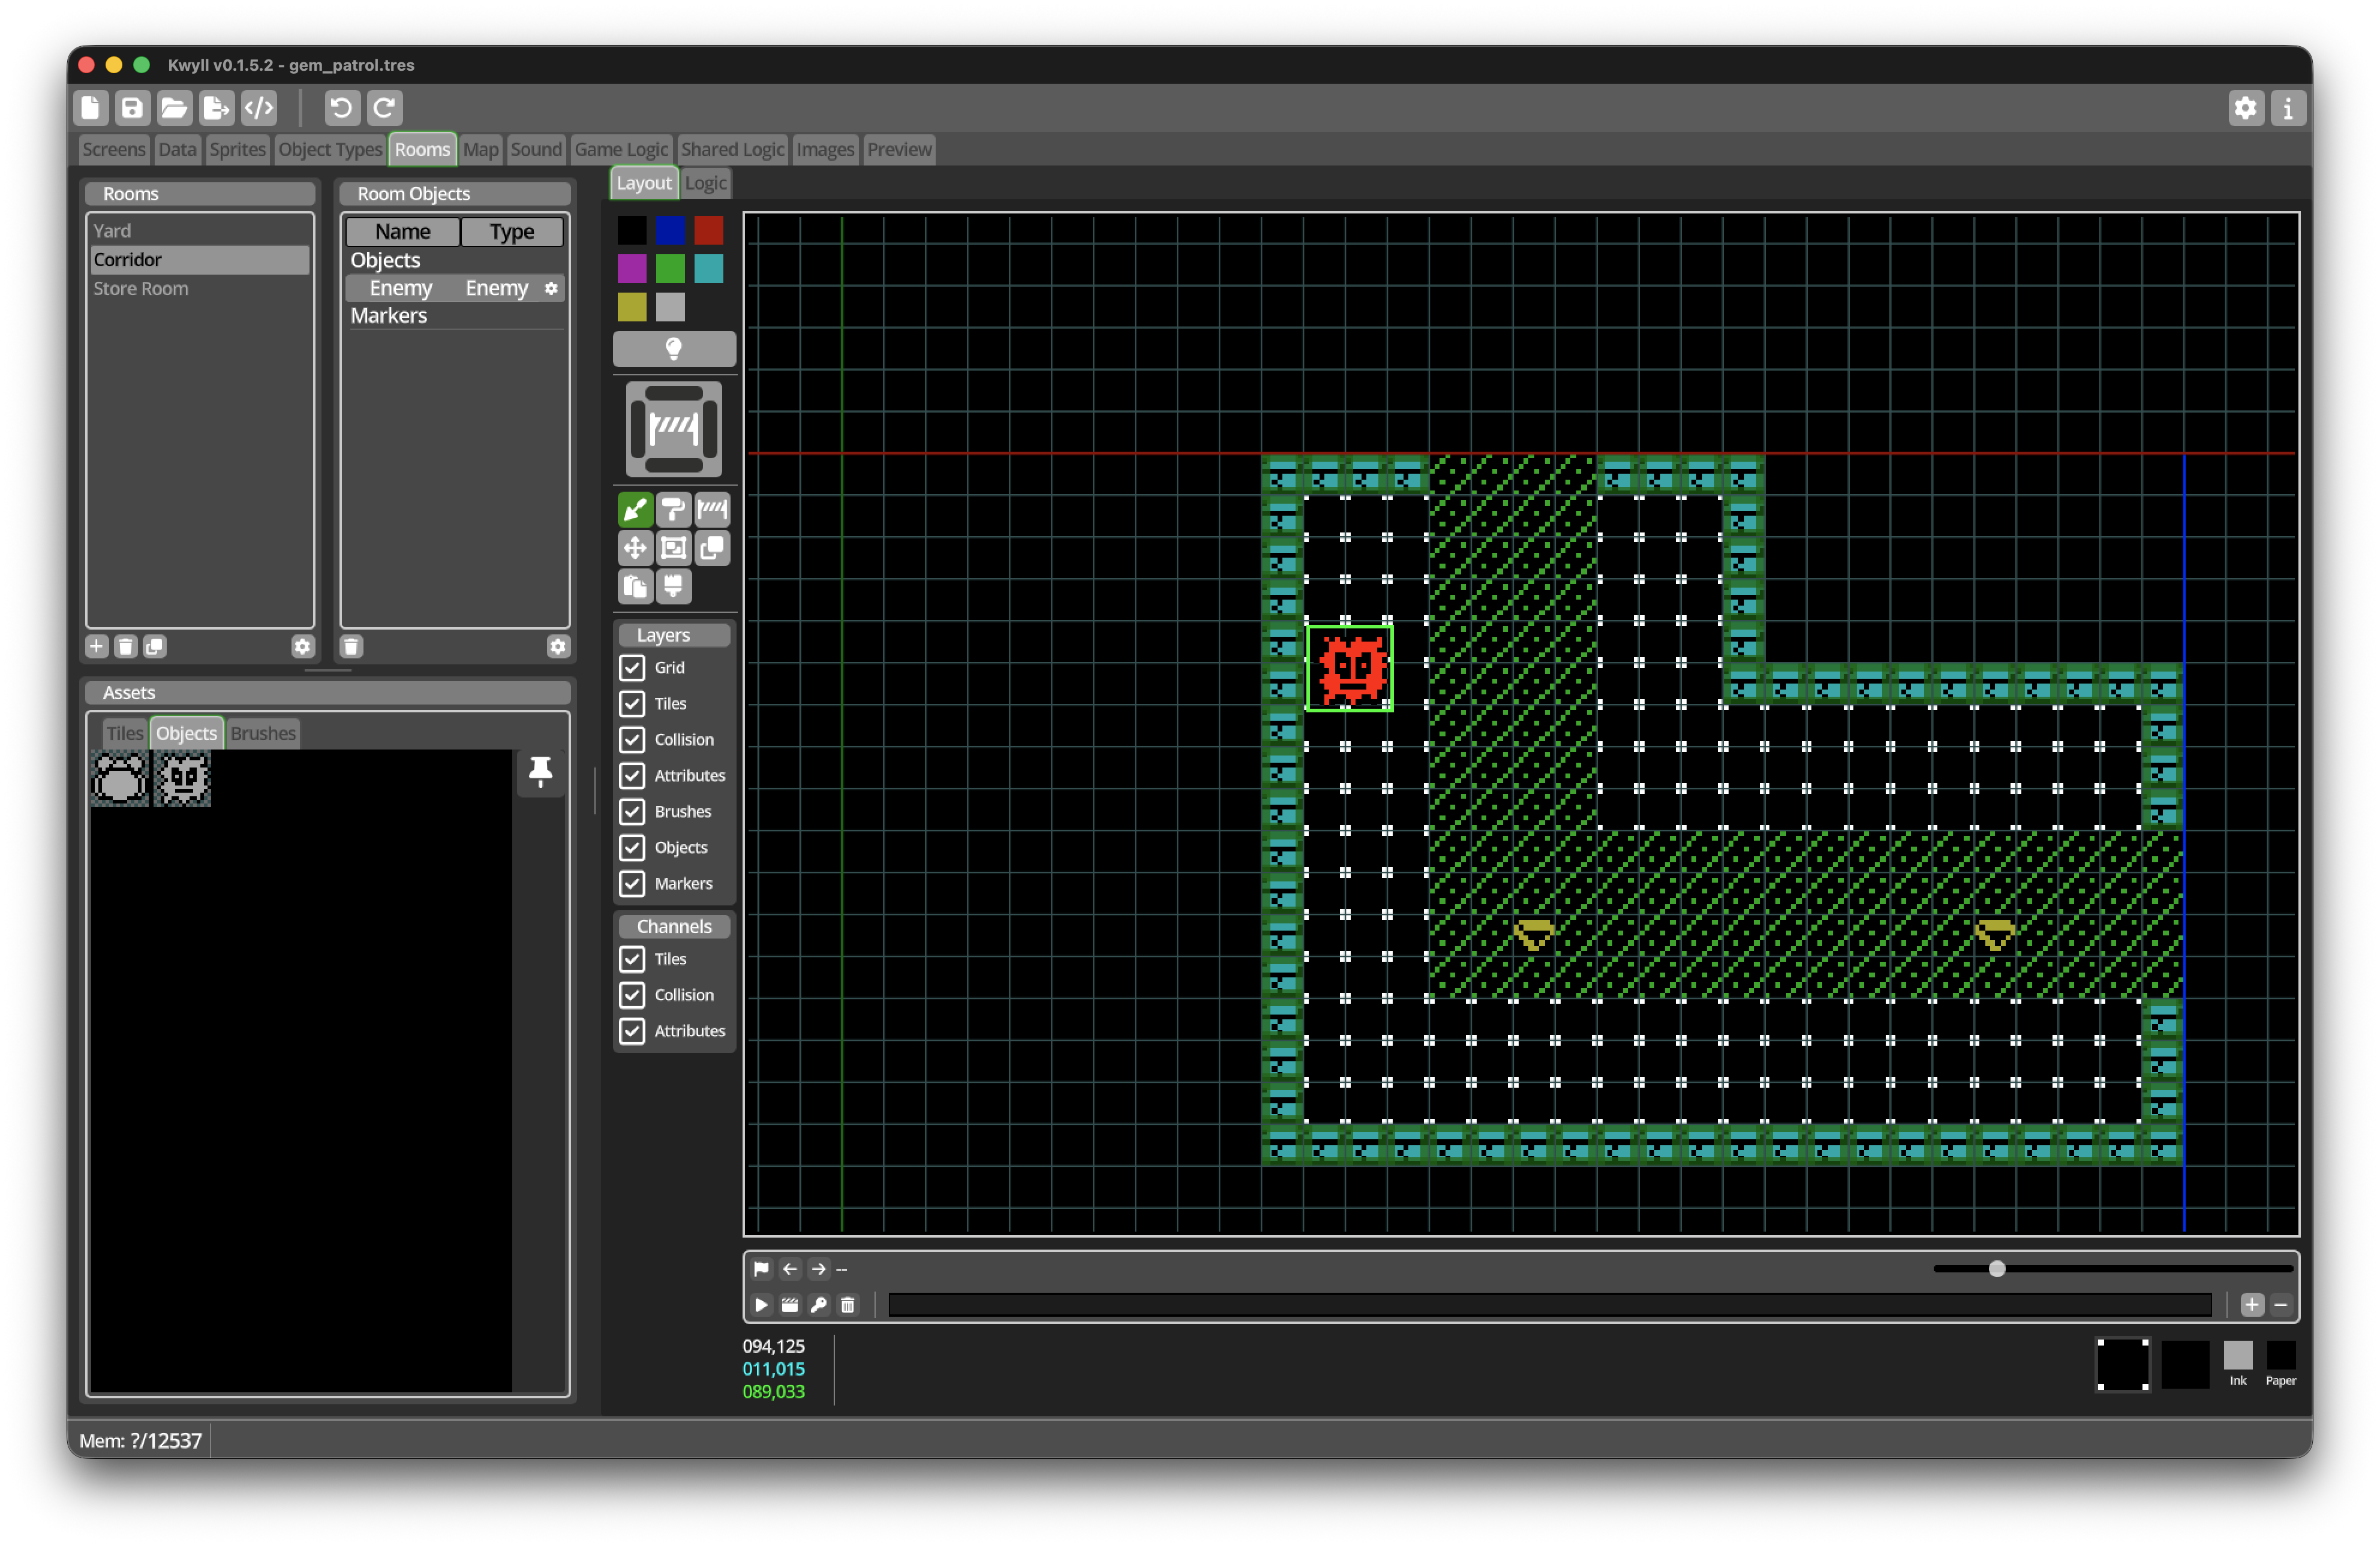
Open the Corridor Room Type and select its Layout tab.
-
Select the Objects section of the Assets panel.
-
Drag
Enemyinto the room. -
Place it in a horizontal passage that has solid Wall tiles at both ends.
-
Open the Enemy instance properties.
-
Keep its name as
Enemy. -
Enable Collide Bg, Visible, and Active.
-
Leave Player disabled.
-
Set
speedto1. -
Set
move_xto1. -
Set
move_yto0. -
Accept the changes.
This is a Room Object. It exists only while Stone Corridor—the Location using the Corridor Room Type—is current.
Do not place it directly in the exit leading to the Store Room. Room Objects do not use the Player’s automatic Map navigation, so the patrol should be bounded by walls inside its Room Type.
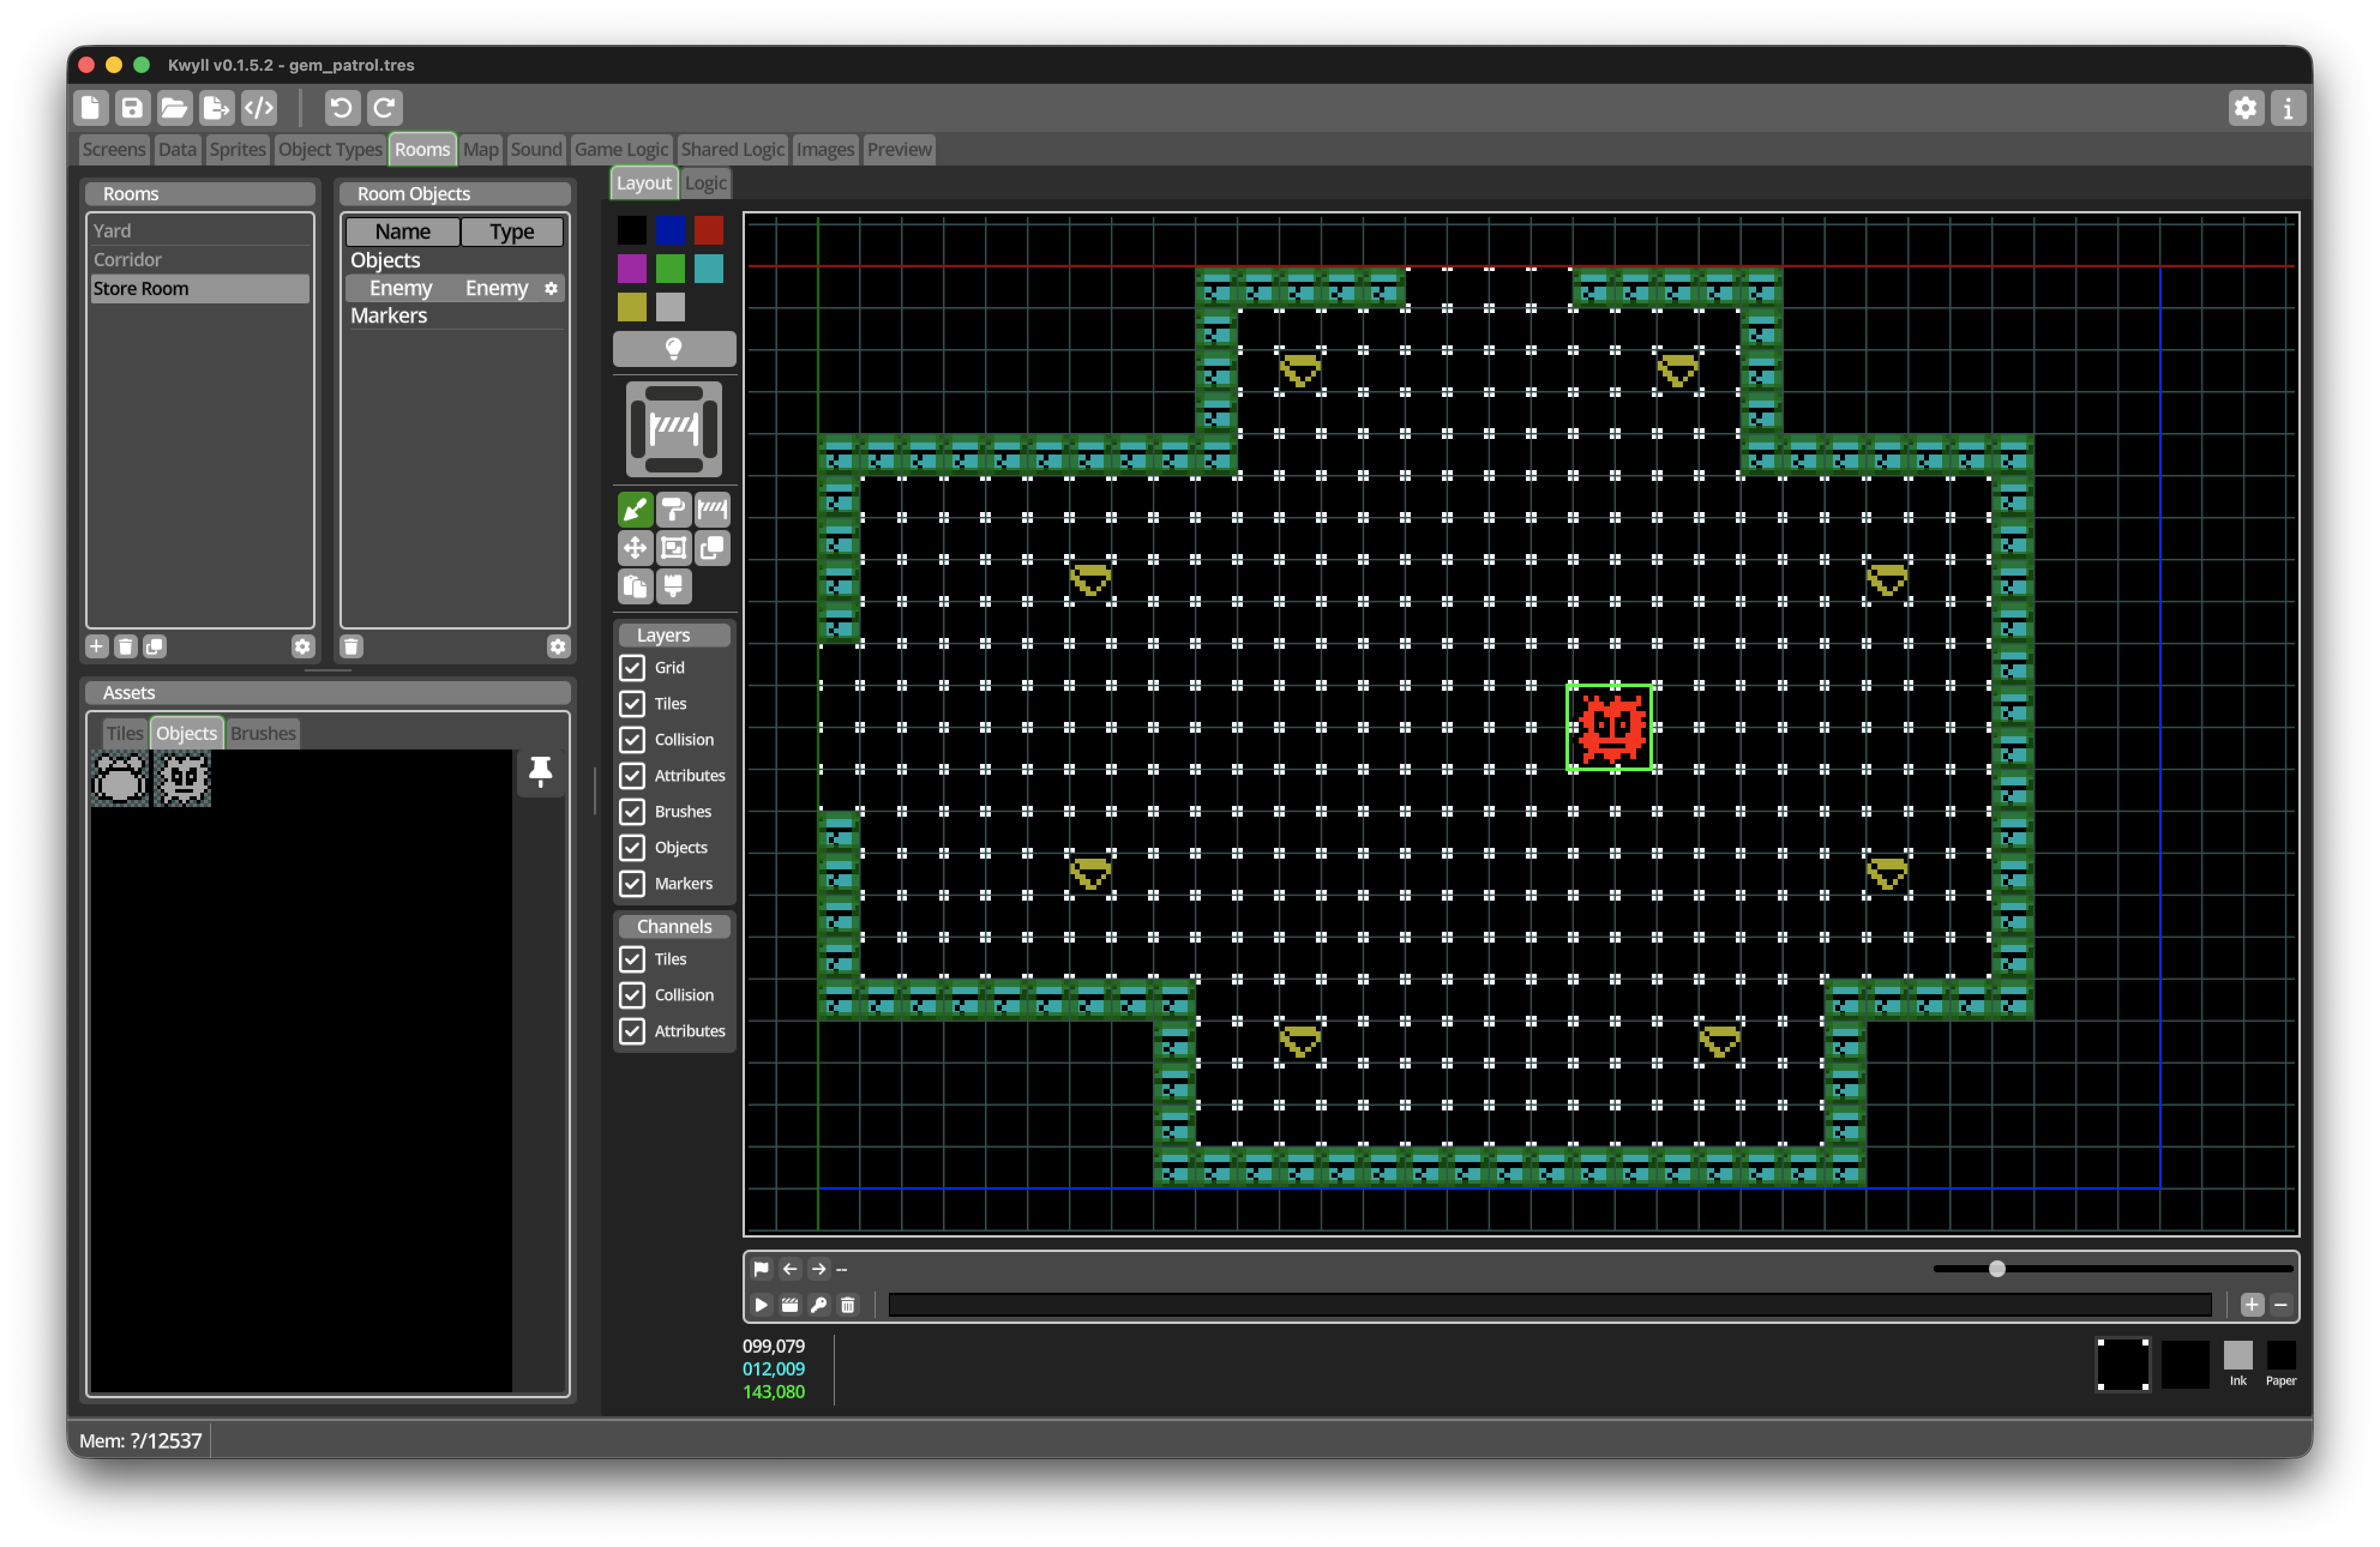
Place a vertical Enemy in Store Room
Select the Store Room Room Type.
-
Drag another
Enemyinto the room. -
Place it in a vertical aisle with solid Wall tiles above and below it.
-
Keep it clear of the opening to Upper Yard and any gem tile.
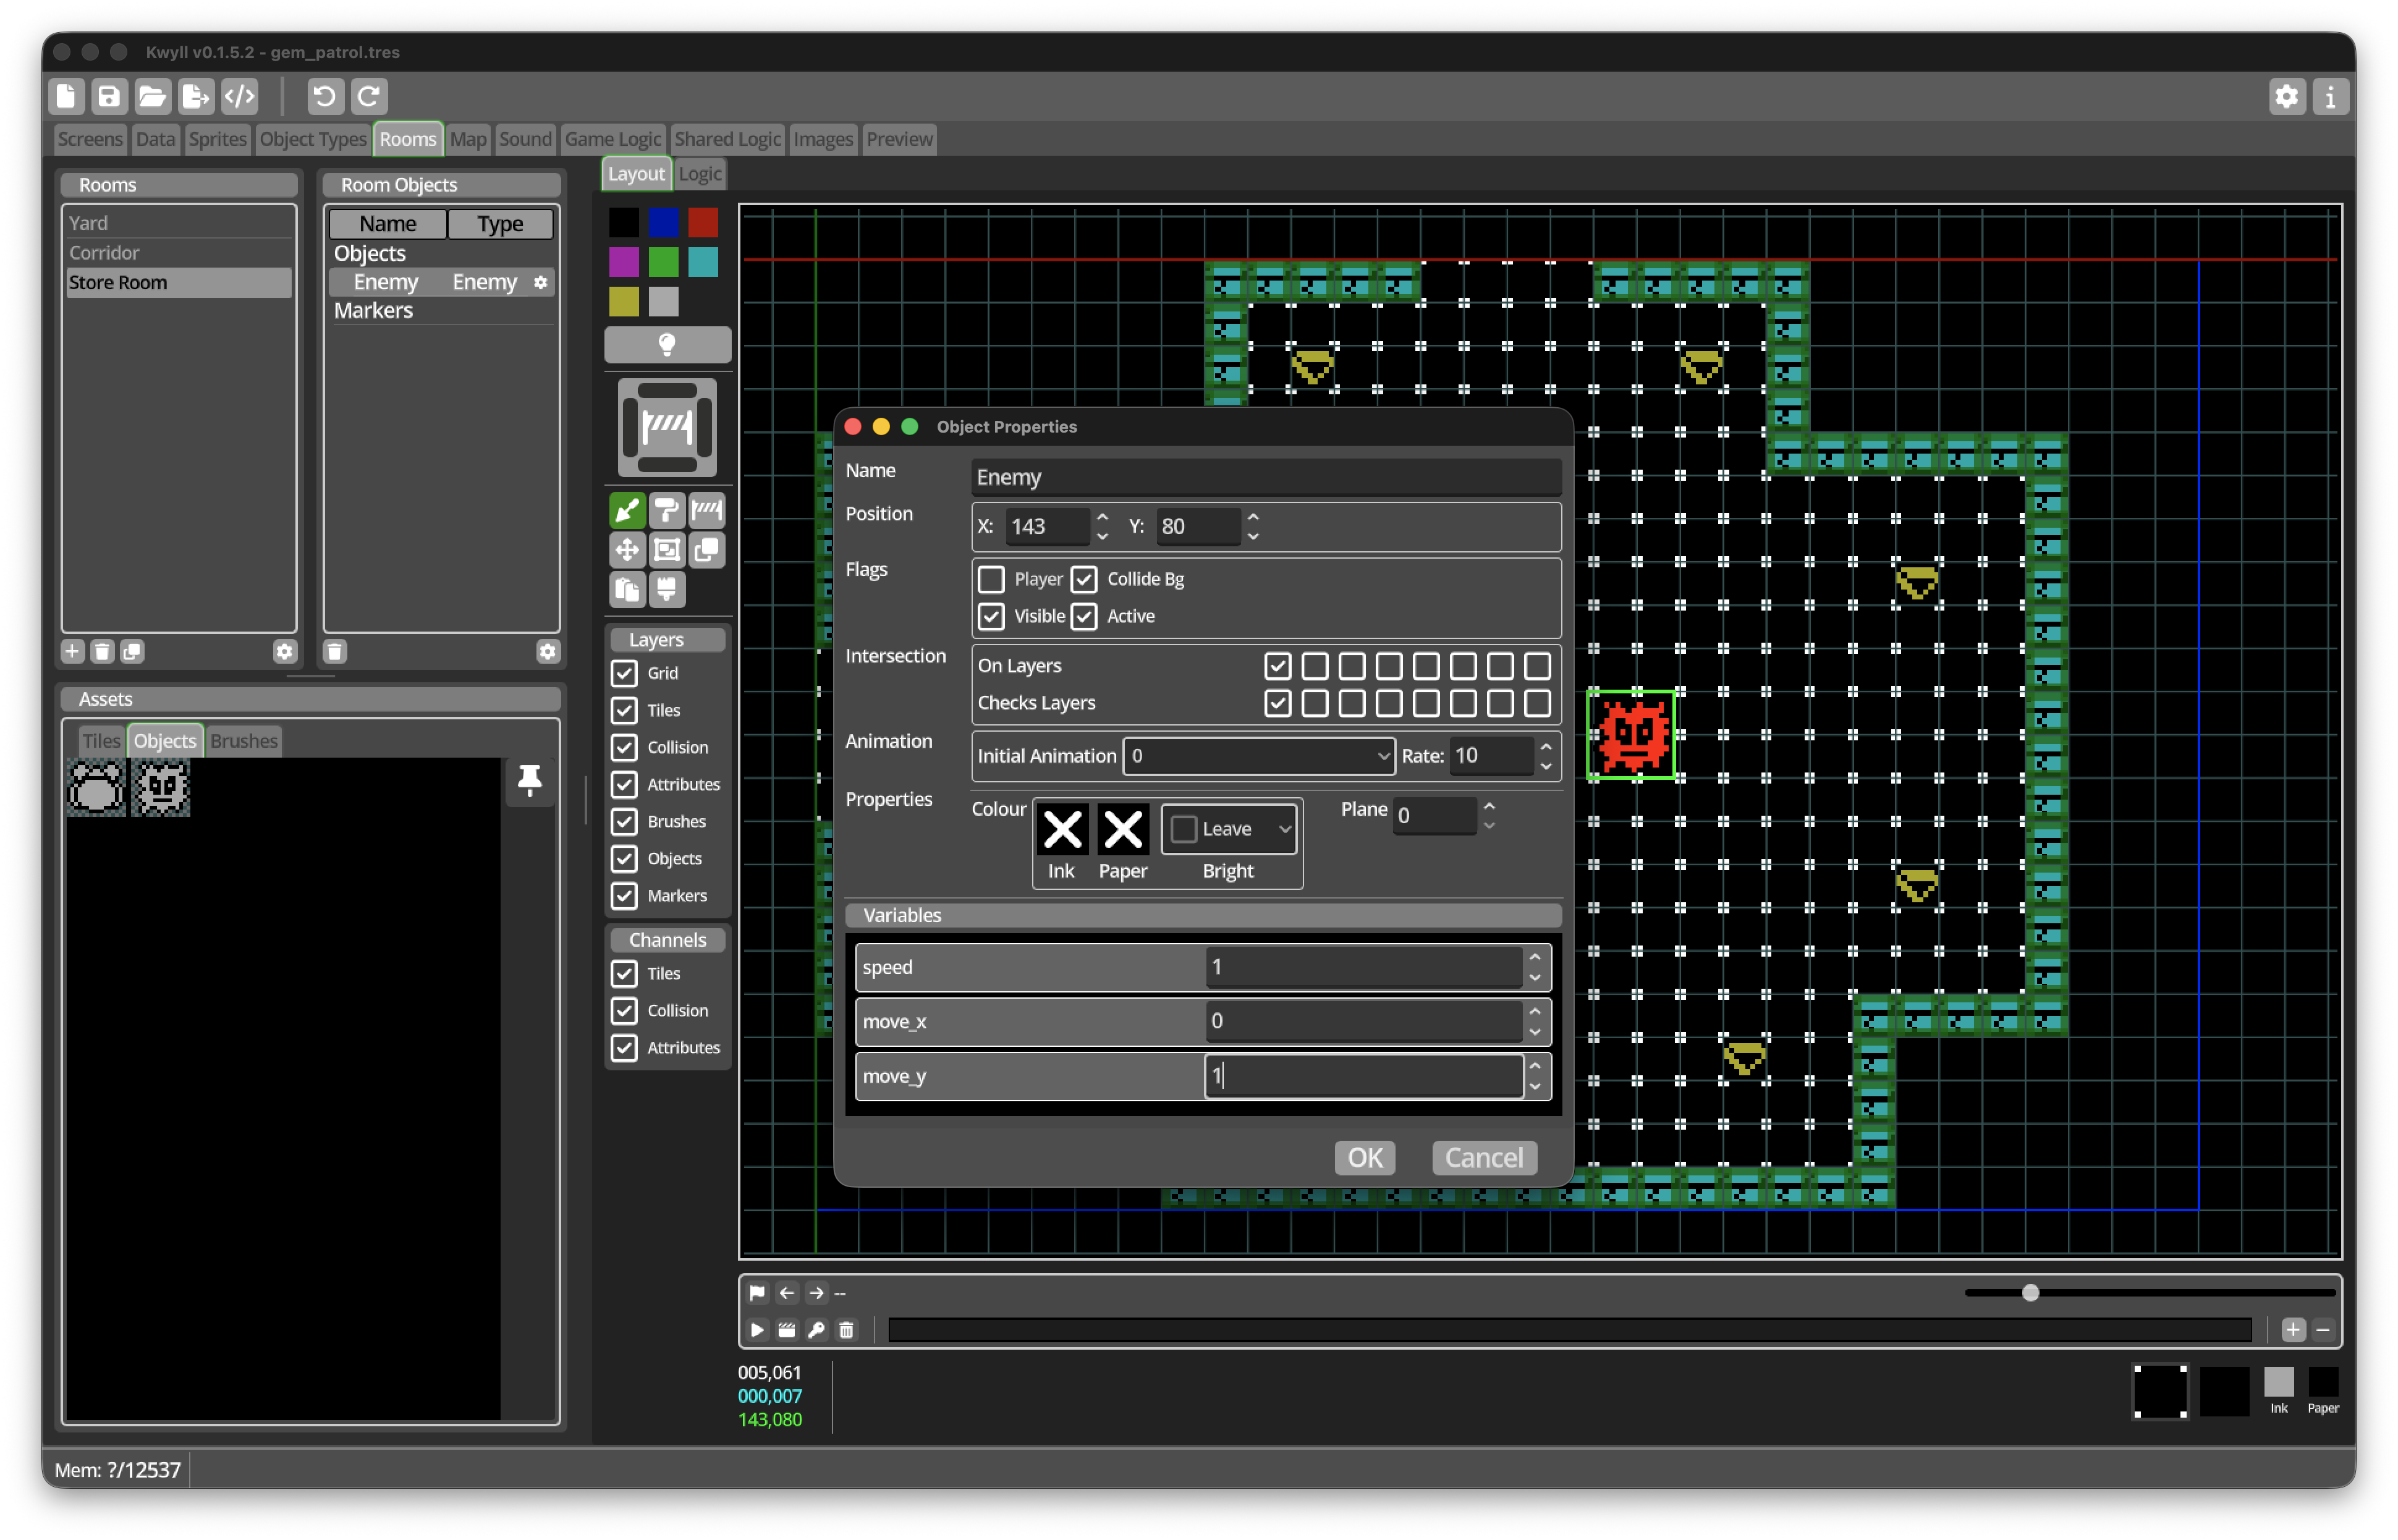
-
Open its properties.
-
Enable Collide Bg, Visible, and Active.
-
Leave Player disabled.
-
Set
speedto1. -
Set
move_xto0. -
Set
move_yto1. -
Accept the changes.
This second instance uses the same Enemy Logic but moves vertically because its variable values are different.
Test the patrols
Save and run Preview.
-
Move from Entrance Yard into Stone Corridor.
-
Watch the first Enemy travel horizontally.
-
Wait until it touches each end of its passage and confirm that it reverses.
-
Continue into the Store Room.
-
Watch the second Enemy travel vertically and reverse at its walls.
-
Leave a Location and return to it.
The Enemy should be recreated from its Room Object data when its Location becomes active again. It may restart from its initial position and direction; unlike collected-gem state, we are not recording patrol progress.
The Enemies do not damage the Player yet. They can overlap it because we have not configured object intersection behaviour. That will be added alongside projectiles in the next milestone.
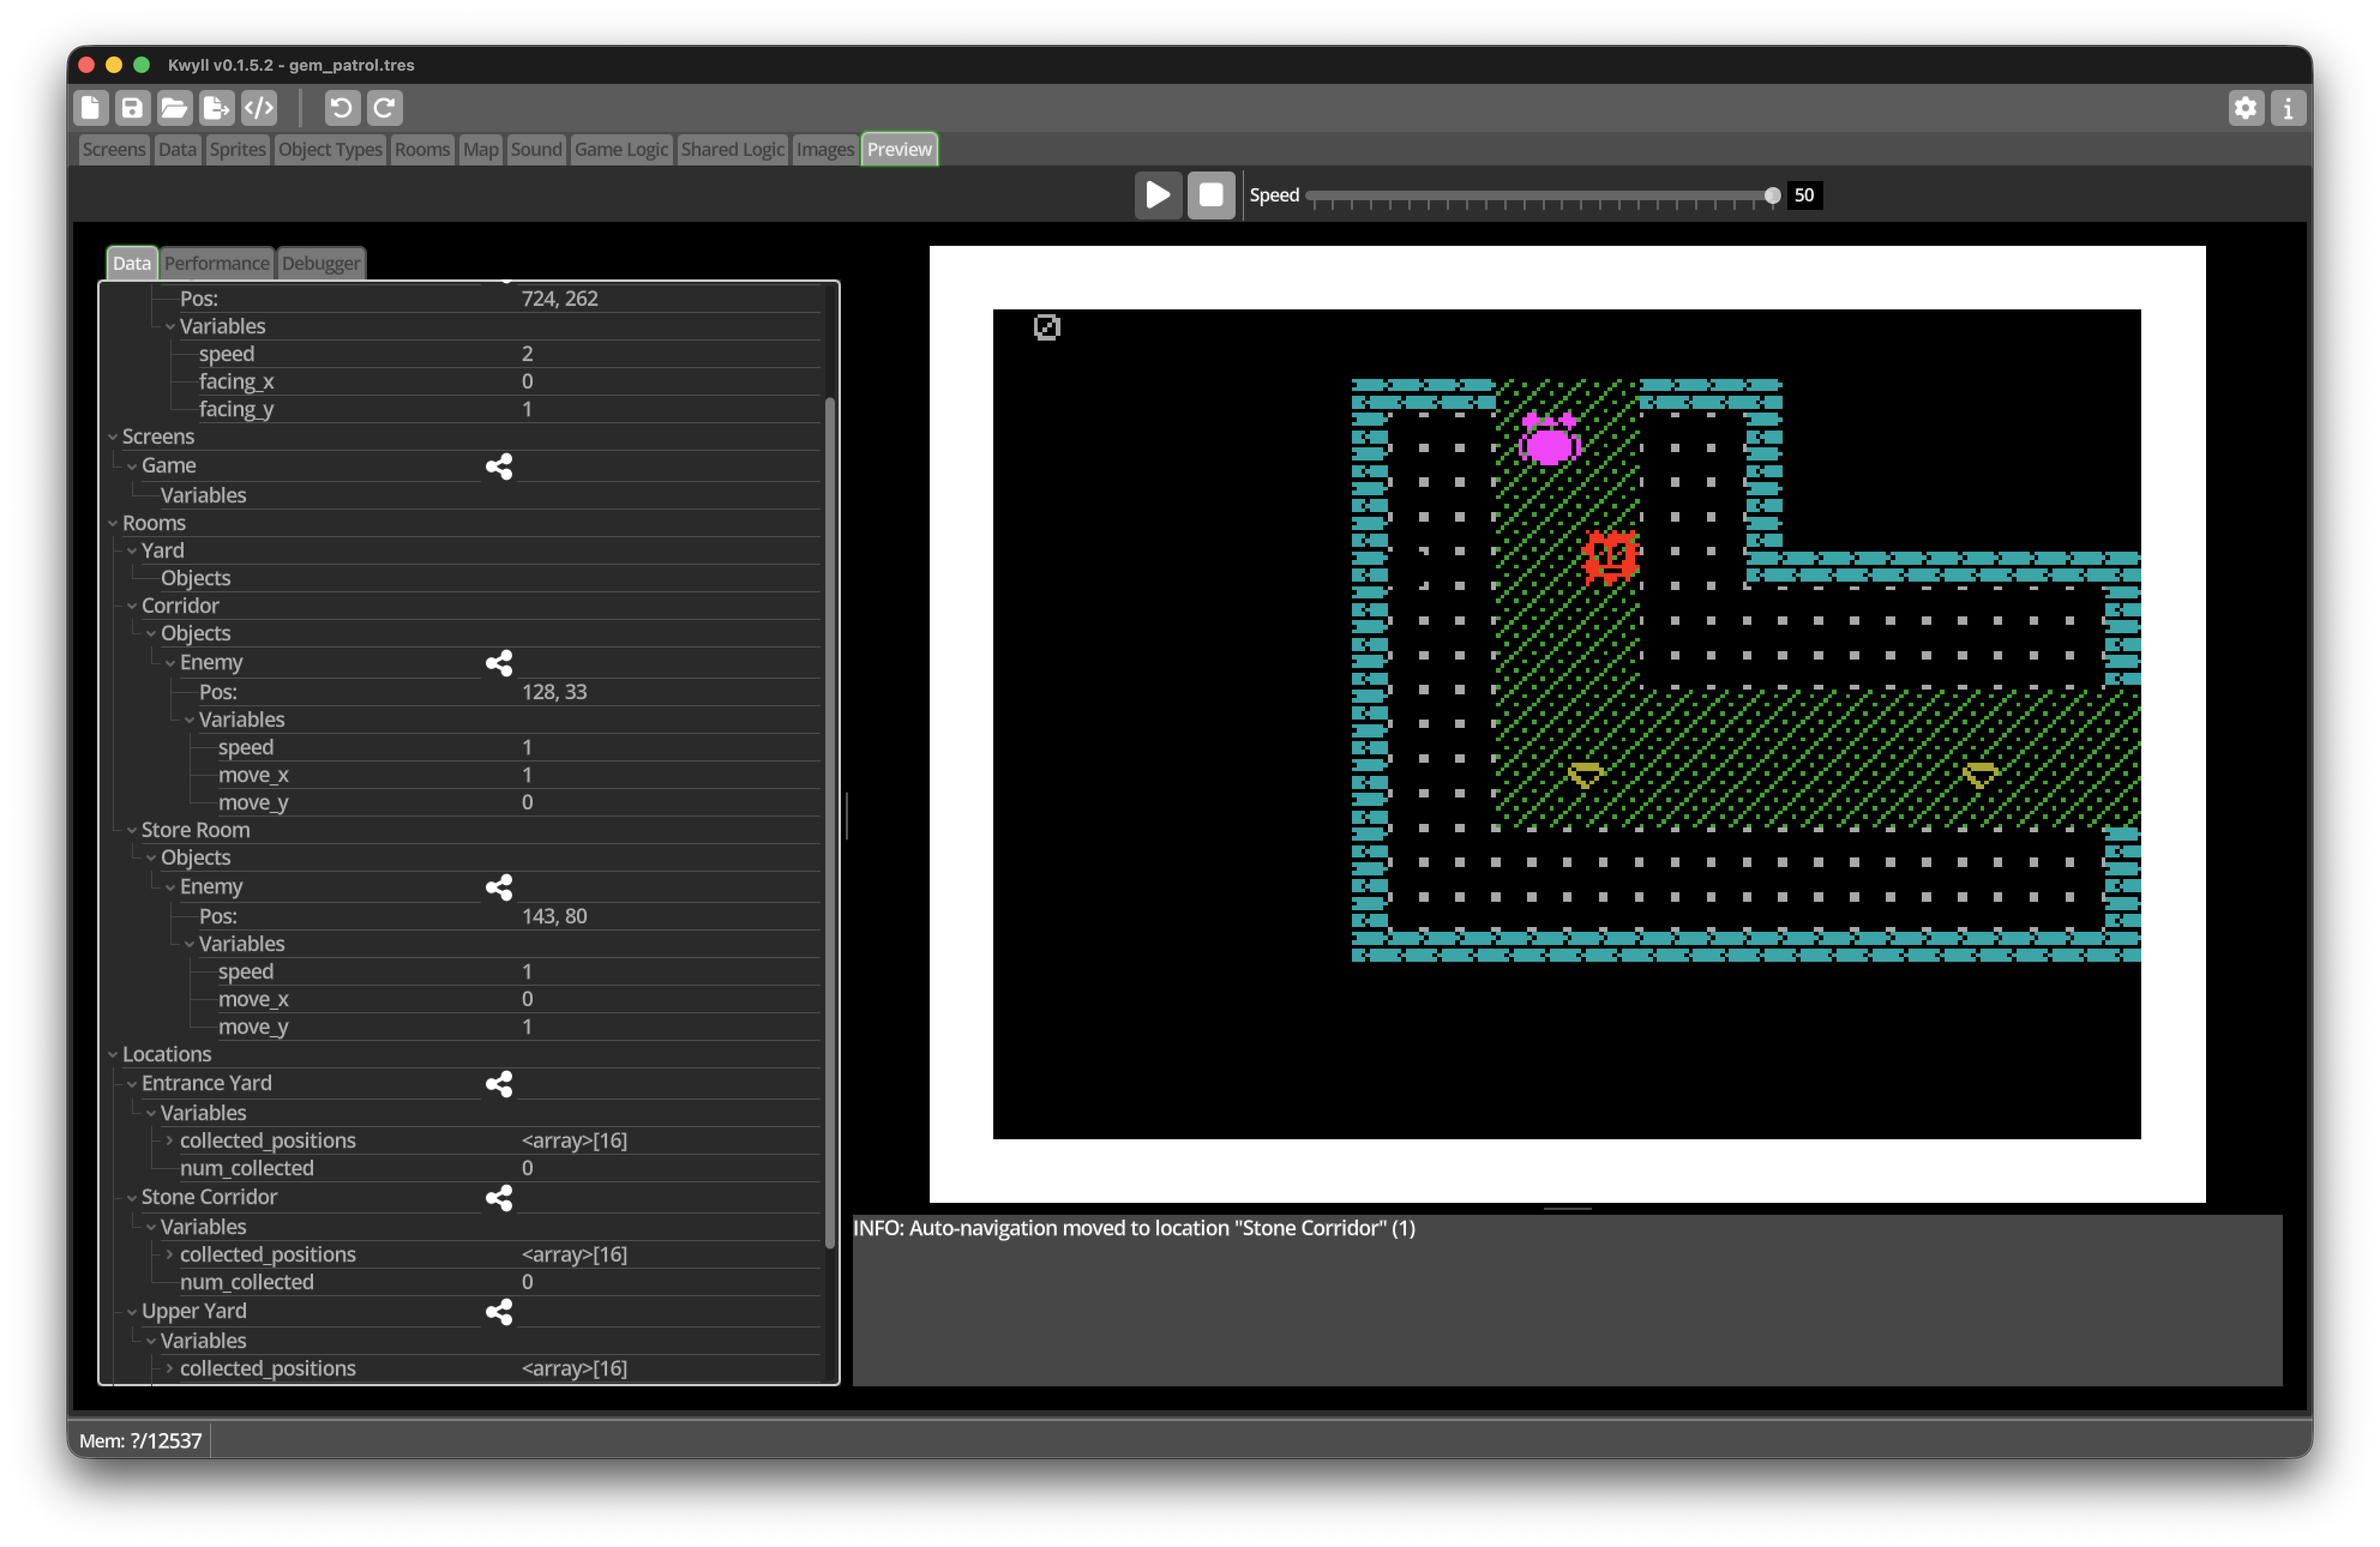
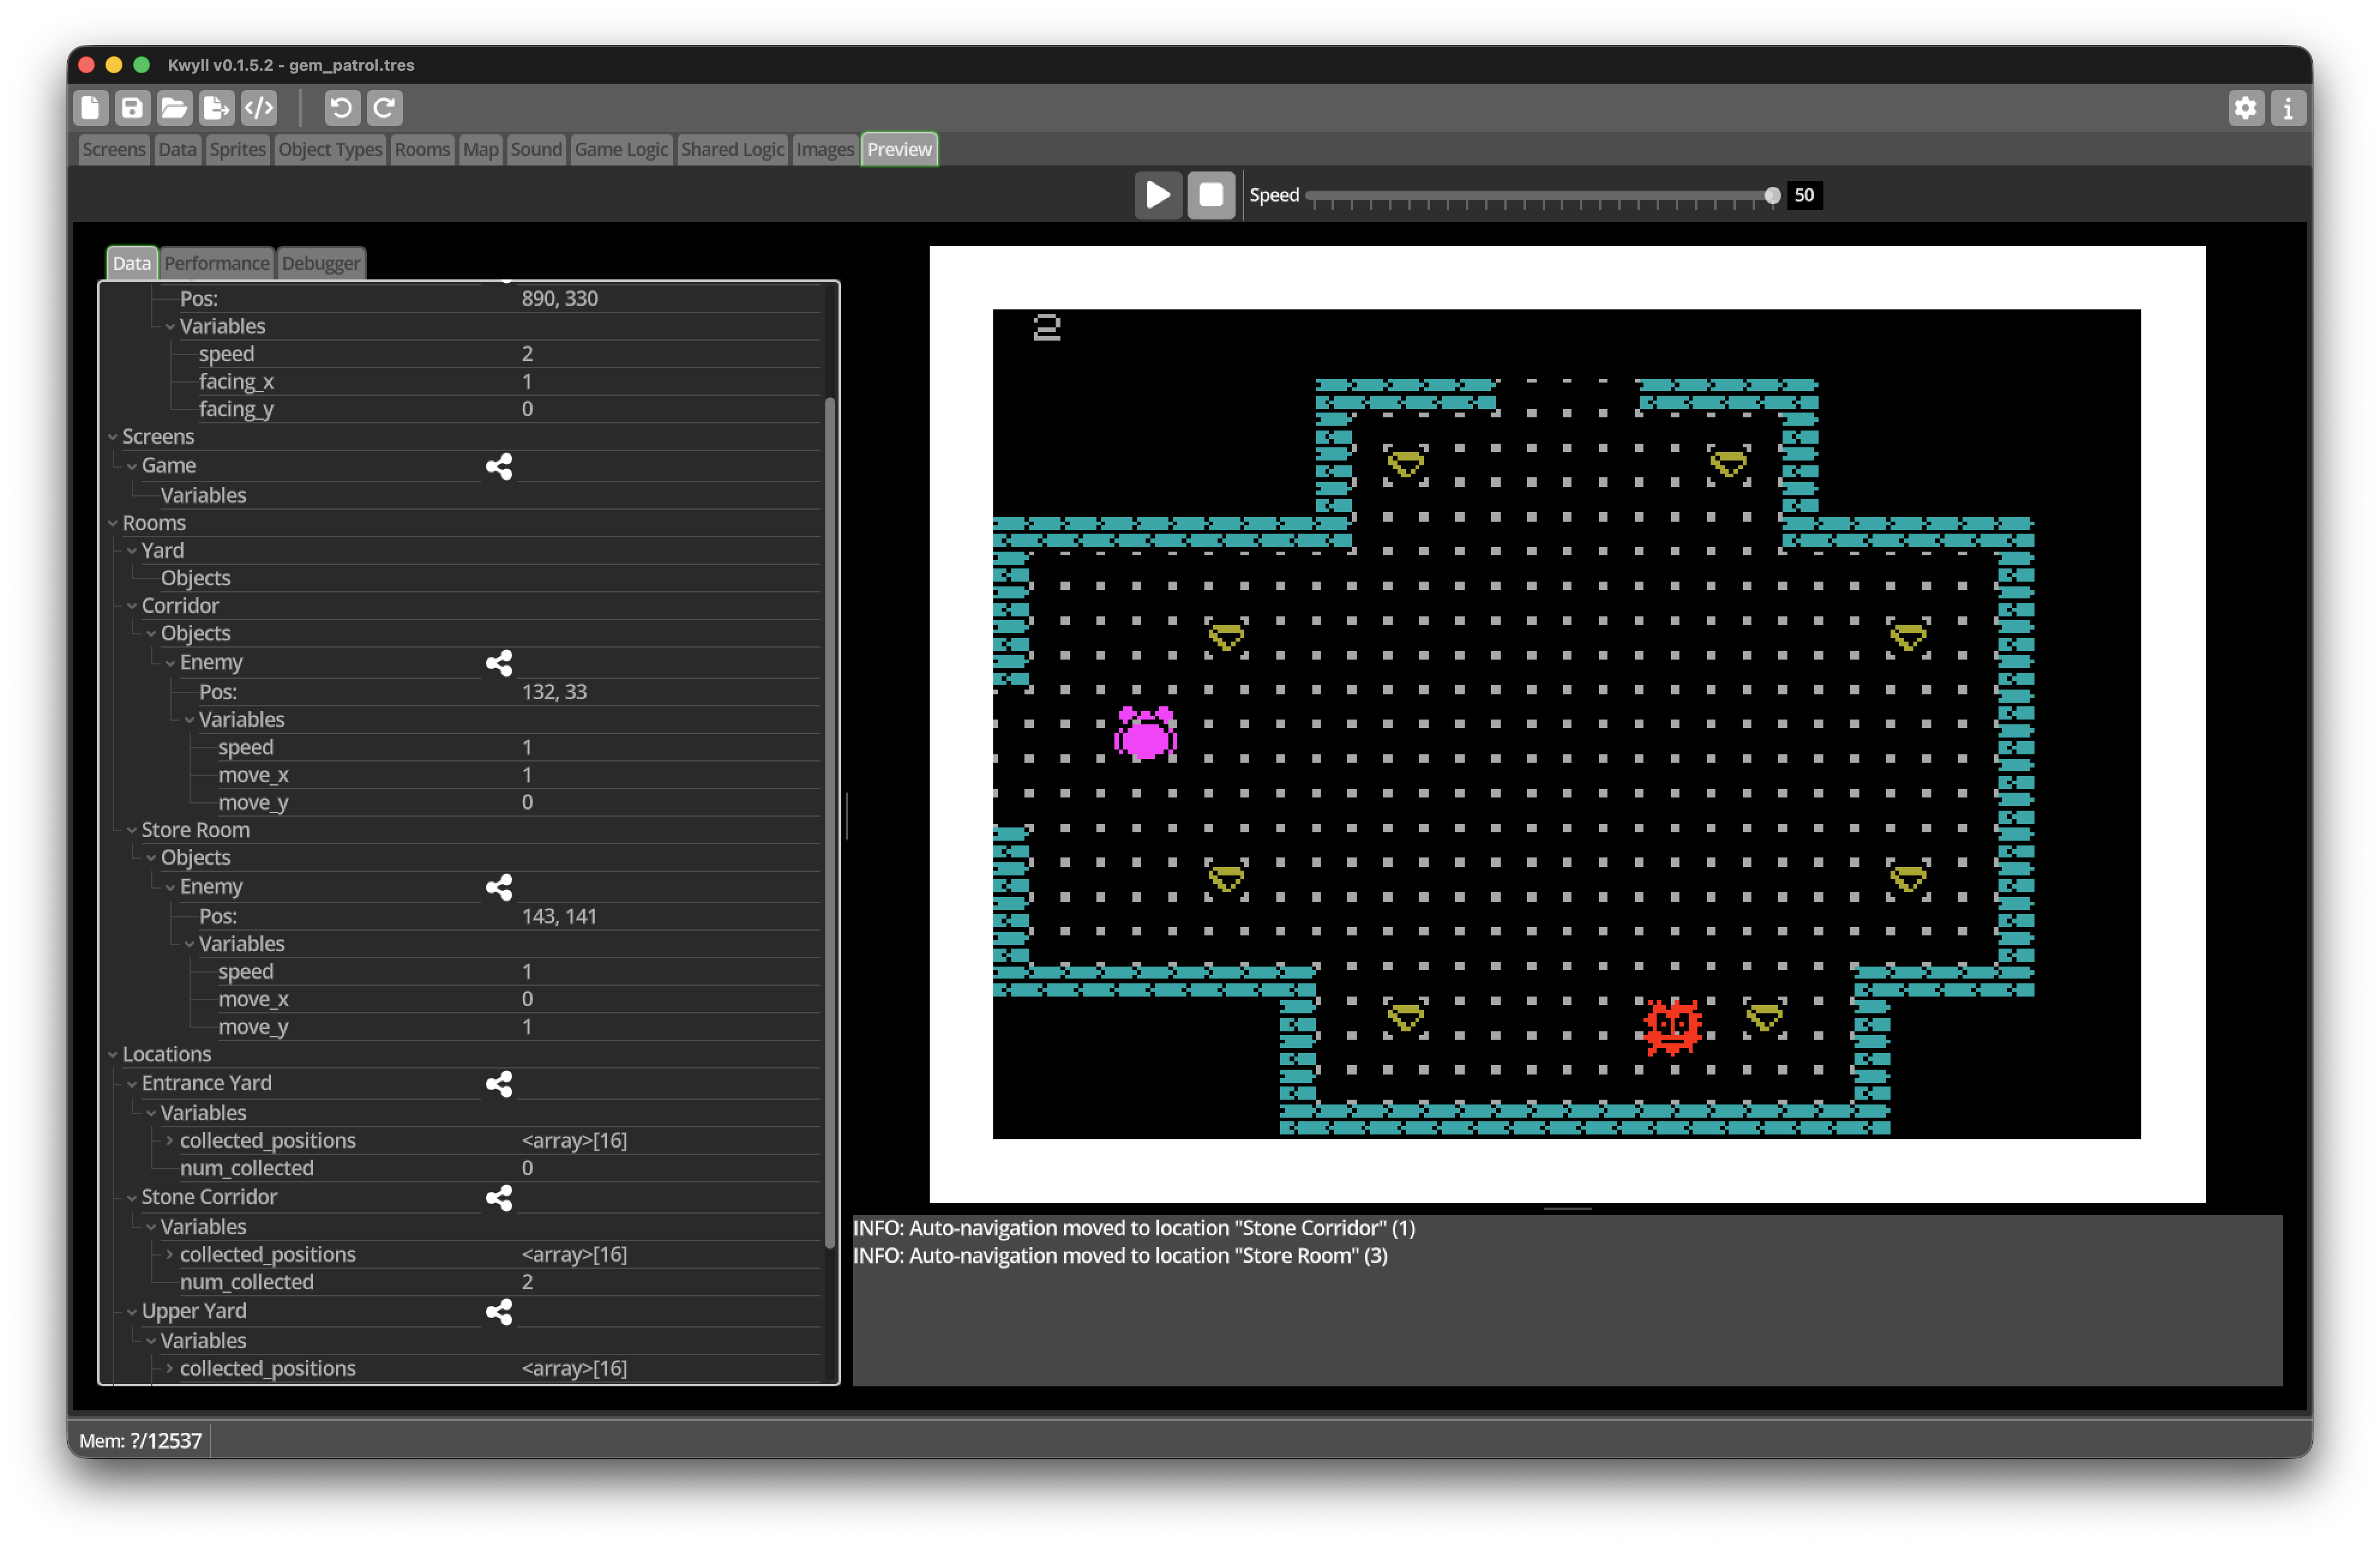
In Preview’s Data panel, expand the current Room’s Objects section. The live
Enemy instance should show its position and its speed, move_x, and
move_y values. Watch the appropriate direction change between 1 and -1
when it reaches a wall.
What we reused
One Enemy Object Type now supplies:
-
one shared Sprite and animation;
-
one movement graph;
-
one collision-response graph; and
-
three variable declarations.
Each Room Object Instance supplies only its own position, flags, and initial variable values. This is a useful Kwyll pattern: put common behaviour on the Object Type and put the differences on its instances.
Milestone 4 checklist
Before continuing, confirm that:
-
the
EnemyObject Type has a masked 16-by-16 Sprite; -
Enemy Logic defines
speed,move_x, andmove_y; -
one Enemy Room Object exists in Corridor;
-
one Enemy Room Object exists in Store Room;
-
the Corridor Enemy moves horizontally;
-
the Store Room Enemy moves vertically;
-
both patrols reverse when they collide with walls;
-
neither Enemy can escape through a Location opening; and
-
leaving and returning safely recreates the Room Object patrol.
Save another copy as gem_patrol_milestone_4.tres.
Milestone 5: Fire projectiles and destroy enemies
This milestone adds the final main mechanic. Pressing Fire will create a
Projectile at the Player’s position. It will travel in the direction stored in
facing_x and facing_y, disappear when it hits a wall or leaves the Screen,
and defeat an Enemy when the two objects intersect.
Projectiles will be Dynamic Objects. Unlike the Player Map Object and the
Enemy Room Objects, they are created while the game is running with
Spawn Object and removed with Kill Object.
Create the combat sounds
The default Kwyll project already contains a Fire Beep FX that is suitable
for the Projectile. We will reuse it rather than creating another one.
-
Open the Sound editor.
-
Select
Fireand use the play control to hear the existing effect. -
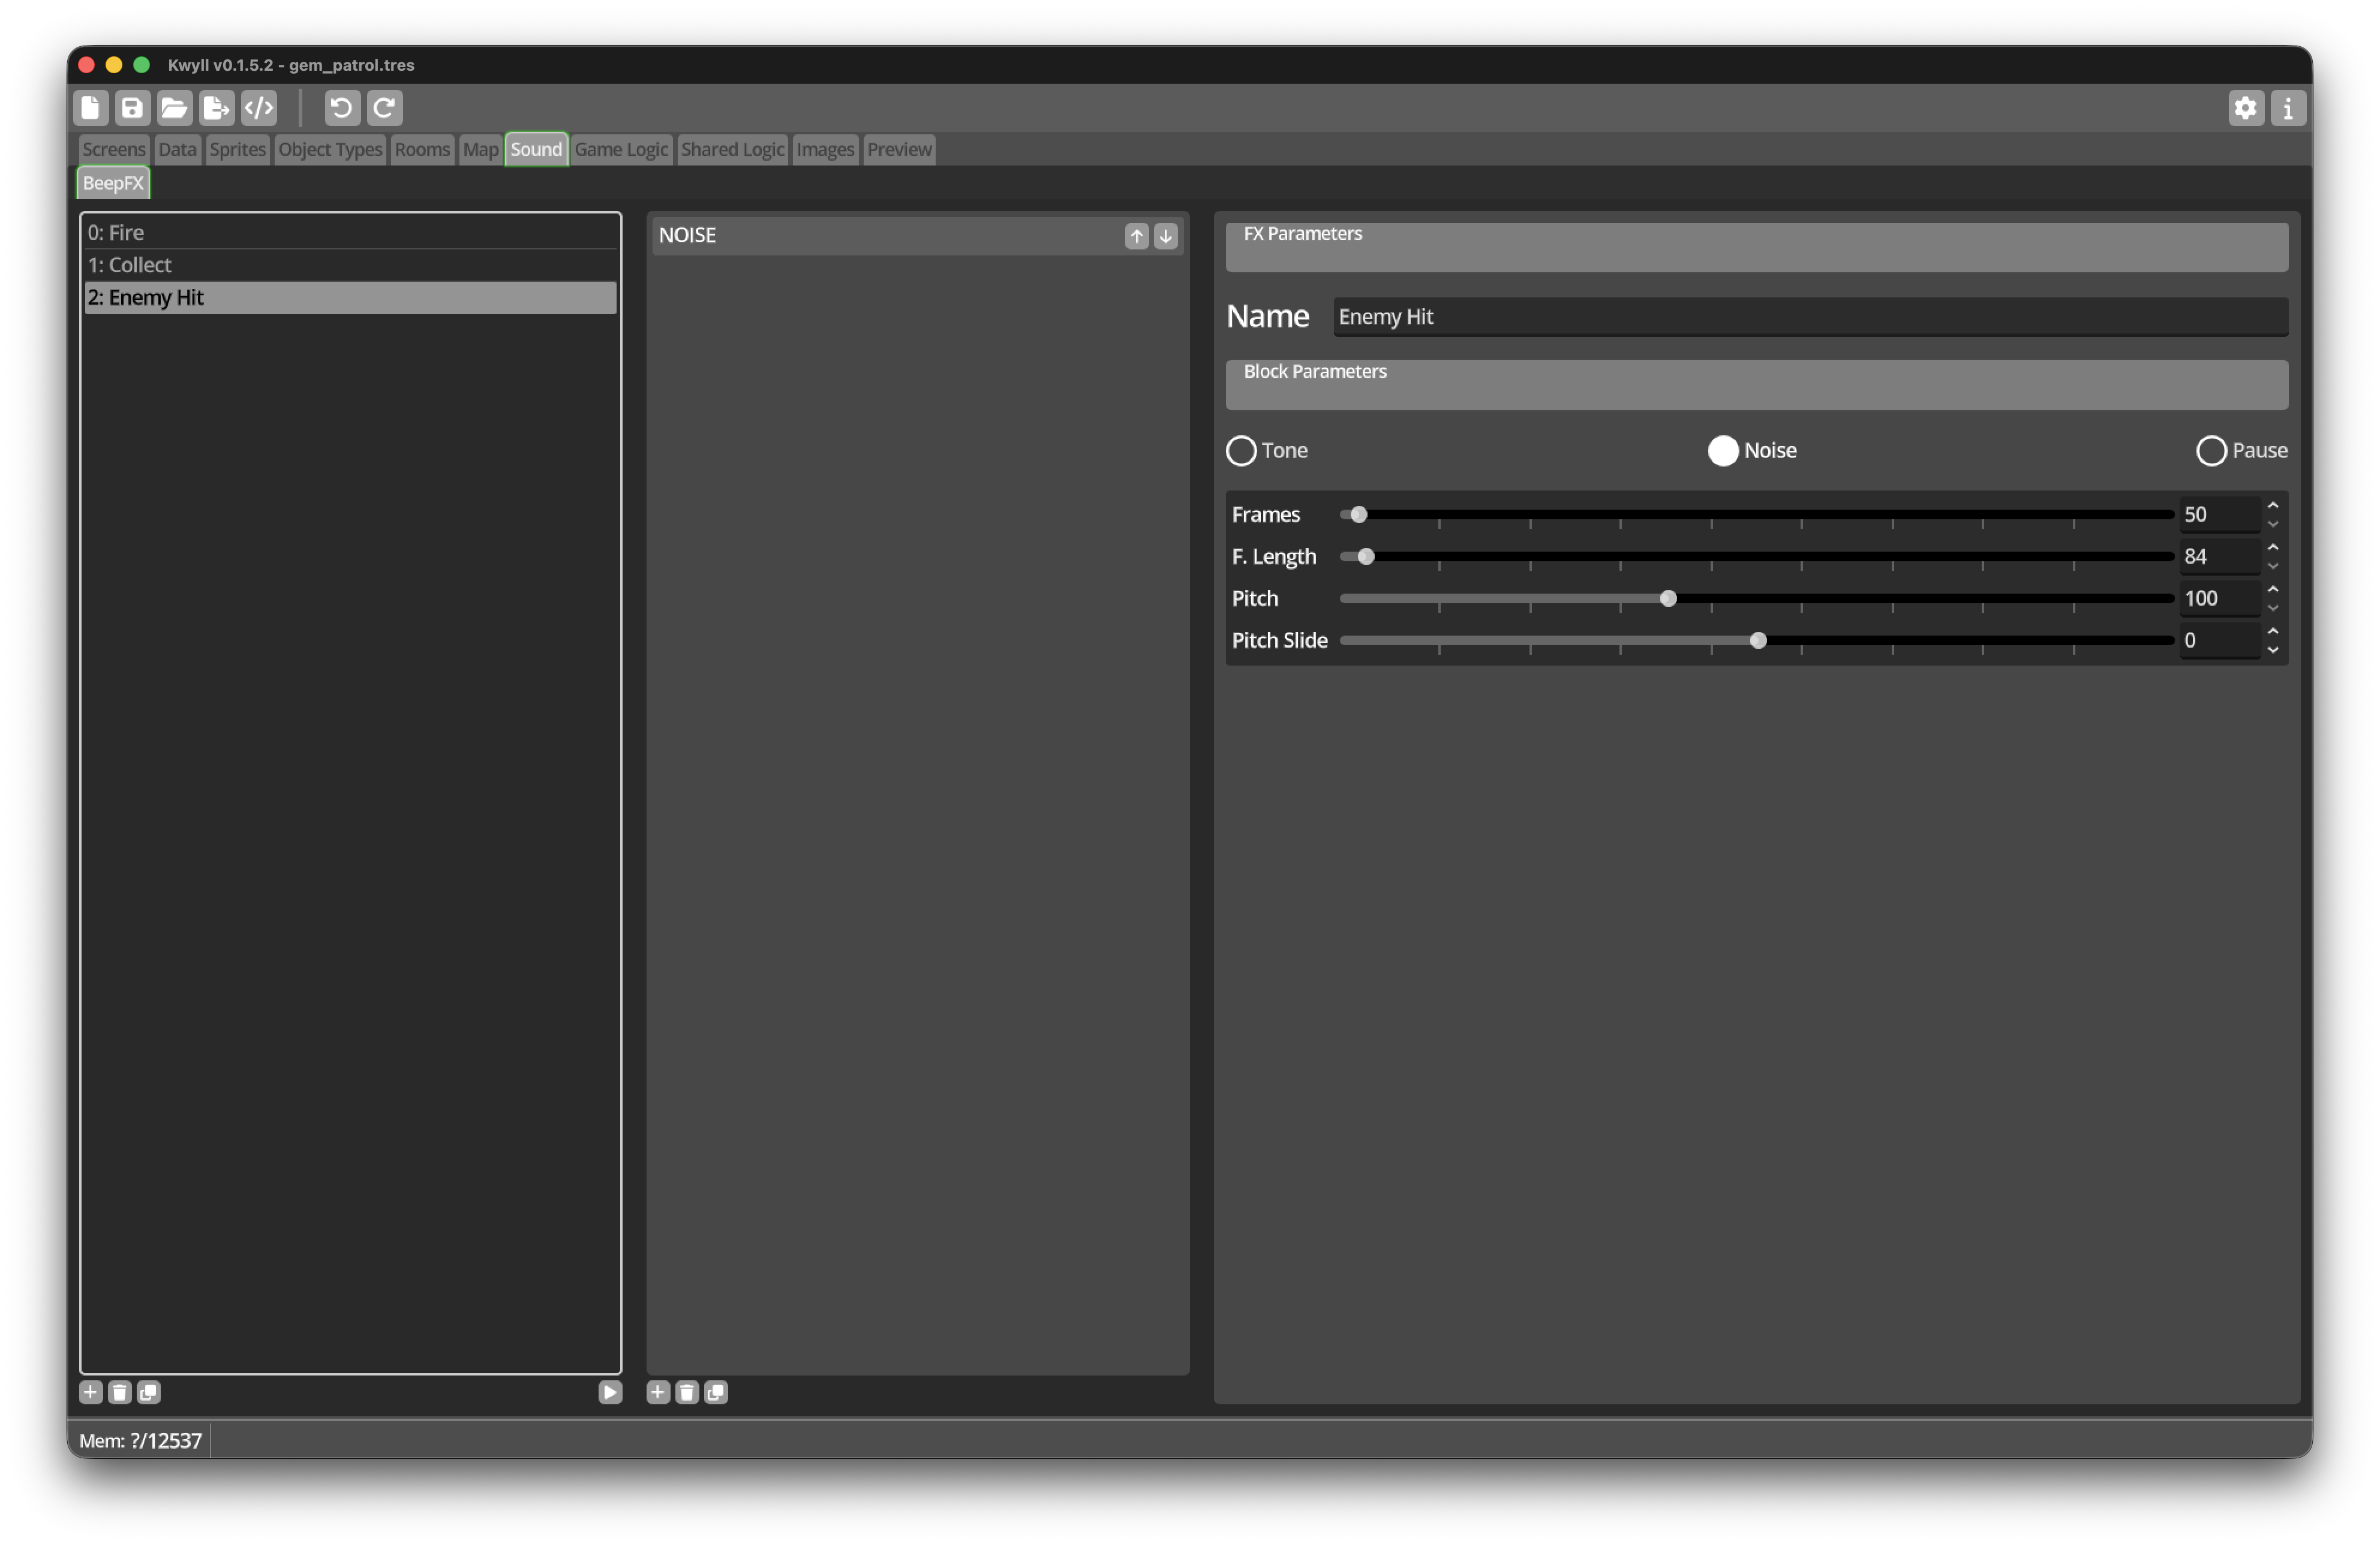
Add one new Beep FX named
Enemy Hit. -
Give it a slightly lower or noisier character than
FireandCollect. -
Preview all three effects and make sure they are easy to distinguish.
Draw the Projectile sprite
The Projectile can be smaller than the Player and Enemy.
-
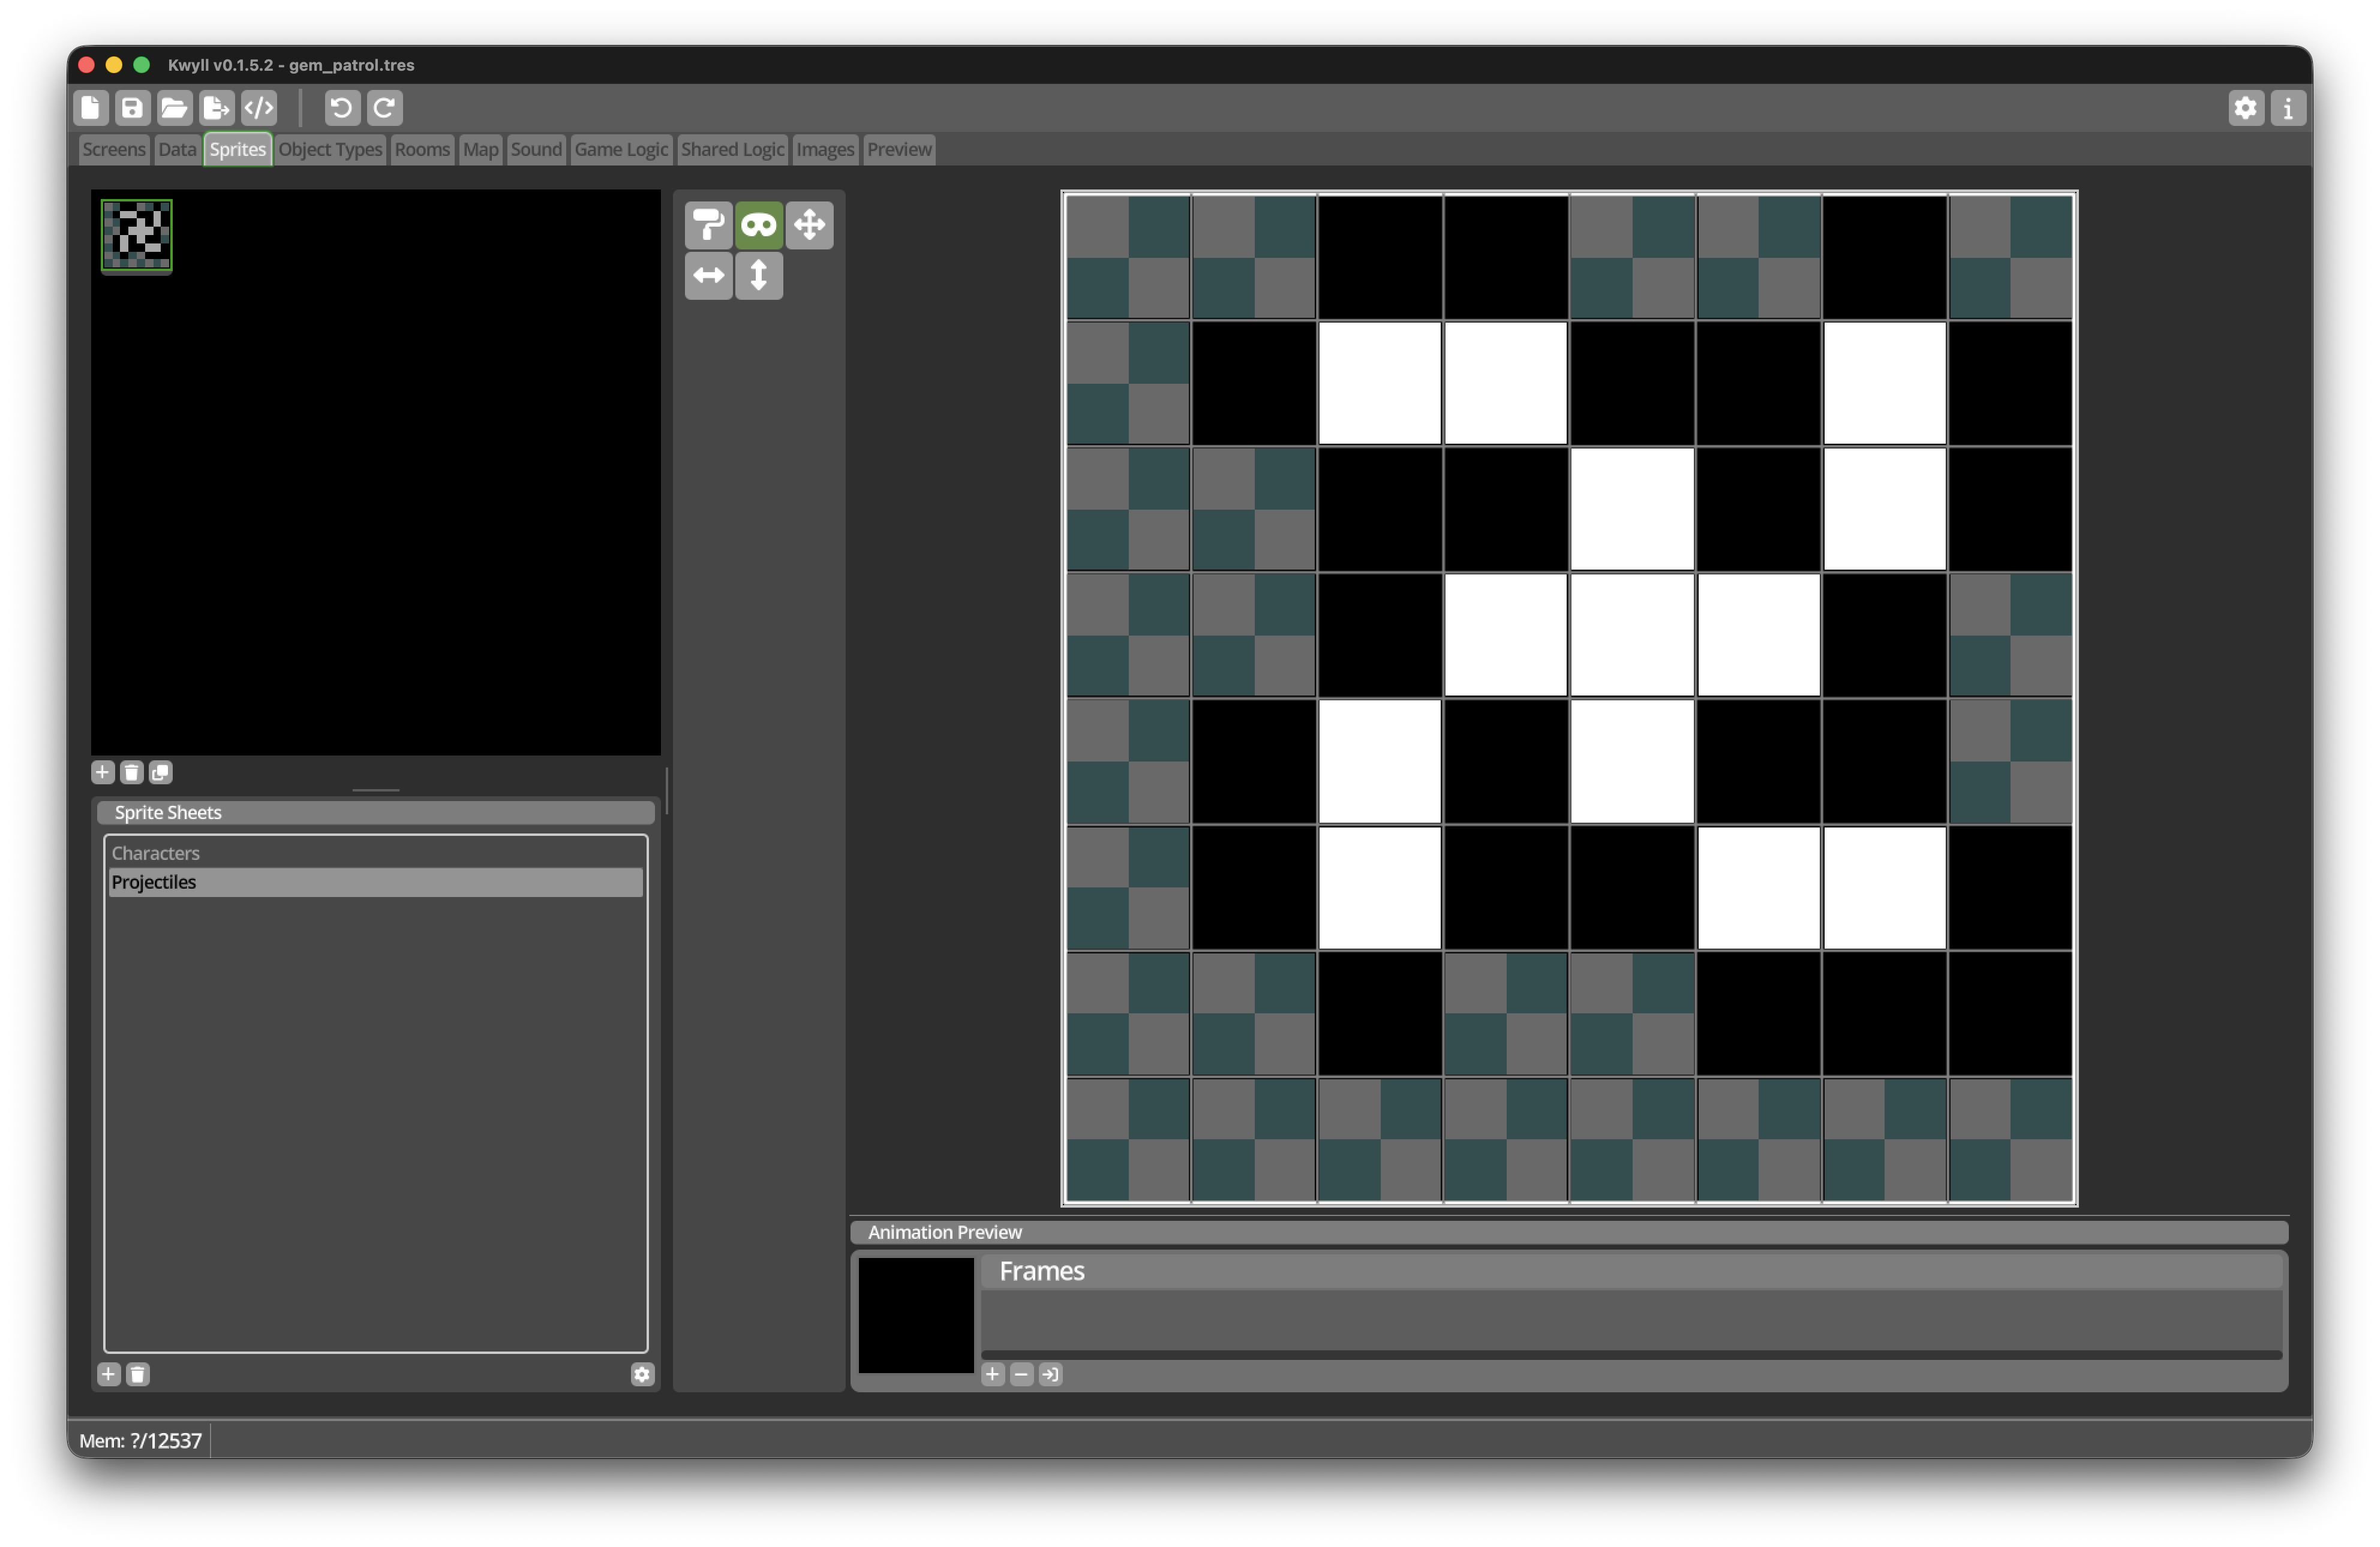
Open the Sprites editor.
-
Add a Sprite Sheet named
Projectiles. -
Set its Sprite Width and Height to
8pixels. -
Enable its Mask flag.
-
Add one Sprite.
-
Draw a small bolt, star, or pellet.
-
Mask the unused pixels around it.
Create the Projectile Object Type
-
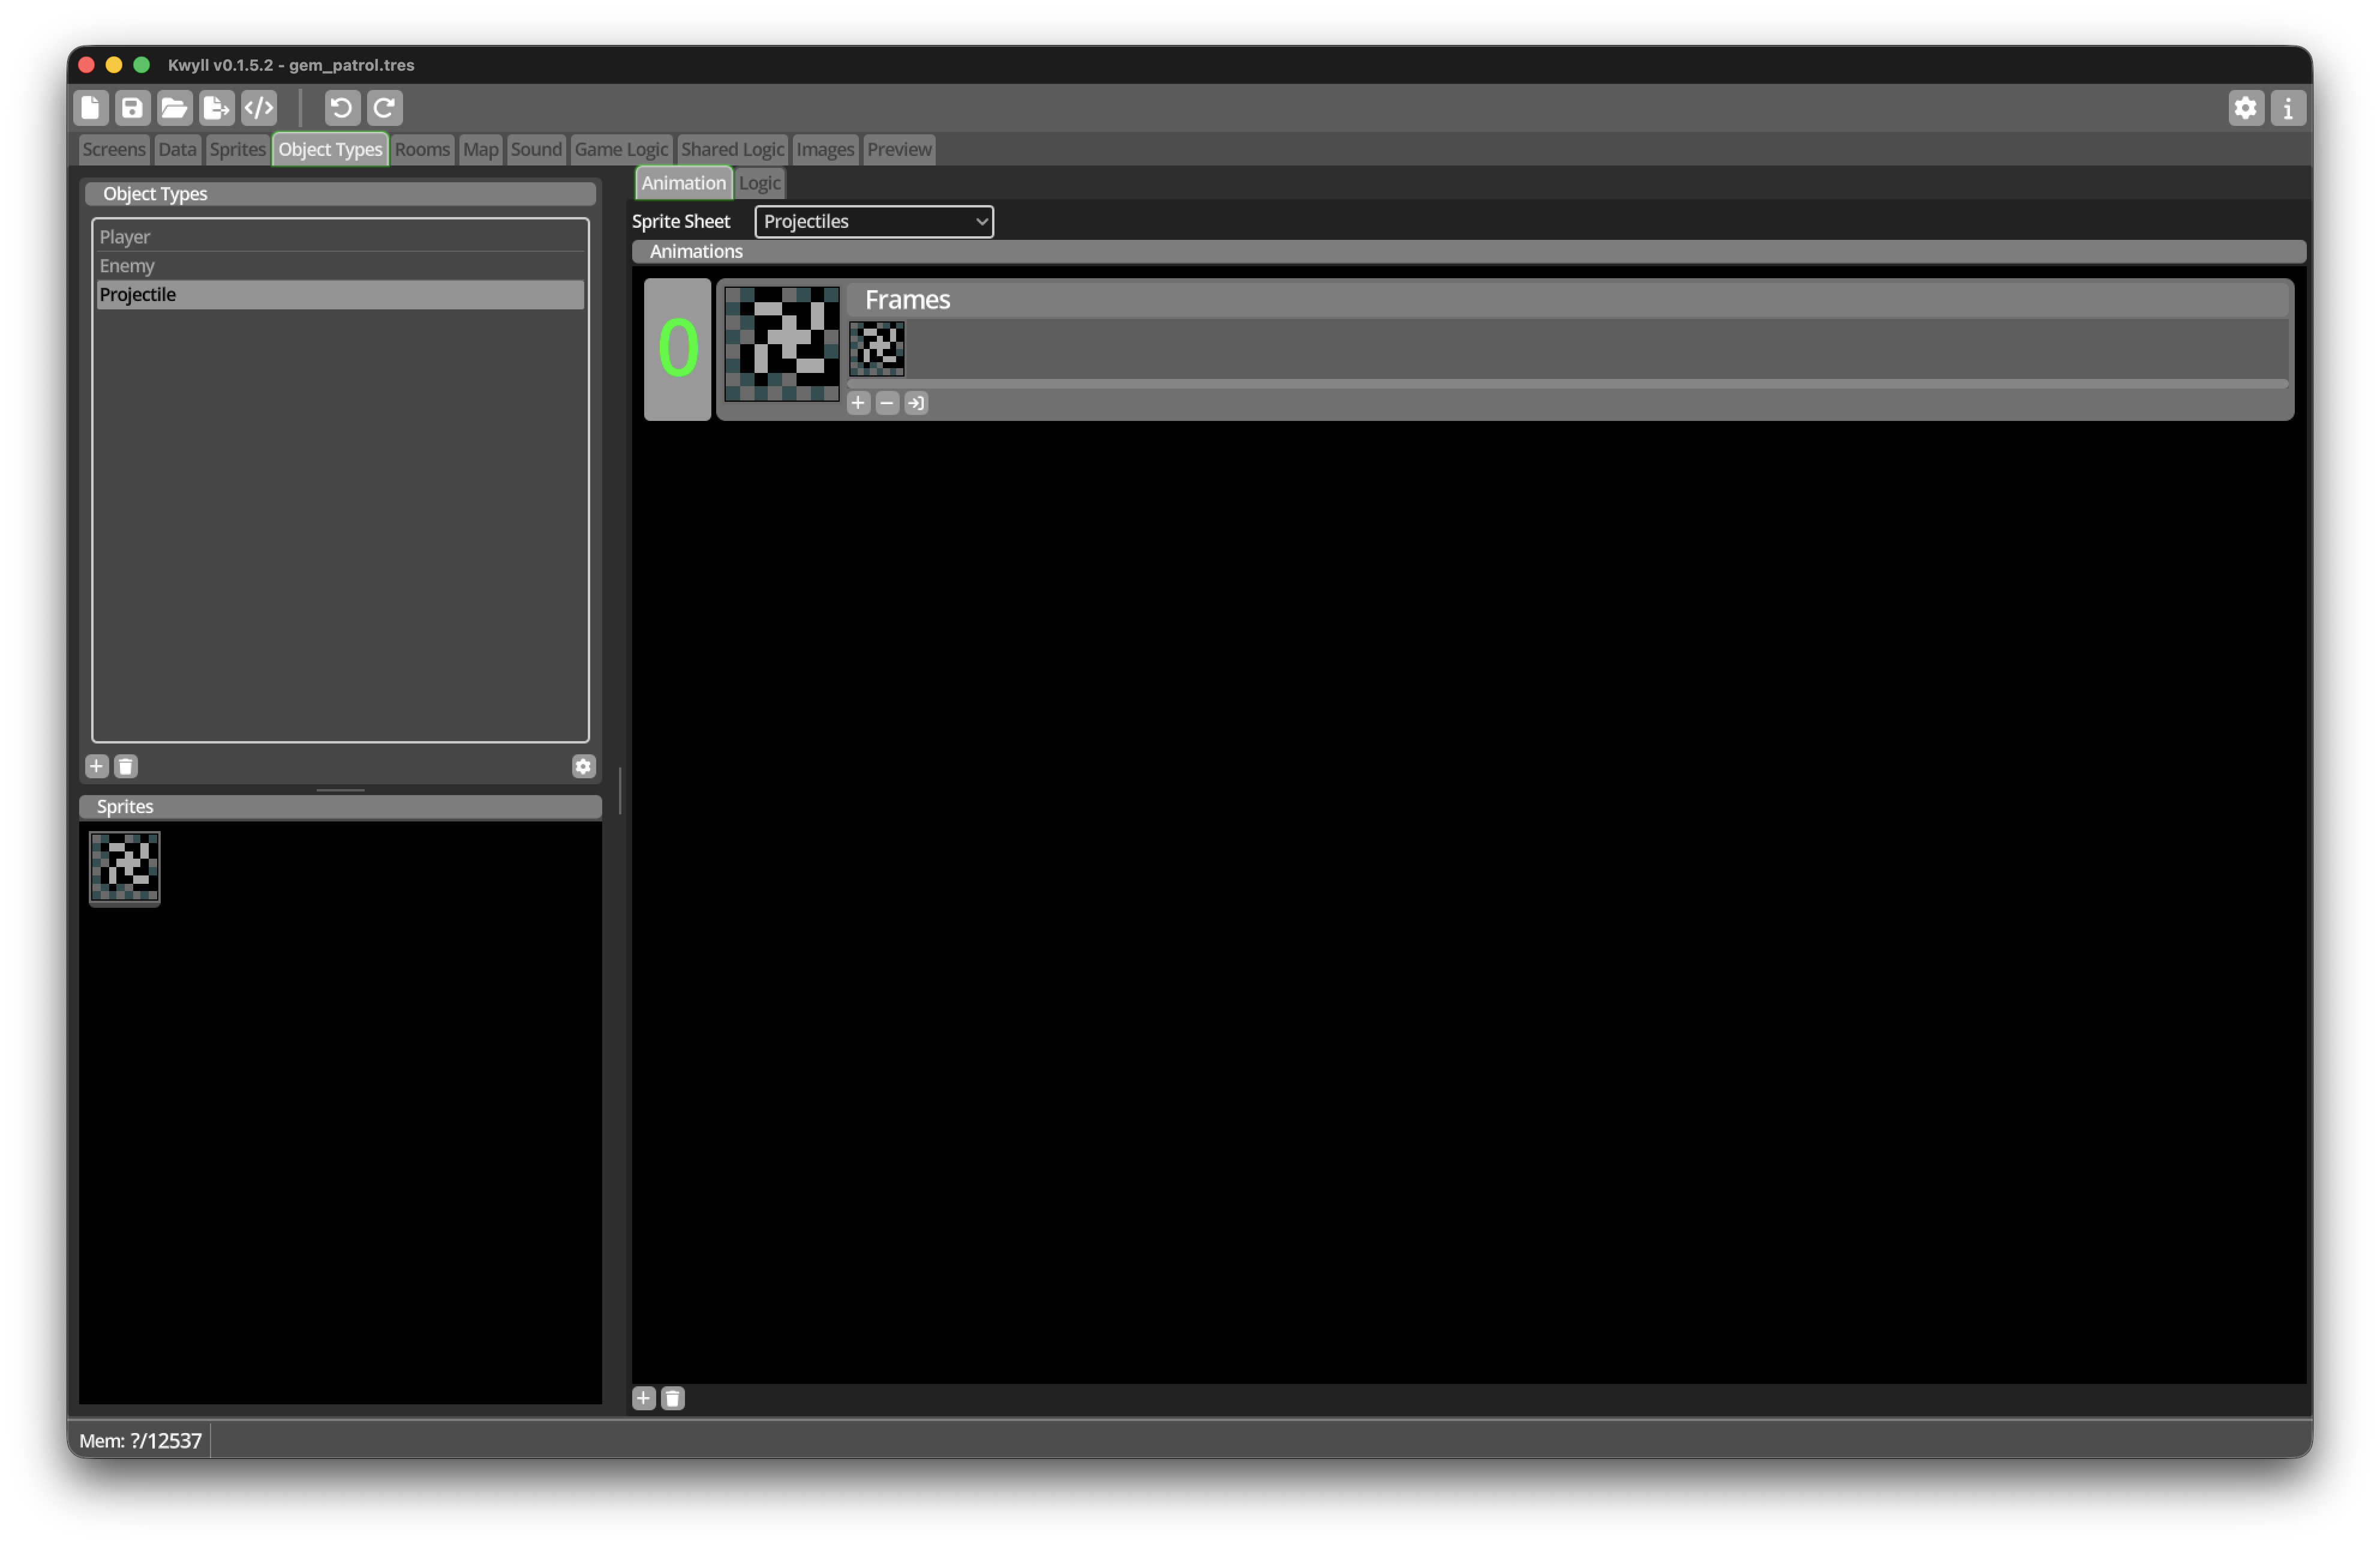
Add an Object Type named
Projectile. -
Set its Draw Mode to
Mask. -
Set its default Ink to Yellow and enable Bright.
-
Leave Paper unset.
-
Select the
ProjectilesSprite Sheet. -
Add one animation containing the Projectile sprite.
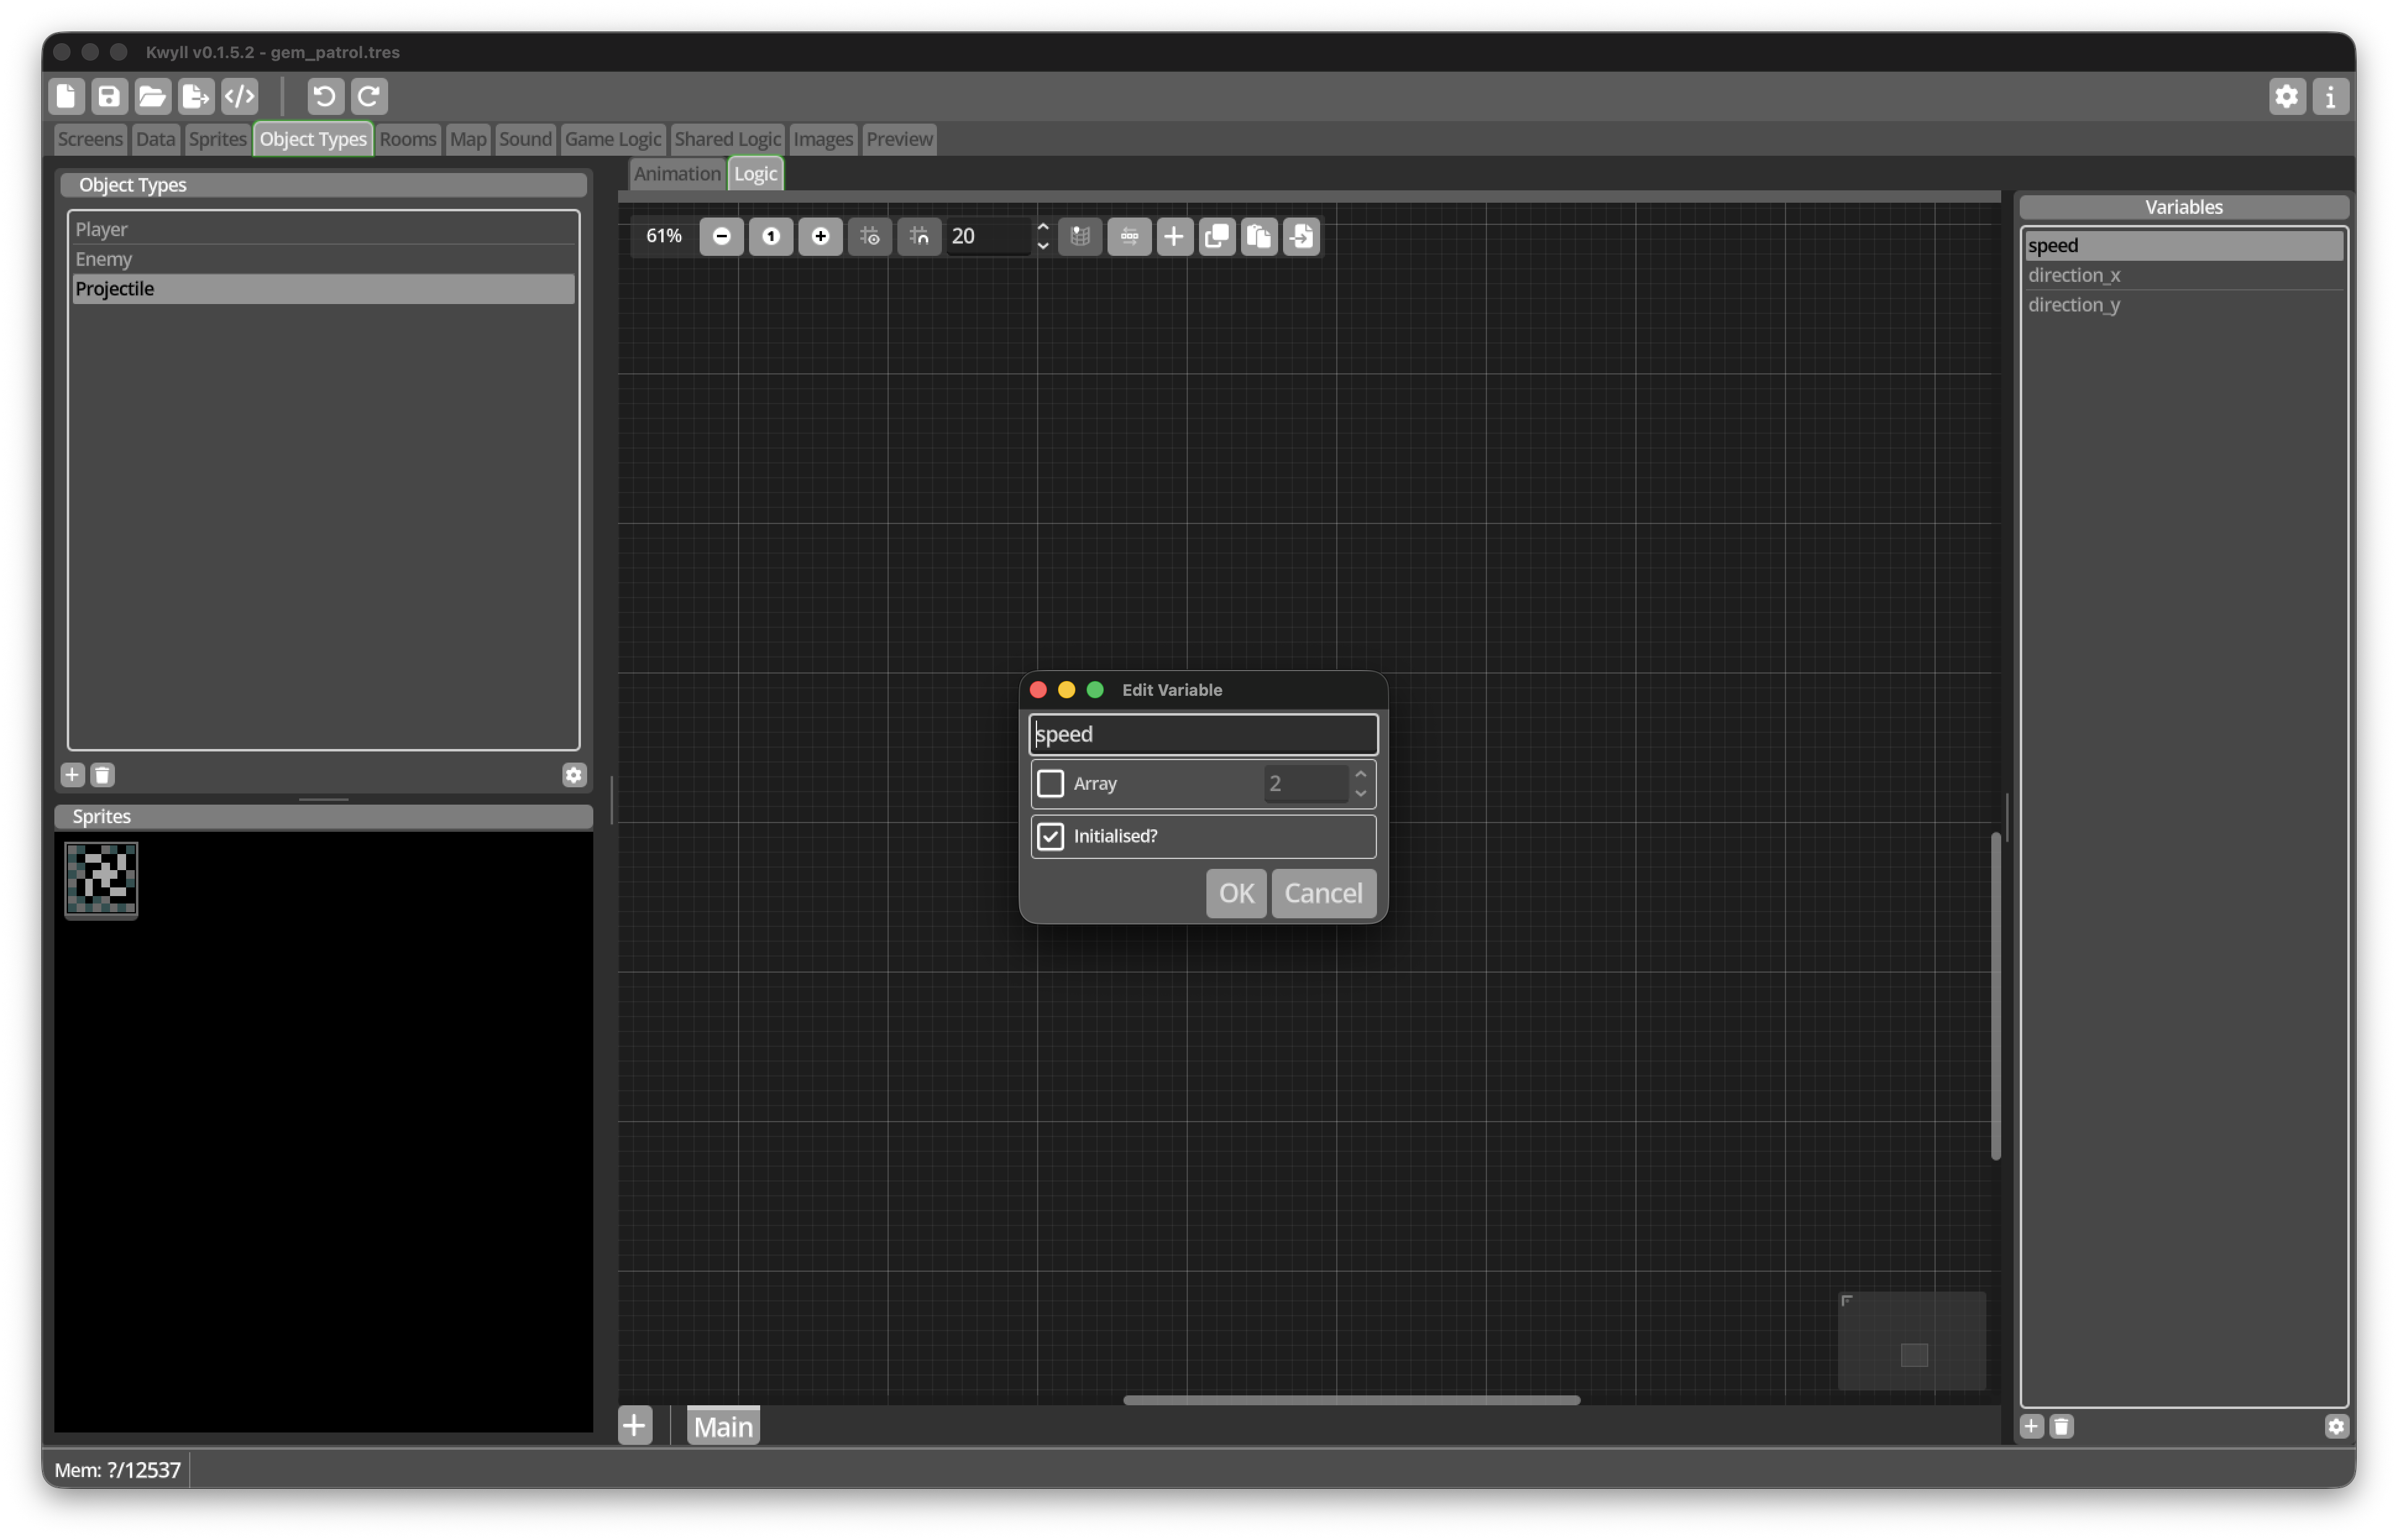
Add these initialised variables to Projectile Logic:
| Variable | Purpose | Initial value |
|---|---|---|
|
Pixels moved on each update |
|
|
Horizontal direction supplied by the Player |
|
|
Vertical direction supplied by the Player |
|
All three values begin at zero. Dynamic Objects do not take the configured instance defaults used by placed Map and Room Objects, so the Player will send the movement values immediately after spawning the Projectile.
Receive the firing direction
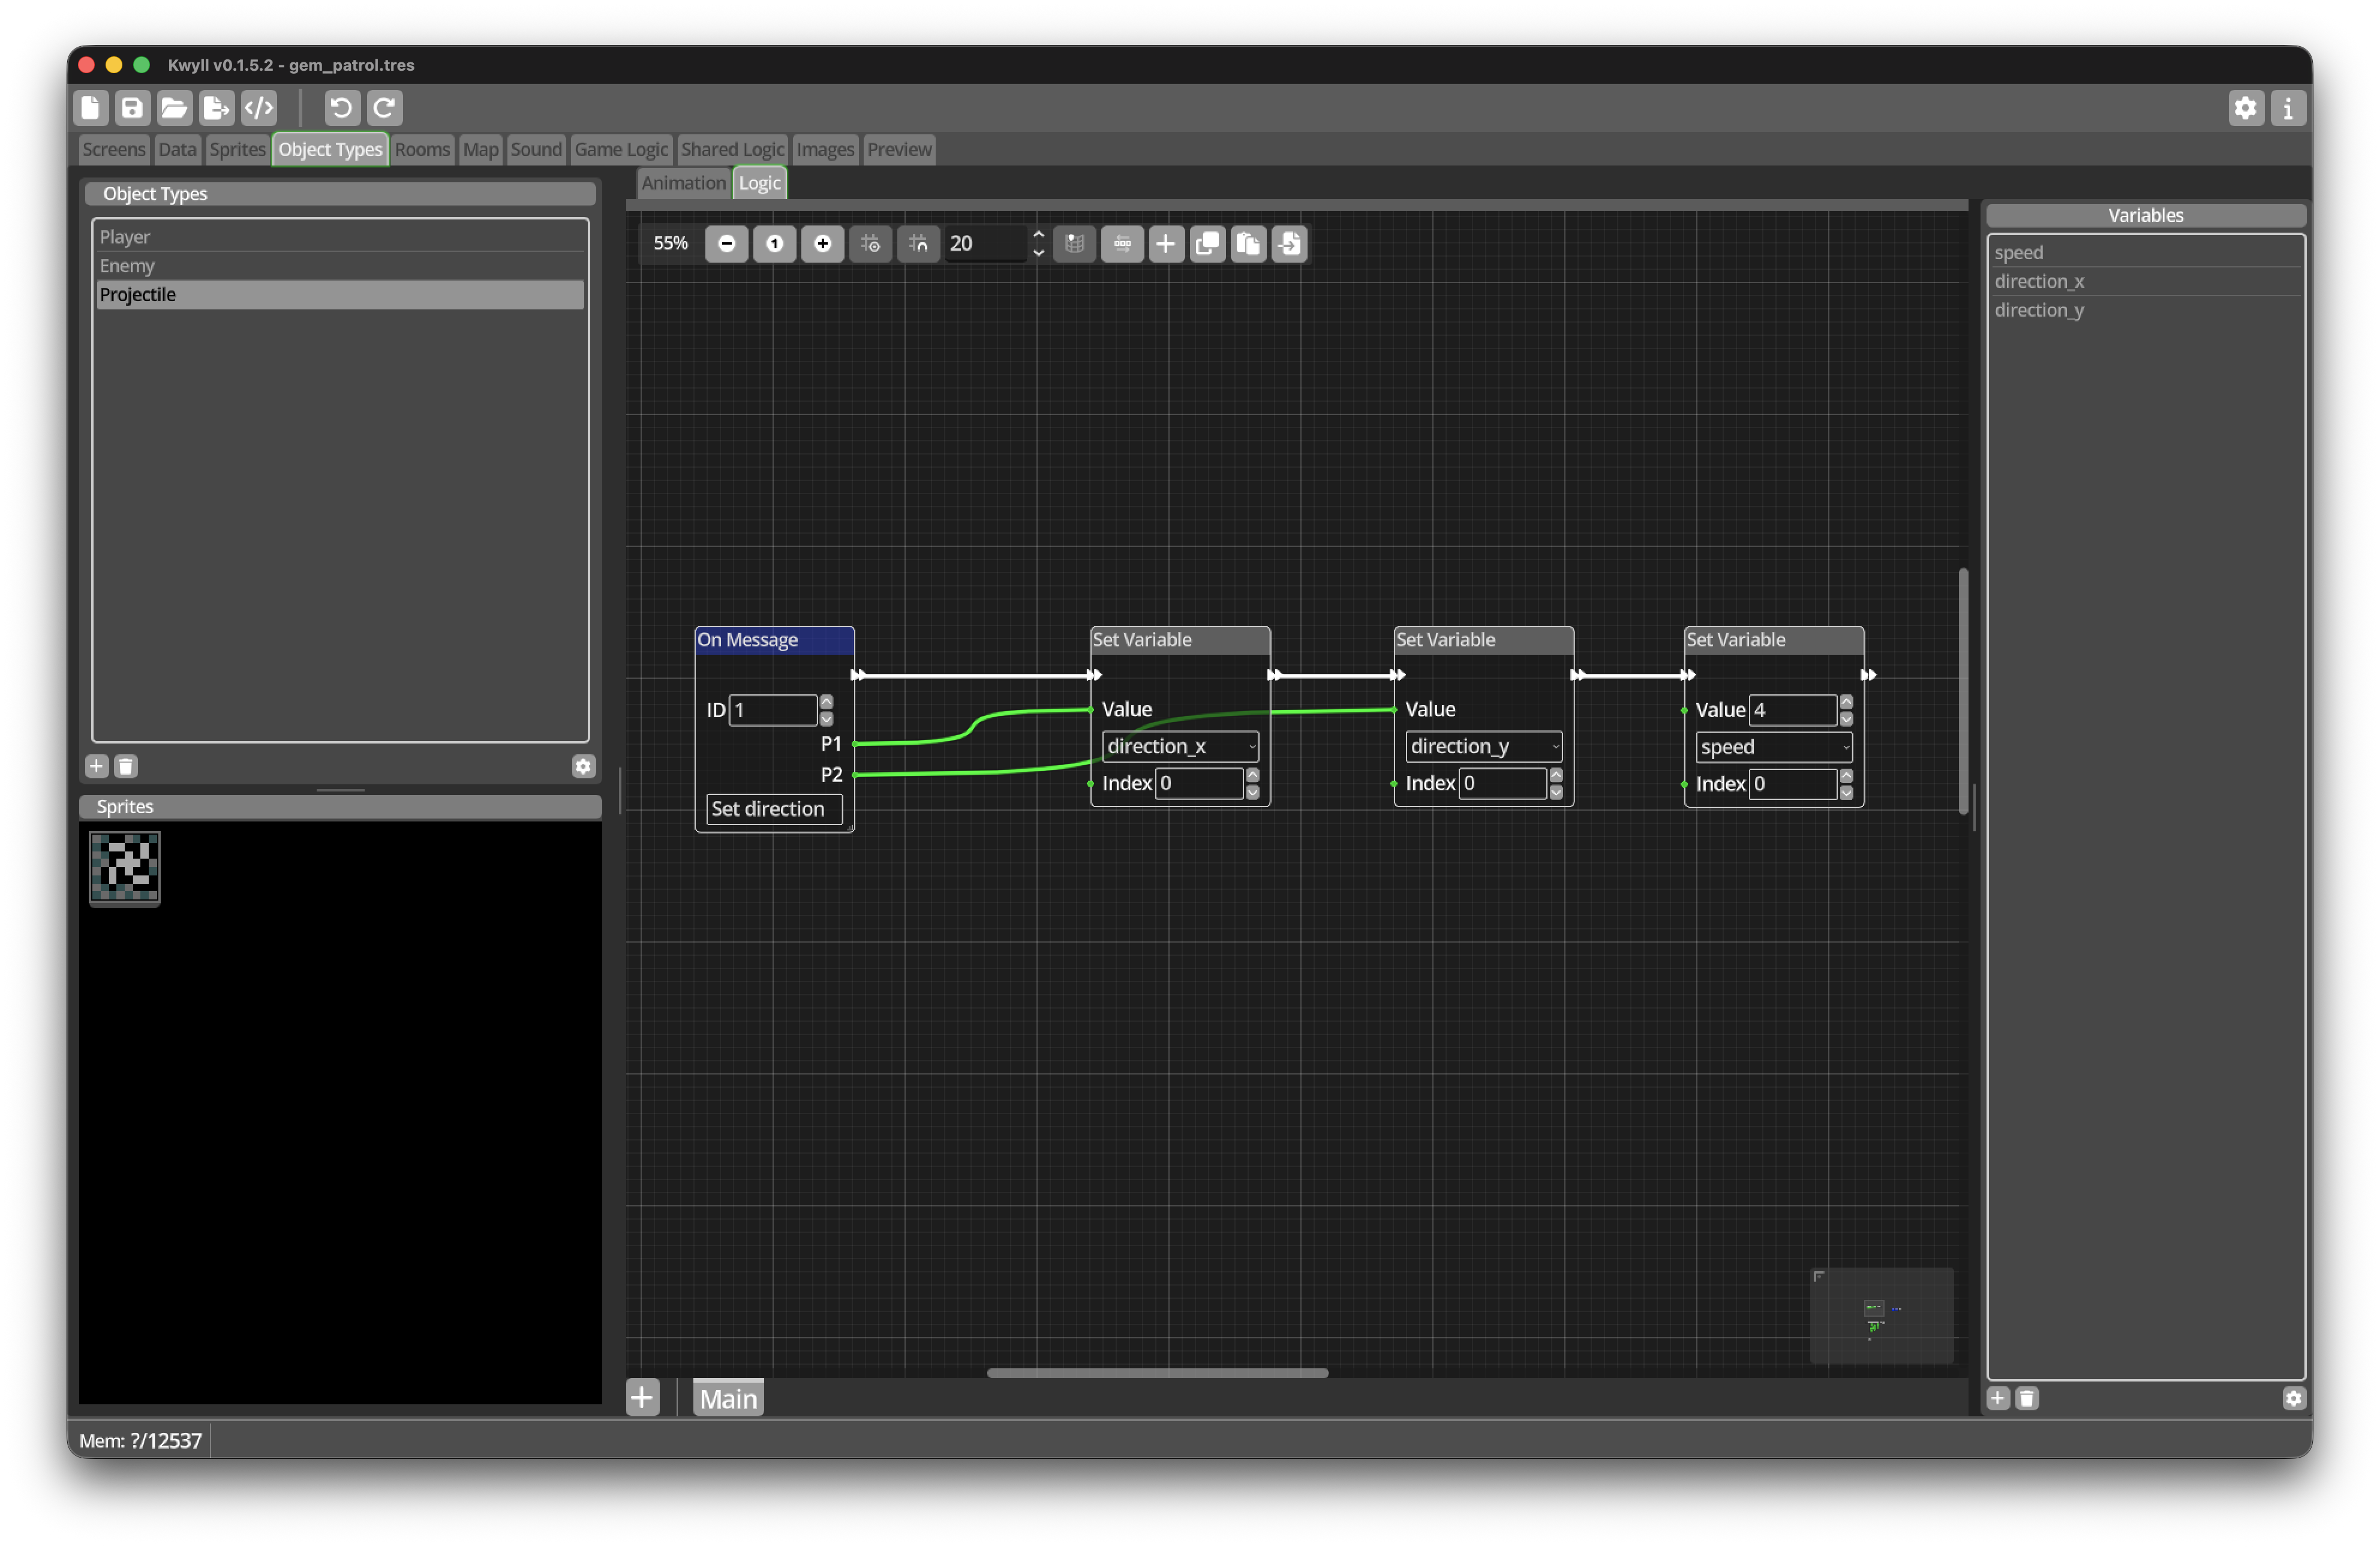
In Projectile Logic:
-
Add an
On Messagetrigger with ID1. -
Give it the descriptive name
Set directionif available. -
Add a
Set VariableNode fordirection_x. -
Connect P1 from
On Messageto Value. -
Add a
Set VariableNode fordirection_y. -
Connect P2 from
On Messageto Value. -
Add a
Set VariableNode forspeedand set Value to4. -
Connect the white flow through all three
Set VariableNodes.
The Player will use message ID 1 when initialising a newly spawned
Projectile. P1 carries facing_x, while P2 carries facing_y.
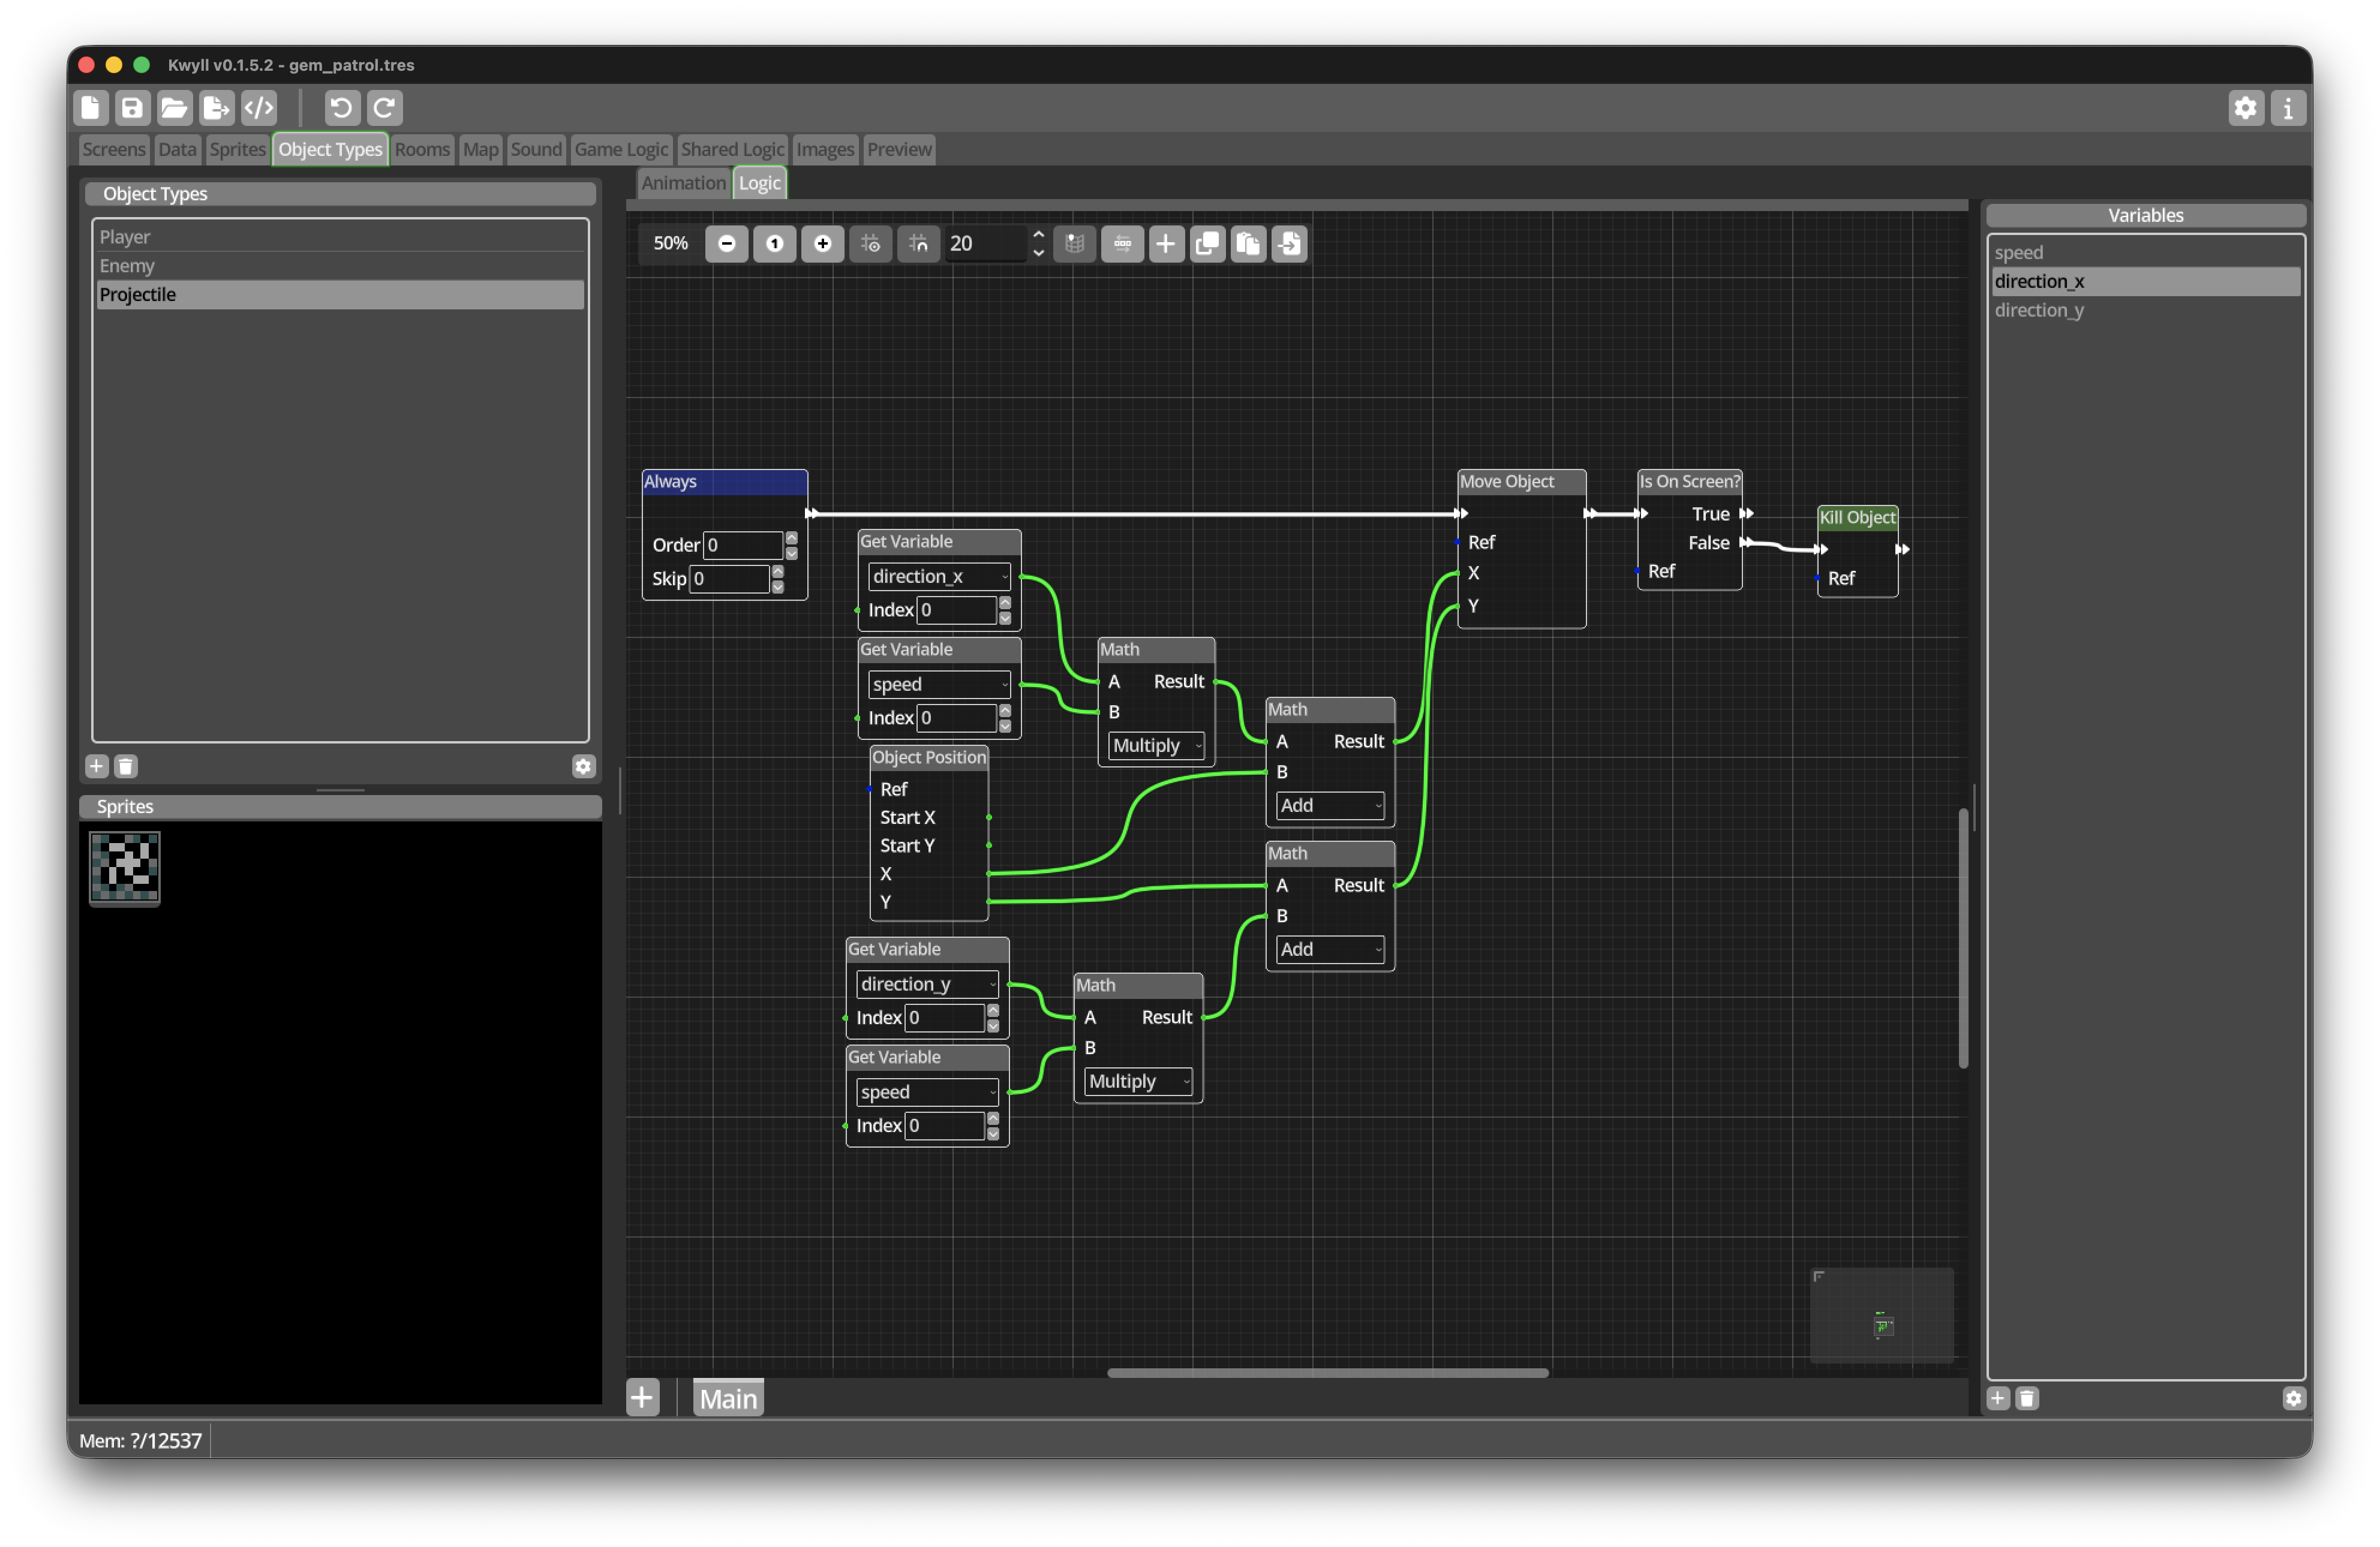
Move the Projectile
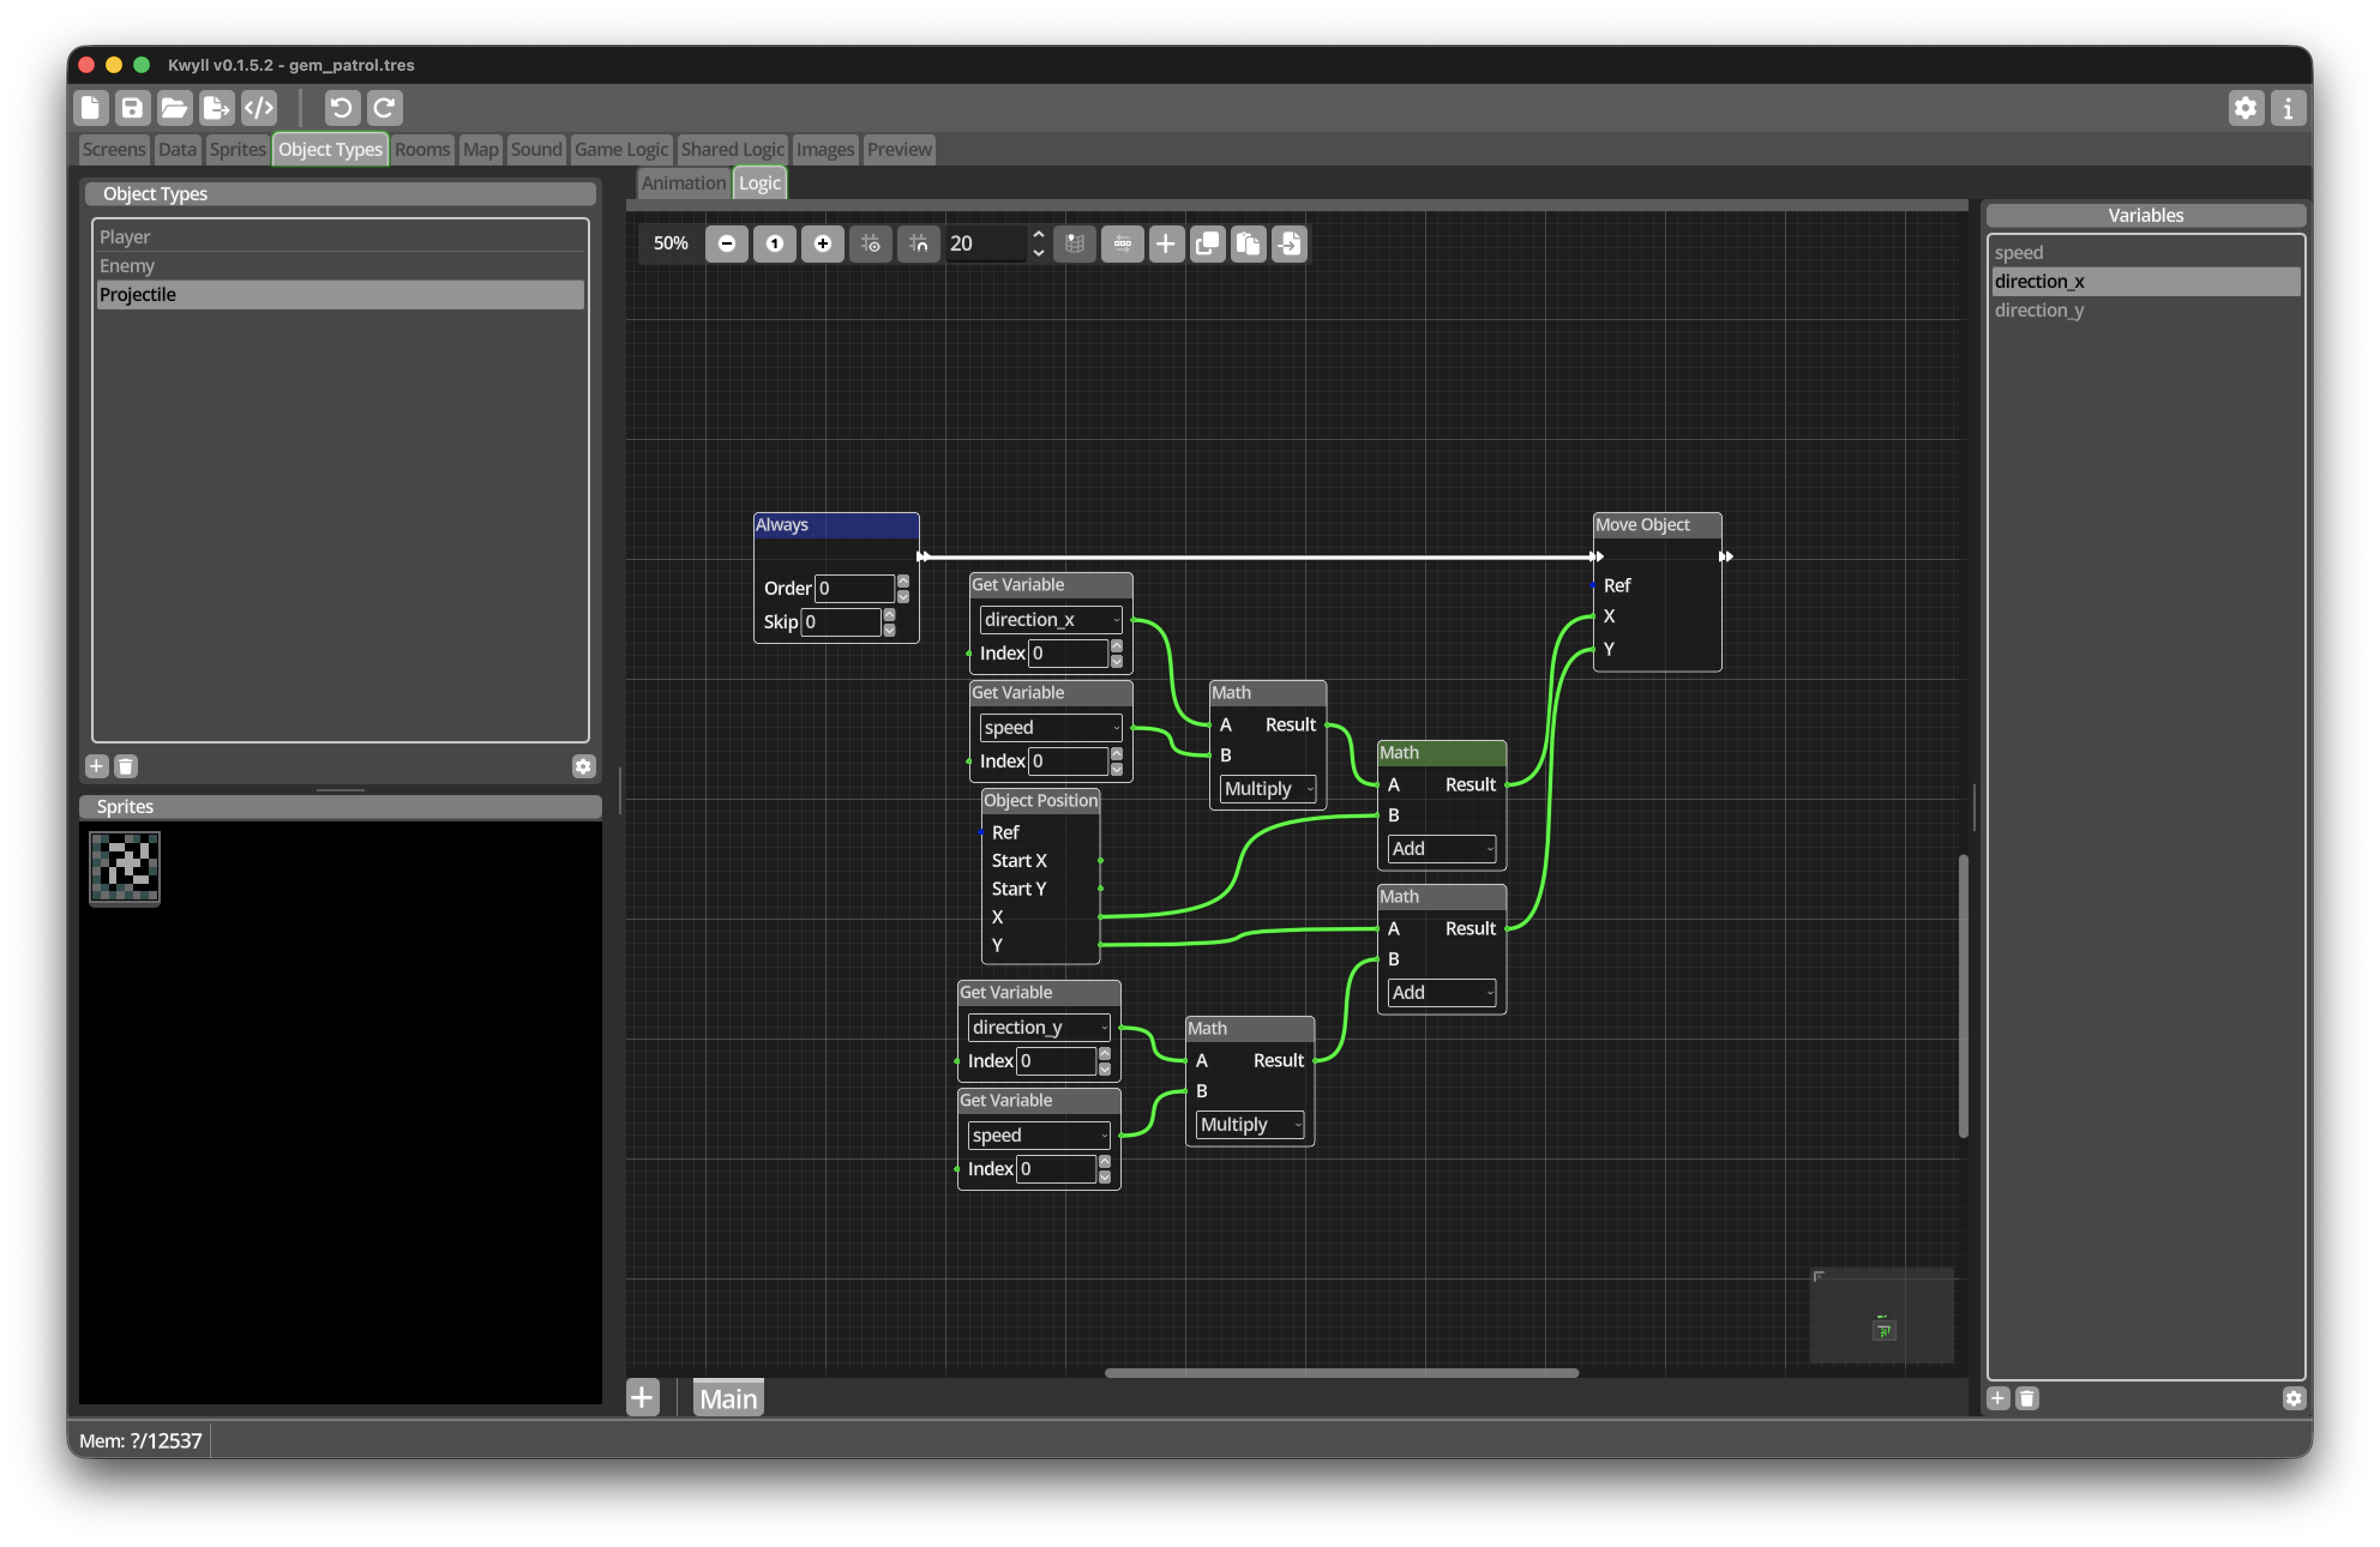
Build a movement flow in Projectile Logic:
-
Add an
Alwaystrigger and anObject PositionNode. -
Get
speedanddirection_x. -
Multiply
direction_xbyspeed. -
Add the result to the current X position.
-
Get
direction_y. -
Multiply
direction_ybyspeed. -
Add the result to the current Y position.
-
Add a
Move ObjectNode. -
Connect the calculated X and Y positions.
-
Leave Ref unconnected.
-
Connect
AlwaystoMove Object.
This is the same movement pattern used by the Enemy. Reusing a familiar pattern is often easier and safer than inventing a different solution for every Object Type.
Remove Projectiles that hit walls
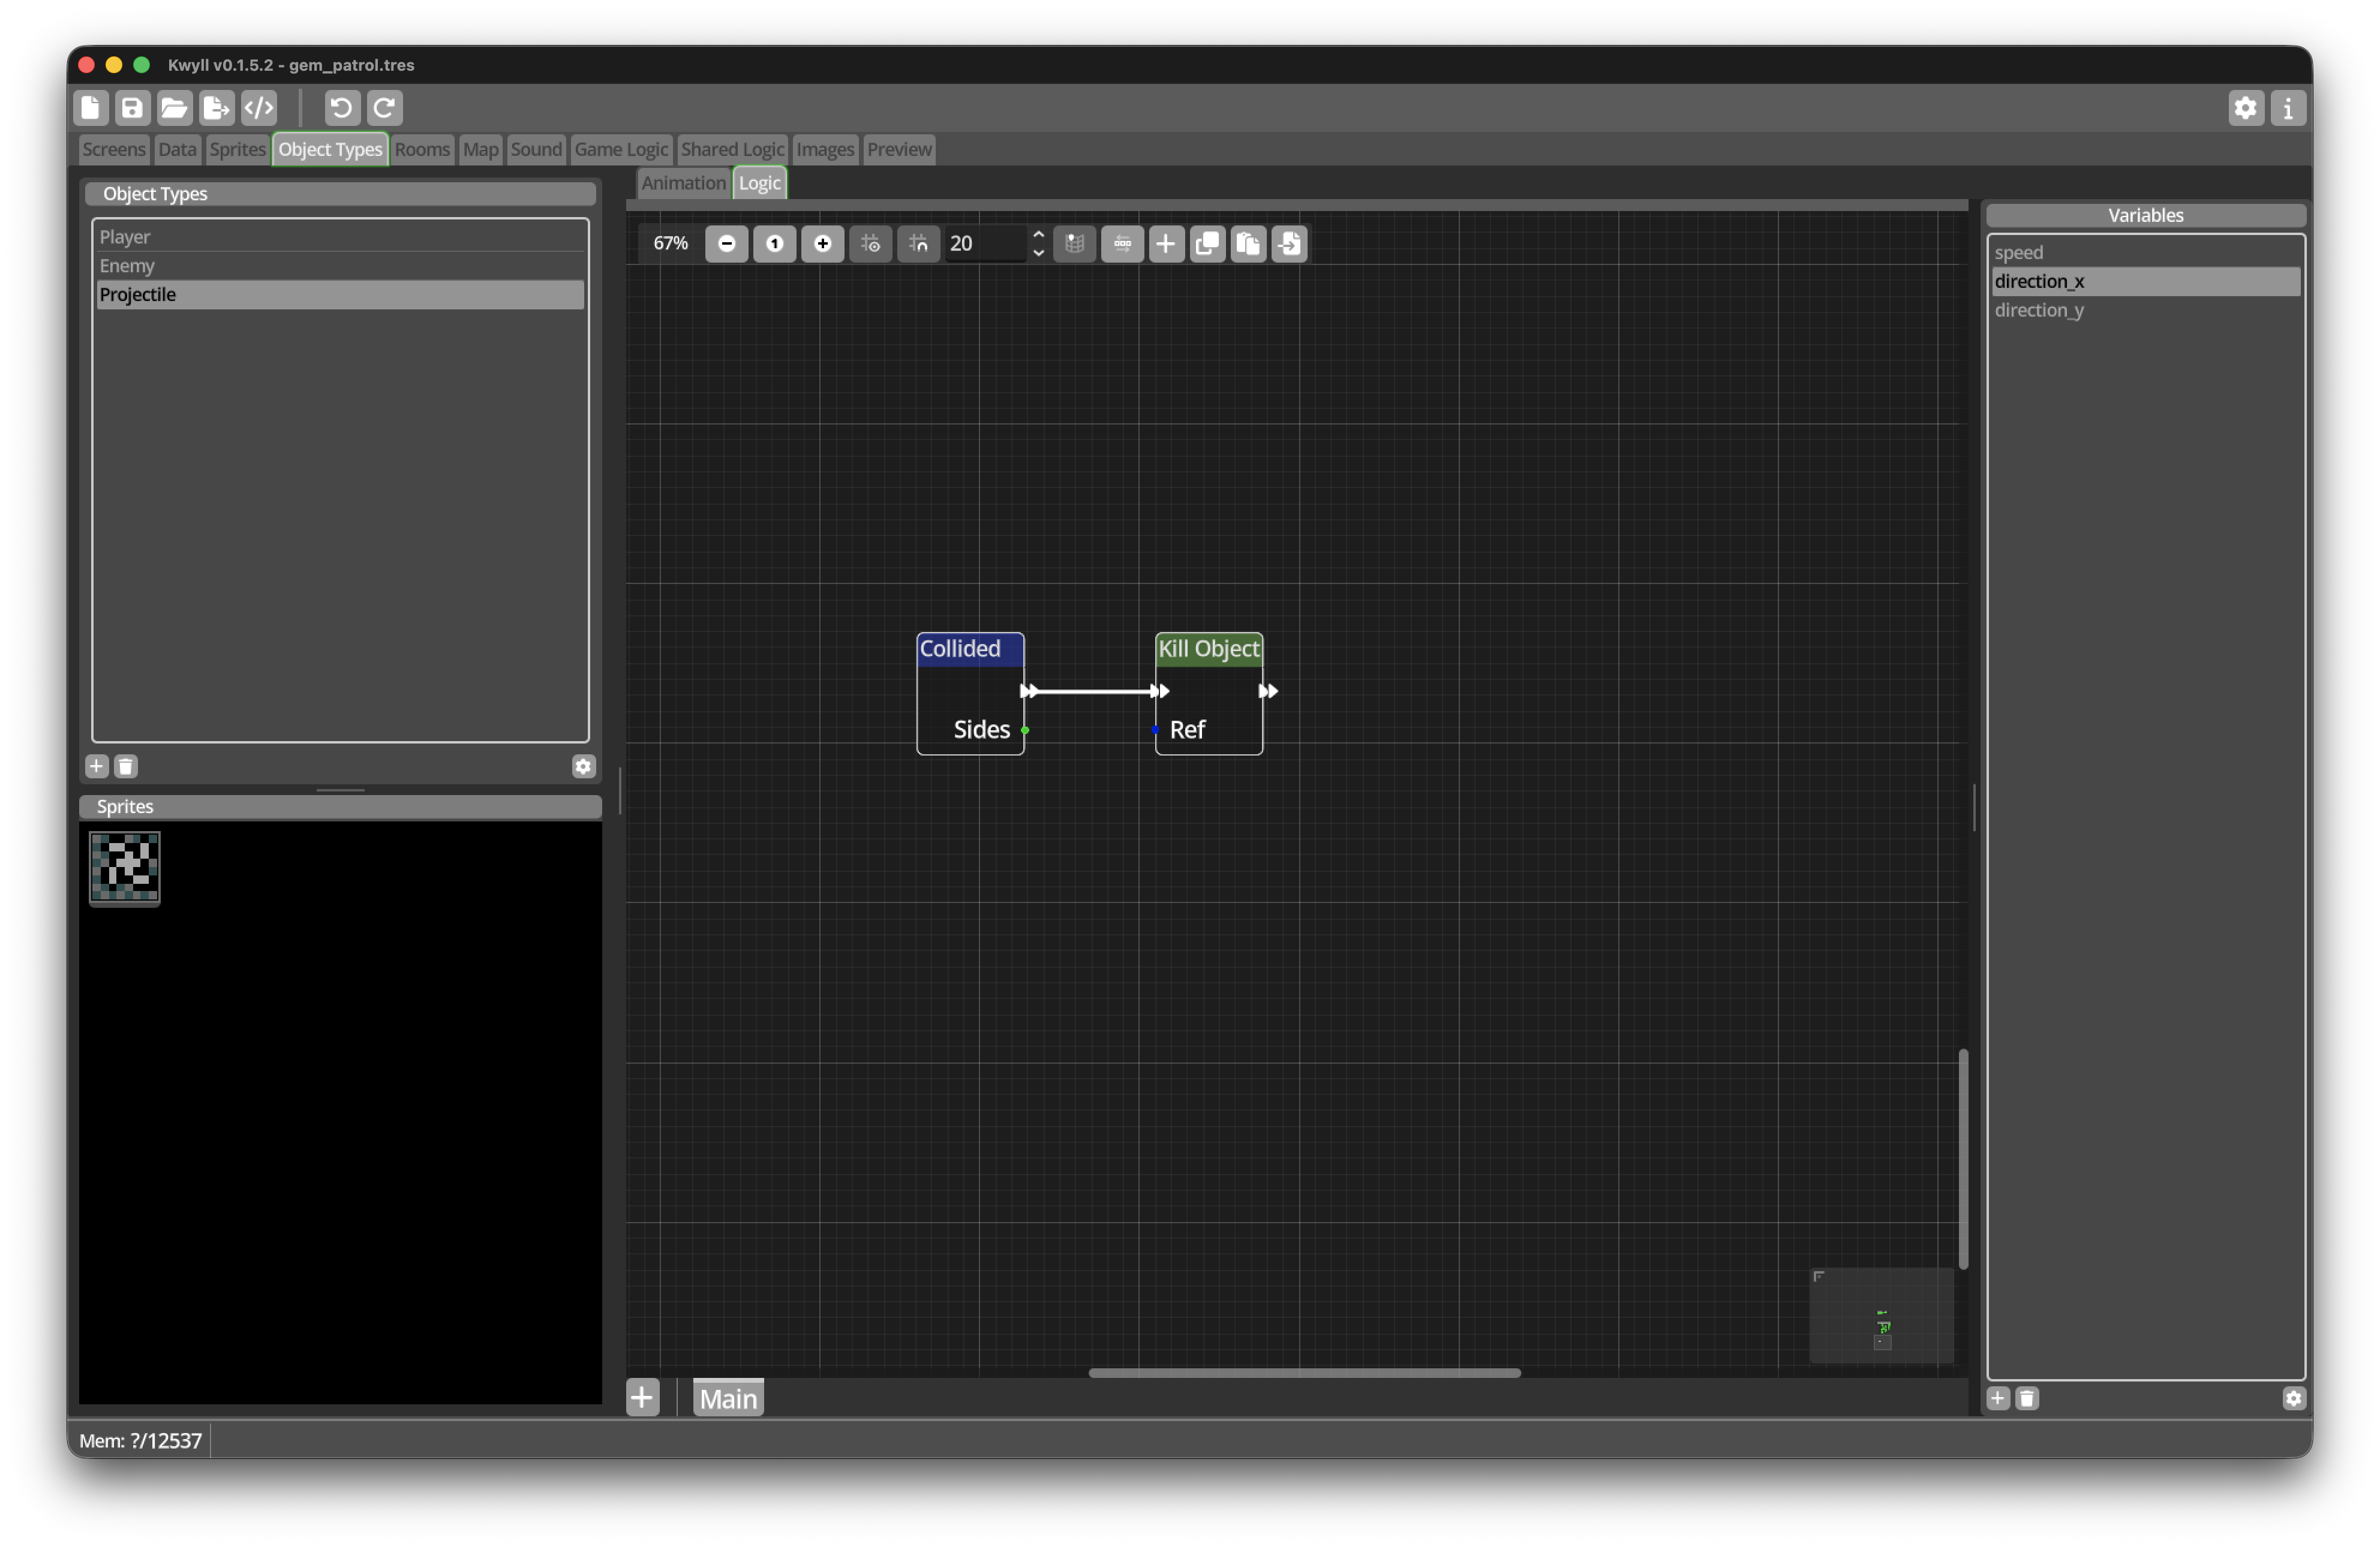
Add a Collided trigger and connect it directly to a Kill Object Node. Leave
Ref unconnected so that the current Projectile is removed.
Kill Object works here because the Projectile was created dynamically. It
cannot remove the Enemy Room Objects.
Remove Projectiles that leave the Screen
A Projectile might travel through an open exit instead of hitting a wall. We do not want unseen Dynamic Objects to accumulate.
-
Add an
Is On Screen?Node afterMove Object. -
Connect the Flow Out of
Move Objectto its Flow In. -
Leave Ref unconnected.
-
Connect the False flow to another
Kill ObjectNode. -
Leave the True flow unconnected.
The Projectile continues to exist while it is on the current Screen. As soon as its position is outside, it is removed.
Configure Enemy intersection layers
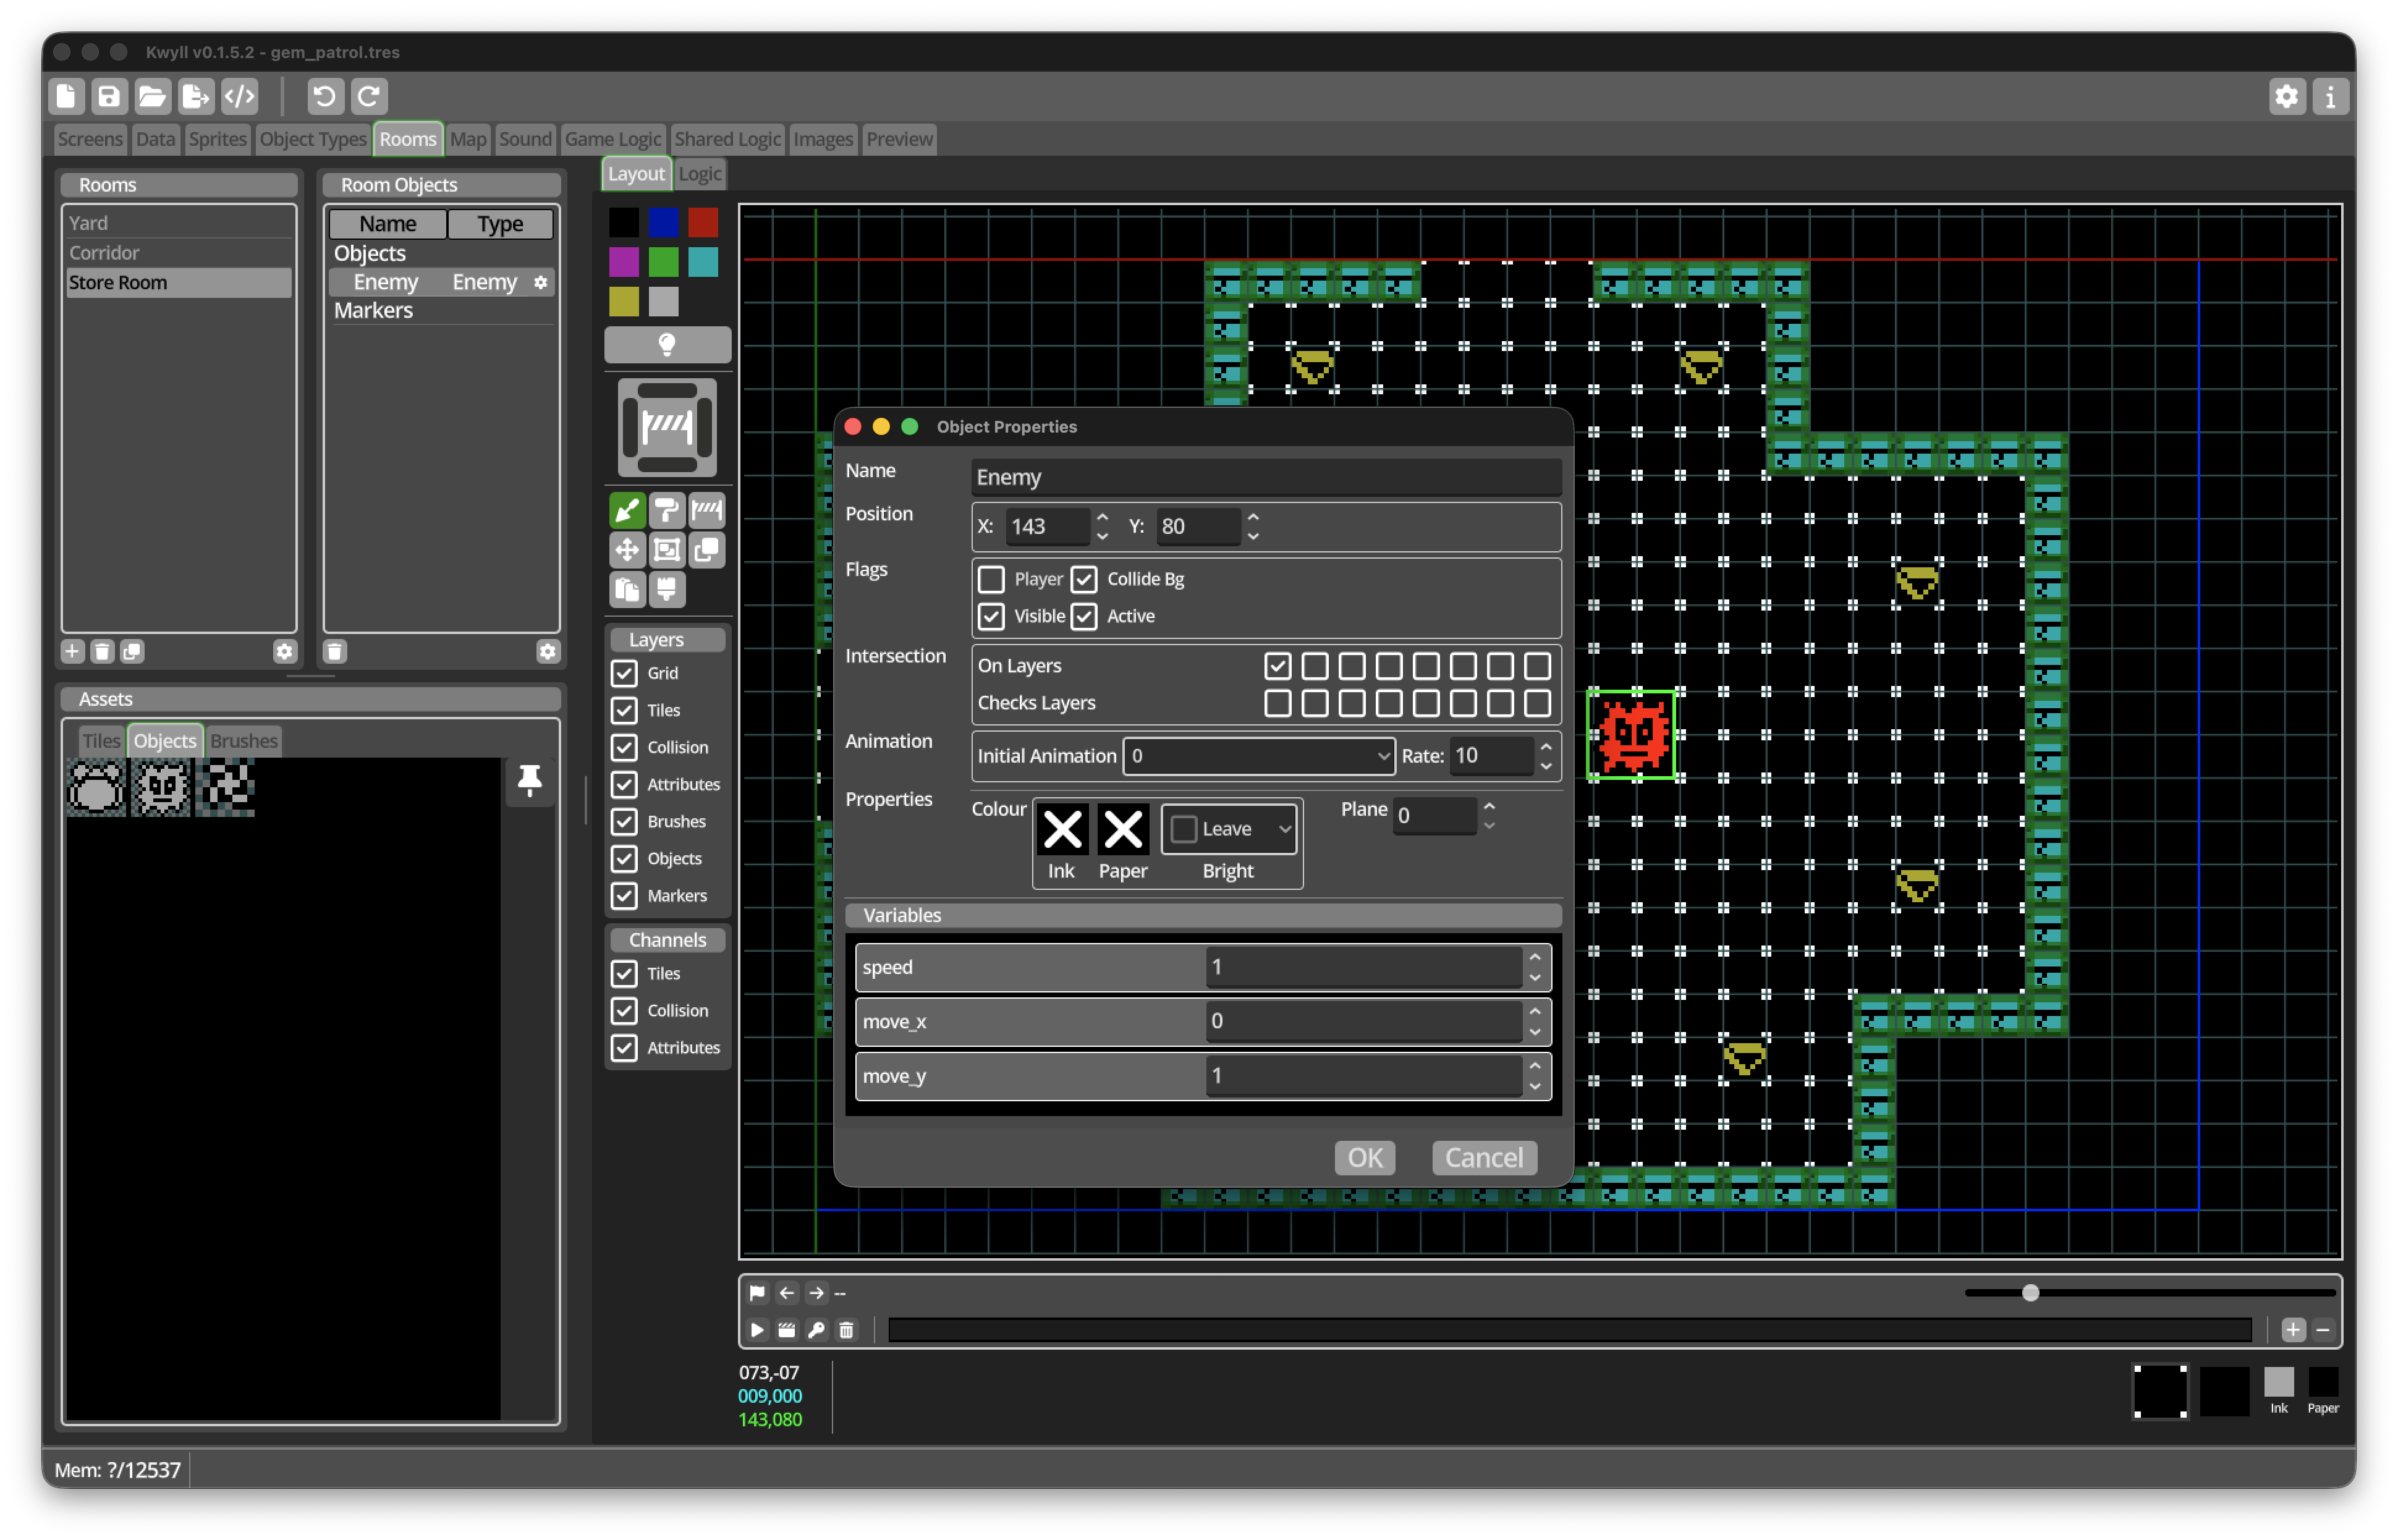
Kwyll uses intersection layers to avoid testing every object against every other object. We only need Projectiles to test against Enemies.
Open the Enemy instance properties in both Corridor and Store Room. For each Enemy:
-
Set On Layers to
1. -
Set Checks Layers to
2, the Projectile layer. -
Keep Collide Bg, Visible, and Active enabled.
The two Enemy instances must use the same layer configuration.
There is no separate Intersect Objects flag on an Object Instance. Whether an intersection is registered is determined by the On Layers and Checks Layers settings.
Fire from the Player
Open Player Logic and find another empty area.
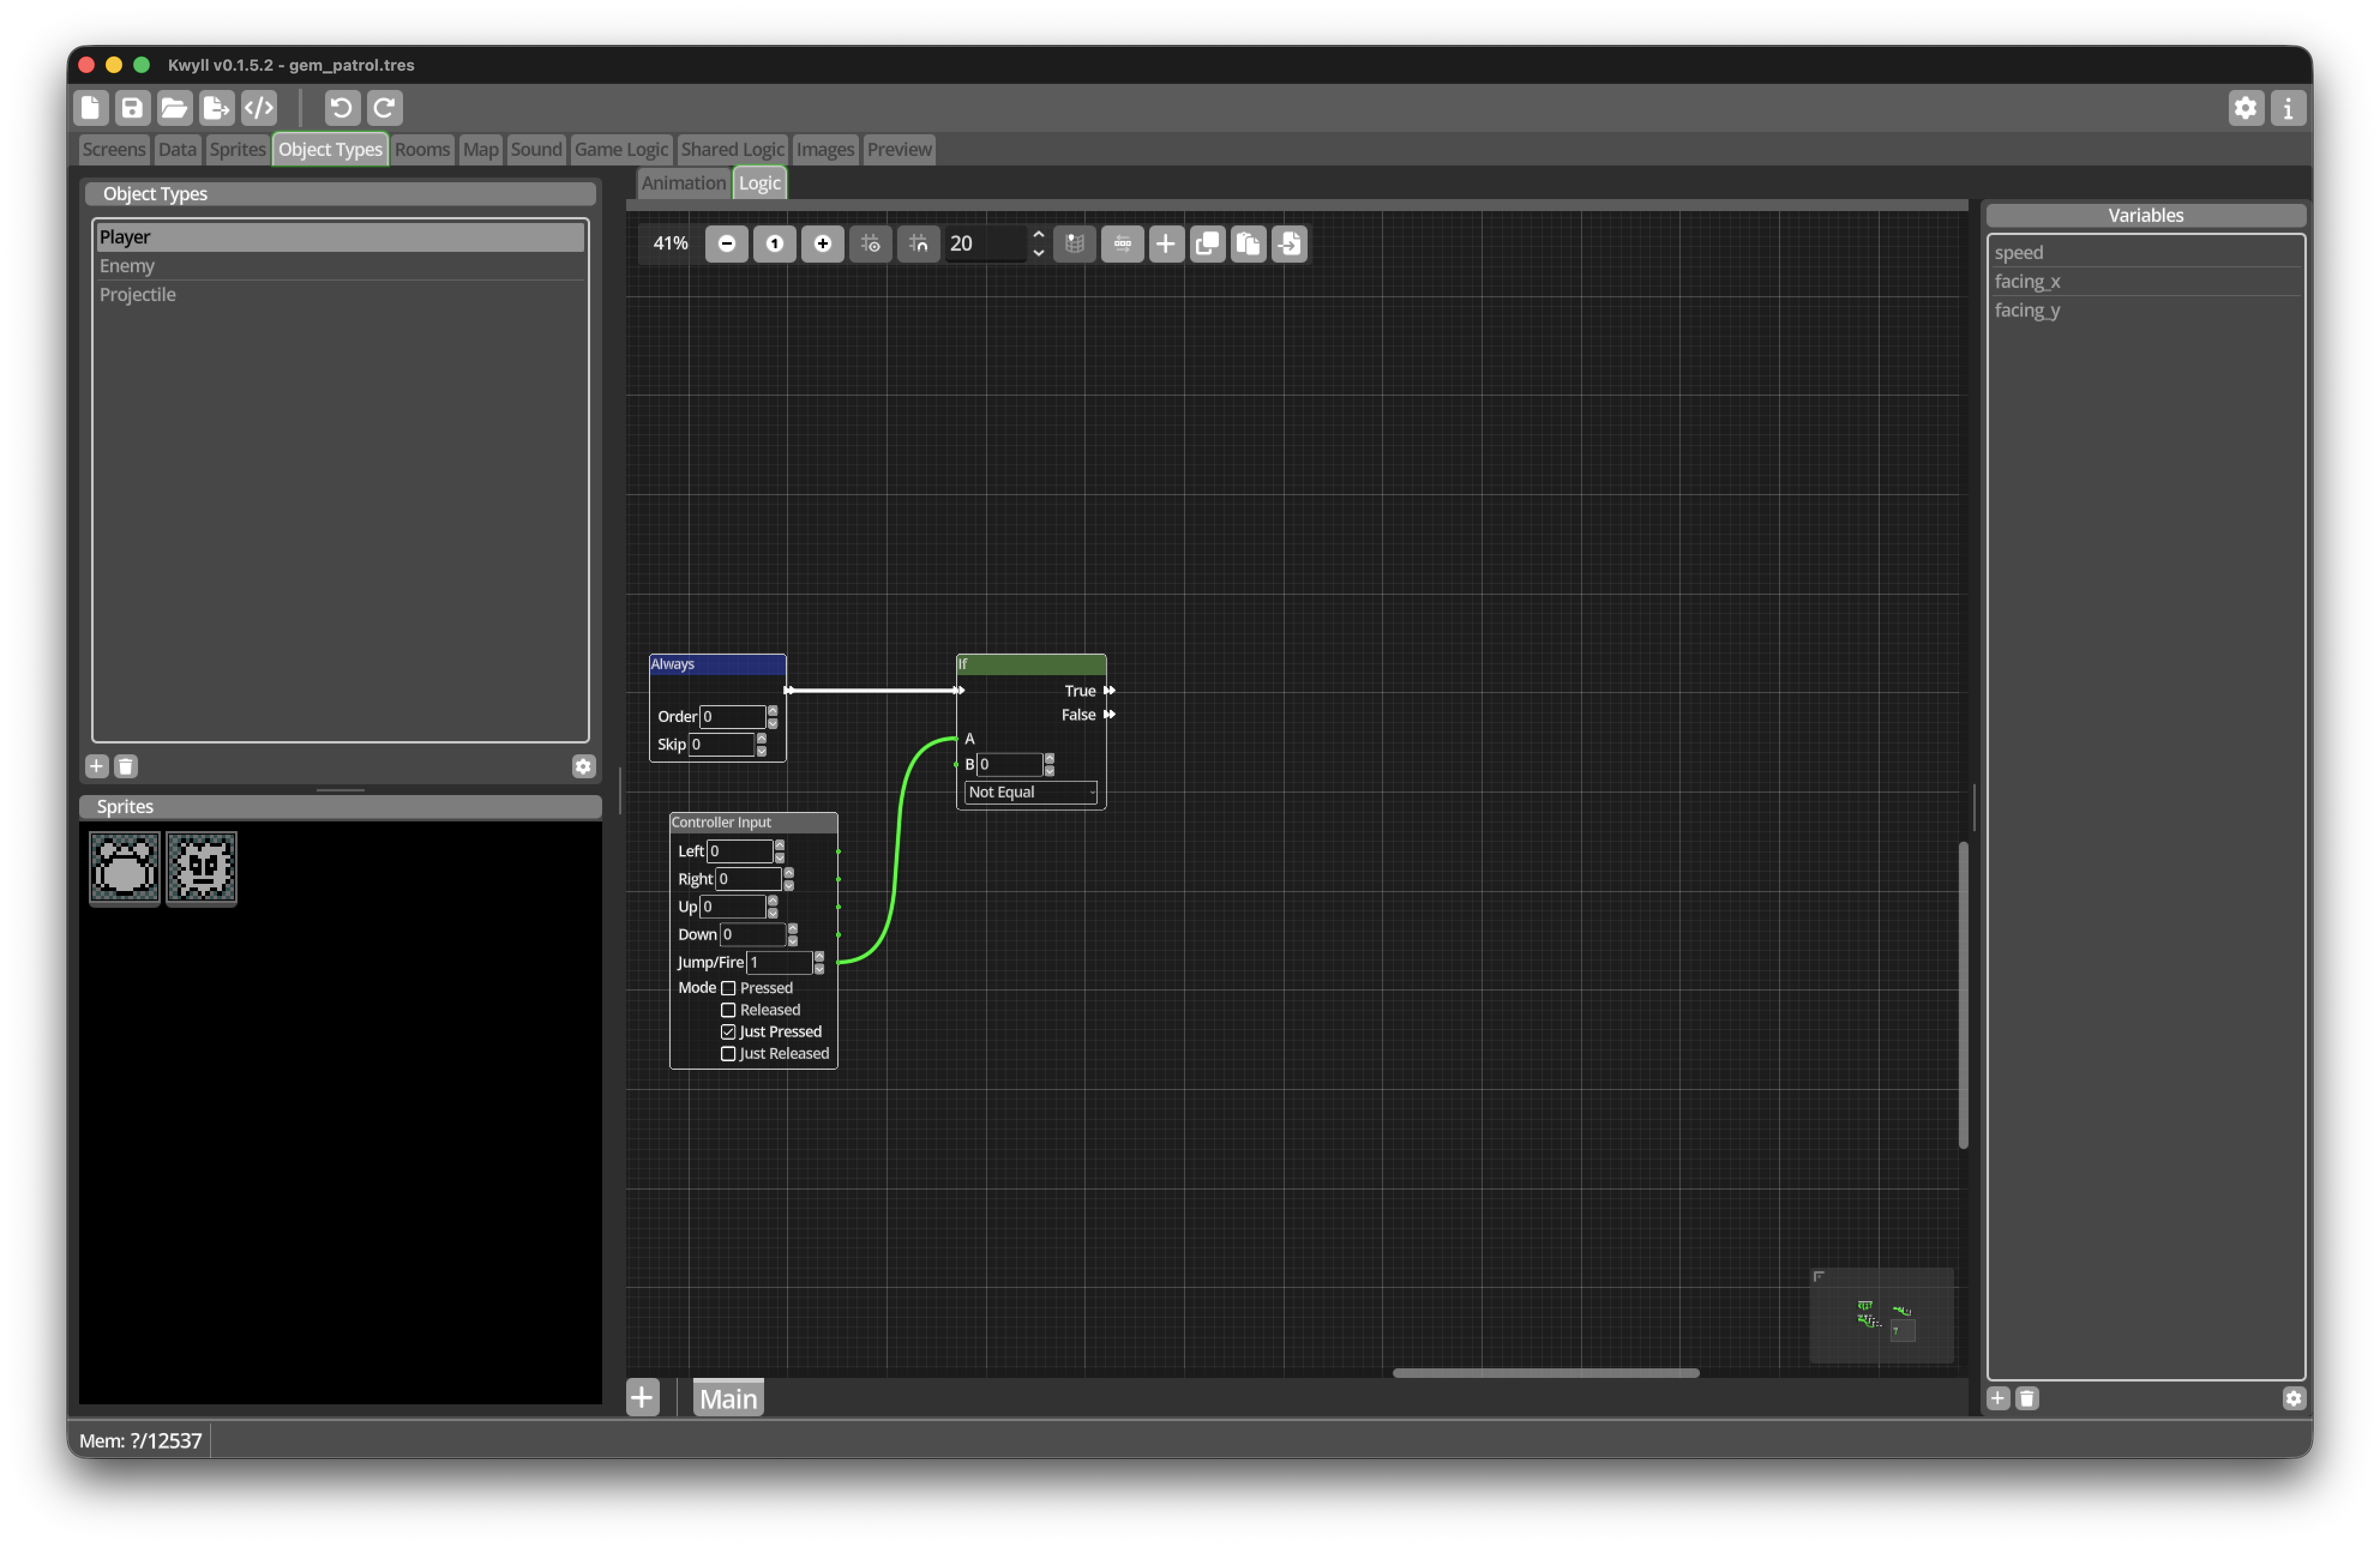
-
Add an
Alwaystrigger. -
Add a
Controller InputNode. -
Set its Mode to
Just Pressed. -
Set Jump/Fire to
1. -
Add an
IfNode. -
Connect Jump/Fire to A.
-
Set B to
0and Comparison toNot Equal. -
Connect
Alwaysto theIf.
Using Just Pressed creates one Projectile for each press. Using Pressed
would attempt to create a new Projectile on every update while Fire was held.
Spawn the Projectile
-
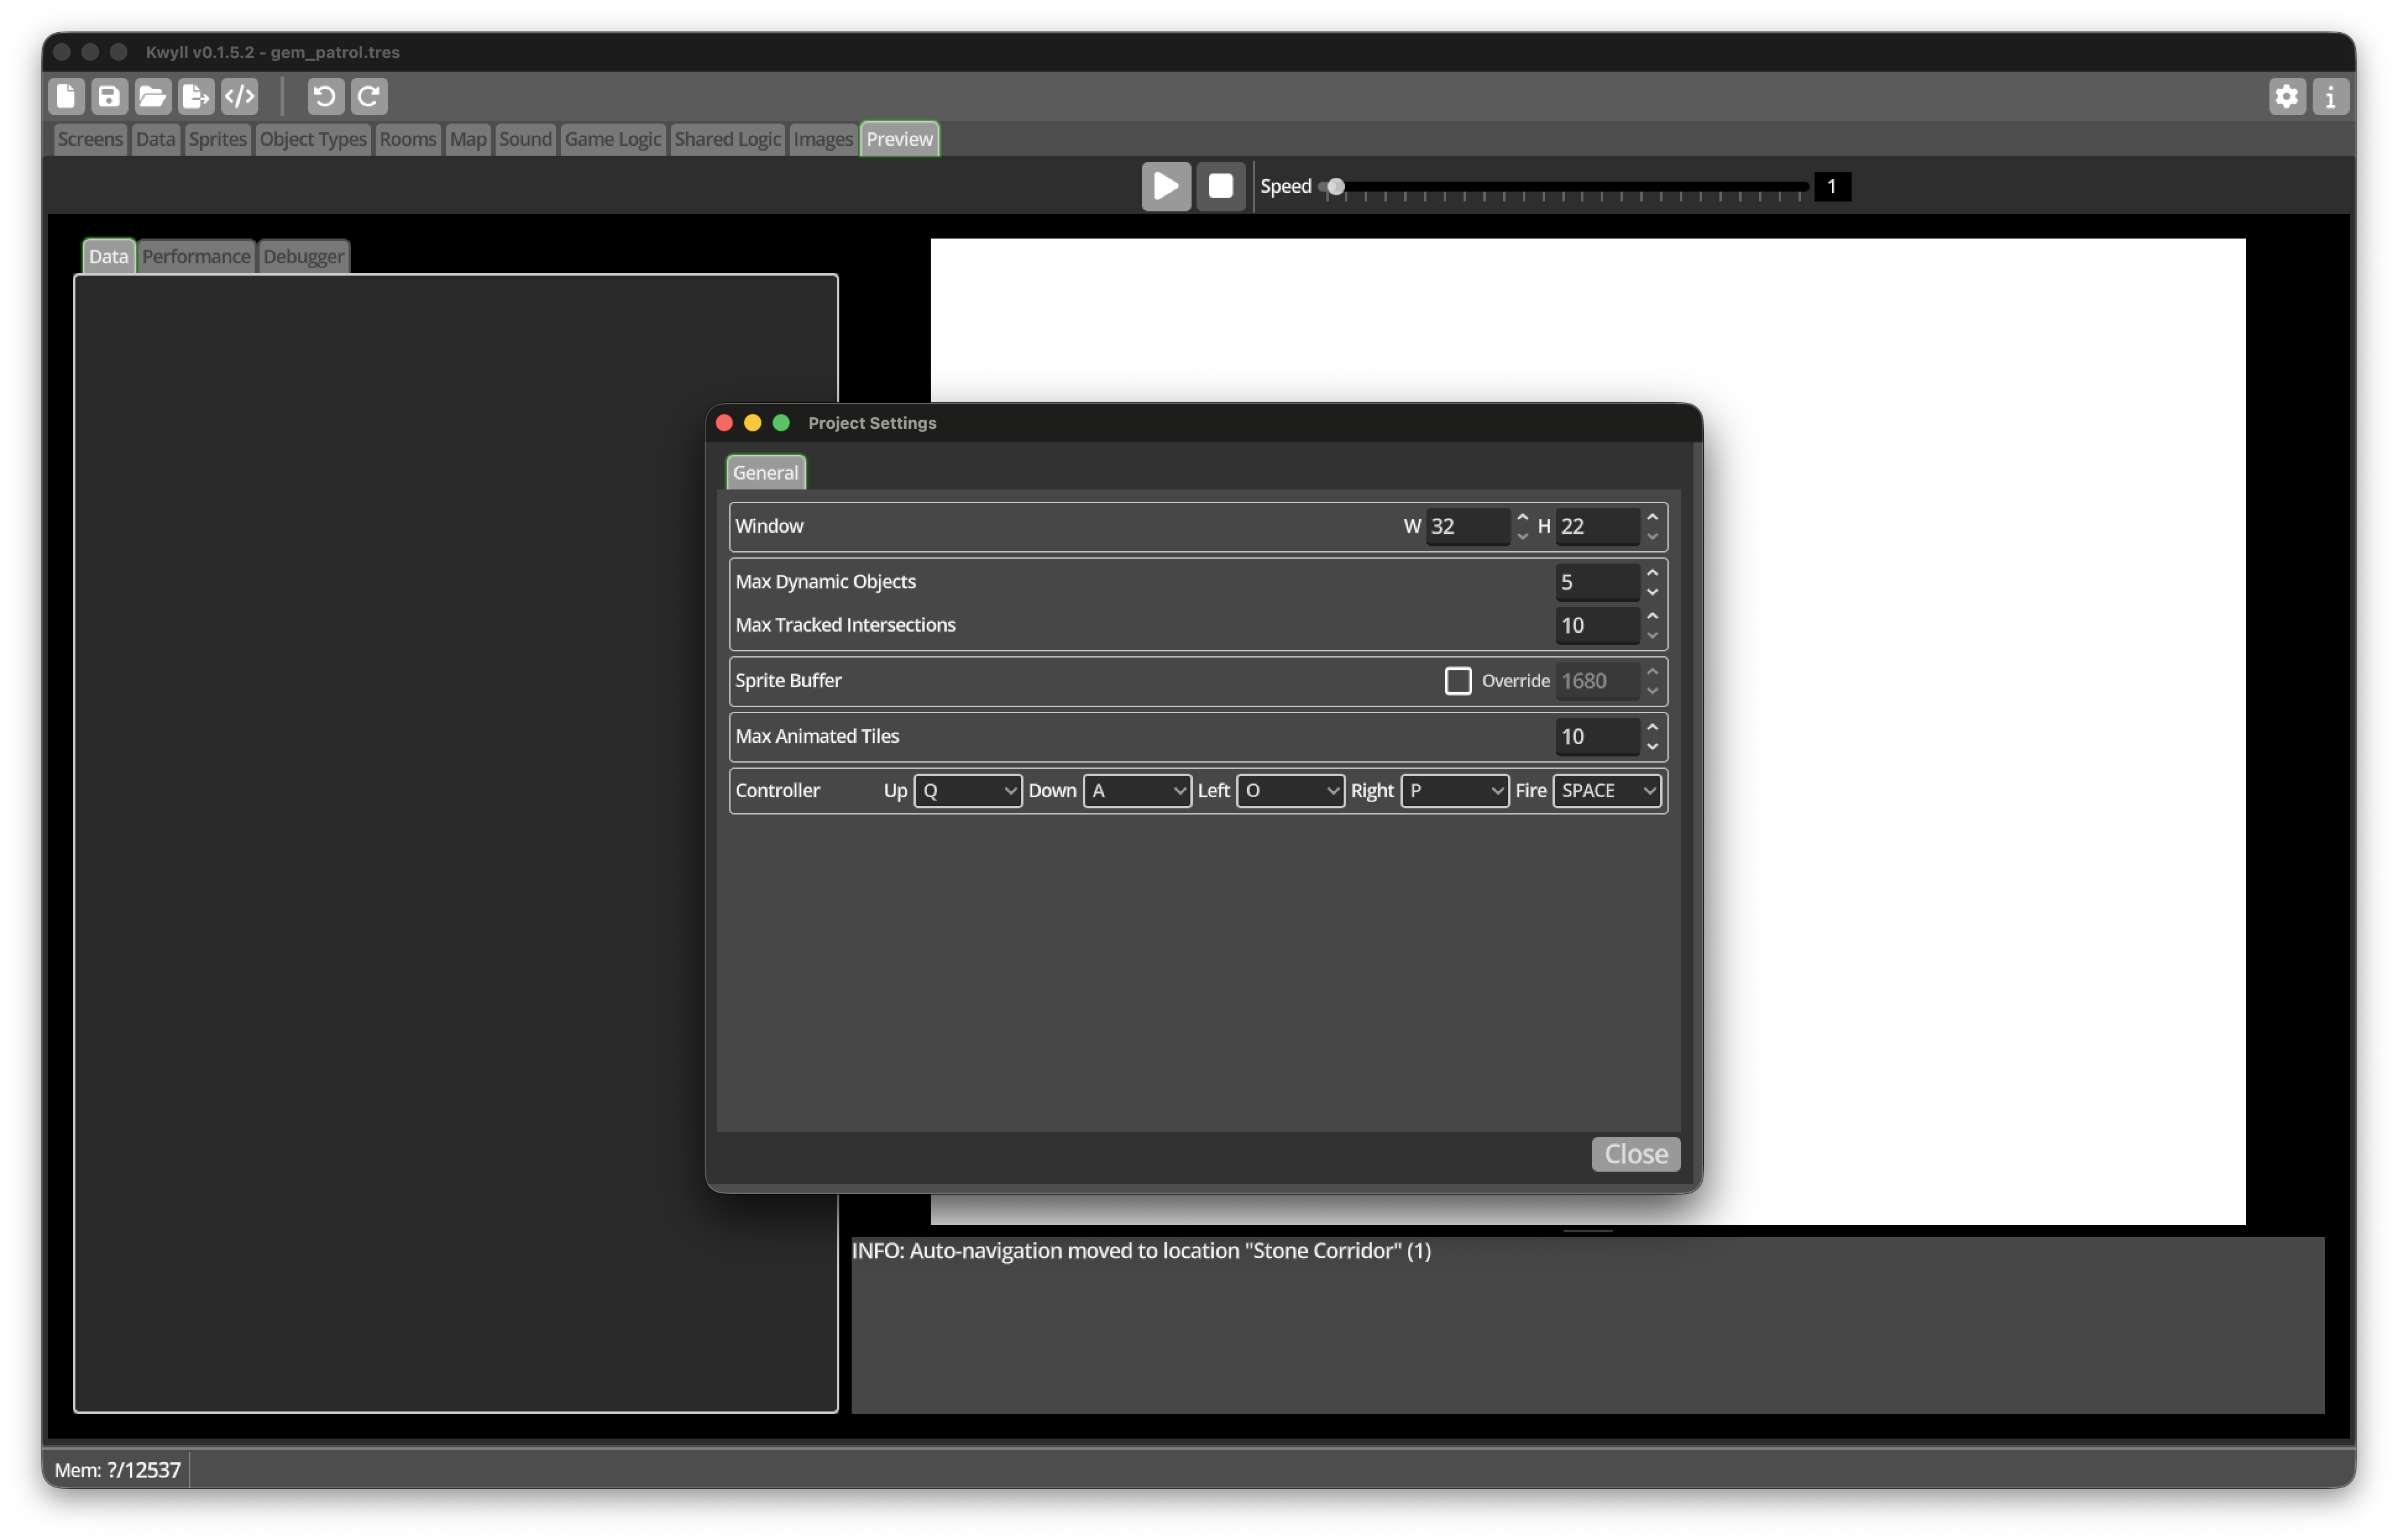
Open Project Settings using the gear icon.
-
In the General settings, set Max Dynamic Objects to
5. -
Leave Max Tracked Intersections at its default value.
-
Accept the changes.
A new project defaults Max Dynamic Objects to 0. If it remains zero, every
Spawn Object attempt follows the Fail output and no Projectile appears.
-
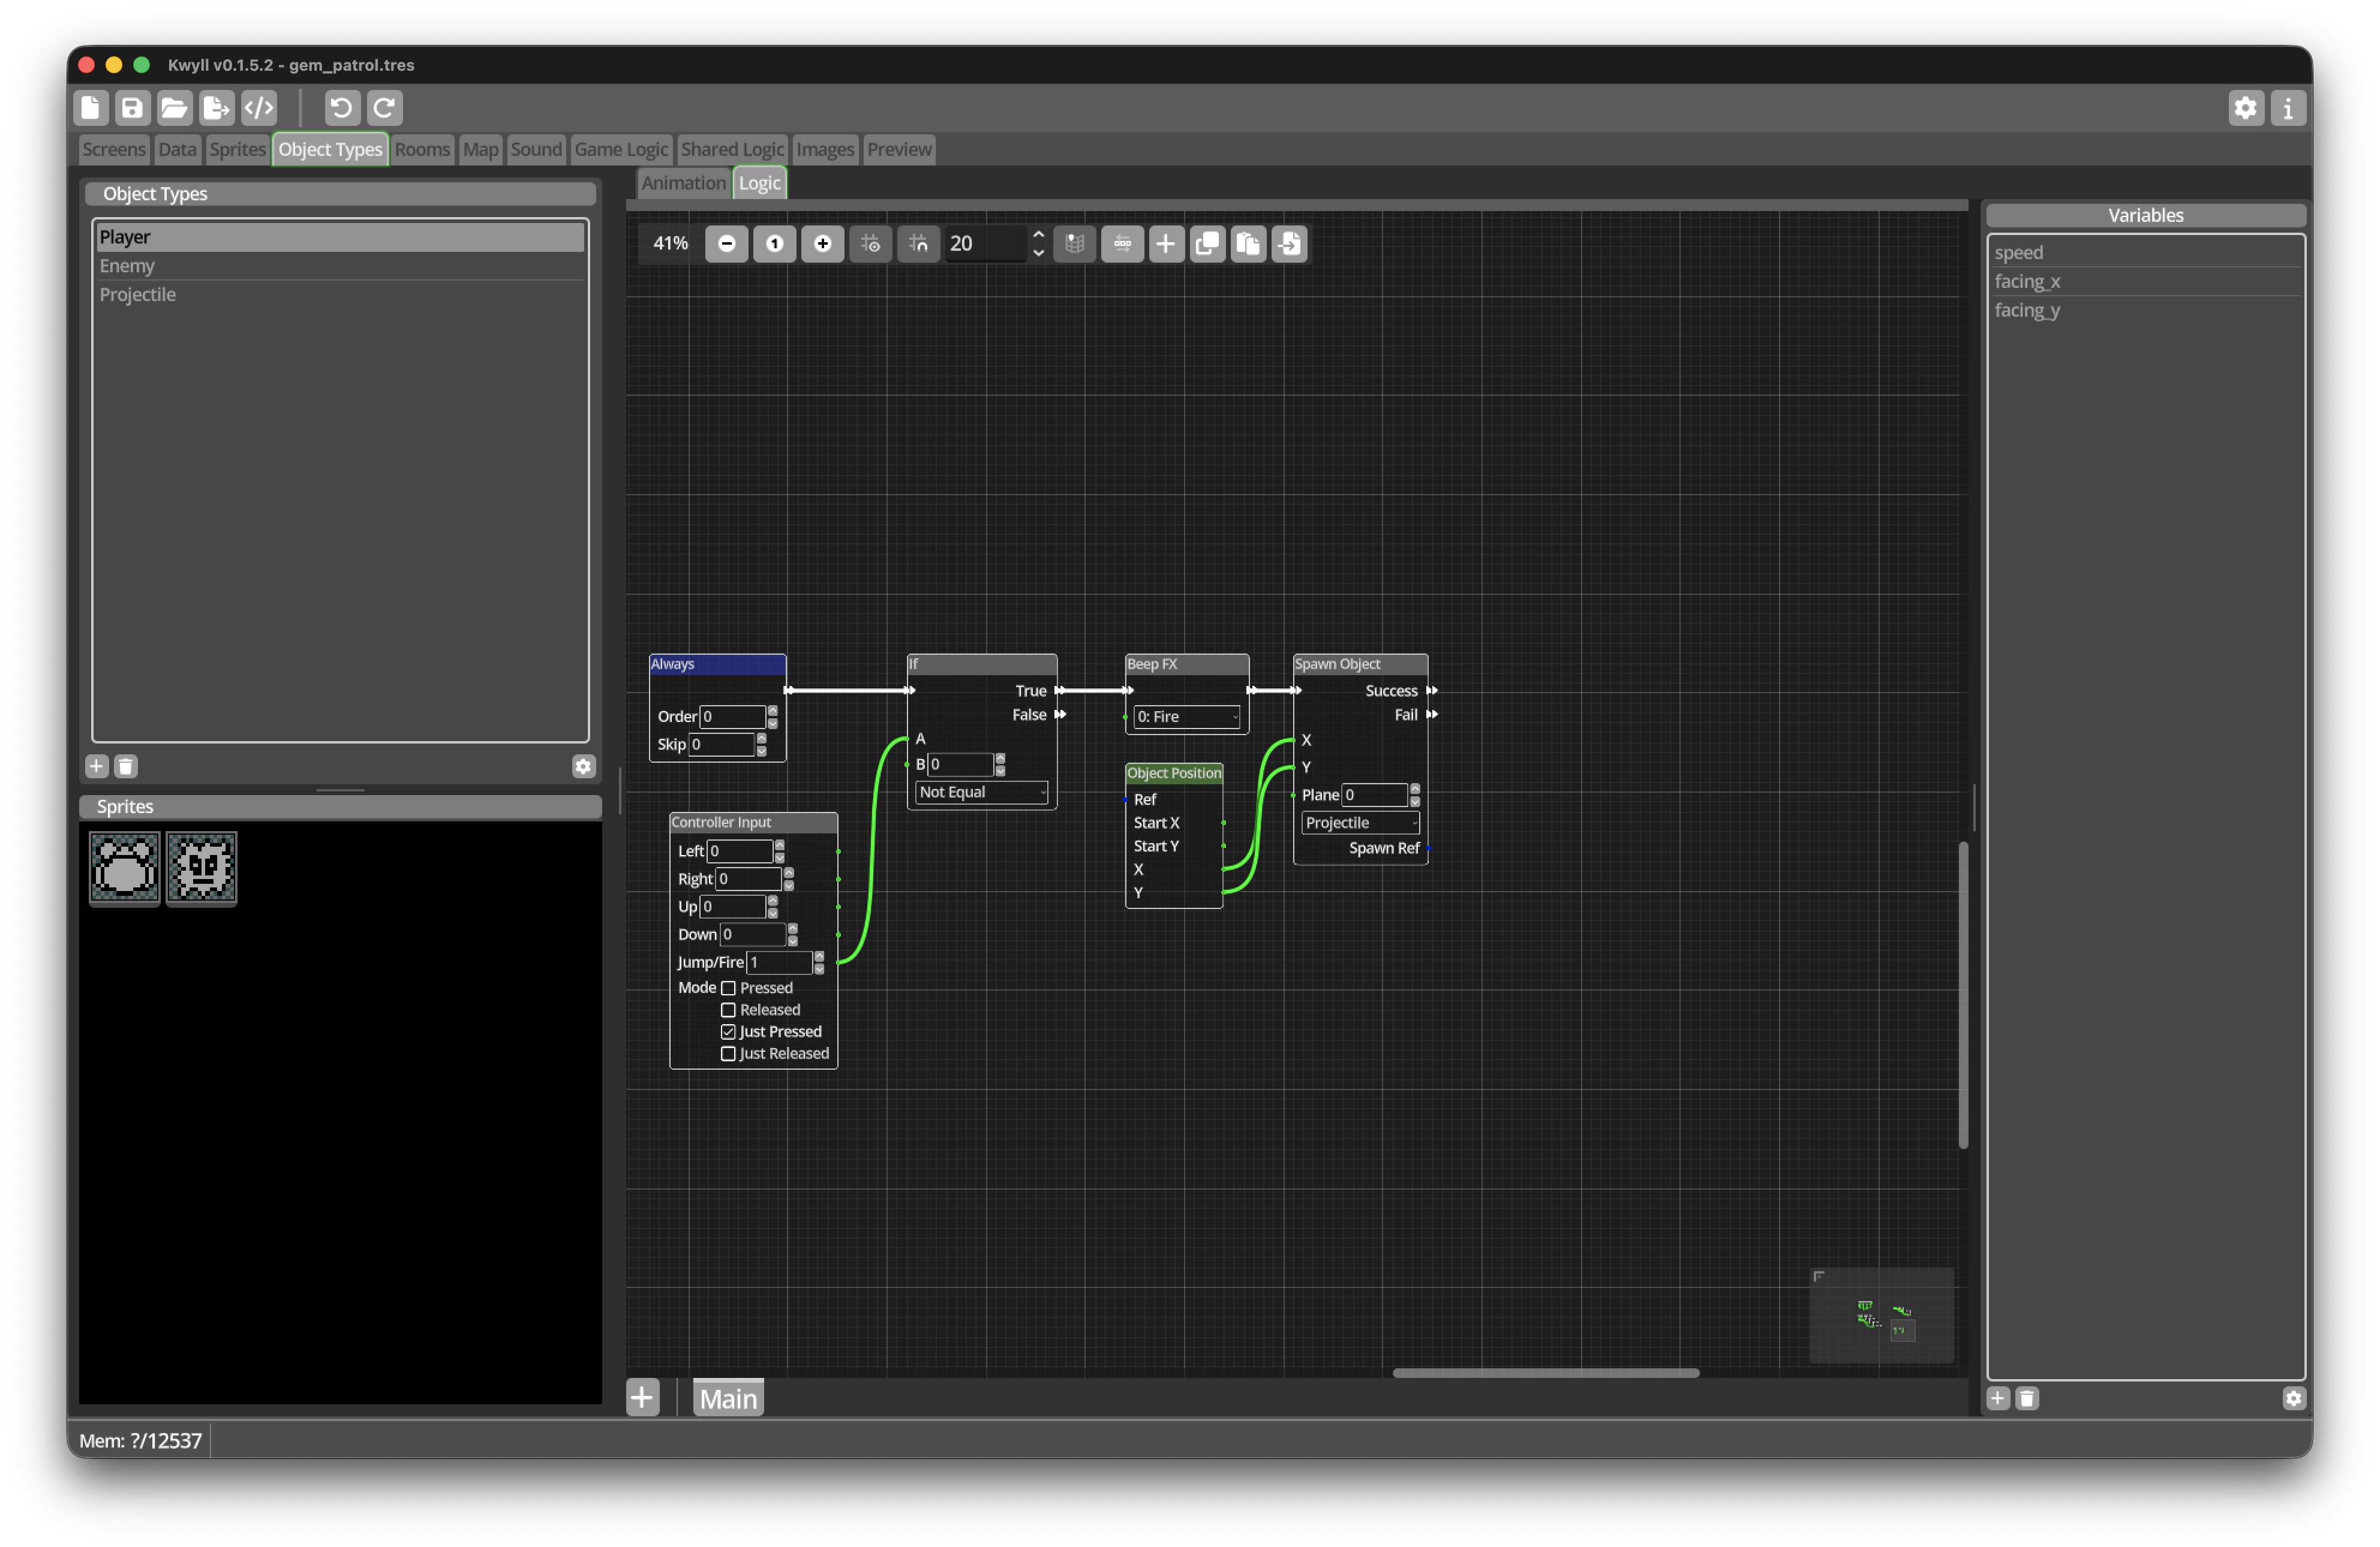
Add a
Beep FXNode and selectFire. -
Connect the True flow of the
IftoBeep FX. -
Add an
Object PositionNode. -
Add a
Spawn ObjectNode afterBeep FX. -
Select
Projectileas its Object Definition. -
Connect current X from
Object Positionto X onSpawn Object. -
Connect current Y to Y on
Spawn Object. -
Leave Plane at
0.
The Projectile begins at the Player’s map position. Because we will configure it to check only the Enemy layer, overlapping the Player at the moment of creation does not count as a hit.
Spawn Object has Success and Fail flows. The Fail flow runs if the project
has reached its Max Dynamic Objects limit. We can leave Fail unconnected in
this introductory game; a larger project could play a different sound or
reuse an existing Projectile.
Configure the spawned Object
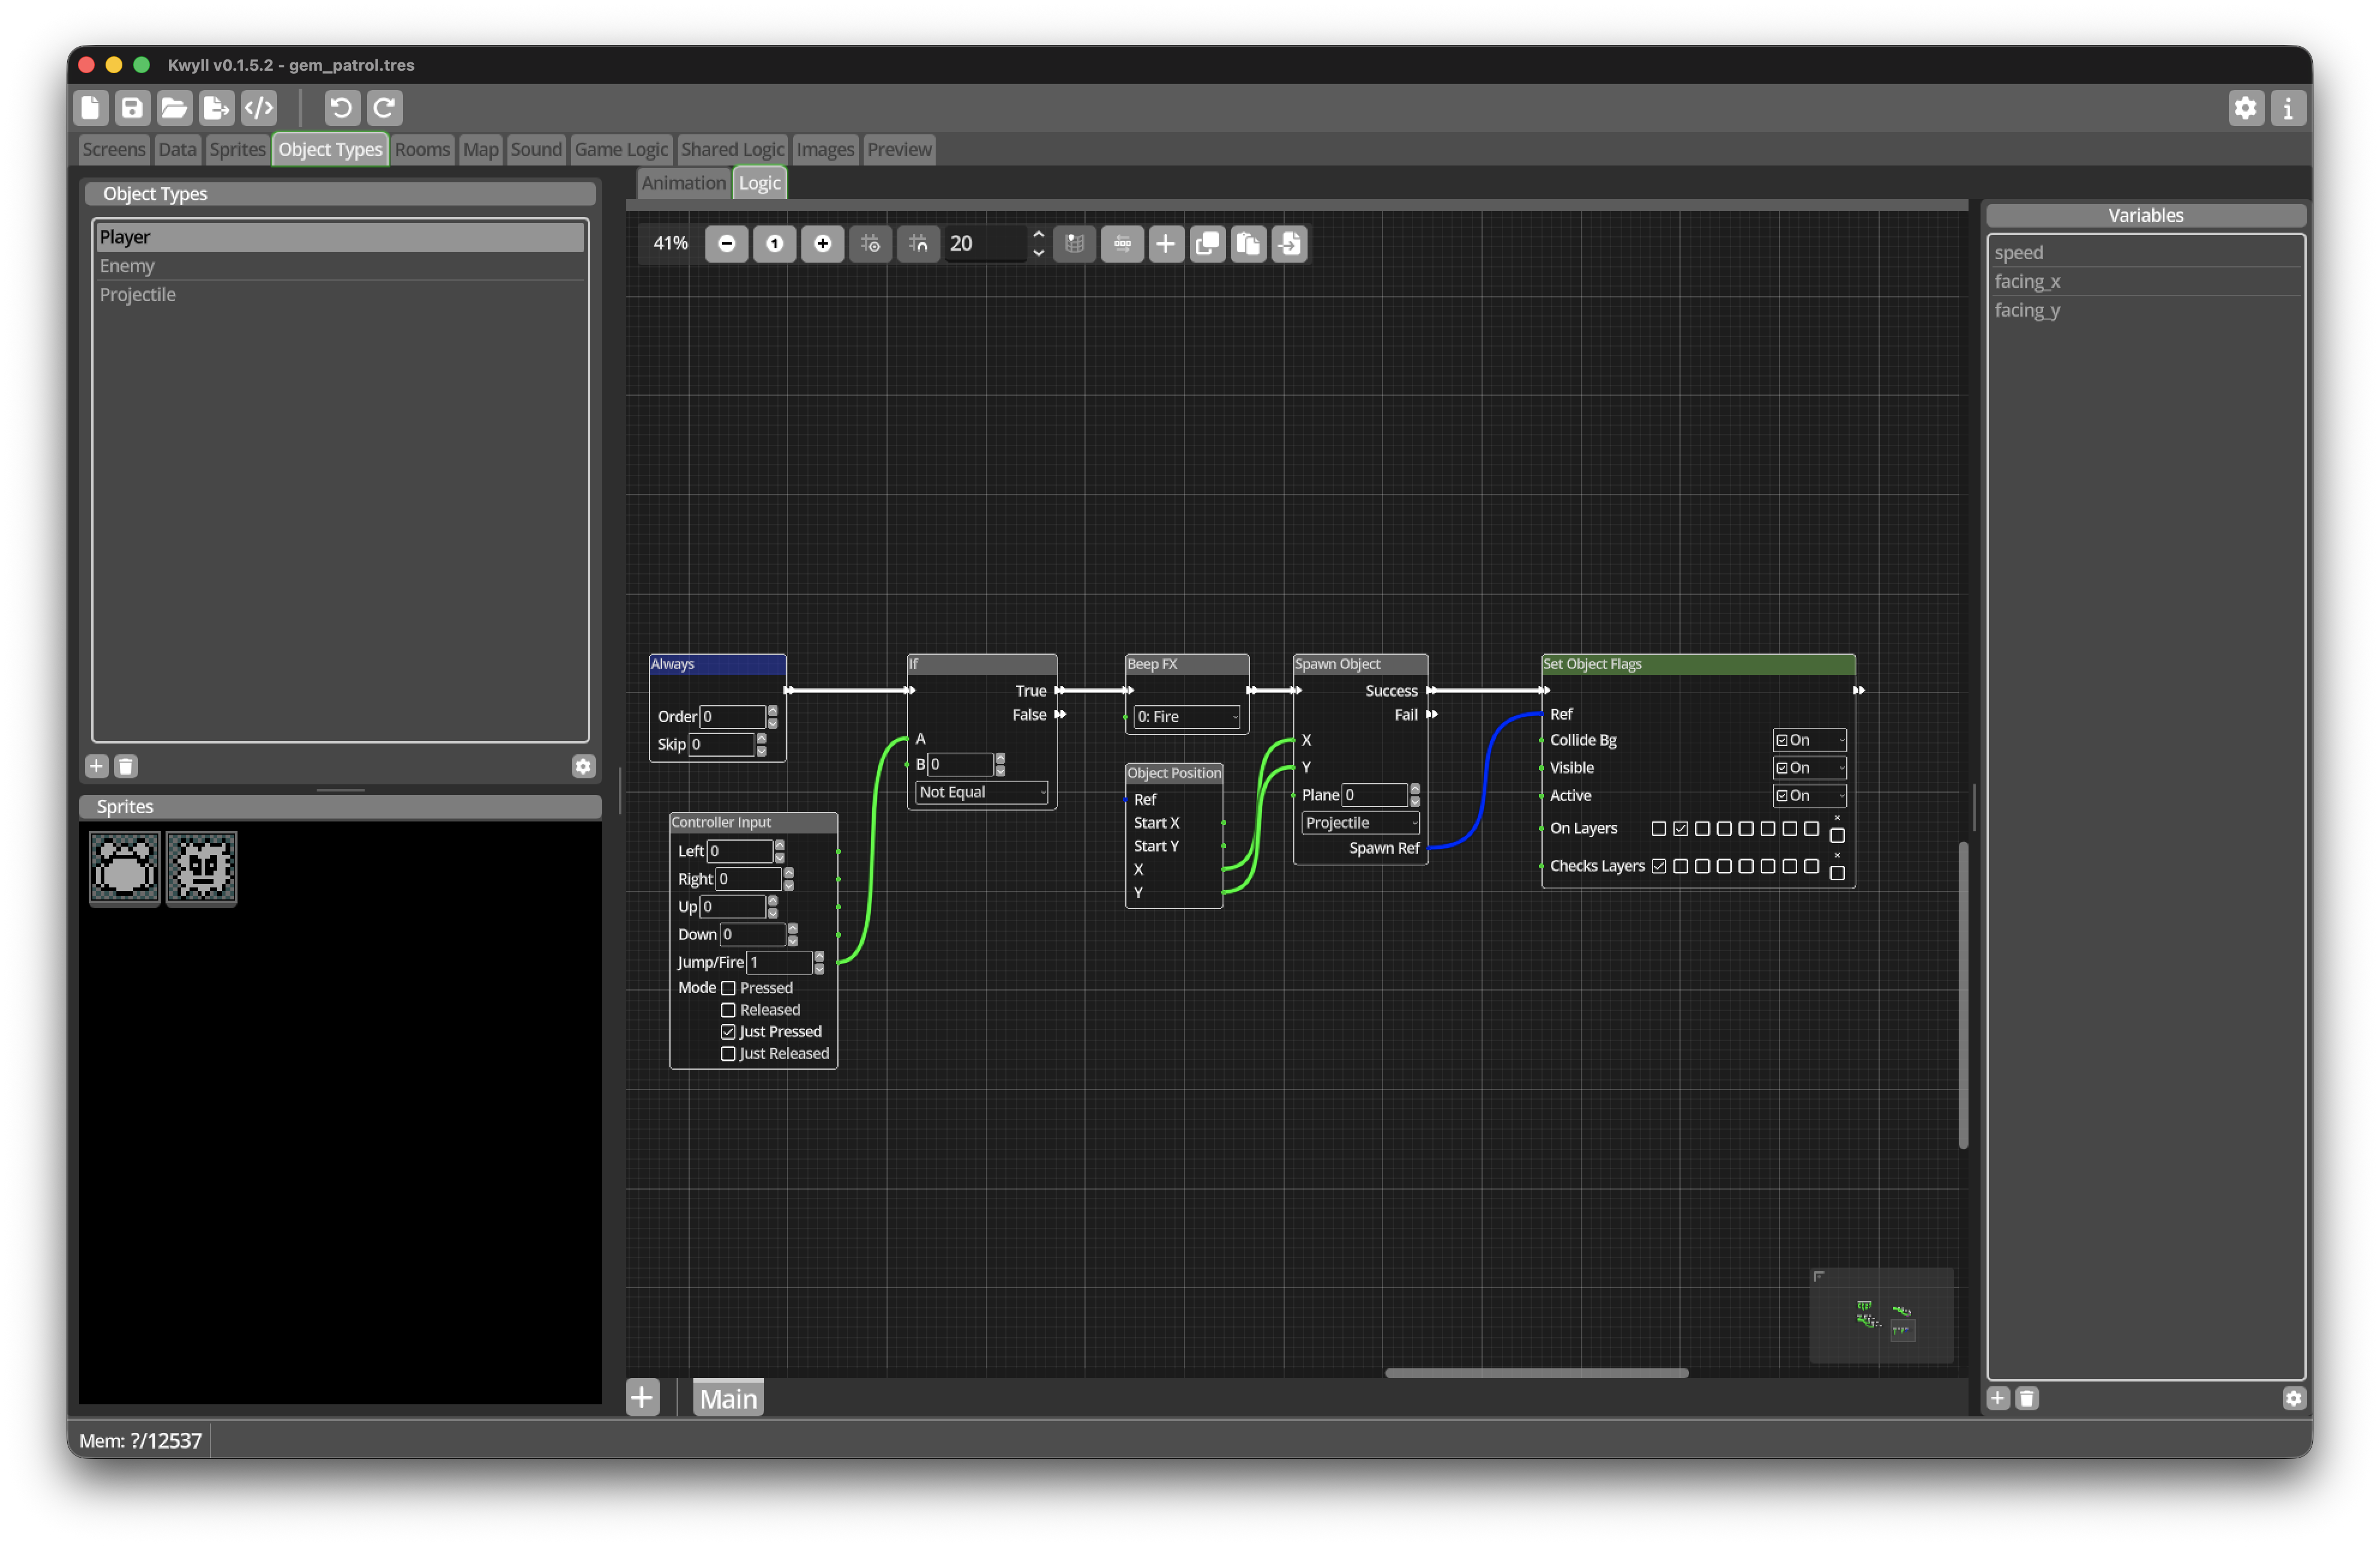
Dynamic Objects are created Visible and Active, but the Projectile also needs background collision and intersection settings.
-
Add a
Set Object FlagsNode to the Success flow ofSpawn Object. -
Connect Spawn Ref to Ref on
Set Object Flags. -
Set Collide Bg to On.
-
Leave Visible and Active On.
-
Set On Layers to
2, the Projectile layer. -
Set Checks Layers to
1, the Enemy layer.
Use the three-state flag controls carefully: On explicitly enables a flag, Off disables it, and Leave preserves its existing value.
Send the facing values
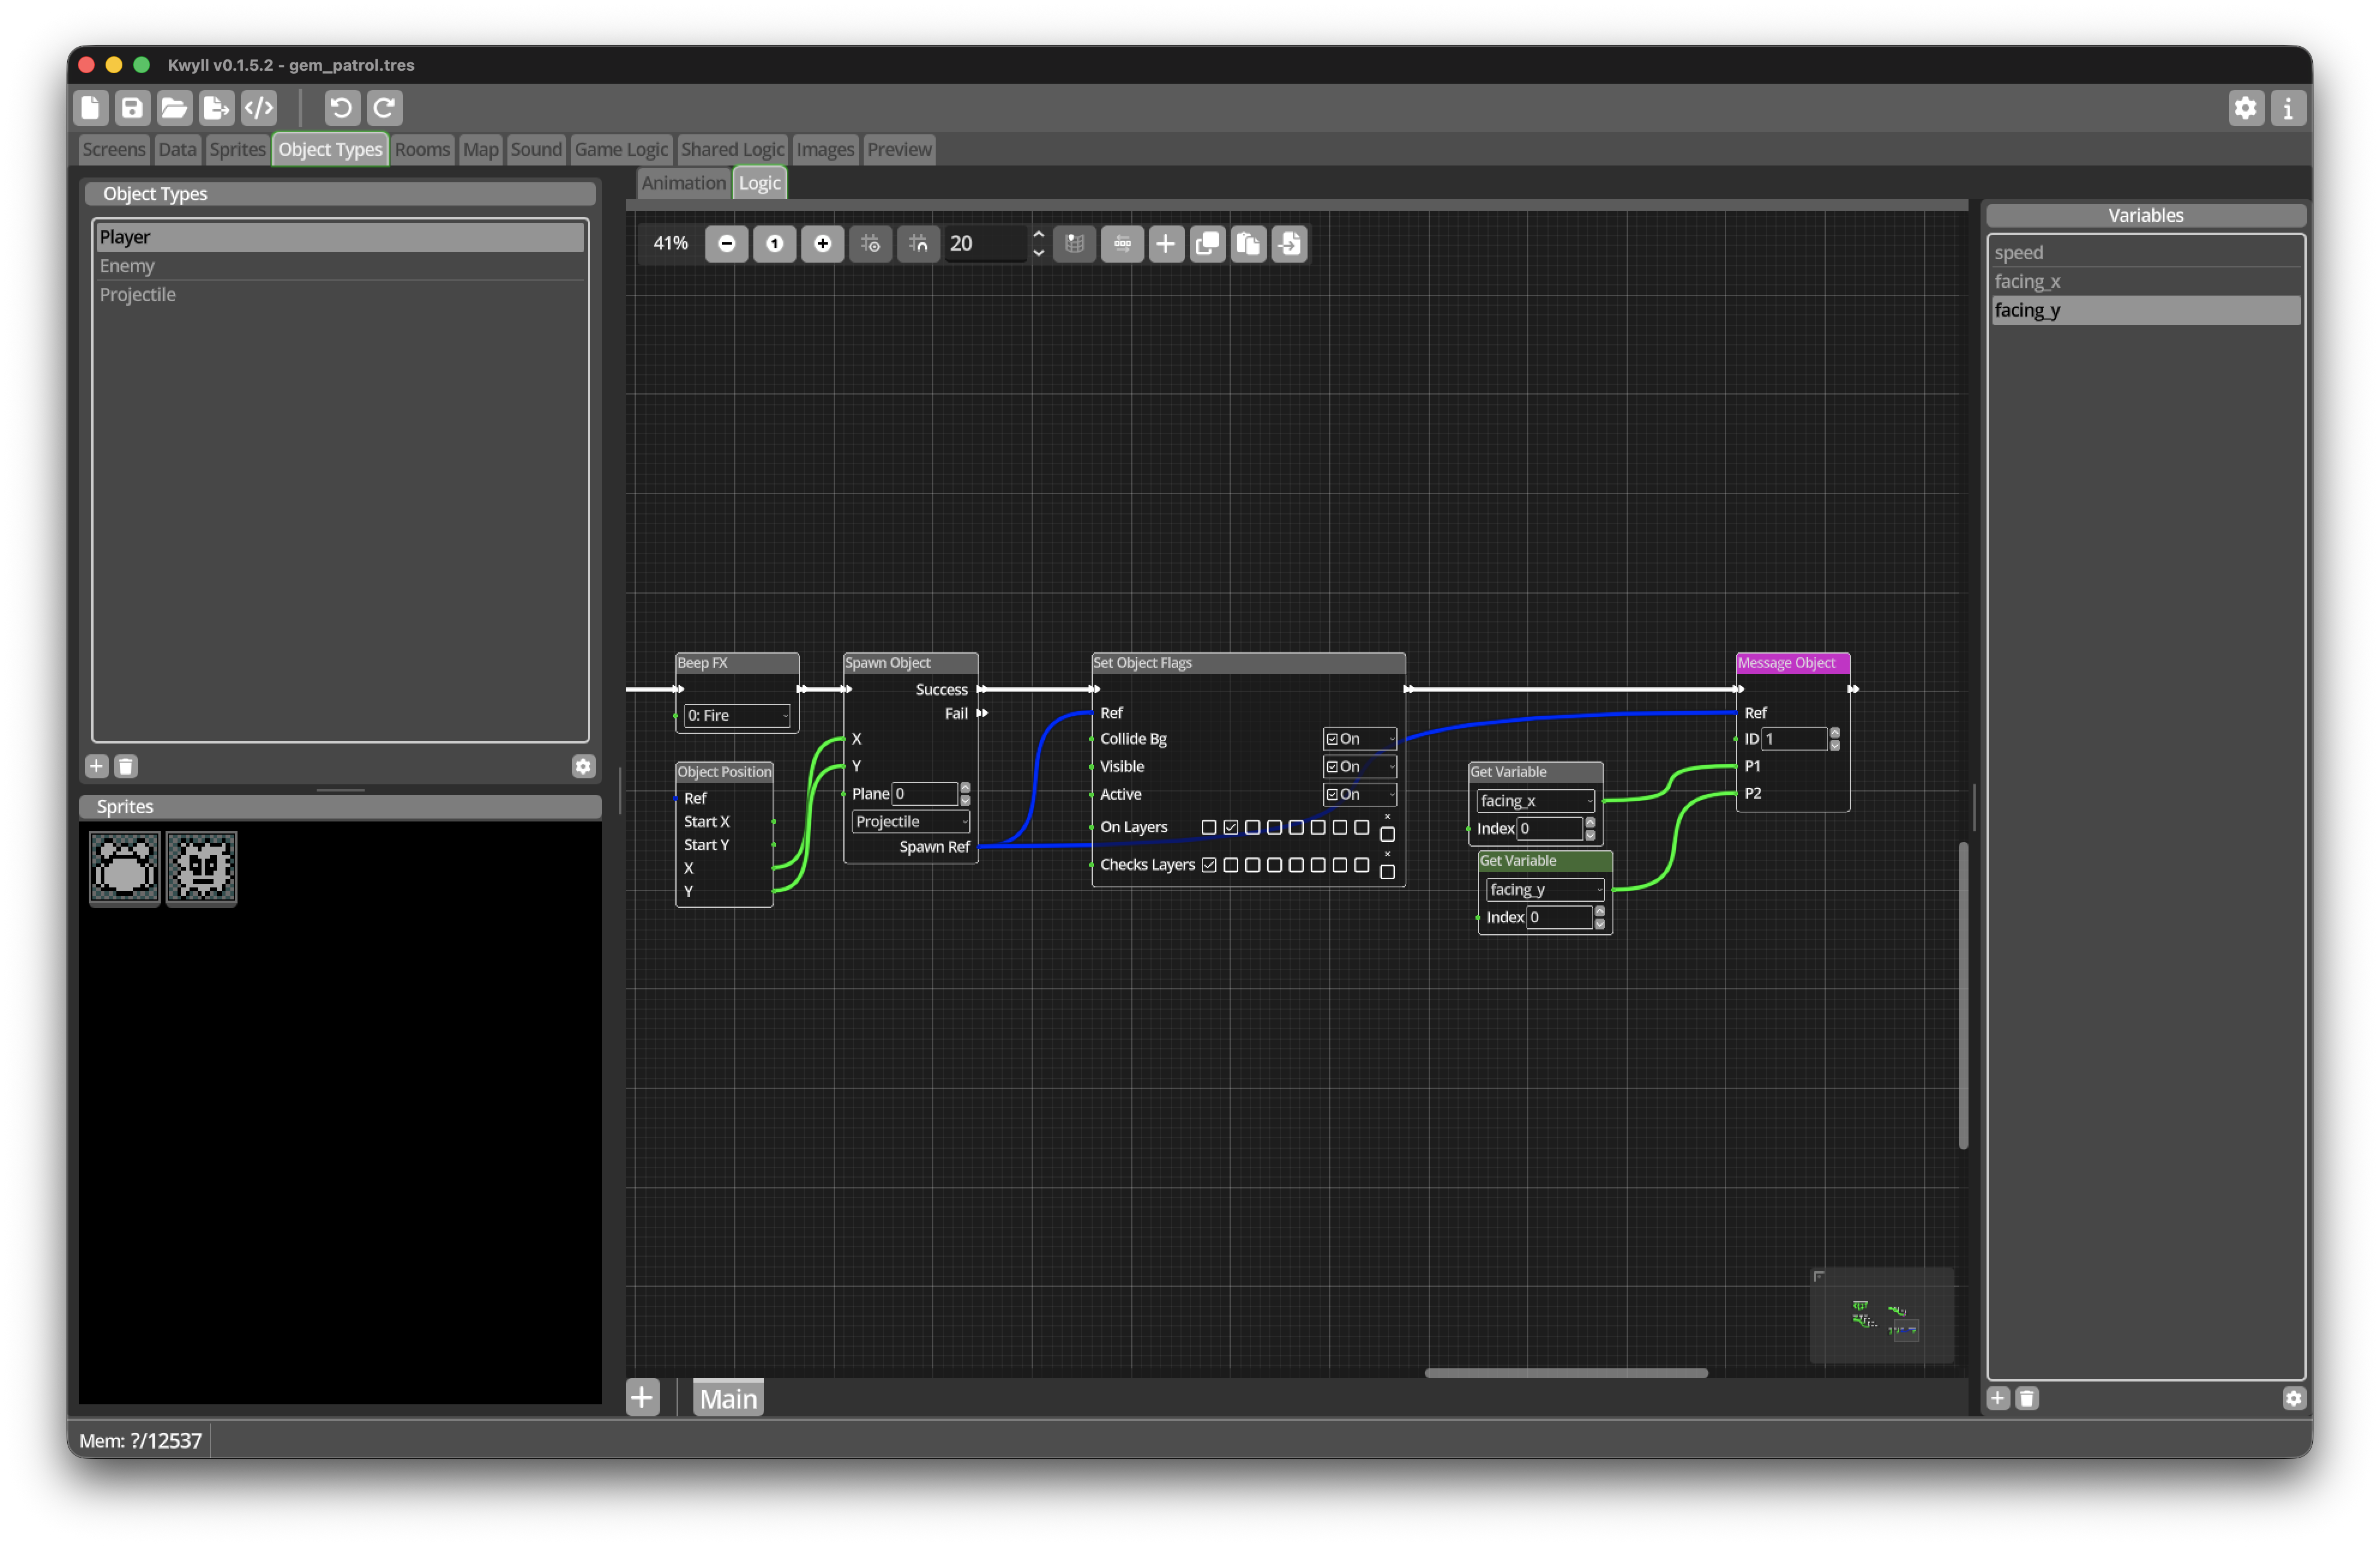
-
Add a
Message ObjectNode afterSet Object Flags. -
Connect Spawn Ref to its Ref input.
-
Set its ID to
1. -
Add
Get VariableNodes forfacing_xandfacing_y. -
Connect
facing_xto P1 onMessage Object. -
Connect
facing_yto P2. -
Connect the Flow Out of
Set Object FlagstoMessage Object.
The complete success path now creates the Projectile, configures its flags and layers, and tells it which way to move.
Save and test before adding Enemy hits.
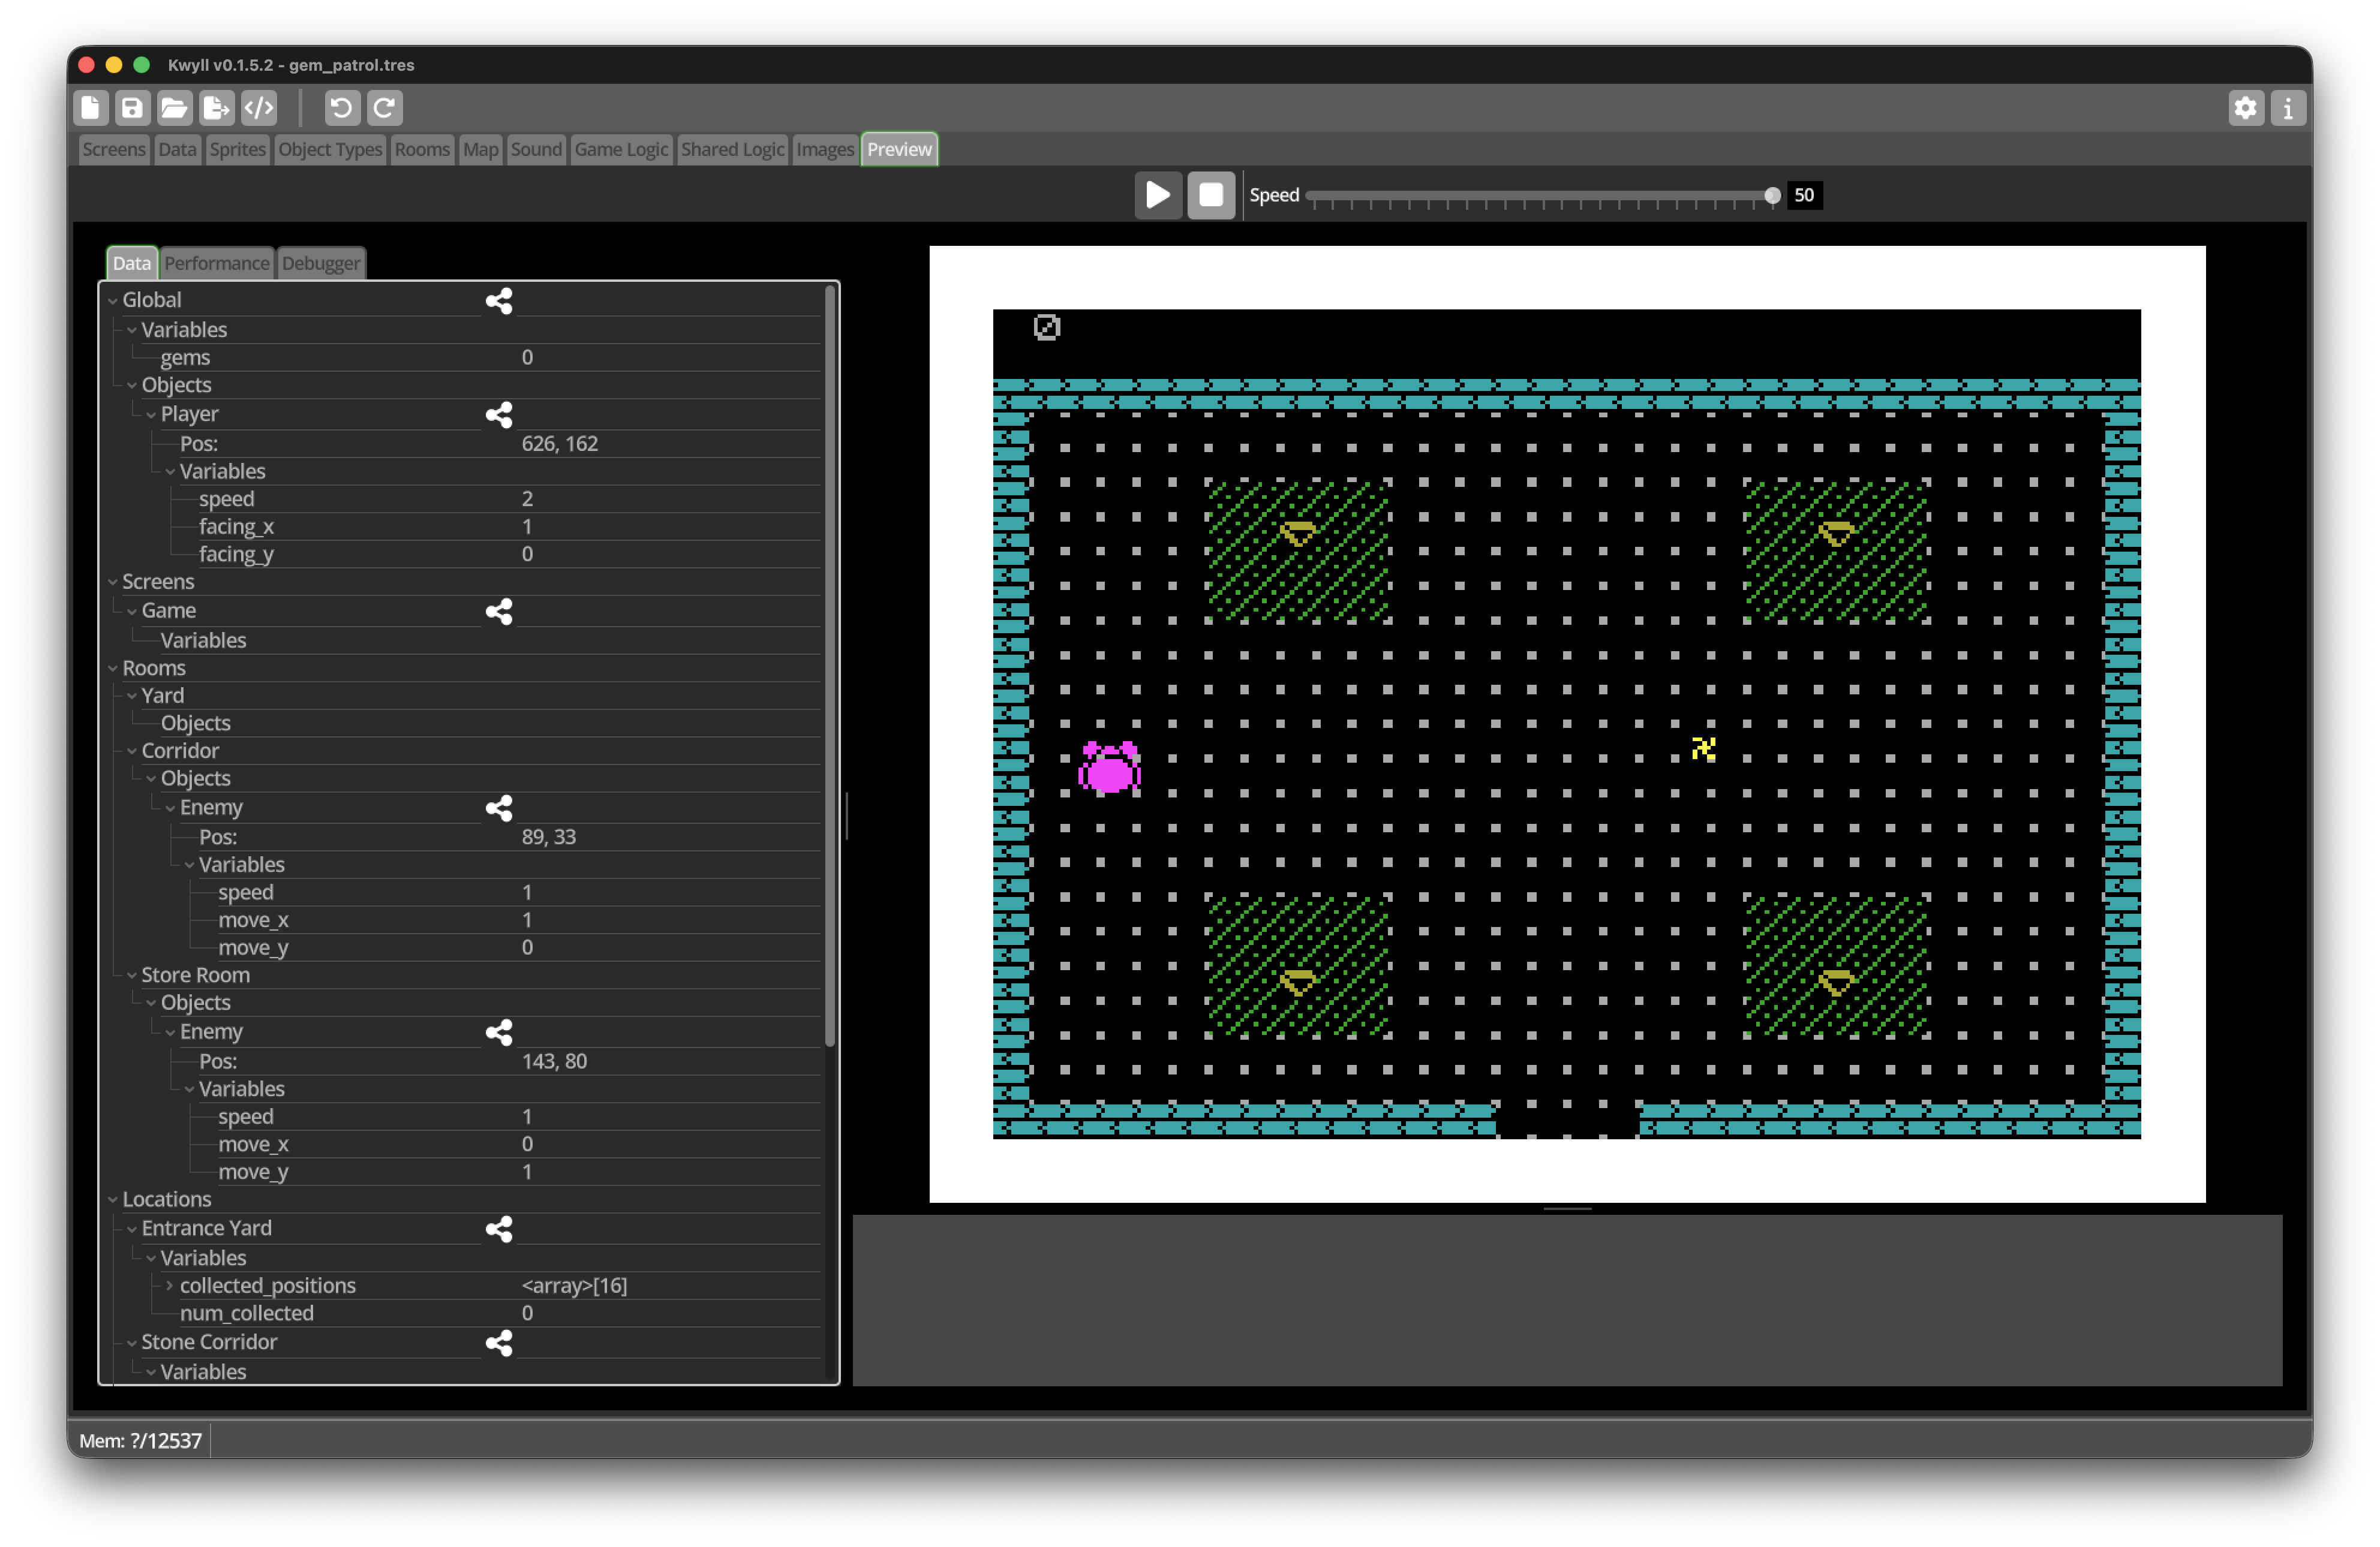
The Player should fire one Projectile per press. Test all four facing directions. Each Projectile should travel until it hits a wall or leaves through an exit, then disappear.
In Preview’s Data panel, expand Dynamic Objects while a Projectile is visible. Its direction values should match the Player’s facing values.
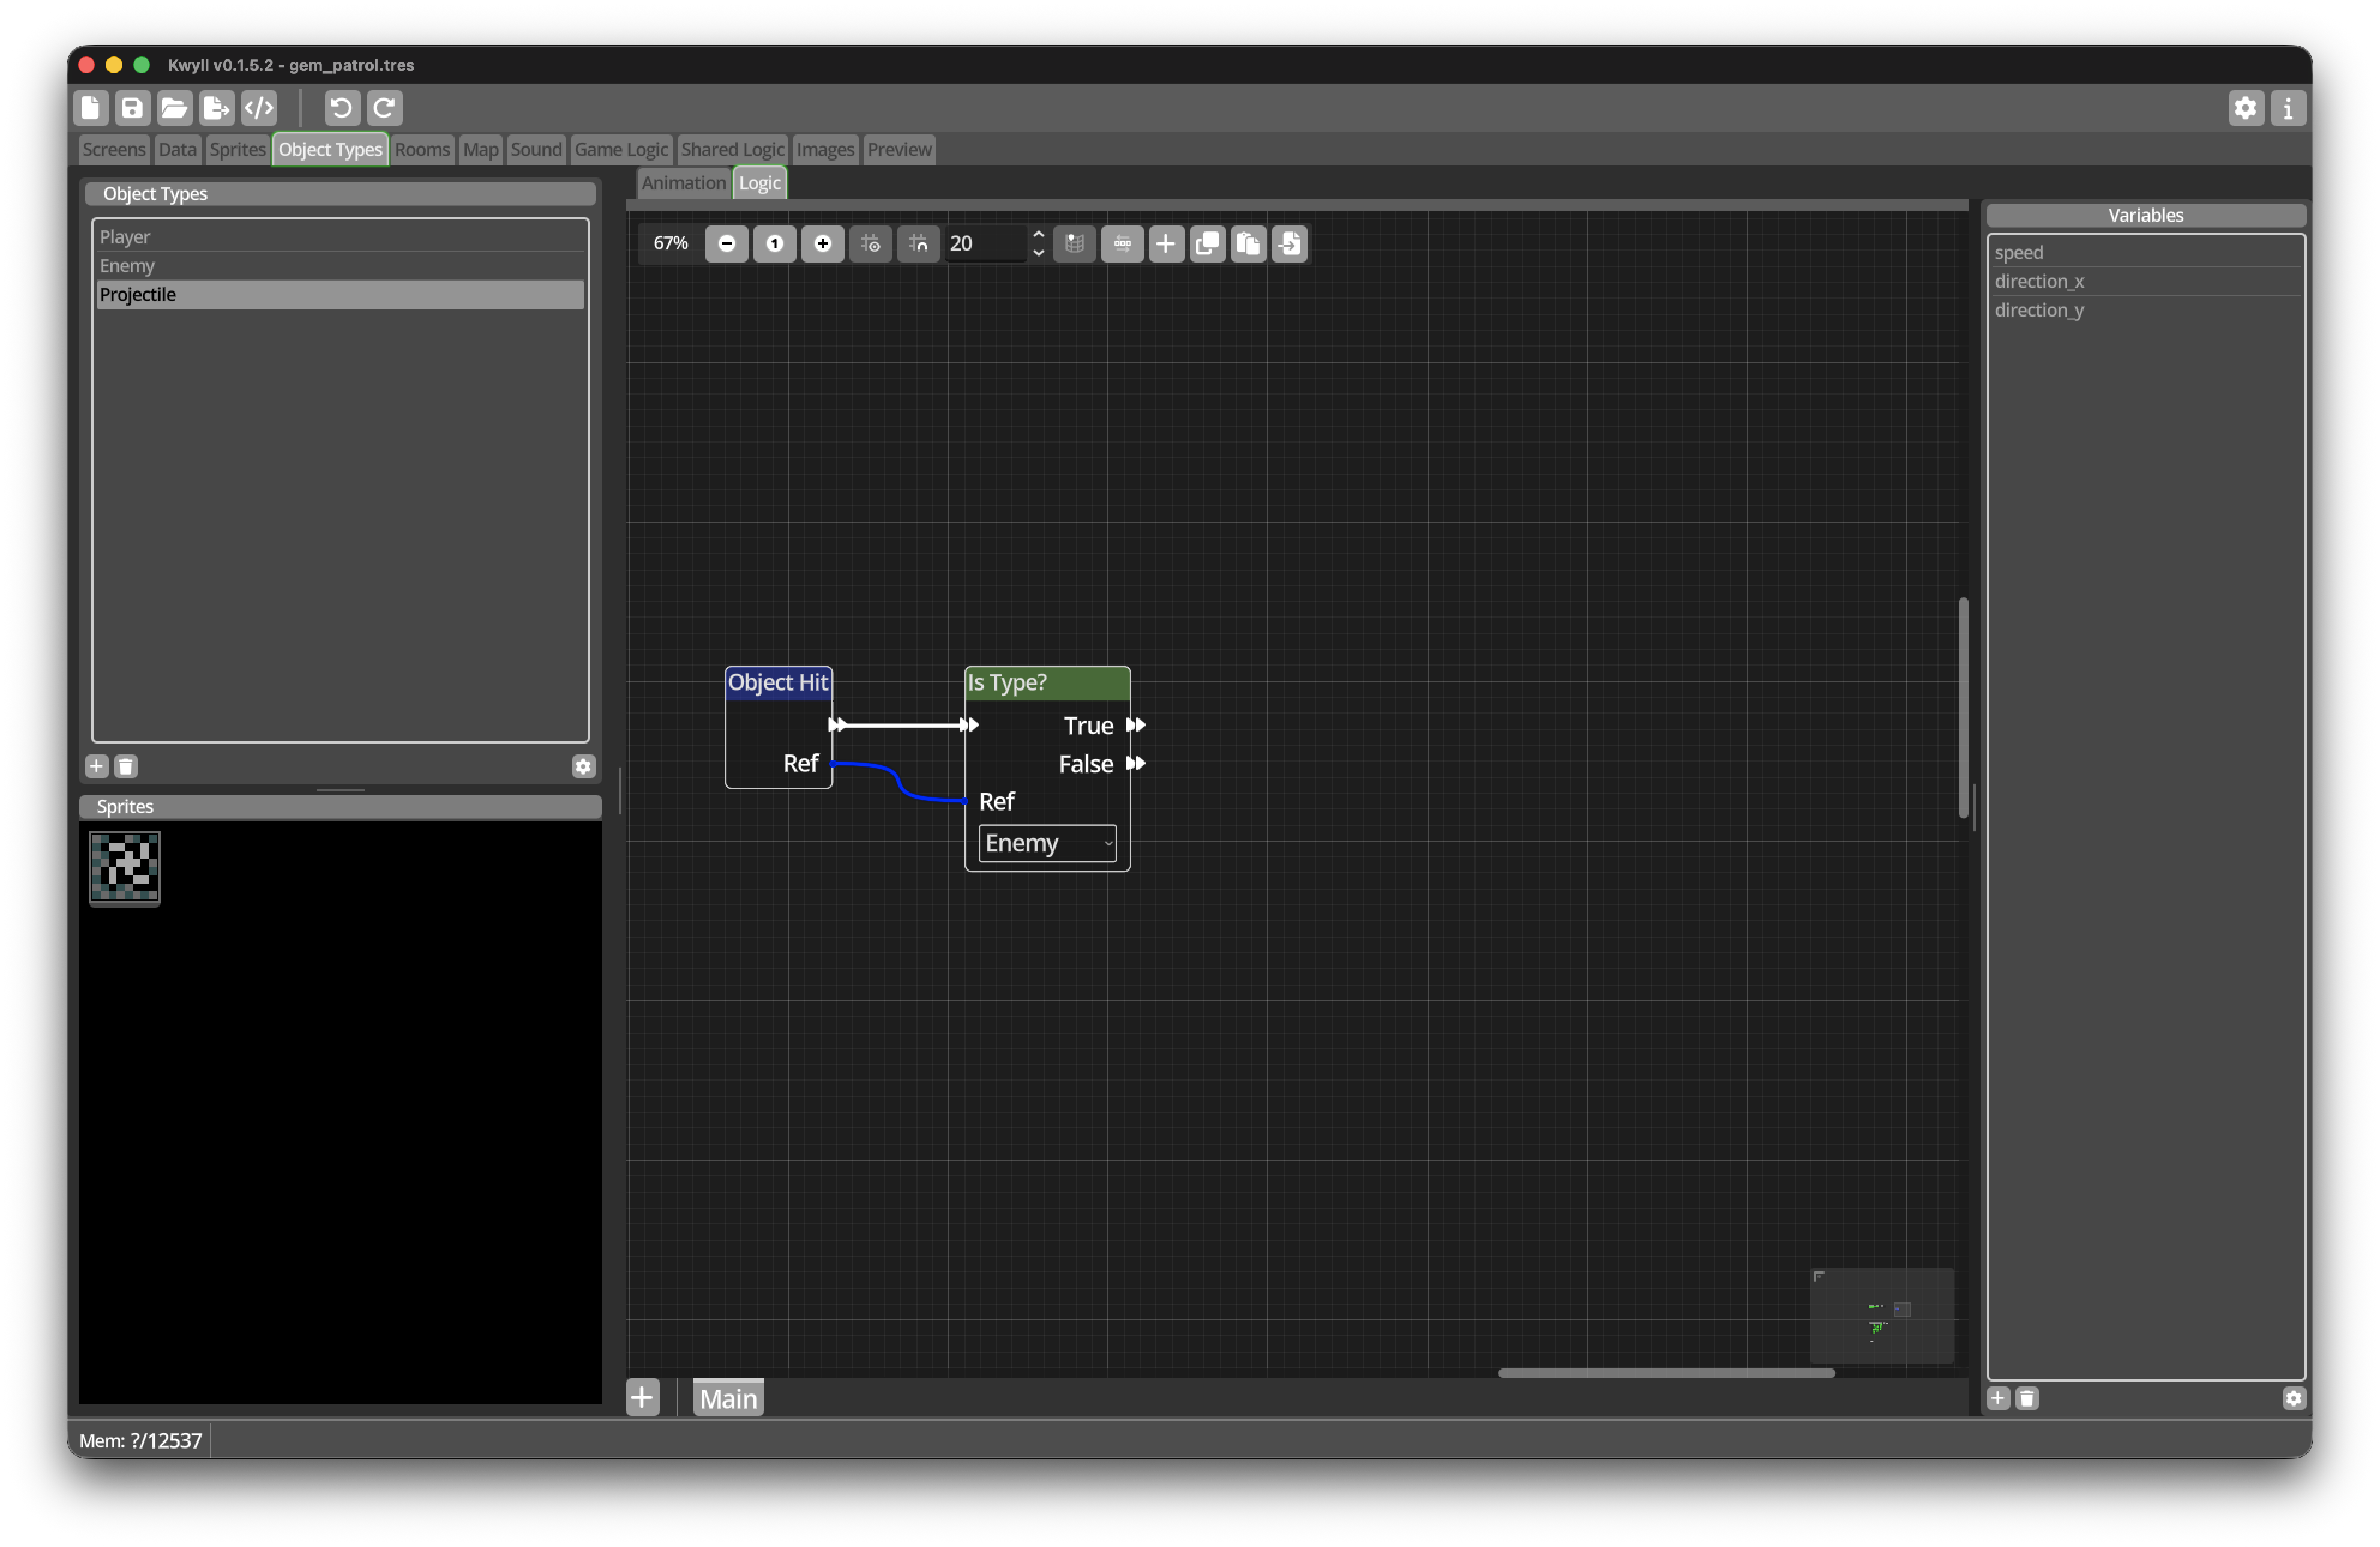
Let the Projectile recognise an Enemy
In Projectile Logic:
-
Add an
Object Hittrigger. -
Add an
Is Type?Node. -
Connect Ref from
Object Hitto Ref onIs Type?. -
Select
Enemyas the Object Definition. -
Connect the white Flow Out of
Object HittoIs Type?.
This protects the combat flow from reacting to any other Object Type that might later share an intersection layer.
Tell the Enemy it was hit
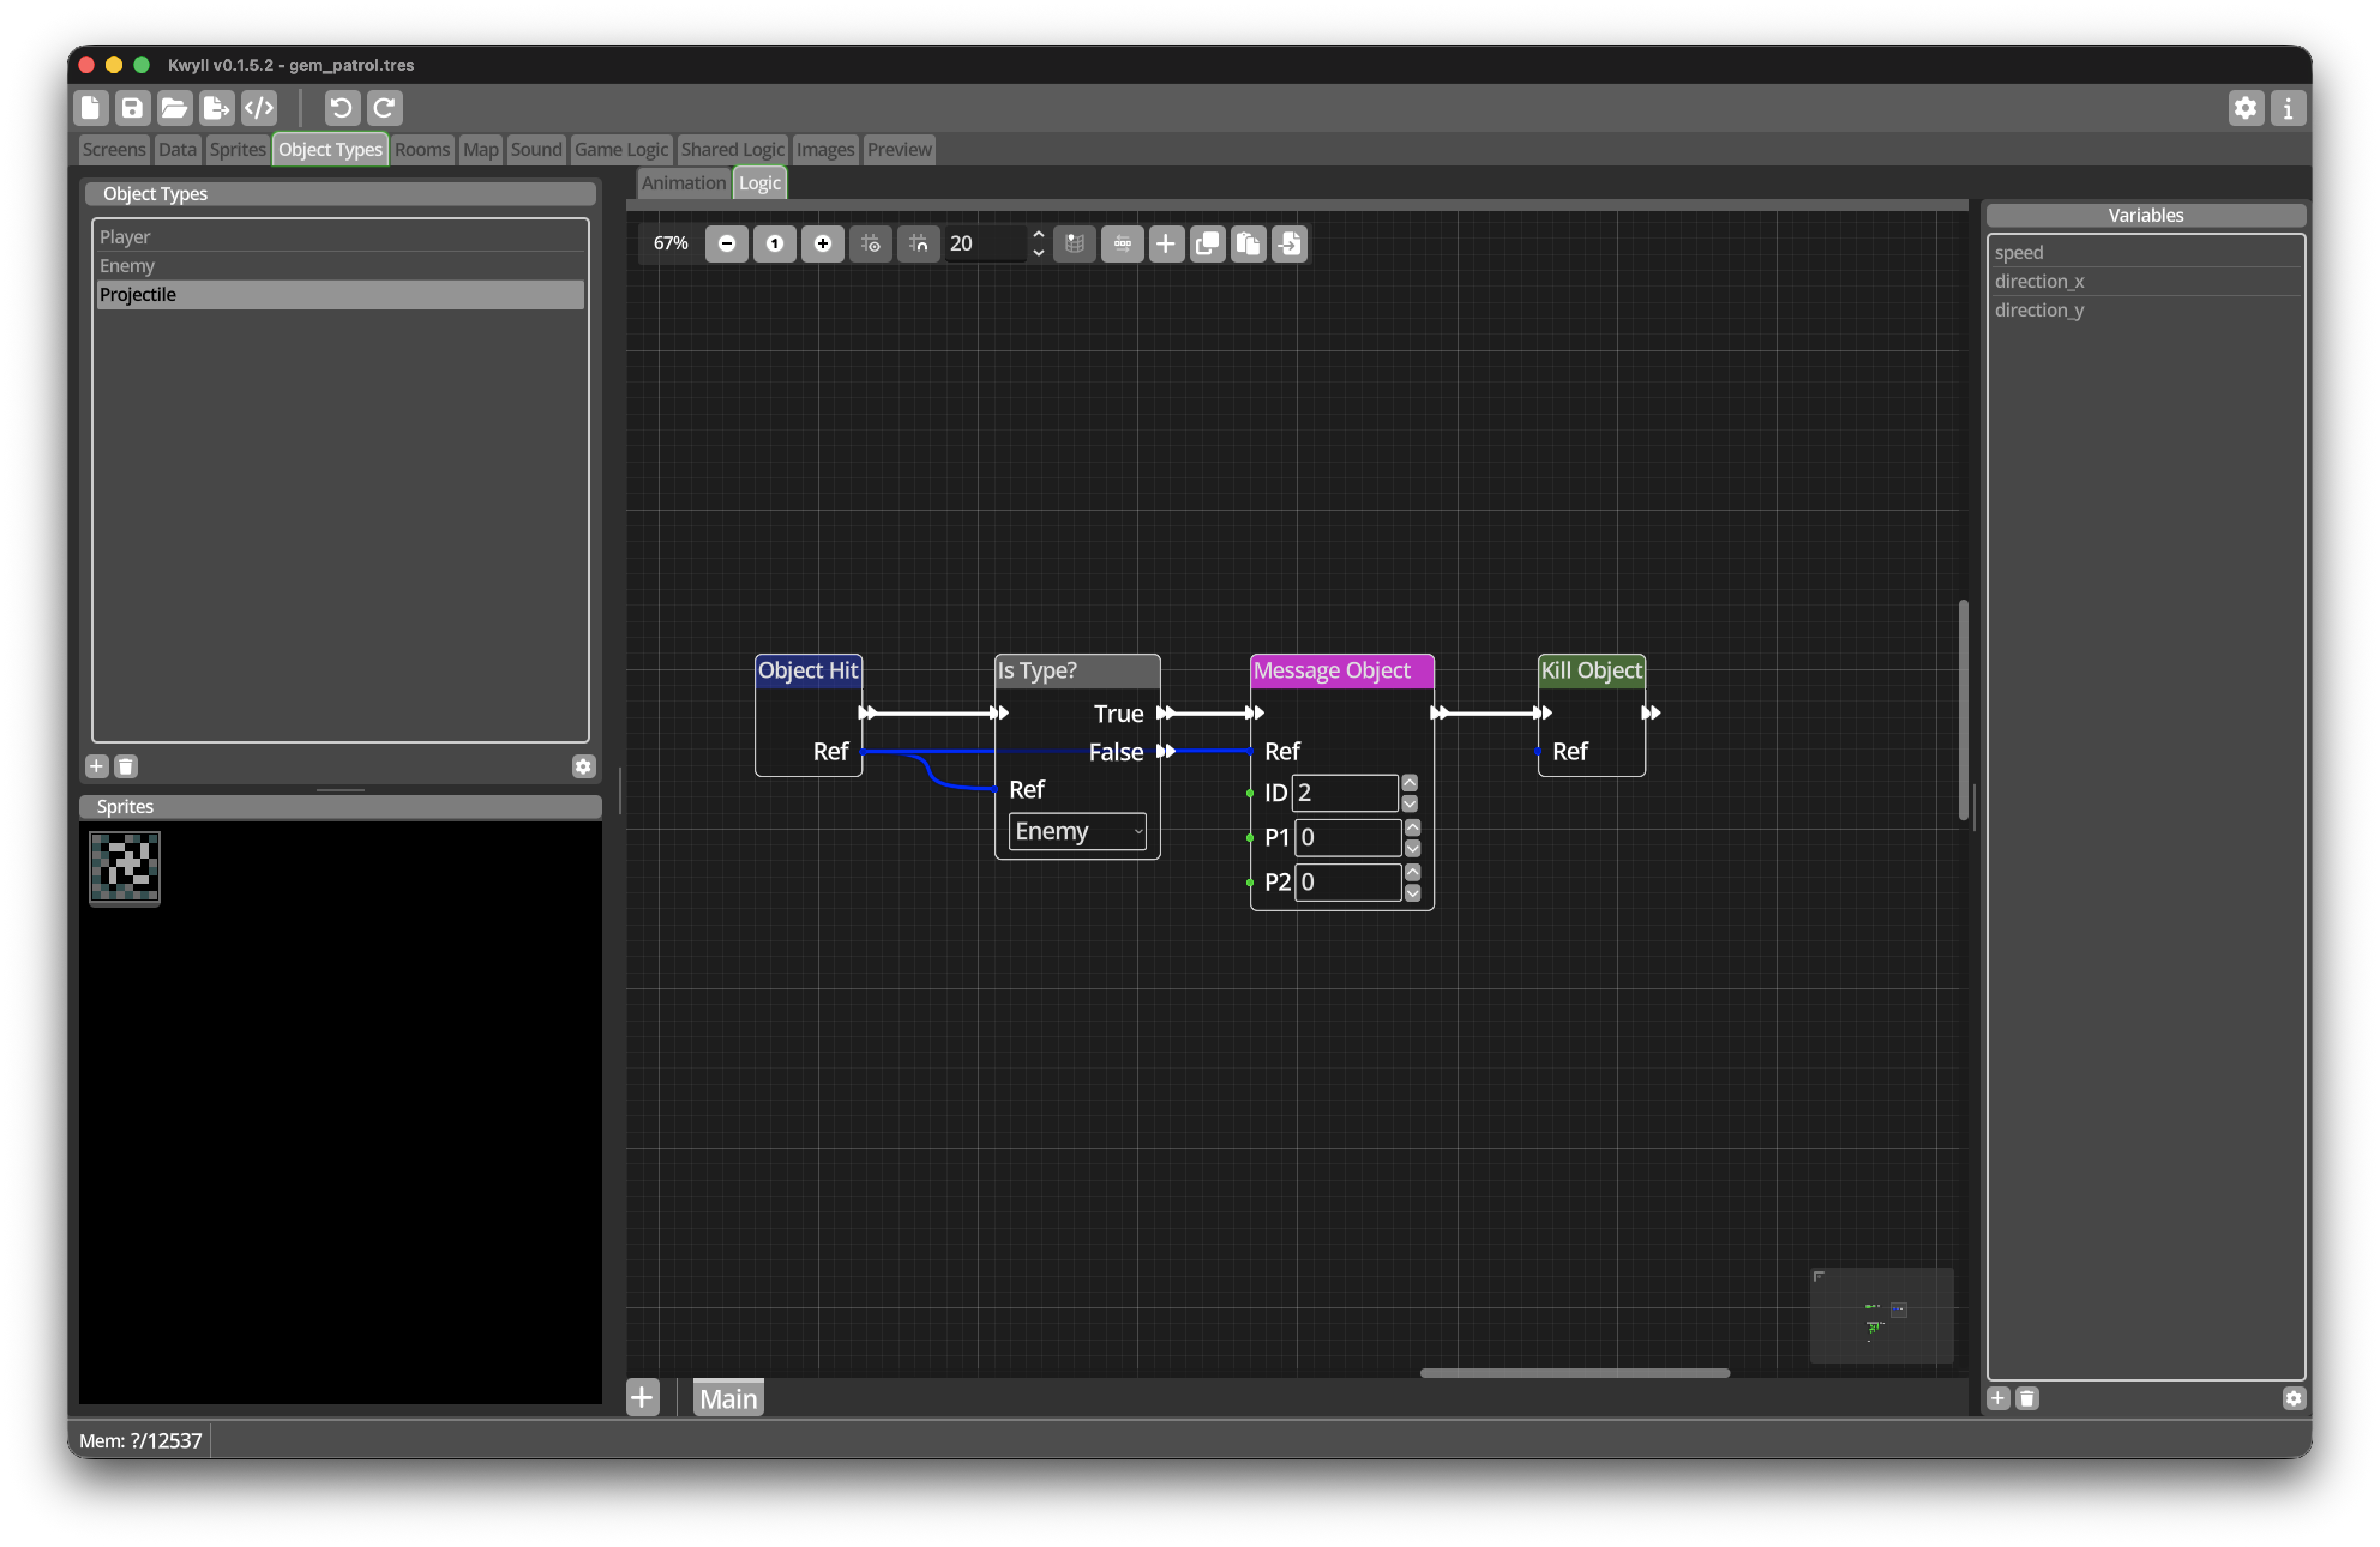
-
Add a
Message ObjectNode to the True flow ofIs Type?. -
Connect Ref from
Object Hitto Ref onMessage Object. -
Set its ID to
2. -
Add a
Kill ObjectNode afterMessage Object. -
Leave Ref unconnected so that it removes the current Projectile.
Message ID 2 means “the Enemy was hit”. The Projectile tells the Enemy
first, then removes itself.
Defeat the Enemy Room Object
Room Objects cannot be removed with Kill Object; that Node is specifically
for Dynamic Objects. Instead, the Enemy will respond to message ID 2 by
turning off the flags that make it visible and active.
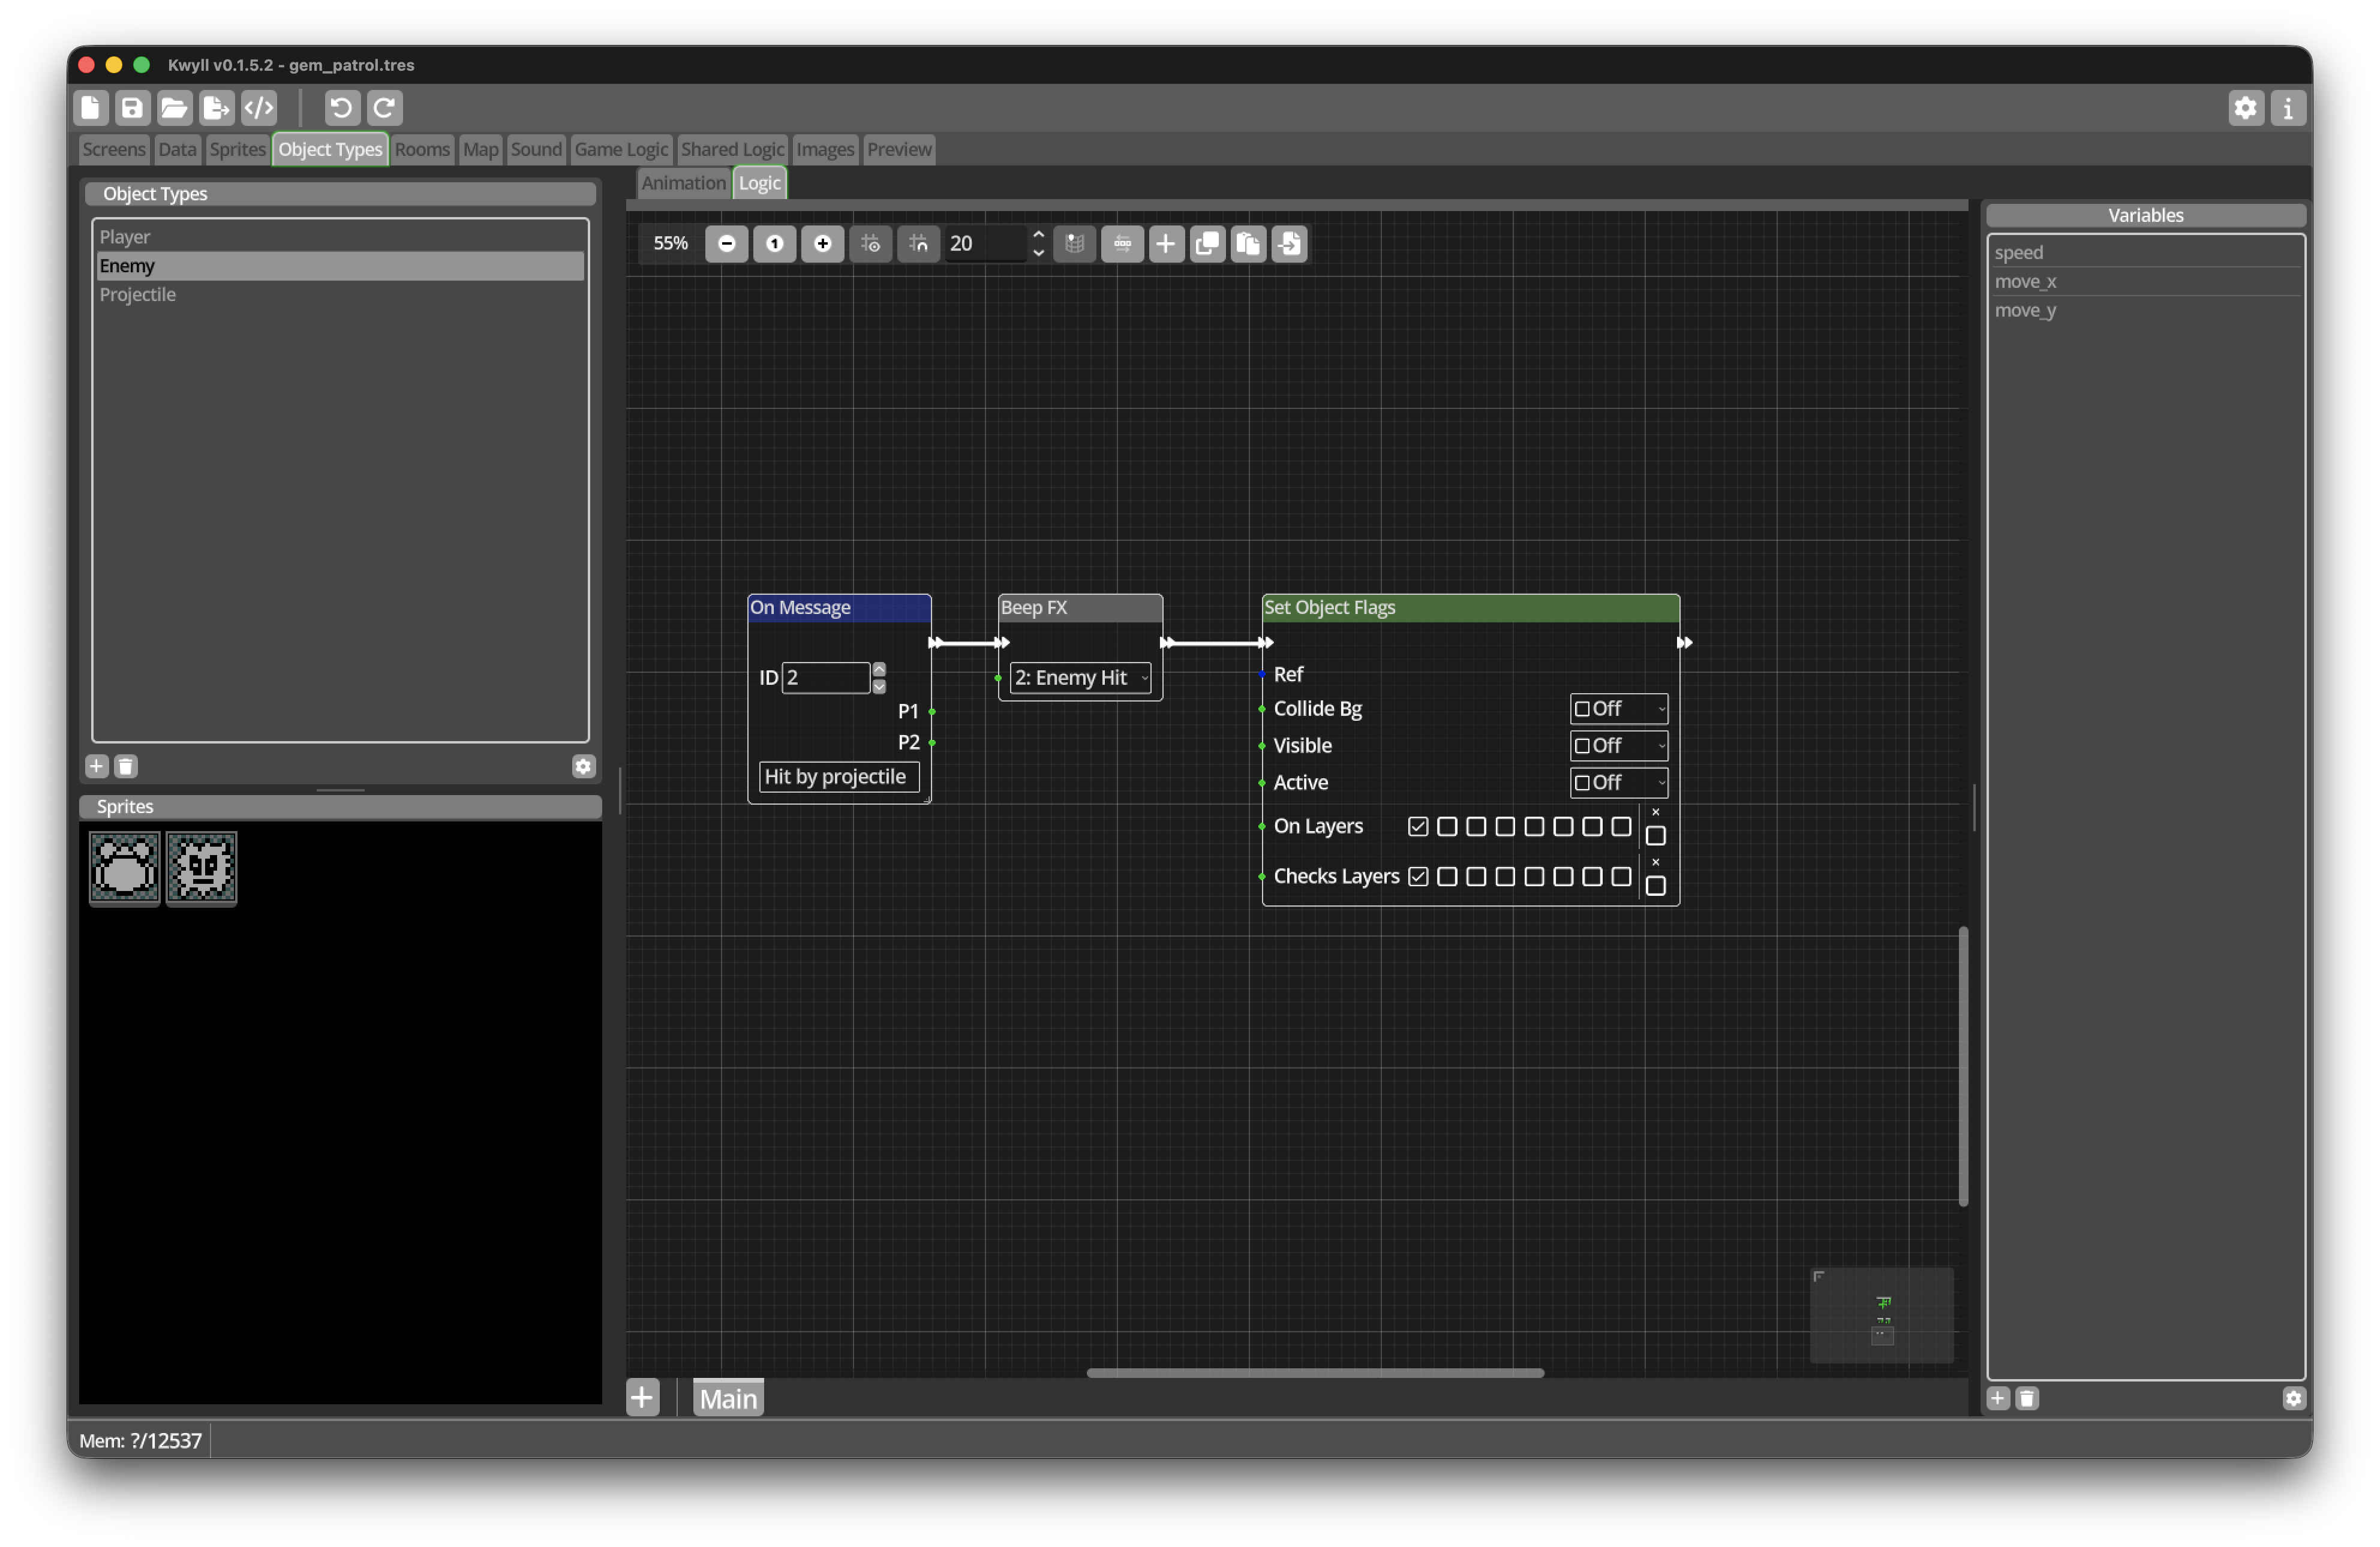
Open Enemy Logic:
-
Add an
On Messagetrigger with ID2. -
Give it the descriptive name
Hit by projectileif available. -
Add a
Beep FXNode and selectEnemy Hit. -
Add a
Set Object FlagsNode. -
Leave Ref unconnected so that it changes the current Enemy instance.
-
Set Collide Bg to Off.
-
Set Visible to Off.
-
Set Active to Off.
-
Leave the layer values unchanged.
-
Connect the white flow from
On MessagethroughBeep FXtoSet Object Flags.
Once inactive and invisible, the Room Object behaves as a defeated Enemy.
Test the complete combat loop
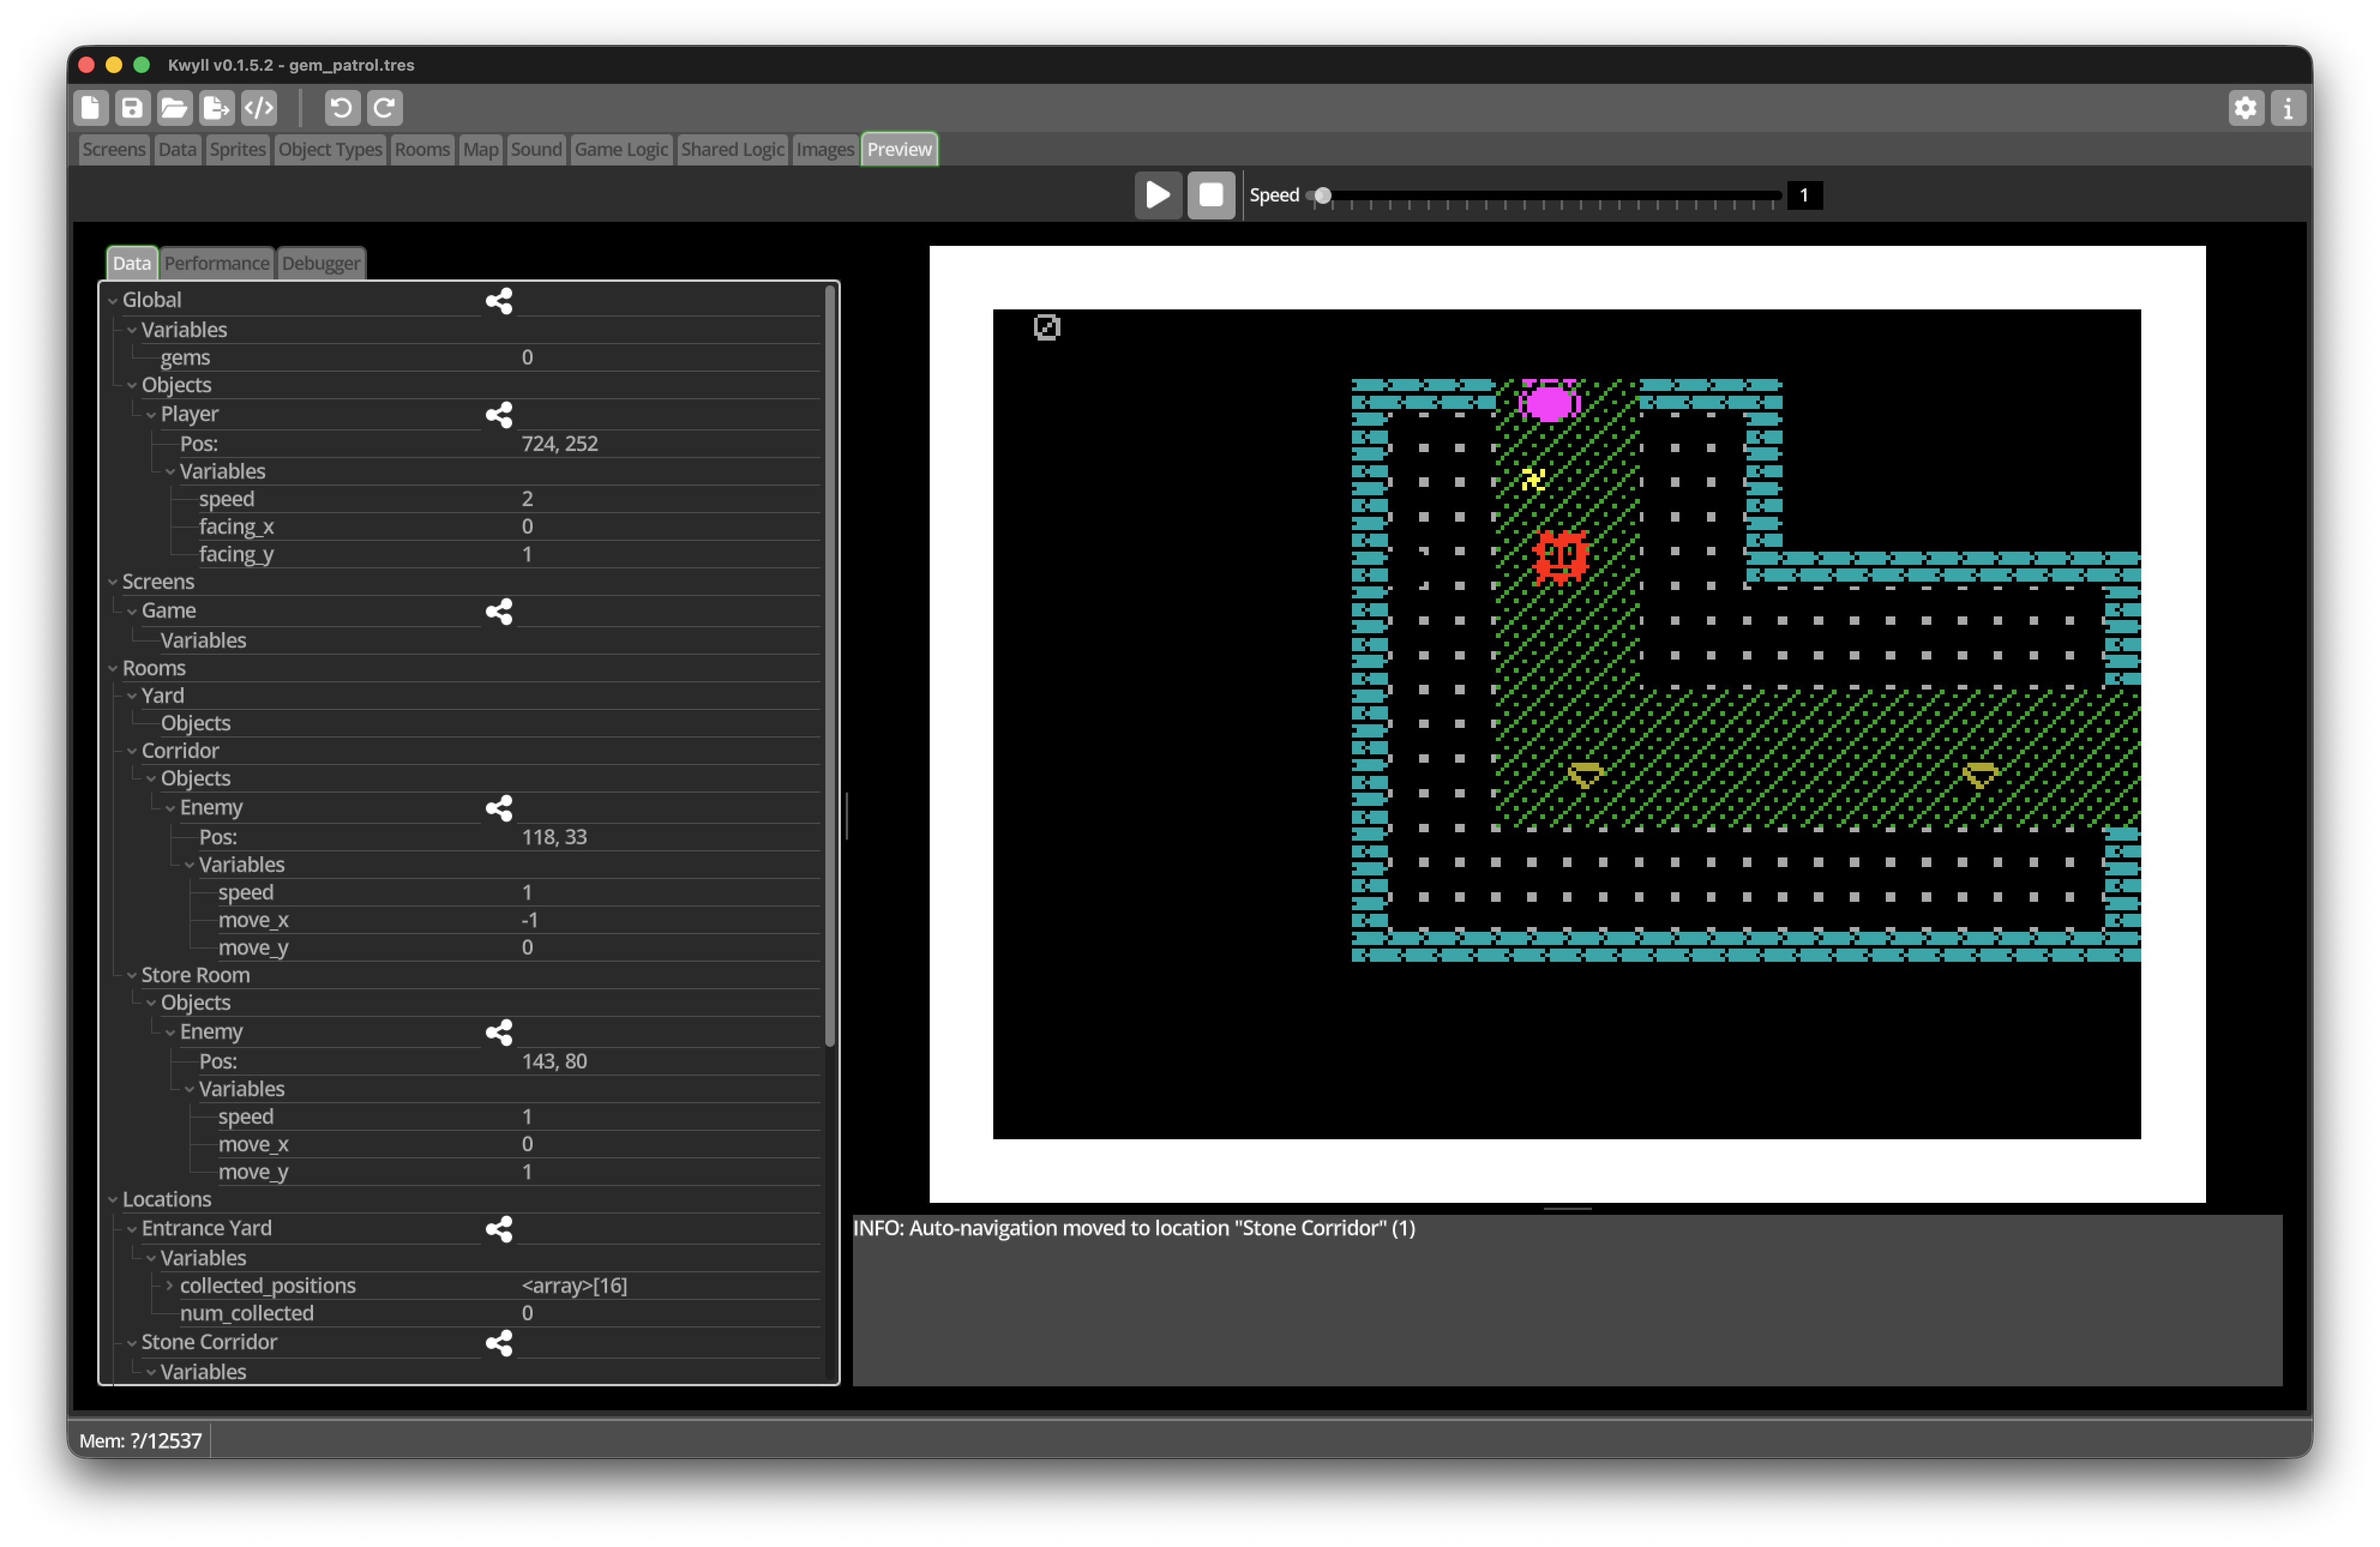
Save and run Preview.
-
Enter Stone Corridor.
-
Face towards the moving Enemy.
-
Press Fire once.
-
Confirm that the Projectile travels in the stored facing direction.
-
When it overlaps the Enemy, confirm that both disappear and
Enemy Hitplays. -
Continue into the Store Room and defeat its Enemy.
-
Fire into a Wall and confirm that the Projectile disappears.
-
Fire through an open exit and confirm that the Projectile is cleaned up after leaving the Screen.
-
Leave a defeated Enemy’s Location and return.
The Enemy should remain defeated. A Room Object is stored in the Room Type’s definition, and changes to its flags persist until the game is reset. Leaving and re-entering a Location does not create a fresh copy of it.
This also matters when reusing Room Types. A Room Object belongs to the Room Type, not to an individual Location. If two Locations use the same Room Type, disabling an Enemy this way makes it disappear from both Locations.
If your game should restore its Enemies whenever the player enters a room,
add a Room Entered trigger to the room’s Logic and connect it to a
Set Object Flags Node for each Enemy. Set Visible and Active to On, and
restore any other flags or variables that the Enemy needs. If reused
Locations should remember separate defeated states, store that state in
per-Location variables, as we did for collected gems, and use Room Entered
to apply the correct state.
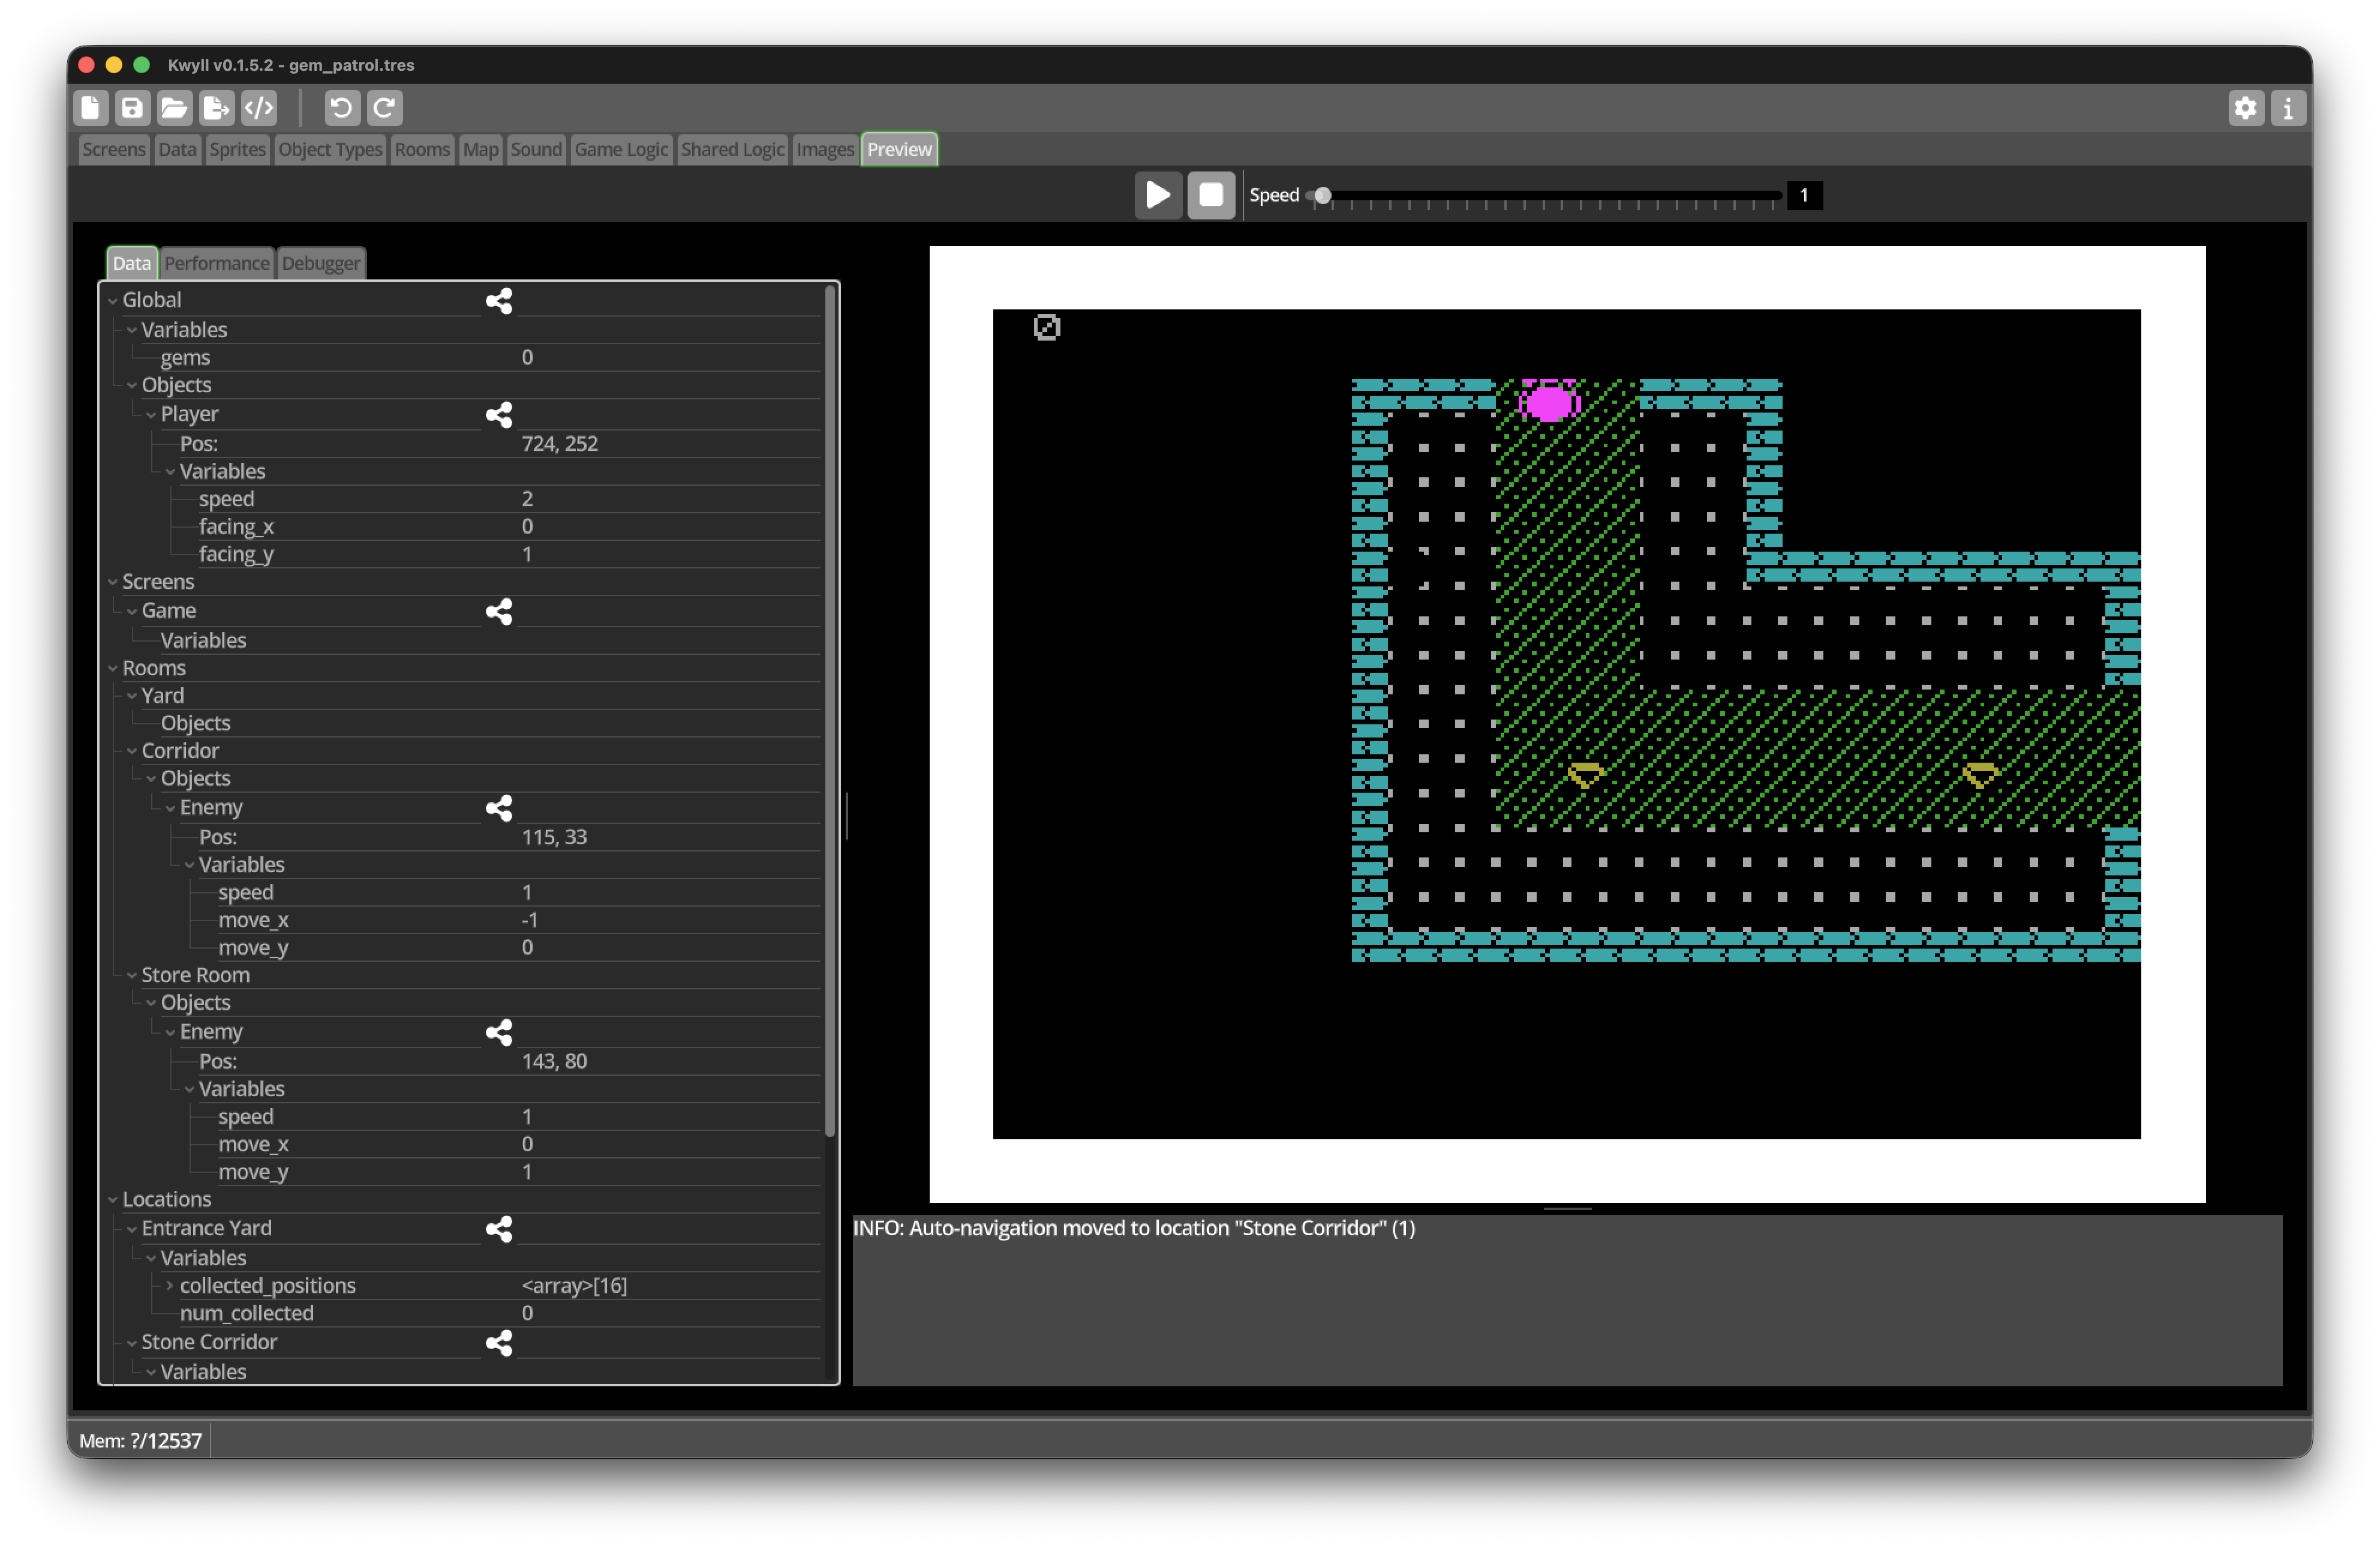
Object roles in the finished template
| Object | Kind | Lifetime |
|---|---|---|
Player |
Map Object |
Exists throughout the game and moves between Locations |
Enemy |
Room Object |
Stored in its Room Type; changes persist and are shared by Locations that reuse that Room Type |
Projectile |
Dynamic Object |
Created on demand and killed on impact or when off-screen |
These three lifetimes are worth understanding. Choosing the appropriate kind of Object Instance keeps both Logic and resource use manageable.
Milestone 5 checklist
Before continuing, confirm that:
-
the existing Fire effect and the new Enemy Hit effect sound distinct;
-
Projectile is an 8-by-8 masked Object Type;
-
Max Dynamic Objects is set to
5; -
Fire creates one Projectile per press;
-
the Projectile receives
facing_xandfacing_yand sets its speed to4; -
it travels in all four directions;
-
wall collision kills it;
-
leaving the Screen kills it;
-
each Enemy is On Layers
1and Checks Layers2; -
each Projectile is On Layers
2and Checks Layers1; -
hitting an Enemy disables the Enemy and kills the Projectile;
-
both Room Object Enemies can be defeated; and
-
returning to the Location leaves the Enemy defeated.
Save another copy as gem_patrol_milestone_5.tres.
Next: Final testing and ways to continue
The main game template is now complete. This final milestone is a chance to test the whole route and review how its parts fit together.
Milestone 6: Test and review the finished template
Play the complete route
Save the project, open Preview, and play from Entrance Yard to Store Room. Try to test features together rather than one at a time:
-
Collect the gem in Entrance Yard and check that the Gems Instrument increases.
-
Move down into Stone Corridor, defeat the Enemy, and collect its gem.
-
Continue right into Store Room and test its Enemy and gem.
-
Travel up into Upper Yard and collect the final gem.
-
Return to every Location and confirm that collected gems stay collected.
-
Check that enemies patrol, reverse at walls, and can be hit from all four directions.
-
Fire at walls and through exits to confirm that unused Projectiles are removed.
If something goes wrong, use Preview’s Data and Debugger panels to inspect the current values and active Objects. Testing after each small change is usually faster than trying to diagnose several changes at once.
What you have built
Gem Patrol is deliberately small, but it uses the main ideas that larger Kwyll projects are built from:
-
A Screen arranges the game window and the Gems Instrument.
-
Tiles draw the rooms and carry collision and collection information.
-
Three Room Types define reusable room layouts.
-
Four Locations place those rooms on the Map and connect them.
-
The Player is a persistent Map Object.
-
Enemies are Room Objects belonging to individual rooms.
-
Projectiles are temporary Dynamic Objects created by Logic.
-
Sounds give immediate feedback for collecting, firing, and hitting.
-
Logic connects input, movement, messages, collisions, variables, and changes to the game world.
The gem system also demonstrates an especially useful principle: store lasting game state separately from what is currently drawn. The tile changes immediately when collected, while a per-Location variable records that change so the room can restore the correct state when the player returns.
Keep experimenting
This project is a template rather than a complete game. Good next steps include:
-
restore enemies on
Room Entered, or remember independent defeated states with per-Location variables using the same pattern as collected gems; -
give the player lives and make touching an enemy reduce them;
-
add a second enemy behaviour or vary its speed;
-
animate the Player, Enemy, Gem, or Projectile;
-
add more Locations that reuse the existing Room Types;
-
create a locked exit that opens after all four gems are collected; or
-
add a title Screen and a simple win Screen.
Make one change at a time and test it. Reusing a familiar project while experimenting is one of the easiest ways to learn what Kwyll’s Nodes and editors can do.
Final checklist
Before calling the project finished, confirm that:
-
all four Locations are connected and reachable;
-
the Player moves and fires in four directions;
-
the Gems Instrument displays the correct total;
-
collected gems remain collected after revisiting a Location;
-
both Enemies move and can be defeated;
-
Projectiles are removed after hitting an Enemy, a wall, or leaving the Screen; and
-
the project saves and starts correctly in Preview.
Save the finished project as gem_patrol_complete.tres, or keep your current
gem_patrol.tres as the version you continue to extend.
You have now built a small playable Kwyll project from an empty starting point. More importantly, you have used the same project structure and Logic patterns that you can carry into your own games.